SEARCH FINESCALE.COM

Enter keywords or a search phrase below:

1/48 Hasegawa A6M2-N Type 2 Rufe Complete

6429 views
73 replies
1 rating 2 rating 3 rating 4 rating 5 rating
  • Member since
    July 2014
1/48 Hasegawa A6M2-N Type 2 Rufe Complete
Posted by modelcrazy on Monday, January 4, 2016 1:36 AM
I will be building the 1/48 Hasegawa A6M2-N Type 2 Rufe OOB, nothing special. What will be special will be the way I will be displaying it.


My thought here is to display it tied to a beach similar to this photo using resin which will be a new technique for me and which I will be documenting step by step.

This should be a pretty quick build. I will also be trying AK Interactive Worn Effects for the weathering for the first time.


So with that being said, here I go. I just have the office completed.

Steve

Steve

Building a kit from your stash is like cutting a head off a Hydra, two more take it's place.


http://www.spamodeler.com/forum/

  • Member since
    March 2015
  • From: Streetsboro, Ohio
Posted by Toshi on Monday, January 4, 2016 5:18 AM

You've got my full attention!  

Toshi

On The Bench: Revell 1/48 B-25 Mitchell


Married to the most caring, loving, understanding, and beautiful wife in the world.  Mrs. Toshi


  • Member since
    November 2008
  • From: Central Florida
Posted by plasticjunkie on Monday, January 4, 2016 6:37 AM

I will be watching this one very closely Steve. :spy:

For the Float Plane GB I would like to model a 1/72 Jake sitting on a setting as in your picture . Have never done one like that so I will be very interested in your excellent water displaying techniques.

 GIFMaker.org_jy_Ayj_O


Too many models to build, not enough time in a lifetime!!

  • Member since
    June 2013
Posted by bvallot on Monday, January 4, 2016 9:49 AM

Looking forward.

On the bench:  

Tamiya F4U-1  Kenneth Walsh


  • Member since
    November 2003
  • From: Naples, FL
Posted by tempestjohnny on Monday, January 4, 2016 10:46 AM
Popcorn is ready. Have this in the stash.....


  • Member since
    December 2010
  • From: Salem, Oregon
Posted by 1943Mike on Monday, January 4, 2016 10:59 AM

I'm also very interested in what you do here. I have the Tamiya 1/48 of that aircraft in my stash so I'd like to see how you end up displaying your Hase.

Mike


Mike

"Le temps est un grand maître, mais malheureusement, il tue tous ses élèves."

Hector Berlioz

  • Member since
    July 2014
Posted by modelcrazy on Monday, January 4, 2016 1:01 PM

Toshi,

LOL I have you watching on of mine this time.

PJ,

I find it hard to believe I'll be teaching you anything. You always seem to be teaching me new techniques. Since this will be my first at resin we'll get through it. I have been reading up on resin water and it sounds easy, but we'll see.
One thing I was going to try is to color the resin with water colors. Just a few drops of blue to make a hint of turquoise. My hope is that it well be transparent and will be able to see the sandy bottom. I will try it out on a test base first. To make the waves I will use a heat gun (I use for Monokote) with the heat off and use it to "blow" the formation of the waves. The information I found suggested that one use more hardener than recommended so the resin hardens faster, thus holding the waves that were formed.

bvallot, tempestjohnny, Mike,

Thanks I hope I make your following worth it.


Steve

Steve

Building a kit from your stash is like cutting a head off a Hydra, two more take it's place.


http://www.spamodeler.com/forum/

  • Member since
    November 2008
  • From: Central Florida
Posted by plasticjunkie on Monday, January 4, 2016 8:41 PM

Ha ha Steve!  It's your turn to show me a new trick in this hobby. One is never too old to learn something new. Wink

It so happens that I also have the Monokote heat gun. Big Smile I read somewhere sometime back about some resins getting too hot when curing that could melt or distort the plastic so look into that first.

 GIFMaker.org_jy_Ayj_O


Too many models to build, not enough time in a lifetime!!

  • Member since
    October 2004
  • From: Northern Virginia
Posted by ygmodeler4 on Monday, January 4, 2016 8:57 PM

I will try to remember to be looking in to this one as well!

-Josiah

  • Member since
    July 2014
Posted by modelcrazy on Tuesday, January 5, 2016 12:30 AM

plasticjunkie
I read somewhere sometime back about some resins getting too hot when curing that could melt or distort the plastic so look into that first.

Yeah I'm a little concerned about that PJ. I will probably pour the resin in in levels to try to cut down on the heat as it cures. The other option would be to place the build in last but not sure how I would do that. I purchased some resin today, but wow, its pricy stuff. I was going to use this method for a later build, the Prinz Eugen, but will need to come up with a different method for calm water. I was looking into wax, this may be an answer if you don't want transparency.
Well, this is where I'm at with the Rufe. It's going together as expected, pretty easily. Low part count, typical Zero, the only tough part will be the painting.


Steve

Steve

Building a kit from your stash is like cutting a head off a Hydra, two more take it's place.


http://www.spamodeler.com/forum/

  • Member since
    April 2005
  • From: Piscataway, NJ!
Posted by wing_nut on Tuesday, January 5, 2016 7:58 AM
Looks good. I'll be watching your "Beach" technique closely. I've got a Kyofu on the shelf I've wanted to do that to for some time now,

Marc  

  • Member since
    July 2014
Posted by modelcrazy on Thursday, January 7, 2016 9:24 PM
Here is an update for the Rufe. I’m at the point of painting as soon as the glue dries. I tried the Worn Effects on the props. The front face of the prop blades are aluminum and the rear face is flat black. This gave me the perfect opportunity to try the effects out on a test surface. I really liked the result and am excited to try it on the rest of the build.
The base is Styrofoam that I shaved and sanded at an angle to simulate a beach. I applied my favorite substance, Acrylic Gel, for a glue, because it has texture and when dry is similar white glue. I then poured some Oregon sand on the gel to simulate beach sand. Later I will AB sand color on the sand since the Oregon sand is darker than South Pacific sand. This will also allow me to spray a darker sand color to simulate wet sand where the waves have wet the beach.


Next I will start adding resin to the base in stages. We will see how this works.
Steve

Steve

Building a kit from your stash is like cutting a head off a Hydra, two more take it's place.


http://www.spamodeler.com/forum/

  • Member since
    September 2013
Posted by AdeB on Thursday, January 7, 2016 11:15 PM

Awesome start!!

This is a 100% follow build for sure.

  • Member since
    June 2013
Posted by bvallot on Thursday, January 7, 2016 11:56 PM

Coming along nicely Steve! Man, you move quick. =]

On the bench:  

Tamiya F4U-1  Kenneth Walsh


  • Member since
    March 2015
  • From: Streetsboro, Ohio
Posted by Toshi on Friday, January 8, 2016 6:21 AM

No way, very nice!

toshi

On The Bench: Revell 1/48 B-25 Mitchell


Married to the most caring, loving, understanding, and beautiful wife in the world.  Mrs. Toshi


  • Member since
    June 2014
Posted by BrandonK on Friday, January 8, 2016 9:00 AM

This is pretty much the type of scheme I was thinking of doing. I just have no idea where to start or how to do it. This will be very helpful.

BK

On the bench:

A lot !! And I mean A LOT!!

2024 Kits on deck / in process / completed   

                         14 / 5 / 2  

                              Tongue Tied

  • Member since
    November 2008
  • From: Central Florida
Posted by plasticjunkie on Friday, January 8, 2016 3:26 PM

All eyes are on you buddy!:nerd

 GIFMaker.org_jy_Ayj_O


Too many models to build, not enough time in a lifetime!!

  • Member since
    July 2014
Posted by modelcrazy on Friday, January 8, 2016 7:47 PM

LOL, thanks PJ,

I completed the beach and painted the sand. I then taped some poster board around the edge to prepare for a resin pour

.
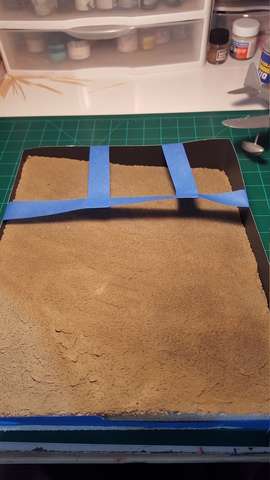
I made my first resin pour, and now I know what not to do.
First off, I used a few drops of blue water color to try to tint the “water”. It was like mixing water and oil, just slower. I finally was able to mix it by using the paint mixer. The turquoise color I wanted didn’t materialize, more of a light blue. Not bad but not what I was looking for.
Second, I was hoping the resin would harden fast enough so that running a sealer around the poster board would not be necessary. I apparently did not put enough hardener in the mix for it to harden fast enough and I had leaks. In fact, most of it leaked out. Oh well, this may actually work to my advantage

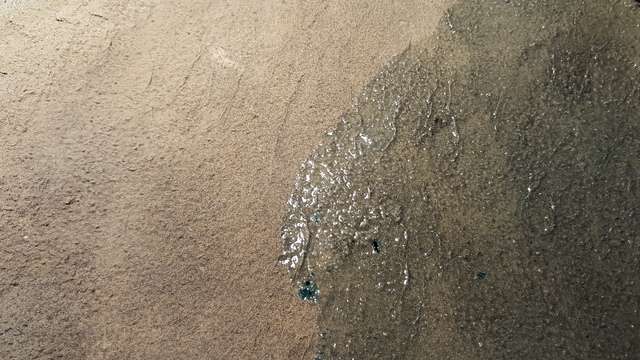
 

Ok, lessons learned....so far.
1. Seal the edges. I'm now using white glue.
2. Put in more hardener.
3. Put in a few drops of turquoise if you want turquoise.

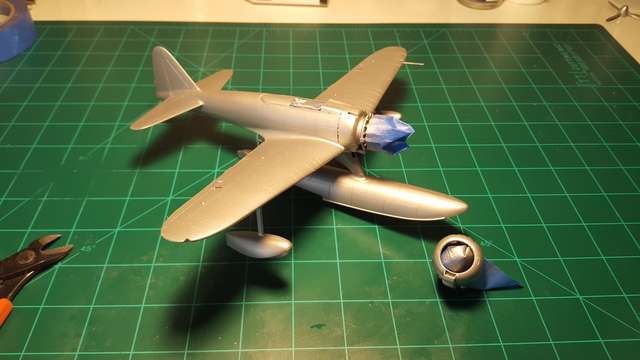
Also, I painted the Rufe silver, air brushed the Worn Effects and am ready for the exterior colors.
 

Steve

Steve

Building a kit from your stash is like cutting a head off a Hydra, two more take it's place.


http://www.spamodeler.com/forum/

  • Member since
    May 2014
Posted by SubarooMike on Saturday, January 9, 2016 7:17 PM

I wish I had a Rufe to build... OH WAIT! Big Smile     Looking amazing, Steve. Absolutely love what you're doing with her.  I'm literally in the middle of working on my Tam offering right now.  I'm just taking a quick break.  

  • Member since
    July 2014
Posted by modelcrazy on Sunday, January 10, 2016 2:00 PM
New progress on the Rufe and beach. I sprayed the Worn Effects, let that dry then sprayed the IJN Grey, let that dry for about a day and a half. This morning I masked and sprayed the green and applied the decals. Interestingly, after pulling off the mask, some of the gray peeled off, which is just fine and adds to the effect. This was probably due to the Worn Effects. The cowl was not glued on yet but it did work on its weathering..
 
The beach is turning out very well in my opinion. I mixed up another layer of resin and mixed in some turquoise, maybe a little too much, but it is at depth so again this should work to my favor.


Steve

Steve

Building a kit from your stash is like cutting a head off a Hydra, two more take it's place.


http://www.spamodeler.com/forum/

  • Member since
    June 2014
Posted by BrandonK on Sunday, January 10, 2016 3:41 PM

It's coming along very nicely. Super work my friend.

BK

On the bench:

A lot !! And I mean A LOT!!

2024 Kits on deck / in process / completed   

                         14 / 5 / 2  

                              Tongue Tied

  • Member since
    August 2014
  • From: Willamette Valley, Oregon
Posted by goldhammer on Sunday, January 10, 2016 4:16 PM

If not to late, how about making a silicone mold of the float and a copy of it, then use the copy of the float to set in your pours.  Could give the copy a coat or cooking oil to make it not stick to the resin pour.

  • Member since
    July 2014
Posted by modelcrazy on Sunday, January 10, 2016 6:06 PM
GH, that probably would have worked had I thought about it.
Here's another update. I believe I’m done with the Rufe once I finish the canopy.
 
I was able to pour quite a few more layers of resin and just about ready to install the build. In fact, once this last layer sets up enough I will set the Rufe on the surface so it sinks into the last layer a bit.
 
Steve

Steve

Building a kit from your stash is like cutting a head off a Hydra, two more take it's place.


http://www.spamodeler.com/forum/

  • Member since
    November 2003
  • From: Naples, FL
Posted by tempestjohnny on Sunday, January 10, 2016 6:11 PM
Steve that is just too cool. It's going to look great


  • Member since
    August 2014
  • From: Willamette Valley, Oregon
Posted by goldhammer on Sunday, January 10, 2016 6:42 PM

The upside may be that the last layer of resin will/might anchor the floats and keep her in place permanently.


Looks great.

  • Member since
    July 2014
Posted by modelcrazy on Sunday, January 10, 2016 7:00 PM
OK guys I put the Rufe on the “water” and OMG! I am soooo pleased with this. This is actually looking like water! I will give this a few days to dry before I apply the last few layers. I will blow some waves in the last layer for some small surf. Oh boy, I can’t wait!
Steve

Steve

Building a kit from your stash is like cutting a head off a Hydra, two more take it's place.


http://www.spamodeler.com/forum/

  • Member since
    August 2014
  • From: Willamette Valley, Oregon
Posted by goldhammer on Sunday, January 10, 2016 7:06 PM

Just watch the heat levels on blowing in the waves, don't want to start deforming floats at this stage of the game

  • Member since
    July 2014
Posted by modelcrazy on Sunday, January 10, 2016 7:12 PM

Thanks GH, I was going to blow than with the heat off. It seems like it may not take much to form them.

Steve

Building a kit from your stash is like cutting a head off a Hydra, two more take it's place.


http://www.spamodeler.com/forum/

  • Member since
    February 2014
  • From: Michigan
Posted by silentbob33 on Sunday, January 10, 2016 7:44 PM
This looks really good!

On my bench: Academy 1/35 UH-60L Black Hawk

  • Member since
    November 2008
  • From: Central Florida
Posted by plasticjunkie on Sunday, January 10, 2016 8:04 PM

Looks superv Steve. I'm glad you chipped the hinomarus cause often modelers leave them in one piece with the wear around them. It looks like real water so excellent effort. What kind of resin did you use? I happen to have a small two bottle set of Envirotts Lite plastic Pouring Resin that I used  on a plaque 20+ years back.

 GIFMaker.org_jy_Ayj_O


Too many models to build, not enough time in a lifetime!!

JOIN OUR COMMUNITY!

Our community is FREE to join. To participate you must either login or register for an account.

SEARCH FORUMS
FREE NEWSLETTER
By signing up you may also receive reader surveys and occasional special offers. We do not sell, rent or trade our email lists. View our Privacy Policy.