SEARCH FINESCALE.COM

Enter keywords or a search phrase below:

Completed! 1/48 Hasegawa F-86F-30

2925 views
35 replies
1 rating 2 rating 3 rating 4 rating 5 rating
  • Member since
    January 2015
Completed! 1/48 Hasegawa F-86F-30
Posted by BrandonD on Tuesday, February 9, 2016 1:44 AM

Hi all,

Back with another build, and this time it's actually a post-WWII aircraft! I'm building it for the Metal Masters group build. I picked up the 1/48 Hasegawa F-86F-30 on consignment in the local hobby shop, and it came with some decals and the Verlinden interior set.

As it turns out, I won't be using the decals because I wanted a Korean War aircraft, and the Scalemaster ones that were extras in the box are postwar, so I ordered a set for "Mig Poison."

Since it's a Korean War Sabre, my research indicated the cockpit is black and not gray, so I decided to try for some tonal variation to spruce it up and make sure it wasn't a black hole.

I primered with Gunze Mr. Surfacer 1500 Black, then sprayed Tamiya NATO Black over most of it. After that, I lightened the NATO Black with white and sprayed the raised surfaces and the centers of the panels as well as I could. This was the result:
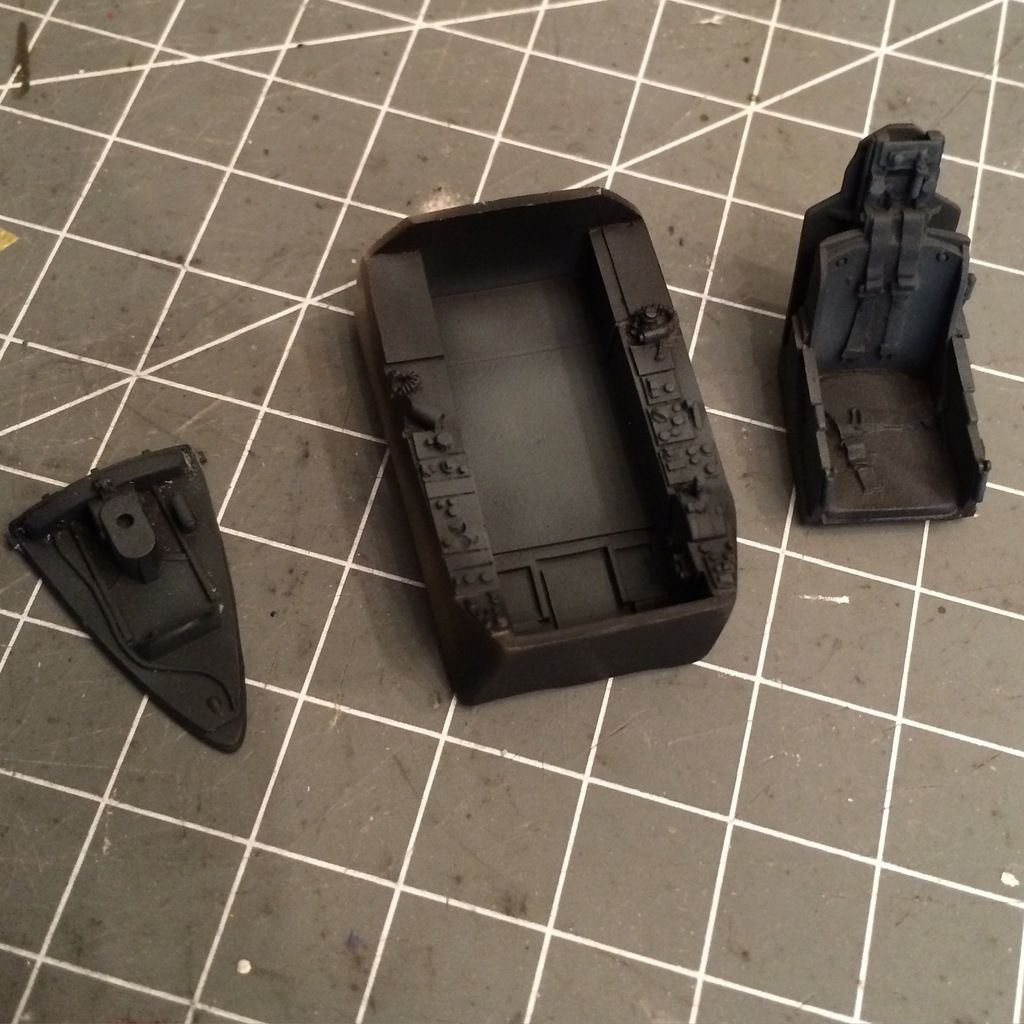
Next up was detail work, and I didn't get too crazy about what buttons were which colors, so this isn't an accurate representation if you're looking for a reference shot.

After that, I came back with a Flory Dark Dirt wash without clear-coating it, so it worked more like a filter. I blotted it off the raised surfaces but wanted it to cut way down on the contrast. THe result is actually a little less stark than this pic, as the whites and silvers are darker in real life.
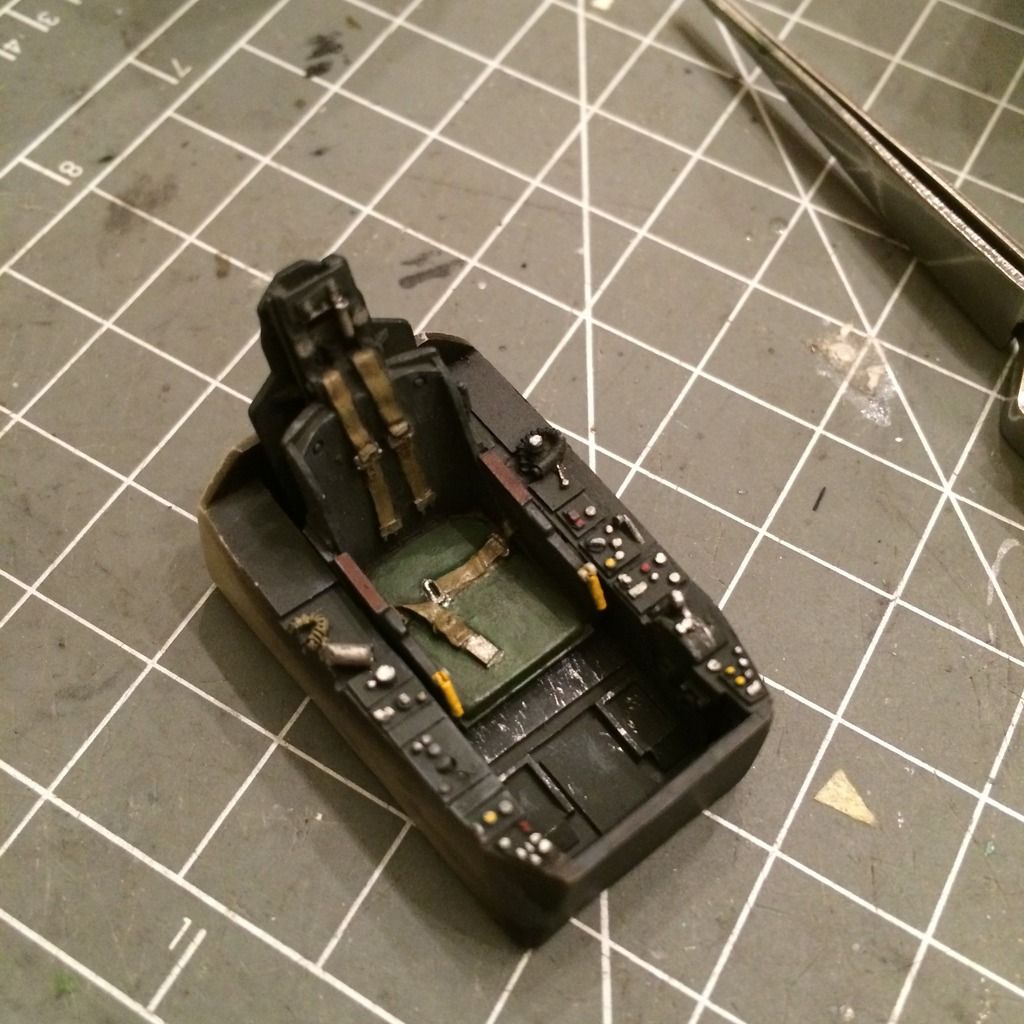
Now, the Verlinden set includes the port gun bay and ammo storage. And as much as I want to open it up and show it, I am also hesitant, since that's the spot where the skull and bones goes, and it's one of my favorite aspects of the marking scheme.

Thanks for looking. All comments and critiques welcome!

-BD-

  • Member since
    June 2003
  • From: Cavite, Philippines
Posted by allan on Tuesday, February 9, 2016 2:05 AM
Looking good. Are those seatbelts molded on? If so, theyre pretty good.

No bucks, no Buck Rogers

  • Member since
    August 2013
Posted by Jay Jay on Tuesday, February 9, 2016 8:22 AM

Excellent job on your "black hole" pit.

Very good idea to use different blacks to real it up. Ty for the informative WIP , I didn't know the Korean ones had a black interior.   I'm taking notes.


 I'm finally retired. Now time I got, money I don't.

  • Member since
    February 2003
  • From: Cameron, Texas
Posted by Texgunner on Tuesday, February 9, 2016 12:33 PM

Man, that cockpit looks great Brandon!  Good job dude!  Yes

Gary


"All you mugs need to get busy building, and post pics!"

  • Member since
    March 2015
  • From: Streetsboro, Ohio
Posted by Toshi on Tuesday, February 9, 2016 1:57 PM

That is a really fantastic job on the cockpit!  Stunning.

Toshi

On The Bench: Revell 1/48 B-25 Mitchell


Married to the most caring, loving, understanding, and beautiful wife in the world.  Mrs. Toshi


  • Member since
    November 2003
  • From: Naples, FL
Posted by tempestjohnny on Tuesday, February 9, 2016 6:07 PM
Black on black on black. I like it


  • Member since
    February 2012
  • From: Olmsted Township, Ohio
Posted by lawdog114 on Tuesday, February 9, 2016 10:44 PM
Nice pit Brandon. I've done the Academy version so I'm curious to how this one compares. I look forward to your progress.

 "Can you fly this plane and land it?...Surely you can't be serious....I am serious, and don't call me Shirley"


  • Member since
    January 2015
Posted by BrandonD on Thursday, February 11, 2016 1:53 AM

Thanks for the compliments, everyone - I appreciate them.

Allan - The belts are molded in, but just to clarify, this is a Verlinden resin pit. The kit plastic cockpit is fine, but the ejection seat is really lacking in my opinion. The Verlinden set is miles above it.

Jay Jay - My research indicates that the pits were black until November, 1953, when they started making the change to gray.

Lawdog - I hear the Academy one and this one are so close that you could almost interchange parts. I am liking this kit a lot so far.

As for an update, I decided I hated the way the kit decal didn't lay down over the resin instrument panel, and it just looked flat and lifeless (along with not matching the detail in many places). So I pulled it off and dry-brushed the gauges, then filled them with Micro Krystal Klear to simulate glass.

This is where it sits at the moment:

That's all for now. Next up is fitting the pit to the fuselage, then closing it up.

-BD-

  • Member since
    January 2015
Posted by BrandonD on Wednesday, February 24, 2016 1:49 AM

I have a quick update for today. After a lot of working on the seams (some of it due to fitting the resin cockpit, I believe). Keeing everything straight took some doing.

I got the model primered and painted gloss black. I then masked for the black borders on the yellow stripes, and shot the yellow stripes. I also used yellow as an undercoat for the red nose, as it covers much better than red over black.

Here are the stripes painted using Model Master Insignia Yellow (they aren't this bright in real life). I have a decal for the fuselage but decided to just paint them all to make them match, and I don't have great luck with stripe decals anyway.

After this pic, I shot the red on the nose. Later this evening I got the stripes all masked and then gave it another coat of gloss black to get rid of the overspray. I hope to get some Alclad on it on Thursday.

-BD-


  • Member since
    January 2015
Posted by BrandonD on Thursday, February 25, 2016 3:24 PM

Well, it looks like I need to pay more attention when I'm painting. I loaded my airbrush too full of Alclad Airframe Aluminum, and I dumped some drops on the port wing. Tried to wipe them off with a paper towel, then tried drowing it in thinner to smooth it out. Nothing worked, so it was back to sandpaper and a new black gloss coat.

Fortunately, it was a small space and nothing too bad was done. Today I was able to use my lunch break to lay down the airframe aluminum and pull off the masking on the stripes. Looks like a little bit of touching up in the black/yellow areas (and a small amount on the red nose), but other than that, I'm happy with it.

Next step is to mask for the different metals on the wings, gun ports and fuselage, and then clears and decals.

-BD-

  • Member since
    February 2014
  • From: Michigan
Posted by silentbob33 on Thursday, February 25, 2016 4:04 PM
Looks really good, I've yet to try Alclad but I like the results. Hopefully I'll get a chance soon.

On my bench: Academy 1/35 UH-60L Black Hawk

  • Member since
    September 2003
  • From: Northern hemisphere - most of the time-
Posted by blkhwkmatt on Thursday, February 25, 2016 5:10 PM

Great looking finish.  The cockpit is outstanding and your markings are looking spot on.  Thanks for sharing

Quidquid latine dictum sit, altum videtur!!! - Anything said in Latin sounds profound!


  • Member since
    June 2003
  • From: Cavite, Philippines
Posted by allan on Thursday, February 25, 2016 7:35 PM

Lovin the way youve painted this bird so far, Brandon!

No bucks, no Buck Rogers

  • Member since
    January 2003
  • From: West of the rock and east of the hard place!
Posted by murph on Monday, February 29, 2016 7:08 AM

Very nice work Brandon.  I really like the painted on yellow ID  bands.  I've heard nothing but horror stories from those who have attempted to use kit decals for the bands.  One of my next Sabre builds will be a Korean War era aircraft and I plan the same thing you've done withpainting the yellow ID bands.

Looking forward to the finished project.

Mike

Retired and living the dream!

  • Member since
    November 2009
  • From: SW Virginia
Posted by Gamera on Monday, February 29, 2016 7:59 AM

She's looking really good there Brandon.

As to the Alclad drips, well been there, done that, got the T-shirt... Embarrassed

"I dream in fire but work in clay." -Arthur Machen


  • Member since
    January 2015
Posted by BrandonD on Monday, February 29, 2016 11:49 AM

Bob, Matt, Allan - Thanks!

Gamera - I found my lid to my paint cup after this. It seems I don't need any more T-shirts :)

Mike - Thanks! I used an aftermarket SuperScale sheet for the decals, and while it had fuselage bands, it didn't have the wing bands, and I didn't want to try to match the paint (nor was I even sure it would fit this kit), so I was forced into it. But I'm glad I was, because it really wasn't that hard. Using the thin tape over the gloss black actually worked really well and made the whole process easy. I had been really nervous about them, but now I think I'm ready for invasion stripes on my next WWII build.

-BD-

  • Member since
    January 2015
Posted by BrandonD on Monday, February 29, 2016 11:53 AM

Quick update: I got the decals on. Some of them gave me fits (mostly the fuselage ones around what I suppose are speed brakes - sorry, this is my first jet and I am not 100% sure what they are Huh?). I held the panels in place using Blu-Tac, and then put the decals over them, used setting solution, and then gently cut them with my knife. It worked well for the most part, but required some touching up (I've found that Model Master Dark Sea Blue is pretty much a perfect match for the blue in the star-and-bar decals on most kits).

Now for the gear, tanks and other bits. Hopefully I can finish it up this week.

-BD-

  • Member since
    April 2010
Posted by Theuns on Monday, February 29, 2016 12:02 PM

That is looking very good!


Theuns

  • Member since
    June 2014
Posted by BrandonK on Monday, February 29, 2016 1:43 PM

That does look really good.

BK

On the bench:

A lot !! And I mean A LOT!!

2024 Kits on deck / in process / completed   

                         14 / 5 / 2  

                              Tongue Tied

  • Member since
    January 2016
  • From: A Galaxy Far, Far Away
Posted by Hunter on Monday, February 29, 2016 5:17 PM

Wow Brandon it looks great! Well done on the paint job.

Hunter 


  • Member since
    January 2015
Posted by BrandonD on Wednesday, March 2, 2016 12:28 PM

Well, I finished this one up last night and got thephotos shot this morning, so here she is:

1/48 Hasegawa (with Verlinden cockpit) F-86F-30 Sabre flown by Maj. James Hagerstrom, a two-war ace. This is "Mig Poison," in which he became a Korean War ace. This plane is from late 1953, so it still sports the black cockpit (the switch to gray seems to have been made on new machines in November 1953) and has the earlier style drop tanks.

The painting was done by priming in Gunze Mr. Surfacer 1500 black, then laying down Tamiya X-1 Gloss Black as a base for the Alclad. At that point, I used thin vinyl tape to mask the black lines on the stripes, then shot the interiors with Model Master Insignia Yellow. After masking, the whole thing got a shot of Airframe Aluminum, and thanks to reading Theuns' post, I tried out using different numbers of coats for the color modulation, so there's nothing but Airframe Aluminum on this one (except for the interiors of the gear doors and speed brakes, which are White Aluminum).

The decals are from Super Scale, and I would rate them ok. The stencils on the port fuselage seem different than every other set I've seen, and there was some trouble with them settling down, but I am happy with them overall.

Ok, the pics:

Thanks all for the compliments along the way. This was my first jet, and it was a lot of fun.

-BD-

  • Member since
    February 2014
  • From: Michigan
Posted by silentbob33 on Wednesday, March 2, 2016 5:01 PM
Very nice finish! Again, the stripes look fantastic.

On my bench: Academy 1/35 UH-60L Black Hawk

  • Member since
    August 2015
  • From: the redlands Fl
Posted by crown r n7 on Wednesday, March 2, 2016 5:06 PM

Sweet looks to good to dirty up 


 Nick.

  • Member since
    June 2014
Posted by BrandonK on Wednesday, March 2, 2016 7:50 PM

DUDE, super nice work. That is really really nice. I love it !!

BK

On the bench:

A lot !! And I mean A LOT!!

2024 Kits on deck / in process / completed   

                         14 / 5 / 2  

                              Tongue Tied

  • Member since
    April 2015
  • From: New Hampshire, USA
Posted by UKguyInUSA on Wednesday, March 2, 2016 9:08 PM

Fabulous finish Brandon and super looking jet. Those Alclads produce superior NMF's, I just can't use them as I work at the dining table....odor free for me, I'm afraid.


What's next on your bench?


Cheers,

Martin Smile

  • Member since
    January 2015
Posted by BrandonD on Thursday, March 3, 2016 3:53 PM

Bob, crown, Brandon and Martin - thanks! I appreciate the compliments.

Martin - my next build might be three, actually. I am thinking of doing a comparison of Three 1/48 Supermarine planes:

Eduard Spitfire Mk. IX in USAAC markings

Special Hobby Seafire Mk. III in French Aeronavale markings

Tamiya Spitfire Mk. I in RAF markings.

We will see. I really don't need three (more) Spits on the shelf, but it makes sense for efficiency with painting, or something.

-BD-

  • Member since
    November 2003
  • From: Naples, FL
Posted by tempestjohnny on Thursday, March 3, 2016 4:39 PM
BD awesome build. One can never have too many spitfires. Hopefully you'll do another jet soon too


  • Member since
    January 2016
  • From: A Galaxy Far, Far Away
Posted by Hunter on Thursday, March 3, 2016 4:42 PM

Brandon - 

Job well done sir, that is a beautiful build and just amazing. 

Hunter 


  • Member since
    January 2003
  • From: West of the rock and east of the hard place!
Posted by murph on Friday, March 4, 2016 10:46 AM

Brandon,

For your first jet, IMHO you couldn't have picked a better starting point.  I know there are others who will disagree but having built 20 of these gems, with a bit of patience these kits go together nicely and easily.  As you correctly did, the kit seat needs dressing up or a resin replacement.  A few vents need to be sanded off (and wingtips modified) in order to build a Canadair Sabre 5 or 6 but Hasegawa and Academy are the go-to kits for a Sabre in this scale.

Great work on your Sword.  The end results are truly reflective of the effort you put into it.

Best of luck with your next builds.

Mike

Retired and living the dream!

  • Member since
    January 2015
Posted by BrandonD on Friday, March 4, 2016 11:46 AM

Murph - thank you for the kind words and encouragement. You know a lot about these, and I am glad you shared thepart about the vent so I could get rid of it. I will definitely build another jet soon (most likely an He-163, and I just ordered an A-4 Skyhawk).

It seems I'm hooked.

-BD-

JOIN OUR COMMUNITY!

Our community is FREE to join. To participate you must either login or register for an account.

SEARCH FORUMS
FREE NEWSLETTER
By signing up you may also receive reader surveys and occasional special offers. We do not sell, rent or trade our email lists. View our Privacy Policy.