SEARCH FINESCALE.COM

Enter keywords or a search phrase below:

WIP 1/48 Revell P-47N NMF using metal foil and rivet tool

1027 views
6 replies
1 rating 2 rating 3 rating 4 rating 5 rating
  • Member since
    March 2015
  • From: Close to Chicago
Posted by JohnnyK on Saturday, April 2, 2016 12:20 AM

Time to install the metal foil.

I have used Bare Metal Foil on my car models, but have never used it as large panels on an airplane. So we will see how this goes.
  

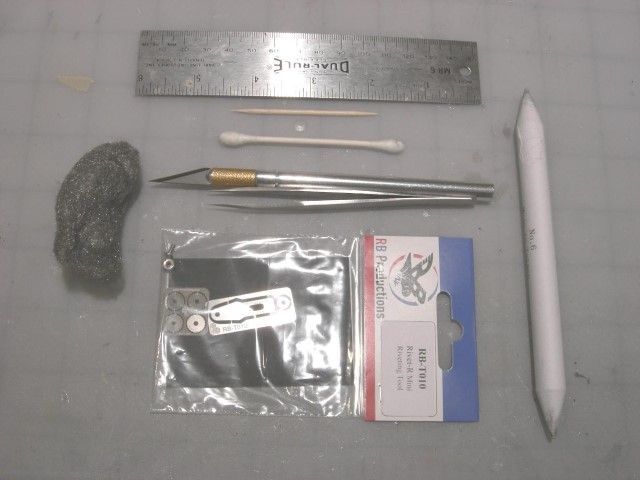
First we need some tools for installing foil; which includes many sharp #11 Xacto blades, a straight edge, tooth pick, Q-tip, tweezers, a tool for making the rivets, a paper blending stick, and #0000 steel wool. Don't forget you magnifing glasses.
Number one rule is to have your work space super clean and wash your hands frequently. The smallest bits of grit or dust that are under the foil will ruin the foil job. Clean fingers will eliminate finger prints on the foil. Also make note of the natural grain of the foil. The grain runs the long diminsion of he foil. Each panel on the aircraft will need to covered in a single sheet of foil.

I will be using two types of Bare Metal Foil, Matte Aluminum and Improved Chrome. Most of the panels will be covered in Matt Aluminum.

First, place a piece of foil over a fuselage panel that is larger than the panel. Gently smooth the foil with your finger. I know that this looks like a mess, but the foil will be made smooth by using the paper blending stick.
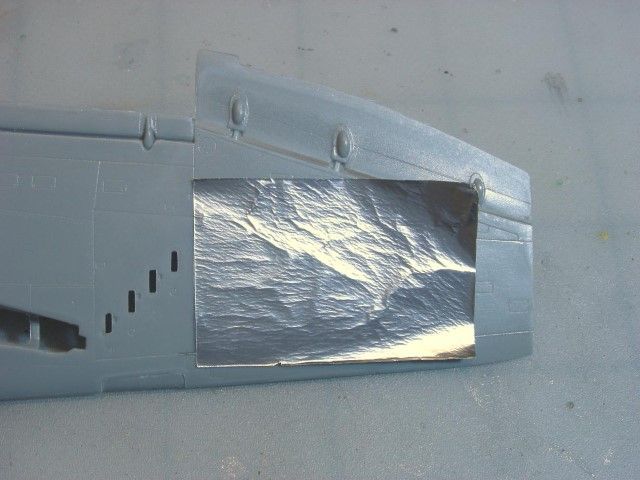
Next, use the paper blending stick to remove the wrinkles from the foil. Just run the blending stick over the foil in the direction of the natural grain (left to right in this instance) and all the wrinkles will be removed. Use the tip of the blending stick to enhance the recessed panel lines.
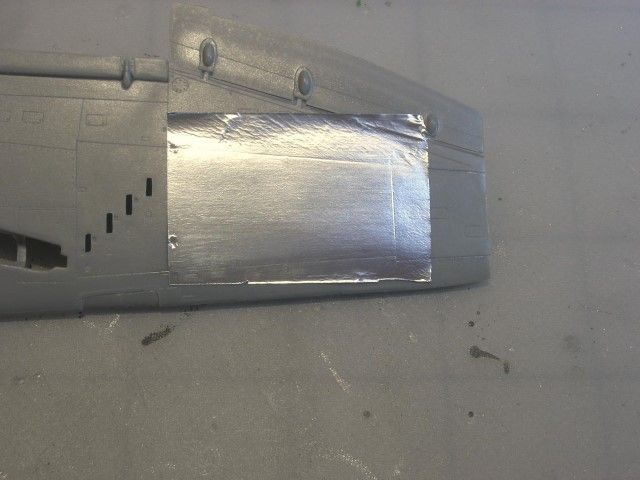
Next, use the Xacto knife and a straight edge to trim the foil along the panel lines. Run the #0000 steel wool in the direction of the natural grain to enhance the grain. Run the steel wool in one direction only. The grain should be straight. If you run the steel wool back and forth the grain will not be straight. In the real world, all aluminum sheets have a grain pattern.
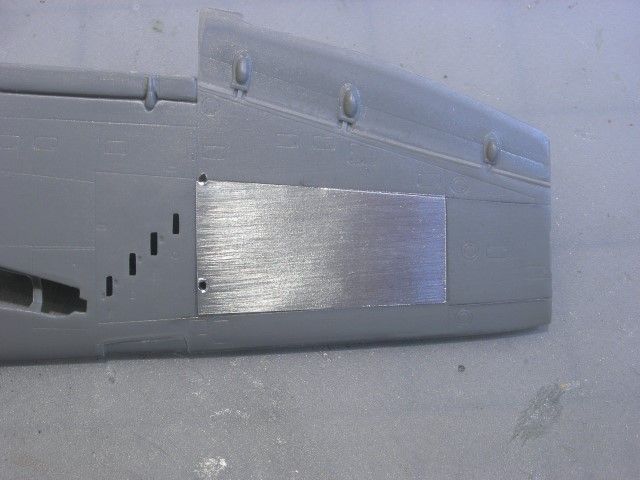
The next panel was applied with the grain running 90 degrees to the first panel. However; I suggest that you run the majority of the grain in one direction only, otherwise the wing will look like a checkerboard. The steady hands of a surgeon and the paitence of an angel will produce the best job. This is very tedious work. All panel lines need to be tight and straight. Replace your Xacto knife often. A dull knife will rip the foil and pruduce a jagged edge.
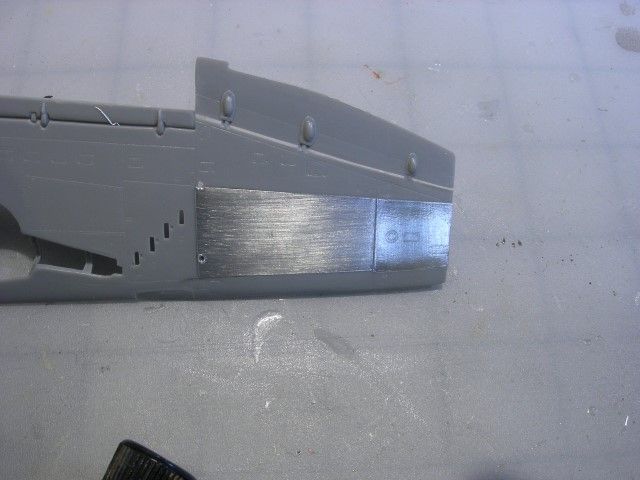
I'll use the rivet tool when all the foil is installed on the wing.

Your comments and questions are always welcome.

  • Member since
    March 2015
  • From: Close to Chicago
Posted by JohnnyK on Friday, April 1, 2016 11:40 PM

lawdog114
Looking great so far. I'm curious to see how this one stacks up to the Academy N. A solution to wing root gaps would be to glue the upper wings to the fuselage first, then go from there. Usually works. 

On the Revell kit the top of the main wing is composed of two parts. The bottom of the mail wing is a single part which includes part of the fuselage. Whwn the main wing is attached to the fuselage the is a large gap at the top wing root.

The solution is to glue the wing assembly to the bottom of the fuselage, press down on the fuselage and glue the top of the wings to the fuselage. The large gap is gone.

Your comments and questions are always welcome.

  • Member since
    February 2012
  • From: Olmsted Township, Ohio
Posted by lawdog114 on Friday, April 1, 2016 9:22 PM
Looking great so far. I'm curious to see how this one stacks up to the Academy N. A solution to wing root gaps would be to glue the upper wings to the fuselage first, then go from there. Usually works.

 "Can you fly this plane and land it?...Surely you can't be serious....I am serious, and don't call me Shirley"


fox
  • Member since
    January 2007
  • From: Narvon, Pa.
Posted by fox on Friday, April 1, 2016 11:21 AM

Looking great!  Can't wait to see the finished build.

Jim  Captain

 Main WIP: 

   On the Bench: Artesania Latina  (aka) Artists in the Latrine 1/75 Bluenose II

I keep hitting "escape", but I'm still here.

  • Member since
    August 2013
Posted by Jay Jay on Friday, April 1, 2016 7:37 AM

Cool idea with the wire buckles on the tape seat belts.  Thanks for sharing this for my "files"  Wink


 I'm finally retired. Now time I got, money I don't.

  • Member since
    March 2015
  • From: Streetsboro, Ohio
Posted by Toshi on Friday, April 1, 2016 7:26 AM

Very nice project to get a feel of the NMF foil.  Cockpit looks great.

Toshi

On The Bench: Revell 1/48 B-25 Mitchell


Married to the most caring, loving, understanding, and beautiful wife in the world.  Mrs. Toshi


  • Member since
    March 2015
  • From: Close to Chicago
WIP 1/48 Revell P-47N NMF using metal foil and rivet tool
Posted by JohnnyK on Thursday, March 31, 2016 11:06 AM

My project for next winter is to build Revell's 1/48 B29 in NMF using metal foil. I have never used metal foil for a NMF, so I thought that I better experiment on a small airplane before I tackle the B29. So, I chose Revell's P-47N. This kit is known for the following poor engineering:

  • Landing gear needing to be installed before gluing up the two wing halves.
  • Cockpit needing to be installed theough an opening in the bottom of the body after the two body halves are glued together.
  • Poor looking antenna
  • Poor looking wing cover for the wing guns
  • Wide joint at the main wiing root.

This is a 1997 kit and has recessed panel lines and a few rivets here and there. This is what is in the box.


The parts are relativaly flash free.

As usual, I'll start with the cockpit. I won't add a lot of detail because very little of the cockpit is visable after it is installed. The cockpit is painted Tamaya cockpit green with the amour plate behind the seat painted black. Decals are provided for the gauges. The seat is painted a leather color and there are some parts painted silver and black.

Setbelts are not provided, so I made some from masking tape and copper wire for buckles. The buckles are not technically correct, but they give a good illusion.


Next I'll try my hand at using Bare Metal Foil.


Your comments and questions are always welcome.

JOIN OUR COMMUNITY!

Our community is FREE to join. To participate you must either login or register for an account.

SEARCH FORUMS
FREE NEWSLETTER
By signing up you may also receive reader surveys and occasional special offers. We do not sell, rent or trade our email lists. View our Privacy Policy.