SEARCH FINESCALE.COM

Enter keywords or a search phrase below:

Finished: 1/48 Tamiya He-162 Salamander

5267 views
32 replies
1 rating 2 rating 3 rating 4 rating 5 rating
  • Member since
    January 2015
Posted by BrandonD on Wednesday, August 10, 2016 12:37 PM

BlackTulip109

I too saw that HE-162 when I visitedPlanes of Fame.

I couldn't believe how small it was.

After THE WAR a British test pilot test flew one and thought it a pretty decent a/c!!!


Yeah it is small. I think it would be lots of fun to fly, but I'd be terrified, seeing as how it's got so many wooden components and was built with slave labor. But so cool to see one, and the first jet ever flown sitting right beside it. Planes of Fame is such an awesome place.

-BD-

  • Member since
    November 2003
  • From: Naples, FL
Posted by tempestjohnny on Sunday, August 7, 2016 6:27 AM
Great build. Check. Can't wait for the next one. Check.


  • Member since
    February 2012
  • From: Olmsted Township, Ohio
Posted by lawdog114 on Sunday, August 7, 2016 2:56 AM
That's beautiful bud. Thanks for sharing your work with us...

 "Can you fly this plane and land it?...Surely you can't be serious....I am serious, and don't call me Shirley"


  • Member since
    January 2015
  • From: Indiana USA
Posted by BlackTulip109 on Saturday, August 6, 2016 9:20 PM

I too saw that HE-162 when I visitedPlanes of Fame.

I couldn't believe how small it was.

After THE WAR a British test pilot test flew one and thought it a pretty decent a/c!!!

  • Member since
    January 2015
Posted by BrandonD on Friday, July 29, 2016 12:41 AM

PJ, Max, Toshi, BK and Mike - thanks for the kind words. I wanted to dirty this one up more, but just couldn't bring myself to do it!

-BD-

  • Member since
    January 2015
  • From: Tumwater, WA.
Posted by M. Brindos on Wednesday, July 27, 2016 9:05 PM

That turned out VERY nice! That paint scheme, even if a bit simplistic, is still interesting. I think you nailed this one. :D:D:D:D:D:D:D

- Mike Brindos "Lost Boy"

  • Member since
    June 2014
Posted by BrandonK on Wednesday, July 27, 2016 2:49 PM

Nice, really nice work. Such a little guy and it looks fantastic.

BK

On the bench:

A lot !! And I mean A LOT!!

2024 Kits on deck / in process / completed   

                         14 / 5 / 2  

                              Tongue Tied

  • Member since
    March 2015
  • From: Streetsboro, Ohio
Posted by Toshi on Wednesday, July 27, 2016 1:39 PM

That is one beautiful build.  Great paint job as well.

Toshi

On The Bench: Revell 1/48 B-25 Mitchell


Married to the most caring, loving, understanding, and beautiful wife in the world.  Mrs. Toshi


  • Member since
    April 2016
  • From: Parsons Kansas
Posted by Hodakamax on Wednesday, July 27, 2016 1:39 PM

Not only an excellent build but an interesting subject. All cool! That cockpit makes me feel inferior! Keep up the good work.

Max

  • Member since
    November 2008
  • From: Central Florida
Posted by plasticjunkie on Wednesday, July 27, 2016 12:55 PM

Looks fantabulous BD! That pit is just too much.Beer

 GIFMaker.org_jy_Ayj_O


Too many models to build, not enough time in a lifetime!!

  • Member since
    January 2015
Posted by BrandonD on Wednesday, July 27, 2016 12:04 PM

Ok, this one is done. I really enjoyed building this kit - typical Tamiya fit that made it a dream, with the only real seam cleanup being on the fuselage seam, and that was minimal. I love the inclusion of the steel ball to keep it from sitting on its tail, and I really find the subject matter interesting.

To think that they were able to build so many of these (I think something like 150 actually survived the war), it's just a cool plane.

The paints are Mr. Paint RLM 81, Tamiya Flat Green for RLM 82 and the Tamiya-recommended mix for RLM-76. Exhaust staining aft of the engine was Alclad Jet Exhaust. Aftermarket inclusions were the HGW harness and markings from Kagero. Unfortunately, the Cartograf decal sheet Kagero provided did not include stencils, national insignia or swastikas, so I used the (thick) Tamiya decals for those. It was a little annoying, as I bought the Kagero book and decals to get away from using Tamiya's decals. Oh well, they came out ok, and I was able to score them along panel lines so you can't tell they didn't sink down on their own.

Thanks for looking!

-BD-

  • Member since
    August 2009
  • From: Borlando Fla home of the rat
Posted by TREYZX10R on Sunday, July 10, 2016 11:01 PM

Great looking build Brandon and the seat and harness are spot on!

  • Member since
    April 2016
  • From: Parsons Kansas
Posted by Hodakamax on Saturday, July 9, 2016 7:05 AM

Nice build and your seat details are super. Good work.

Max

  • Member since
    January 2015
Posted by BrandonD on Saturday, July 9, 2016 12:29 AM

Freem - thank you! I don't know it's worth all that praise, but I appreciate it Big Smile

-BD-

  • Member since
    September 2005
  • From: Central Nebraska
Posted by freem on Friday, July 8, 2016 10:00 PM

Absolutely nailed the seat, Brandon.  My objective in modeling (not that I make it all the time or ever) is to have that model or part of it look realistic in a photo.  You did that in spades!!  This one's in my stash too and I am glad it looks like a quick builder.

Again--outstanding work!

Chris Christenson


  • Member since
    January 2015
Posted by BrandonD on Friday, July 8, 2016 1:46 PM

One place the kit falls flat, like with so many Tamiya (and other) kits, is the harness. I really don't like a decal harness, since they look so lifeless in the seat much of the time. Of course, carefully cutting it and NOT removing it from the backing paper is always an option, but I like the depth given with PE  buckles and microtextile. I took the bang seat out of the cockpit and built the HGW harness for it last night (about 1.5 hours with 22 pieces). Also added the decal and a wash to it. I may drybrush it to highlight some of the raised detail.

-BD-

  • Member since
    January 2015
Posted by BrandonD on Friday, July 8, 2016 1:44 PM

Thanks, Britt and Mike!

The kit builds up really easily. I like the little touches like the windscreen being molded with part of the cowling for ease of gluing and lack of a seam line around the windscreen. The included nose weight is nice, and since it's newer Tamiya, everything just fits together so well. It also includes a second engine and display stand, which I probably won't build because I don't want to add wiring and such, but it's cool nonetheless.

-BD-

  • Member since
    January 2015
  • From: Tumwater, WA.
Posted by M. Brindos on Thursday, July 7, 2016 9:13 PM

That's a really sweet kit, and a dang nice paintjob you've got on it! I really like this, Brandon. Well done so far.  :)

- Mike Brindos "Lost Boy"

  • Member since
    June 2013
Posted by bvallot on Thursday, July 7, 2016 2:07 PM

Very cool Brandon. =] I've been staring at that kit for a while now wondering how it would build up. Thanks for the WIP. Looks like you're almost done! Fantastic job so far.

On the bench:  

Tamiya F4U-1  Kenneth Walsh


  • Member since
    January 2015
Posted by BrandonD on Thursday, July 7, 2016 1:22 PM

Just a small update for now. I got the engine mounted. Tamiya engineered this very well to be held in place with poly caps and metal rails, but since I broke the interior structure of the engine, I had to glue mine. No big deal, and I managed to glue it without messing up the paint job, which might be a new thing for me.

I also realized I left out half the cockpit when I built this - control stick, gunsight, harness and the window into the nose wheel well. No big deal, as I planned to show it with an open canopy, but I think I love the lines so much with it closed that I will add the aforementioned parts and close it up again. It just looks too cool like this, and it's big enough and clear enough to still see inside what is really kind ofa boring cockpit anyway.

-BD-

  • Member since
    January 2015
Posted by BrandonD on Thursday, July 7, 2016 1:17 PM

lawdog114
That looks stunning Brandon...
 

Thank you!

  • Member since
    February 2012
  • From: Olmsted Township, Ohio
Posted by lawdog114 on Wednesday, July 6, 2016 6:11 PM
That looks stunning Brandon...

 "Can you fly this plane and land it?...Surely you can't be serious....I am serious, and don't call me Shirley"


  • Member since
    January 2015
Posted by BrandonD on Tuesday, July 5, 2016 2:09 AM

Thanks, Johnny. Yeah it's an interesting scheme, buta bit boring in my opinion. Most of it is overall light green, but the engine cover and intake, right wing, left stabilizer and right elevator are brown violet. The ailerons are both light green upper and lower. I prefer the cool splinter camo or some mottling, but the 163 didn't really have much of that, and I didn't feel like reproducing the bare metal and putty finish that is admittedly more interesting to look at.

-BD-

  • Member since
    November 2003
  • From: Naples, FL
Posted by tempestjohnny on Monday, July 4, 2016 6:17 AM
Nice build BD. Interesting scheme with the two different color wings


  • Member since
    January 2015
Posted by BrandonD on Sunday, July 3, 2016 1:57 AM

Ok, I have been on vacation, but was able to make some progress when I got back.

Here she is as she sits now. I shot the light blue on and freehanded the demarcation line, which meant I had to come back with the green and fix a few booboos, but then it was off to clear coat and decals. I have a Kagero set of Cartograf decals which are excellent, but they didn't include national insignia or stencils, so I used the thickr Tamiya ones, and fortunately they worked out ok.

Next up is a panel line wash and attaching the engine. Hopefully I can get it on without messing up the paint job. Probably should have attached it earlier...

Thanks for looking!

-BD-

  • Member since
    January 2015
Posted by BrandonD on Thursday, June 16, 2016 1:14 PM

Thank you, Toshi and Brandon!

I was hoping to get the RLM 76 down before leaving on vacation, but it doesn't appear that will happen. Oh well, fun for when I get back.

-BD-

  • Member since
    June 2014
Posted by BrandonK on Thursday, June 16, 2016 8:49 AM

Nice work on a subject we dont often see here. I really like the luft instrument panels, they always looked the part to me. Great work.

BK

On the bench:

A lot !! And I mean A LOT!!

2024 Kits on deck / in process / completed   

                         14 / 5 / 2  

                              Tongue Tied

  • Member since
    March 2015
  • From: Streetsboro, Ohio
Posted by Toshi on Thursday, June 16, 2016 6:20 AM

I like the direction you're taking this build.  It's very exciting to see it's transformation!  Great job sir!

Toshi

On The Bench: Revell 1/48 B-25 Mitchell


Married to the most caring, loving, understanding, and beautiful wife in the world.  Mrs. Toshi


  • Member since
    January 2015
Posted by BrandonD on Wednesday, June 15, 2016 12:30 PM

Ok, I got some time at lunch the past few days to do some work on my He-162.

Construction of this thing was easy. It basically fell together, and fixing the seams was pretty painless, even by my whiny standards.

I primed the whole model in Mr. Surfacer 1500 Black, and I shot the RLM 81 parts with Mr. Paint (not Mr. Color/Mr. Hobby/Gunze) RLM 81. If you haven't used these paints, you're missing out. They're crylic and prethinned for airbrush use, and I love them. They provide some colors that tend to be missing in a lot of ranges, like the MiG cockpit turquoise, Soviet AMT colors and RAF Extra Dark Sea Gray, for example.
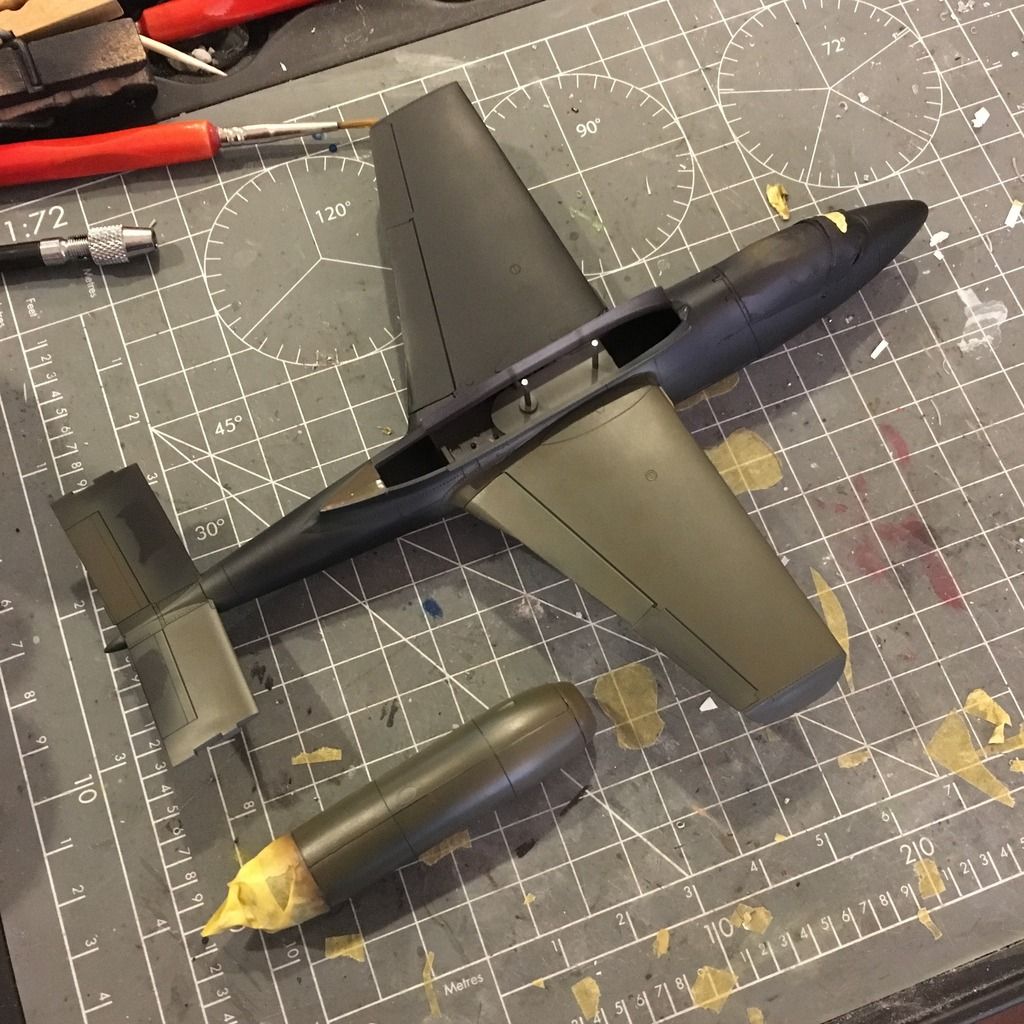
Anyway, I got the RLM 81 on, then masked for the RLM 82, which is just Tamiya XF-5 Green. I'm using a color profile in Kagero's book on the Me-163, Me-262 and He-162, which came with nice Cartograf decals. While I like the scheme with the bare metal parts, I decided to go ahead and do one fully painted, since I imagine had the war gone on, they would have painted them to give more protection against strafing attacks while they were parked.
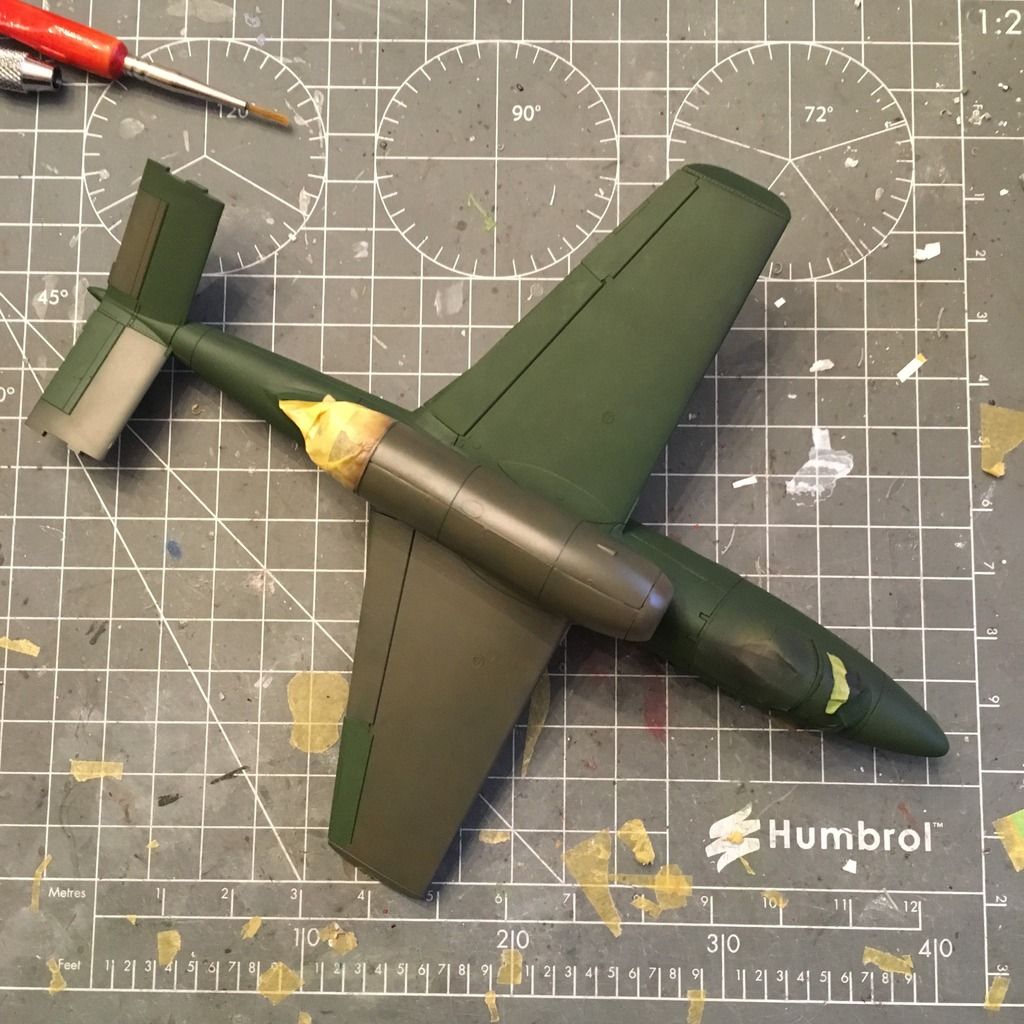
Next up is masking for the RLM 76 on theunderside, and then it's on to decals.

I have to say, I'm not a fan of the schemes on these and thought about varying, but I decided to keep it pretty much as it appeared in 1945, under the assumption that they wouldn't have made drastic changes going into '46.

-BD-

JOIN OUR COMMUNITY!

Our community is FREE to join. To participate you must either login or register for an account.

SEARCH FORUMS
FREE NEWSLETTER
By signing up you may also receive reader surveys and occasional special offers. We do not sell, rent or trade our email lists. View our Privacy Policy.