SEARCH FINESCALE.COM

Enter keywords or a search phrase below:

Completed! 1/48 Hasegawa P-40E Aleutian Tiger

8188 views
37 replies
1 rating 2 rating 3 rating 4 rating 5 rating
  • Member since
    January 2015
Completed! 1/48 Hasegawa P-40E Aleutian Tiger
Posted by BrandonD on Thursday, August 4, 2016 12:32 PM

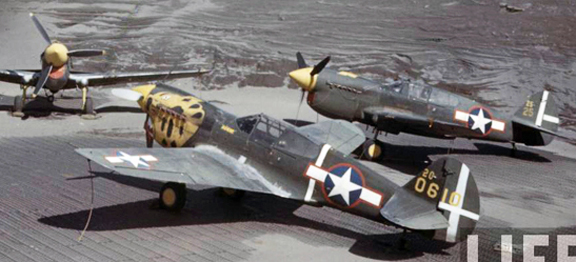
I was going to wait for a group build to tackle this one, but after visiting Alaska and seeing an Aleutian Tiger under restoration, I wanted to move this up.

So I have the Hasegawa kit, which came (eBay) with the Eduard PE set, and I have the Barracuda decals for the aircraft in the foreground of this image.

As many/most of you will know, Hasegawa molded the P-40 with multiple inserts for the fuselage and wings so they could use the basic model for multiple variants. And that means lots of seam work just to get to a basic fuselage half, which is a big downside to the kit, in my opinion, and that makes me happy Airfix is releasing a B model later this year, instead of Hasegawa revisiting this one.

I decided to install the inserts before joining the fuselage instead of following the instructions, which show them being istalled after, mainly to avoid a step at any join (I'd rather fill a seam up top or down below than reshape the fuselage itself.

Here you can see the tail sections are added, as are the sections for the area behind the cockpit.

Still cleanup work to do on the panel lines, but Mr. Dissolved Putty is my friend here.

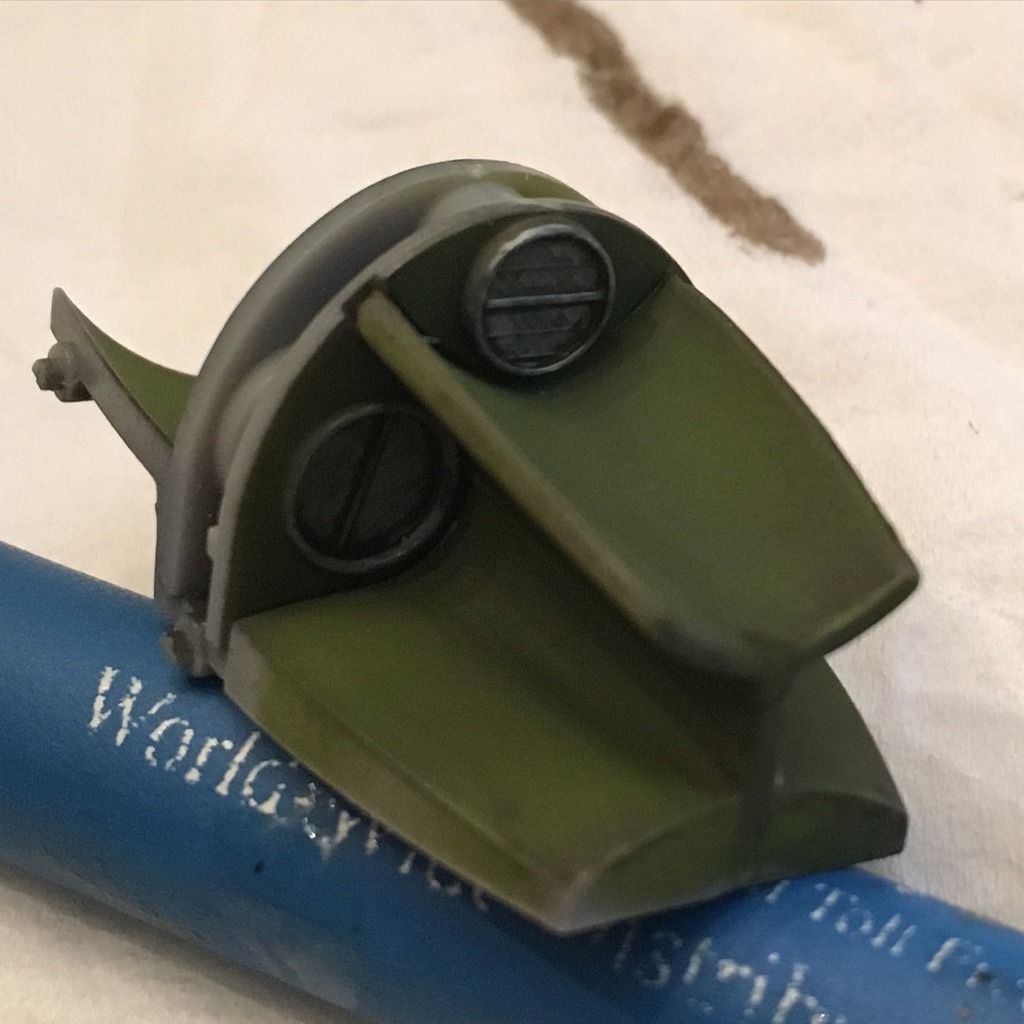
In the meantime, I got to work on the intake, and I decided not to go with actual mesh screens just because it's so buried and most people won't see it.

And then I worked on the wing gun inserts. One of them didn't fit very well at all, and too a fair amount of cleanup. I sanses, used Mr. Dissolved Putty, and then primed and sanded again to get to this place. You can see the seam, but it's very smooth, and I think that when I throw another coat of primer on it today, it will have disappeared (though I need to rescribe that panel line that somehow got crooked on me).

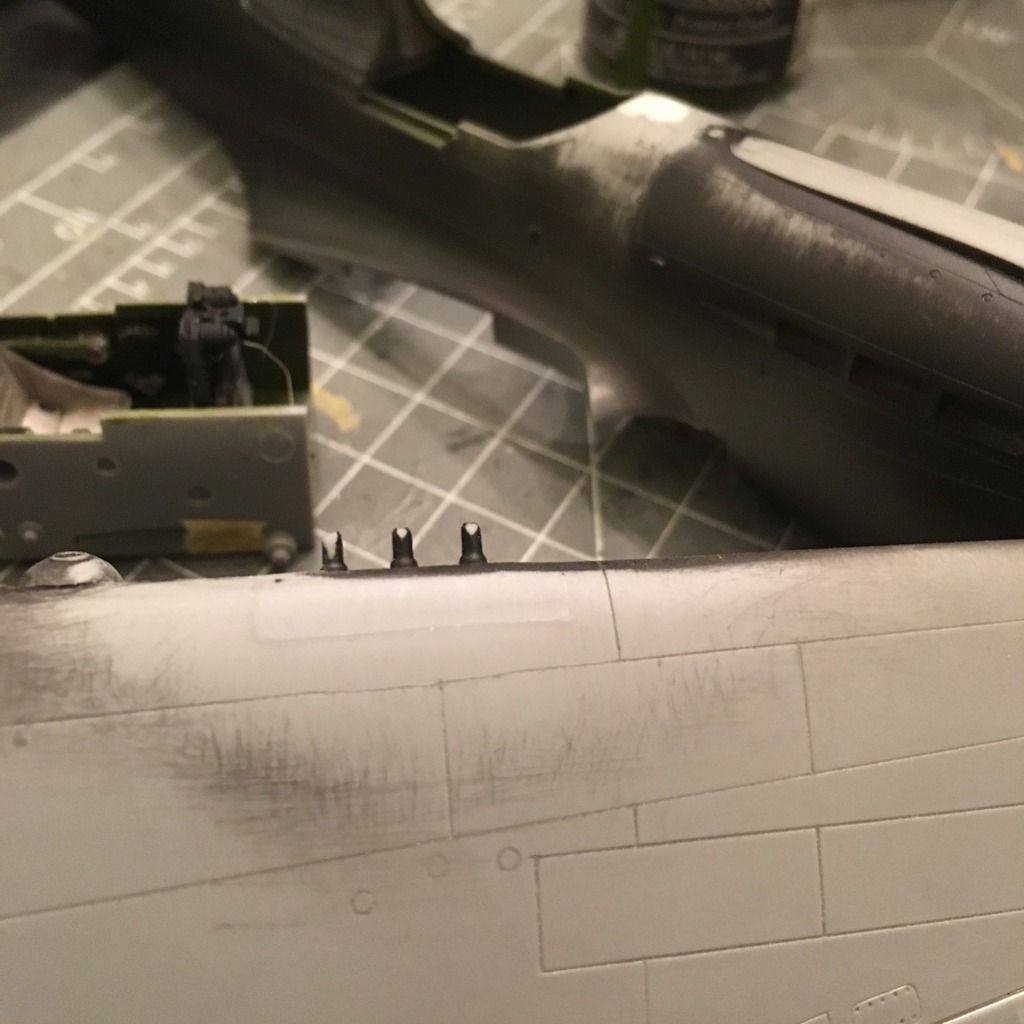
I think the guns ended up being ok, but if I accidentally misshaped them by hitting them with sandpaper, I will most likely replace them with some Albion Alloys brass tubing.

I also joined the fuselage halves last night, and did some seam cleanup. Hasegawa did modelers a favor by designing the cockpit so it can be dropped in from the bottom with the fuselage halves already closed.

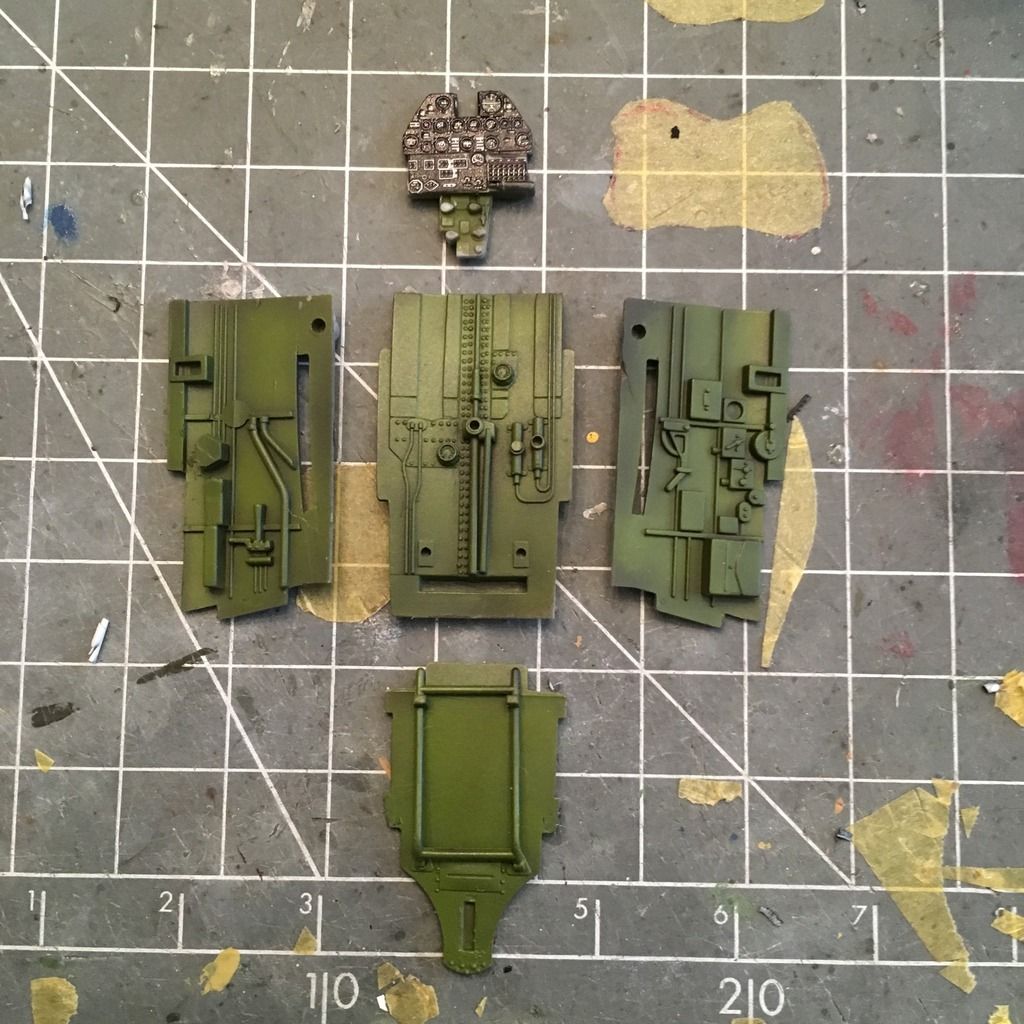
This is the first step on my cockpit. I plan on making it somewhat dirty because of the volcanic sand they had in the Aleutians.

Anyway, that's all for now. I am hoping to get major assembly done by this weekend so I can start throwing primer on it.

-BD-

  • Member since
    July 2016
  • From: Kentucky , USA
Posted by MailDude on Thursday, August 4, 2016 12:43 PM

Great looking cockpit so far. YesYes Can't wait to see the finished product. 

MailDude a.k.a. mailwalker

  • Member since
    September 2014
Posted by rooster513 on Thursday, August 4, 2016 1:04 PM

Great work so far Brandon! Looks like really nice detail in that cockpit...look forward to seeing it all painted up! I'm looking forward to the Airfix release too, I need a P40 in my collection. Hopefully it's as good as thier latest releases.

-Andy

  • Member since
    November 2009
  • From: SW Virginia
Posted by Gamera on Thursday, August 4, 2016 9:17 PM

Yeah, if the rest of her looks as good as the cockpit you're got a winner on your hands!

"I dream in fire but work in clay." -Arthur Machen


  • Member since
    June 2014
Posted by BrandonK on Friday, August 5, 2016 5:05 PM

Looks like we have the same taste in kits at the moment. Nice work! I can't wait to see this done up.

BK

On the bench:

A lot !! And I mean A LOT!!

2024 Kits on deck / in process / completed   

                         14 / 5 / 2  

                              Tongue Tied

  • Member since
    March 2015
  • From: Streetsboro, Ohio
Posted by Toshi on Friday, August 5, 2016 6:19 PM

Any kit in your hands will look fantastic as always!  

toshi

On The Bench: Revell 1/48 B-25 Mitchell


Married to the most caring, loving, understanding, and beautiful wife in the world.  Mrs. Toshi


  • Member since
    September 2011
Posted by fightnjoe on Saturday, August 6, 2016 6:04 AM

Got to love a hawk.  Looks like great progress.  I do love the kits that have the ability to install the pit after the halves of the fuse are closed.  


Joe

Veterans,

Thank You For Your Sacrifices,

Never To Be Forgotten

Where you can find me:

Workbench on FaceBook  Google Plus  YouTube

  • Member since
    February 2012
  • From: Olmsted Township, Ohio
Posted by lawdog114 on Sunday, August 7, 2016 2:46 AM
Nightmare isn't it. I personally have never been able to get the ghost seams completely out of the gun inserts. It's a fine kit once you get past all of the fitting and sanding. I think it has one if the best out of the box cockpits too. Your doing a fine job my friend.

 "Can you fly this plane and land it?...Surely you can't be serious....I am serious, and don't call me Shirley"


  • Member since
    November 2003
  • From: Naples, FL
Posted by tempestjohnny on Sunday, August 7, 2016 6:36 AM
Another great start. I'm pulling up a chair


  • Member since
    January 2015
Posted by BrandonD on Wednesday, August 10, 2016 12:09 PM

Thanks, all!

Rooster - Yeah I am really excited about that Airfix P-40. I just preordered two so it would qualify for the free shipping. Hopefully it's good!

Brandon - we do seem to be on the same types of builds, don't we?

-BD-

  • Member since
    January 2015
Posted by BrandonD on Wednesday, August 10, 2016 12:14 PM

Quick update on where I am:

I got the cockpit finished up and weathered a bit. In this pic, the glass is still drying on the instruments (Micro Kristal Klear).

Then I dropped it into the fuselage from the bottom and added the wings. I left it drying like this for 24 hours to make sure the glue set, as the plastic wanted to return to flat and ruin the dihedral as well as create wing root seams. Right now it sits with some Mr. Dissolved Putty on the seams, which I should be able to clean up this week and get primer on it. 

-BD-

  • Member since
    September 2005
  • From: North Pole, Alaska
Posted by richs26 on Wednesday, August 10, 2016 9:00 PM

WIP:  Monogram 1/72 B-26 (Snaptite) as 73rd BS B-26, 40-1408, torpedo bomber attempt on Ryujo

Monogram 1/72 B-26 (Snaptite) as 22nd BG B-26, 7-Mile Drome, New Guinea

Minicraft 1/72 B-24D as LB-30, AL-613, "Tough Boy", 28th Composite Group

  • Member since
    January 2015
Posted by BrandonD on Wednesday, August 17, 2016 5:17 PM

Thanks, Rich. You mean the shrouds around the exhaust pipes?

Hmm, I wonder how to match the decal color though if I do that.

Something to consider. Thanks again.

-BD-

  • Member since
    January 2015
Posted by BrandonD on Thursday, August 18, 2016 12:31 PM

Well, I went down a rbbit hole with this thing last night. I knew Hasegawa had released an Aleutian Tiger version of this kit, and lo and behold, the shrouds are present on the sprue next to the exhaust pipes, so no need to scratch them, which is nice. Thanks for pointing that out, or else mine wouldn't have them. And every pic I can see has them in place.

The second piece was that apparently the Hasegawa Aleutian Tiger kit supplied different gun plugs for the wings, without the protruding barrels for a very early -E variant. Mine, however, has the protruding barrels.

After much searching of actual photos, it appears that both versions were used by the Aleutian Tigers. I have a theory that the first planes in service with the unit did NOT have the protruding gun barrels, and I have yet to see one with the star-no-bar markings that has protruding gun barrels.

However, my decals have the star and bar with the red outline, and photos I have seen of the planes with these markings DO, in fact, have protruding gun barrels, so I am comfortable leaving them on, which is always nice.

Again, I am building the one in the foreground of the photo below, and while I don't have an image of the guns, the plane in the background appears to have exposed gun barrels. It's possible that the black marks on the leading edge are gunpowder residue, but I really doubt it, as you just don't see it that much in actual photographs.

The image below lends credence to my theory, I believe, that replacement planes around the time the red outlined star andbar was introduced had the exposed gun barrels. It also appears that the front part of the exhaust shrouding was always there, but the layers over the middle part weren't necessarily present. This one is clearly an Aleutian Tiger, as evidenced by the winterization and the plane in the background with the tiger on it, but it hasn't had its tiger painted on yet. It also shows that the spinner and tiger weren't painted at the same time, so it's possible that there would be a variation in the color between the two, which is good news for modelers going crazy trying to match it.

Thanks agin for the heads-up!

-BD-

  • Member since
    January 2015
Posted by BrandonD on Thursday, August 18, 2016 12:33 PM

Rich - just saw you're in Alaska. I was so close to going to North Pole, but we just didn't have time. Have you been to the aviation heritage museum in Anchorage and seen the Aleutian Tiger in the restoration hanger? It's pretty cool.

-BD-

  • Member since
    January 2015
Posted by BrandonD on Thursday, August 18, 2016 1:24 PM

Well, quick update - I got the color on the underside last night.

That's pretty much it for now. Hope to get at least some of the upper color on at lunch today.

-BD-

  • Member since
    September 2005
  • From: North Pole, Alaska
Posted by richs26 on Thursday, August 18, 2016 7:13 PM

Brandon, the red surround of the star and bar was the marking specified for the time period of July to August 1943. It was changed to blue for September 1943 and beyond until changed in 1947 with the reorganization of the armed forces. It has nothing to do with the type of armament on the airframe.  I think that the early D and E models had different gun fairings than the rest of the production like 0610.   The aircraft you have planned to do is 0610 or otherwise known as 40-610 with the 0 standing for the 1940 fiscal year which started July 1, 1939.  The 11th FS received replacement aircraft that were not weatherized and were not painted in the Tiger scheme such as photos showing 40-597 and the aircraft next to 610.  Production of the E models ended early in 1942. 

WIP:  Monogram 1/72 B-26 (Snaptite) as 73rd BS B-26, 40-1408, torpedo bomber attempt on Ryujo

Monogram 1/72 B-26 (Snaptite) as 22nd BG B-26, 7-Mile Drome, New Guinea

Minicraft 1/72 B-24D as LB-30, AL-613, "Tough Boy", 28th Composite Group

  • Member since
    February 2012
  • From: Olmsted Township, Ohio
Posted by lawdog114 on Thursday, August 18, 2016 9:42 PM
Looking good Brandon. Indeed the red surround was a a few month trial in 1943. I read they wanted to avoid confusion due to the Japanese Hinomarus (Meatballs), so they were eventually paint over in blue. That's why some have a darker blue surround due to the paint over. My Grandfather's B-17 was one such victim. I look forward to the OD...

 "Can you fly this plane and land it?...Surely you can't be serious....I am serious, and don't call me Shirley"


  • Member since
    January 2015
Posted by BrandonD on Friday, August 19, 2016 5:40 PM

I think I was unclear in what I meant about the stars and bars. I knew they came about for a short time after the star insignia without bars, and that was also when later versions of the P-40 with protruding guns were more common than the early ones that had recessed barrels. I didn't mean to equate the insignia specifically to an aircraft's armament. I just meant that I hadn't seen any protruding gun barrels on planes with the earlier insignia, but had seen them on ones with the red surrounds.

THanks again for the info though. I didn't know that about how they numbered the planes and the fiscal years.

-BD-

  • Member since
    January 2015
Posted by BrandonD on Thursday, March 30, 2017 1:26 PM

I haven't forgotten this build. It's actually very close to being done. I used the Barracude decals and got them down, then started doing some weathering before flat coats and adding the winterization on the exhausts.

The only pics I have right now are of the decal stage, so I'll put them up. Hopefully I will complete thisone this weekend.

As you can see in the pic below, the decals weren't opaque on the bars, and the high-contrast white on olive drab showed through underneath. I had to seal it, then mask it and paint it. But it came out fine.

Also, as you can see below, the tiger was slightly off at the top. This later proved to be an easy fix with some black paint and some patience.

I'm glad I pulled this off the shelf of doom, because I'm really liking where it's heading.

-BD-

  • Member since
    September 2014
Posted by rooster513 on Thursday, March 30, 2017 1:35 PM

Love it BD! Nice save with the decals in both situations. Very well done!

-Andy

  • Member since
    January 2015
  • From: Tumwater, WA.
Posted by M. Brindos on Thursday, March 30, 2017 1:53 PM

I can't believe I forgot about this one! Looking forward to seeing more!  :)

- Mike Brindos "Lost Boy"

  • Member since
    February 2012
  • From: Olmsted Township, Ohio
Posted by lawdog114 on Saturday, April 1, 2017 12:48 AM
Nice to see this one again Brandon. I look forward to the finished pics.

 "Can you fly this plane and land it?...Surely you can't be serious....I am serious, and don't call me Shirley"


  • Member since
    January 2015
Posted by BrandonD on Tuesday, June 6, 2017 10:09 PM

Ok, it's time to call this one done. The inspiration for this build came from a visit to Alaska almost exactly a year ago, so good timing I suppose.

Anyway, this is the Hasegawa kit with Barracuda decals. Lots of fun, but I would have gone a few shades lighter on the olive drab if I were doing this one again.

Thanks for looking. I do love a P-40, and the Hasegawa kit + Eduard PE does a nice job. The inserts are a PITA, but overall happy with the kit.

-BD-

  • Member since
    March 2015
  • From: Streetsboro, Ohio
Posted by Toshi on Tuesday, June 6, 2017 10:13 PM

Few shades lighter?  I think you did a fantastic job on this build!  Superb!

Toshi

On The Bench: Revell 1/48 B-25 Mitchell


Married to the most caring, loving, understanding, and beautiful wife in the world.  Mrs. Toshi


  • Member since
    January 2015
  • From: Tumwater, WA.
Posted by M. Brindos on Tuesday, June 6, 2017 10:14 PM

Well hot Dayum, Brandon! That's a beautiful -E!

I love it!! :D

- Mike Brindos "Lost Boy"

  • Member since
    January 2015
Posted by BrandonD on Tuesday, June 6, 2017 10:26 PM

Toshi, Mike - thanks, guys! I appreciate the kind words.

-BD-

  • Member since
    June 2014
Posted by BrandonK on Tuesday, June 6, 2017 10:33 PM

Very nice. It came out stunning. Well done!

BK

On the bench:

A lot !! And I mean A LOT!!

2024 Kits on deck / in process / completed   

                         14 / 5 / 2  

                              Tongue Tied

  • Member since
    May 2004
  • From: Land of Lakes
Posted by cbaltrin on Wednesday, June 7, 2017 7:11 AM

Nice Build!

On the Bench: Too Much

  • Member since
    November 2003
  • From: Naples, FL
Posted by tempestjohnny on Thursday, June 8, 2017 6:49 AM
What a great finish. That Tiger would look great in any display


JOIN OUR COMMUNITY!

Our community is FREE to join. To participate you must either login or register for an account.

SEARCH FORUMS
FREE NEWSLETTER
By signing up you may also receive reader surveys and occasional special offers. We do not sell, rent or trade our email lists. View our Privacy Policy.