SEARCH FINESCALE.COM

Enter keywords or a search phrase below:

Monogram/Revell "Yankee Lady" Enhanced Build

7425 views
94 replies
1 rating 2 rating 3 rating 4 rating 5 rating
  • Member since
    March 2012
  • From: Louisville, KY
Posted by Builder 2010 on Tuesday, November 1, 2016 3:35 PM

I will say it takes a lot of determination. I was just ready to build the layout in our Pennsylvania home when my company asked me to come to German headquarters and run some global programs. I only had a couple of engines and some track. All of it had to come from the USA. I asked Henkel if I built a model railroad in the basement of our German house (we had a rare thing... a house in Duesseldorf) would they pay to move it back to Pennsy when my assignment was over. They agreed. 

We lucked out customs-wise. Germany, unlike the US, checks your bags to your destination city. In the US you have to take you bags through customs at the airport which you land first, then re-check your bags to your final destination. In Germany, we used to fly from Philly to Munich and then take a local flight to Duessldorf, but the bags didn't come off in Munich. And there was no customs at Duesseldorf since it was a inner-country flight. So... I brought duffle bags full of Ross track, MTH cars and engines to Germany without paying any duty. I did have one engine that I bought shipped from Sunset 3rd Rail and it cost me 30% duty! I wasn't staying that country nor was I re-selling it there. That enabled me to build a working layout there (no scenery or structures), and then ship it back home. I built it to come apart and to fit into our Pennsy home. 

So, my point is if you really want to do it, you can find a way. It would have been much easier to have not started the railroad there, but as things have it, while in Germany, Henkel divested their Chemicals division. This reduced the US Henkel workforce by 50% and all people over 55 were offered early retirement. I took it and then started a consulting company. Therefore, my salary was greatly curtailed and I wouldn't have had the resources to start building. But since I already had a railroad, it wasn't very expensive to enlarge it.

Carpe Diem. You need to get into action since you never know what's around the corner.

  • Member since
    March 2015
  • From: Close to Chicago
Posted by JohnnyK on Tuesday, November 1, 2016 3:00 PM

OMG, OMG, OMG!!!!! I love the train layout. When I was about 5 years old my father built a 15'x10' American Flyer layout. About 5 years later he built a 20'x15' HO layout. I had a great dad. I can't remember how many hundreds of hours I spent playing with it over a number of years. Such great memories of my childhood. I wish I had a train layout now, but there are just so many hours in a day and just so many dollars in the bank. 

Your comments and questions are always welcome.

  • Member since
    March 2012
  • From: Louisville, KY
Posted by Builder 2010 on Tuesday, November 1, 2016 9:35 AM

Thank you Toshi for your over-the-top compliment.

Next projects in plastic are probably two Trumpeter Kits: 1/32 ABM Avenger with some Eduard AM parts and a 1:350 Essex WW2 carrier for which I haven't yet purchased any AM but plan to do it up like the Missouri.

But, most of my efforts are going to completing the large O'scale model railroad I've been building for over 4 years. I've been posting a thread about this creation from the very beginning and it can be found here:

http://ogrforum.ogaugerr.com/topic/continuing-saga-of-the-pandampprr

As in the B-17 thread, I cover all aspects of the build in ridiculously granular detail. So while you're waiting for me to do more plastic you can spend some idle time watching me crash through building some unique and interesting things such as:

A scratch-built 1870 Bourbon distillery including modern material handling system.

A free-lanced substation with a free-lance main transformer and ABB 135kv switchgear. This was an article in Railroad Model Craftsman in November 2015.

And there's a model of a Victorian train station, the style of which was on the NYO&W reailraod in New York. This was an HO plan in a Kalmbach book which I enlarged to O'scale and then scratch-built in styrene. It has a full main floor interior, but it's not easy to see.

The railroad is 39' X 15' and has been a dream of mine since I was a kid and had a 13' X 4' layout. It started in Germany at 21' X 13'. I enlarged it to 27' X 13' until the move to Kentucky where it grew to its present size. So if you need something to read, check it out.

  • Member since
    March 2015
  • From: Streetsboro, Ohio
Posted by Toshi on Tuesday, November 1, 2016 4:35 AM

This sir, was one of the most exciting ventures I've ever had the opportunity to follow along.  Your top quality building skills made some of the issues you encountered moot!  

As you so correctly stated; "We all make mistakes, it's how you recover that that's the key".  I learned much from your tutorial and look forward to another WIP from you.  If I may, what is your next project?

Toshi

On The Bench: Revell 1/48 B-25 Mitchell


Married to the most caring, loving, understanding, and beautiful wife in the world.  Mrs. Toshi


  • Member since
    March 2012
  • From: Louisville, KY
Posted by Builder 2010 on Monday, October 31, 2016 10:59 PM

Thanks! For Alclad (and other solvent-based paints) I need to install an outside-vented spray booth. I'm lobbying the CinC to do it. She seems to have a problem with installing a dryer vent through the outside brick wall of the basement. I really want to do this so I can do all kinds of airbrushing without having the fumes in the house and in my lungs. Even the Tamiya and Vallejo paints end up being breathed in. I don't like using a mask since my glasses always fog up.

  • Member since
    February 2012
  • From: Olmsted Township, Ohio
Posted by lawdog114 on Saturday, October 22, 2016 12:54 AM

Builder 2010

Thanks! That is a tough kit. Nothing fits well especially the seams and the glazing. Plastic models have come so far since this was originally issued in 1975. 


You aren't kidding.  However, you made a gem out of it.  Perhaps try the Alclad line for natural metal next time.  It's very rugged and you'll have less headaches.  Thanks for taking us along.

 "Can you fly this plane and land it?...Surely you can't be serious....I am serious, and don't call me Shirley"


  • Member since
    March 2012
  • From: Louisville, KY
Posted by Builder 2010 on Thursday, October 20, 2016 7:46 PM

Thanks! That is a tough kit. Nothing fits well especially the seams and the glazing. Plastic models have come so far since this was originally issued in 1975. I'd love to have a crack at that HKW 1/32 B-17G (with about an additional $600 in after-market goodies). But that's not going to happen. I have a railroad to build.

  • Member since
    December 2010
  • From: Salem, Oregon
Posted by 1943Mike on Thursday, October 20, 2016 7:29 PM

I had a great time following along on your build. You've made a Flying Fortress par exellence.

You've done the bird proud.

Mike

"Le temps est un grand maître, mais malheureusement, il tue tous ses élèves."

Hector Berlioz

  • Member since
    March 2012
  • From: Louisville, KY
Posted by Builder 2010 on Thursday, October 20, 2016 6:07 PM

Thanks guys, but a bit premature. Today is the official end of project day. This model is not "museum scale" for several reasons. A) it's a crappy kit to start with, and B) I screwed up enough stuff (especially those *)@^_E cockpit windows to relegate it a nice model, but not museum level. That being said, let me get into the final steps. First of all, here are the "official" beauty pics created with my Canon EOS and ZereneStacker depth-of-field software.

I started the day wanted to scratch-build the football antenna since I somehow must have thrown it out with one of the sprues. I'm usually pretty careful about making sure that any parts left and unneeded, but I must have missed that one. I drew a scale profile of this part and then made a bunch of duplicate parts that would be glued together and profiled. 

After gluing them all together I started filing away everything that didn't look like a football antenna. All went well until the base piece was breaking due to the filing stresses. I attempted to insert some brass wire to reinforced, but this too didn't quite work.

Then I was left with filing just the round part. I figured that after I got it shaped, I would fabricate a separate base. Then it launched out of the pliers. I heard it hit something, but that was just the quantum rift opening and swallowing up the part. With that, I decided the plane didn't need any "stink'n" football.

Next up was the landing lights. I put some Bare-Metal-Foil in the space prior to using Canopy Cement to hold the glazing in place.

And then I installed the lens.

The model needed some antennas. There is a short, straight one on the bottom and a double one to the tail. The bottom antenna originally had a couple of plastic pins that long ago broke off in all the seam fixing. I had drilled a couple on 0.021" holes for some brass wire of the same size. Today I added the brass and tied E-Z Line to the two points. If you've never used this product, I believe it's actually Lycra elastic fiber. It takes CA instantly and is very easy to use and, since it is highly elastic, it holds its tension and will not break if you happen to run into it... which I do repeatedly.

For the top antenna, I believed that the two plastic lugs protruding from the port and starboard sides of the radio room were the feed throughs for this antenna. I drilled holes there to accept the line. The tail also has a lug that I drlled for the other end. The antenna needs an insulator at the top end. I tried to make one out of small diameter styrene rod drilled to accept two pieces of E-Z Line. This didn't work very well so I substituted a couple of black seed beads which were much easier to thread.

Last up was replacing the last broken Verlinden gun barrel. I began to realize that doing the same thing again and again and expecting a different outcome was a symptom of insanity (Albert Einstein). I decided to substitue steel for that resin. I found a piece of floral wire (0.046") that closely approximated the resin barrel. I turned the muzzle shape by chucking the wire into my Dremel Flexishaft handpiece and shaping it with a diamond-coated file. It doesn't have cooling holes, but you can't really tell. Not the barrel WILL NOT BREAK, but the gun can still be knocked out the window.

With that, the model is complete! I painted the figures and am including them with the model. The last thing I needed to do (besides cleaning up the shop...) is figuring how to bring it to Philly tomorrow. I came up with this.

Nothing on the model is touching anything except the outer wings and the tail behind the tail wheel. Hot glued straps hold everthing down and the peice of foam keeps it from bouncing up and down. It's a good use for a Costco box. It will sit on top of any luggage and not have anything near it. It should work. 

So, until the next plastic project, thank you all for following along.

  • Member since
    March 2015
  • From: Streetsboro, Ohio
Posted by Toshi on Thursday, October 20, 2016 12:18 PM

Congratulations on a job well done!  One word, "Awesome"!

Toshi

On The Bench: Revell 1/48 B-25 Mitchell


Married to the most caring, loving, understanding, and beautiful wife in the world.  Mrs. Toshi


  • Member since
    September 2006
  • From: Bethlehem PA
Posted by the Baron on Thursday, October 20, 2016 11:54 AM

Outstanding progress!  I'd say that you build museum-quality replicas.  You also illustrate that practice and planning, coupled with experience, are still the best traits a modeler can have.

The bigger the government, the smaller the citizen.


  • Member since
    August 2016
Posted by Keyda81 on Wednesday, October 19, 2016 10:04 PM

Yes  Looks great!  You have a great attention to detail, and a lot of paitence! 

  • Member since
    March 2012
  • From: Louisville, KY
Posted by Builder 2010 on Wednesday, October 19, 2016 5:21 PM

I ended up selectively using Dullcoat to seal the decals. The aluminum already was pretty dull so I didn't have to spray the entire plane. 

Whew! Today was a mixed bag of suceesses and horrors equally balanced. I will elucidate as I go on.

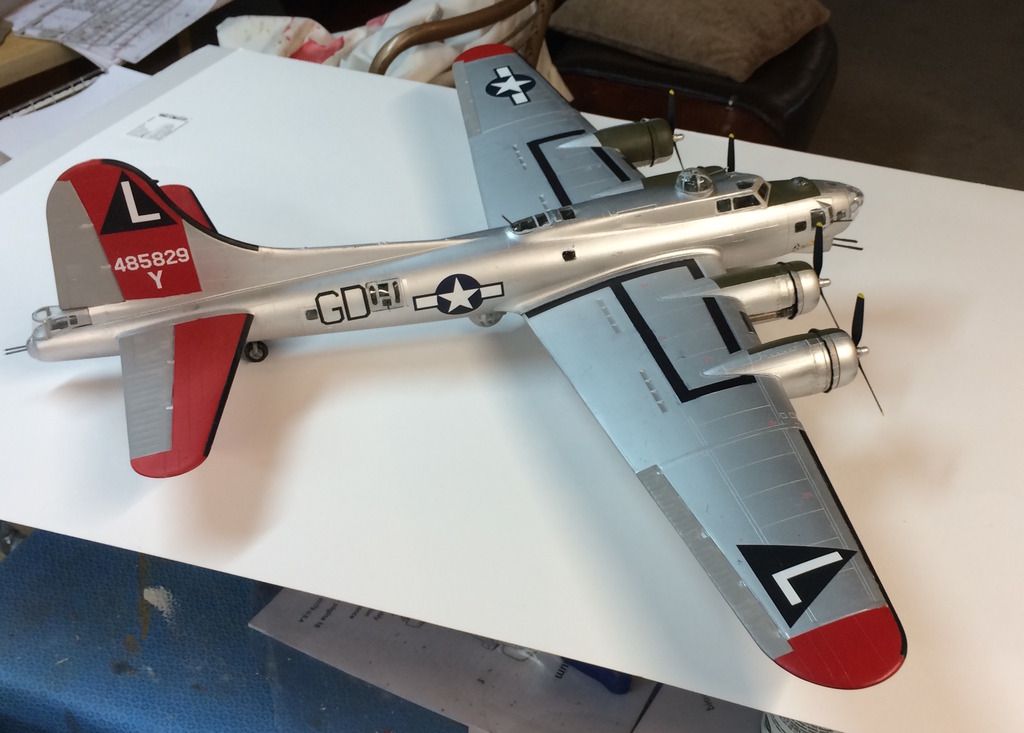
I started by finishing up the stripes. Microsol Liquid Decal Film worked like a charm. The inkjet color stayed put and the decals applied very nicely. This brand of inkjet decal paper has a pretty heavy decal film and takes a lot of Microsol setting solution to lay it down over raised details. As I said before, DON'T USE SOLVASET! It will dissolve these decals. Next up was all the rest of the decals and all went on without difficulty. I then sealed them all and 

After things dried I used Dr Brown's grimy black weathering powder to lay down the exhaust stains. Looks sloppy, but I kind of like it.

After doing this I shot the bottom with Dullcoat so the turbos are no longer shiny. With all the decoration done I started to install all the remaining glazing including the Cheyenne tail. This was a bit more challenging than I would have liked, but I did get it on without a serious screwup.

I also installed the top turret, the guns for the tail turret and fixed the broken guns in the front...AGAIN, but that wasn't the last time.

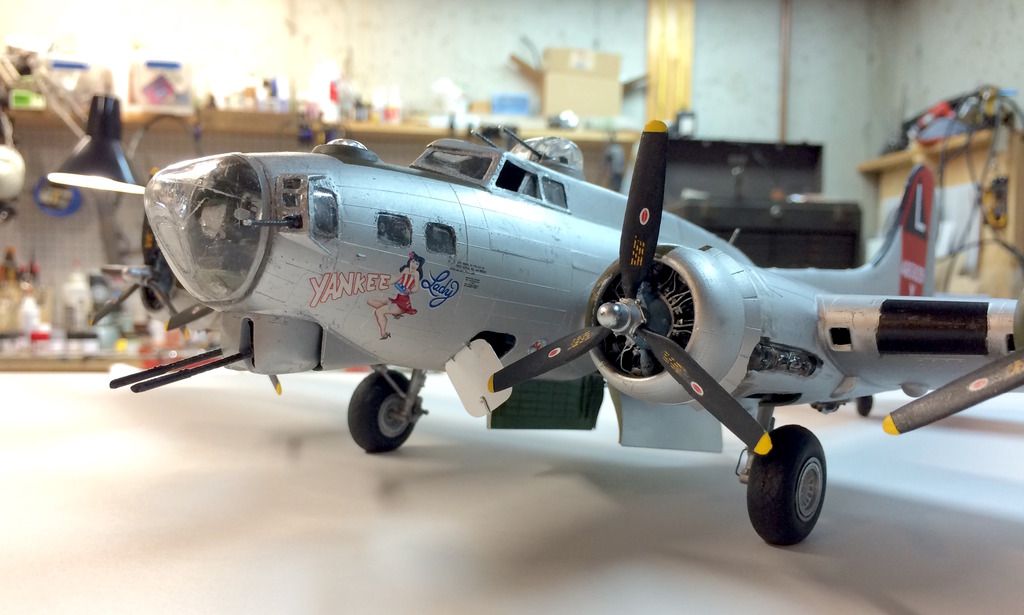
Then the first calamity happened. I wanted to use this new Real Metal buffing aluminum by AK Interactive. It's a wax-based metal paint that polishes bright. When I opened the tube for the first time, the stuff blasted out all over the place, but mostly on my hands. It was a freak'n mess to clean up, but luckily alcohol removes it. I used it on the prop spinners and it worked pretty well.

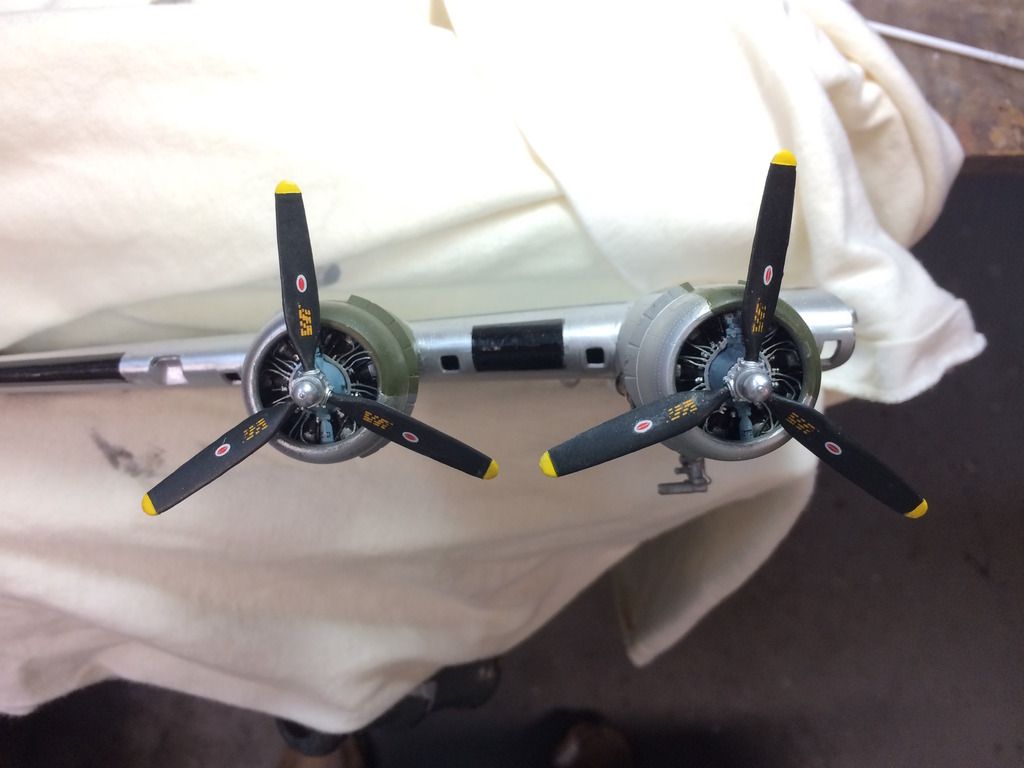
Boy those engines look cool! As far as I'm concerned, they're the best part of this whole project. Too bad the Monogram kit doesn't measure up to those Eduard R-1860s. The props are held on with medium CA.

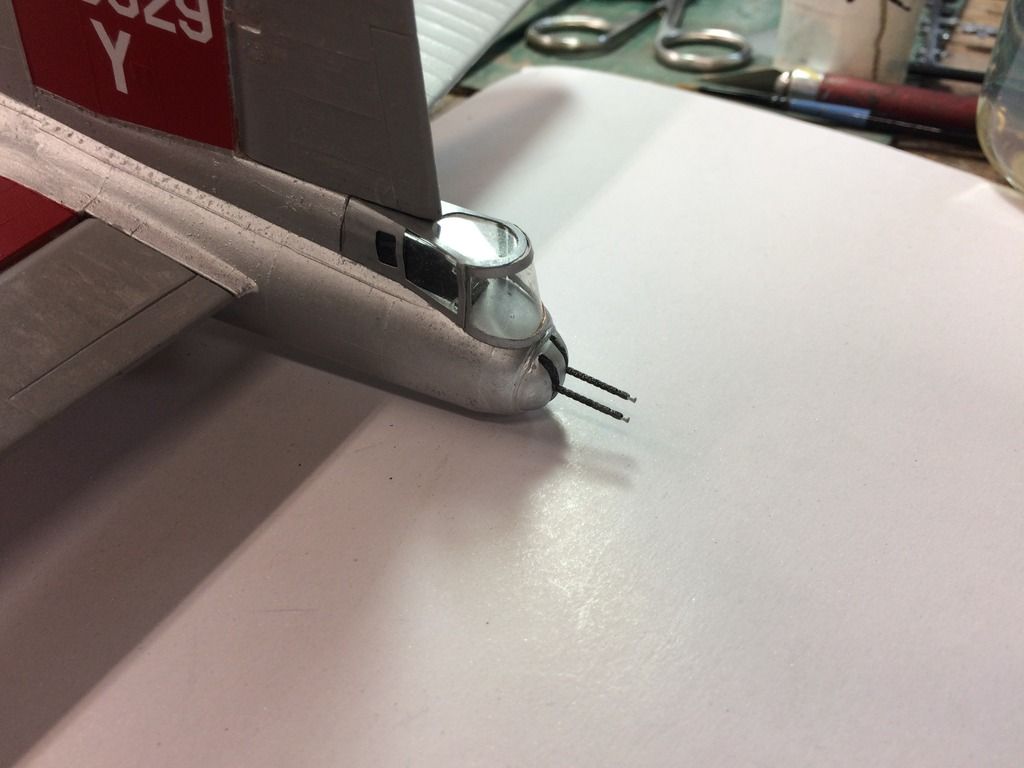
After putting the guns back on, which entailed more micro-drilling and guitar string, I wanted to paint the muzzles with Tamiya Chrome, which then leads to the second calamity.

I thought the lid was screwed on, but when I picked it up, the bottle part flew off, flung chrome silver paint all over the floor and even a drop landed right on the red surface of the horizontal stab. Of course it landed on the red. It couldn't have landed on the entire silver-colored plane. Nope! Murphy's corroletion is still true, "Any tool (or bottle of paint) dropped will always do the maximum amount of damage."

I cleaned up that mess and touched up the stab. Then I proceeded to break off the bombardier and waist gunner gun barrels on the port side. These very fragile resin barrels are ridiculous. They have no give. If you touch them, they will break. Again, I re-drilled the barrels and breaches and, with more E Guitar string, CA'd them back again.

The Aleen's mask removal went well except for two windows. A true liquid mask might be better if you have it.

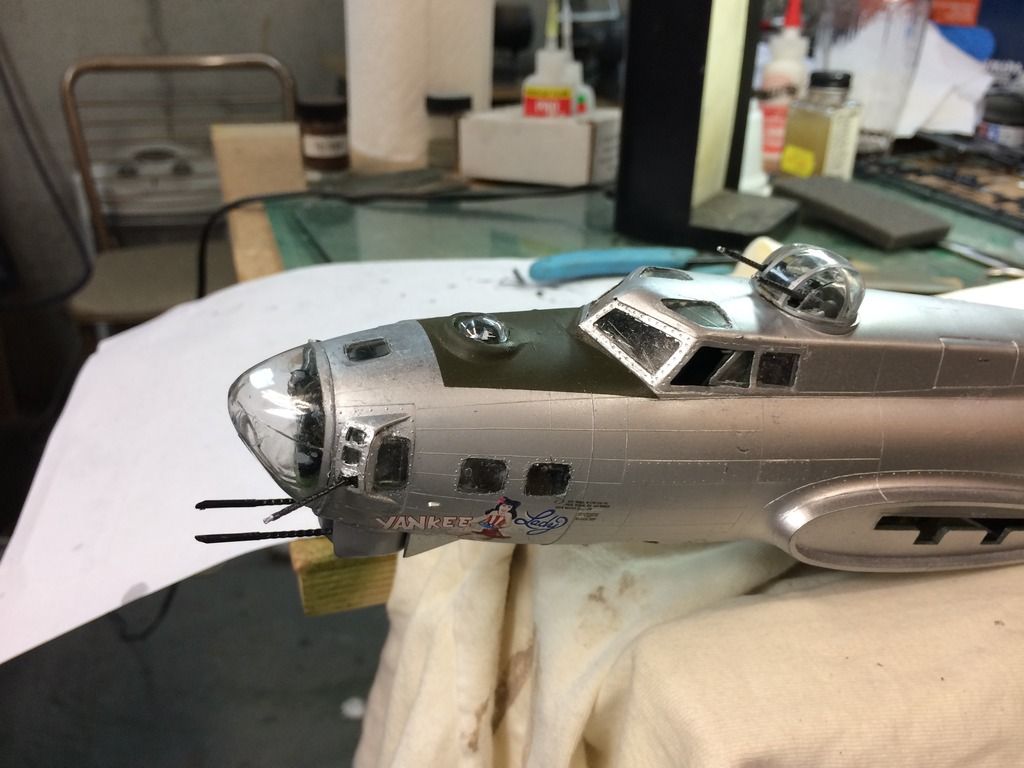
This pic shows the nose dome on. In the process of applying liquid cement, I didn't realize that some had already run out onto my fingers until upon trying to remove them found a huge glue thumb print on the bottom quadrant. Another calamity!

I wet sanded it out and then gave it some Pledge (with Future) acrylic and it's less noticeable. Still there... just less noticeable. I'm not having much luck with clear parts on this model.

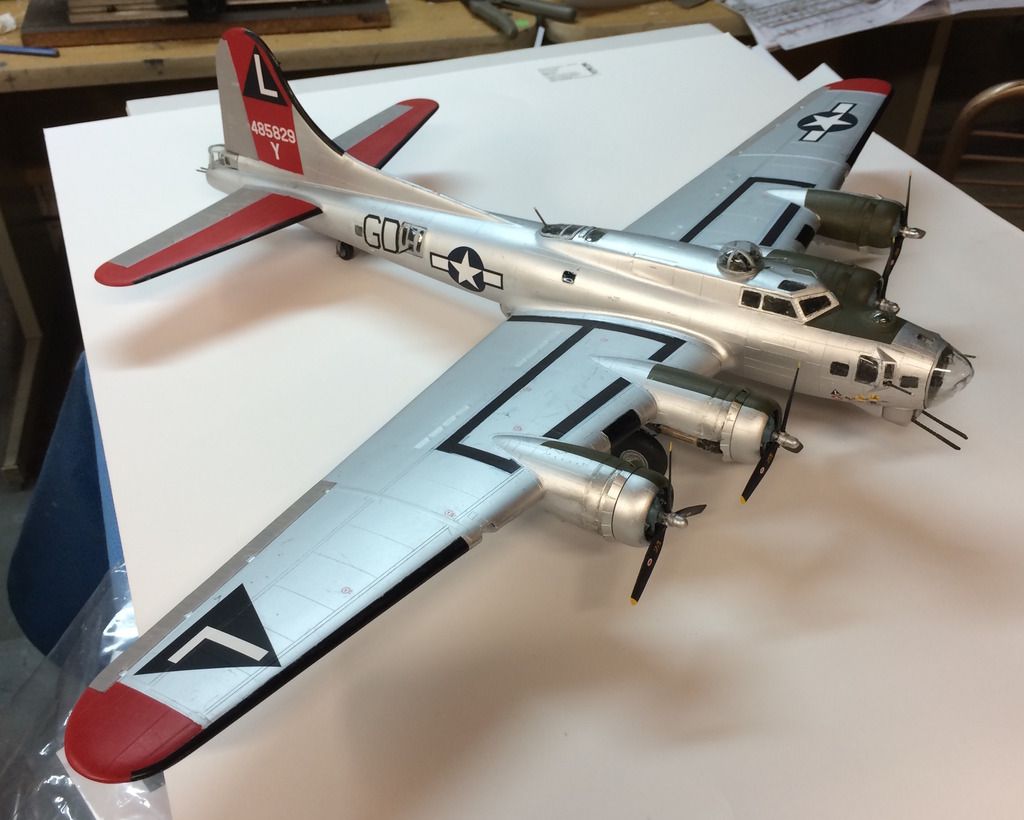
Time to install the wings. You do not need to glue them. It's a lock joint. With the wings on I felt confident enough to install the bomb bay doors and the forward crew door. They actually went on easily.

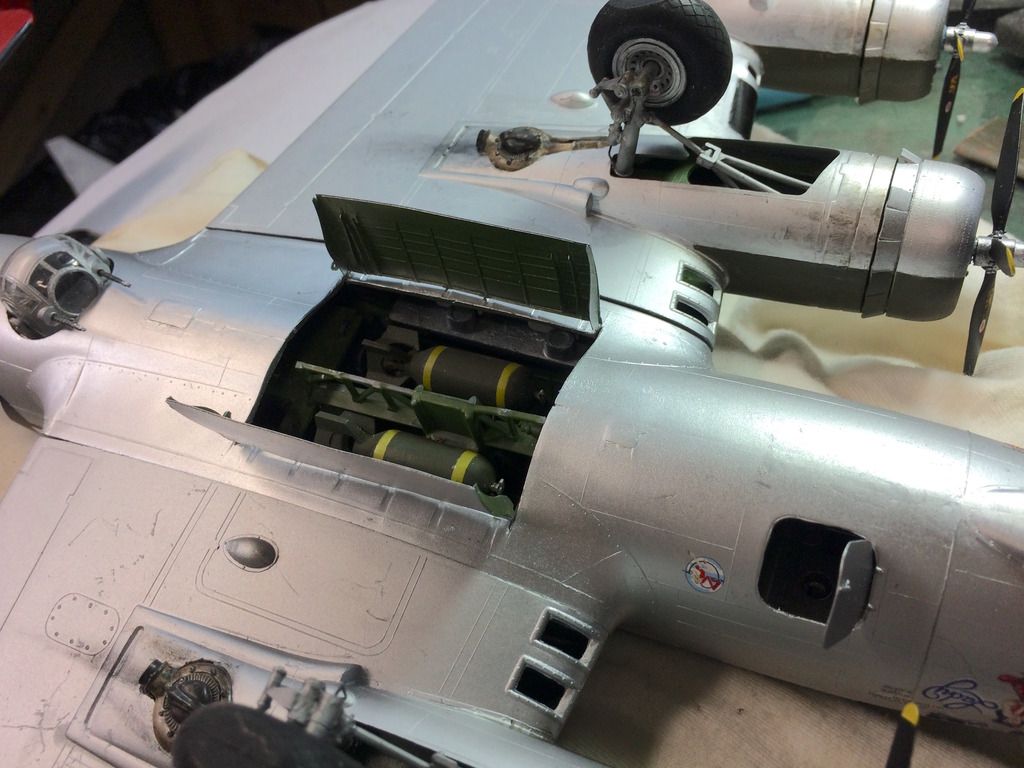
The PE here really works giving the sheet metal look to both surfaces. Lastly, I put on the wheels (although not yet glued) and got the weight spot in the right position, and put the plane on a flat surface to take some "almost complete" pictures. I say, "almost" since I still have to put on the landing light lenses. And then I just touched that port-side  waist gun barrel, and BANG! It broke again. I'm running out of patience. And more imprortantly, running out of gun barrel. I have no more resin barrels other than this stub. I may, heaven forbid, have to use one of the plastic barrels. They may not be scale, but they're styrene and bend a bit before breaking. I will now have to do that repair tomorrow along with the landing lights.

So here are some "almost finished" pics shot with the iPhone. When finished tomorrow, I will take it with Canon EOS and do depth-of-field work on it.

There still some work to do around that ill-fitting nose dome that this picture really shows up.

SO... now that we're heading back East on Friday instead of tomorrow, I will definitely be able to finish it. That is if I don't break anything else.

  • Member since
    March 2015
  • From: Streetsboro, Ohio
Posted by Toshi on Wednesday, October 19, 2016 6:43 AM

I gloss coated my B-17 with a Testors rattle can.  Half of it was visible, it really came out nice!

Toshi

On The Bench: Revell 1/48 B-25 Mitchell


Married to the most caring, loving, understanding, and beautiful wife in the world.  Mrs. Toshi


  • Member since
    March 2012
  • From: Louisville, KY
Posted by Builder 2010 on Tuesday, October 18, 2016 6:04 PM

Thanks! I enjoy posting it too.

Progress is coming fast and furious. I painted the turbos today. I started with a base coat of Tamiya Boat Deck Tan which closely resembled the basic red/tan color of the real ones. After drying I painted the dark parts Tamiya Burnt Iron. The central turbo area was painted straight Burnt Iron and the rest was dry-brushed at various levels to also resemble the discoloration due to heat. I then went back and painted the bolts and clamps flat black. The end result works for me.

The final step will be to apply some exhaust plume eminating from the waste gate. I was thinking about airbrushing the flat black, but may just use Dr. Brown's weathering powders, since it's easier to control. Not shown in this pic was the Tamiya Smoke that I used to discolor the first nacelle ring behind the cowl flats. I also dry-brushed some smoke trailing off the sides of the turbo which I've seen on prototype images. The main exhaust stain will be directly behind.

I then finished up all the machine gun mounts that go into the radio room window and waist gun position. I also rebuilt the broken barrels on both bombardier position guns. One is in place now (probably ready to be broken again) and the other is waiting until the mask comes off the nose.

I then officially started the decal process. We've moved our travel date out one day which gives me one more shop day and almost assures that I will finish on time. The Kits decals are very nice and went on well. Here's the tail on one side. I have to wait until the decals fully cure so I could do the right side.

And then I officially christened this ship, "Yankee Lady" with the nose decals on the left side being installed.

Having the prototype picture showing this graphic in detail really helped in getting it placed properly. I wish this model had recessed panel lines. It would have made it much easier to clean up. Notice that the nose turret has a different finish that the plane in general. I used Tamiya Bare Metal spray for this. I also changed the tone on the Cheyene tail turret.

Wings were next. Again, top side first until the decals dry and then I'll do the bottom. 

Notice that my wing walk decal is not finished in this picture. That's because I ran into trouble with them. Even though I over-coated them with Tamiya Clear Lacquer, it wasn't sufficient to prevent water from causing the inkjet water-soluble ink to bleed. Bleed? Heck, it really got gross.

The long stripes did get on, but the surface is questionable. After this I stopped putting them on and went to Plan B. Plan B was to coat the existing decals with Microsol Liquid Decal Film. I'll give this a try tomorrow. Part of the problem was that I didn't leave enough margin between images. The edges are too narrow and let the water to creep in under the over-coating. Hopefully the Microsol will provide stronger protection. If this doesn't work, I'll re-draw the set and leave more space around the edges. If that doesn't work, I'll mask and paint, but I dread to do that since I'll have to deal with more aluminum paint drama. I'm not looking forward to that.

The idea is still a good one, but the decal film may be sub-par. I'm optimistic that I'll figure it out. I believe in "Test Pilot Problem Solving". You're in a dive and you try A, B, C, D, E, F, G, etc. until you solve the problem or make a hole in the ground. Like I said a while ago, "I am not a patient man, put I am very, very persistent!"

Need some guidance here: After decaling I was going to Dullcoat the model, but that would effectively kill the shine on the metal finish. Otherwise, I could gloss coat the whole deal, but would that work? What do others do with bare metal surfaced aircraft?

  • Member since
    May 2013
  • From: Indiana, USA
Posted by Greg on Tuesday, October 18, 2016 12:24 PM

This is a fun WIP, enjoying following along.

And, btw, another vote for Perfect Plastic Putty here.

  • Member since
    March 2012
  • From: Louisville, KY
Posted by Builder 2010 on Tuesday, October 18, 2016 9:10 AM

I agree, and here's why. I got to go back downstairs again last night and got the de-icing boots done. This enabled me to go back down this morning and shoot some clear coat on the tail and tips so decals can be applied sooner.

Once again, the tape pulled its share of paint off the surface requiring a bunch of re-touching, but I got it all done.

Now, I'm sitting here having coffee and watching political television. In a bit, I'll go down to work and get more done.

  • Member since
    March 2015
  • From: Streetsboro, Ohio
Posted by Toshi on Tuesday, October 18, 2016 6:31 AM

Yes, you can do it in two days!  Go for it!

Toshi

On The Bench: Revell 1/48 B-25 Mitchell


Married to the most caring, loving, understanding, and beautiful wife in the world.  Mrs. Toshi


  • Member since
    March 2012
  • From: Louisville, KY
Posted by Builder 2010 on Monday, October 17, 2016 6:47 PM

You're welcome. We learn from each other.

I just realize yesterday, that if I want to deliver this plane to my commissioner and we're leaving on Thursday, I only have 3 days to finish it. So today I put the pedal to the metal and got into more finishing steps.

First up was fixing those slightly inaccurate nacelle anti-glare panels. The inner ones needed to go further over the top and both had to go around the bottom more. I didn't want to airbrush since this involves a whole lot more masking, so I just masked the lines and brush painted it. I had a lot of leakage due to the non-stickiness of that Vallejo silver paint.

I was worried that the alcohol-based silver would dissolve the alcohol-based Tamiya and not give me a good cover, so I first brushed on some Testor's Dullcoat lacquer to act as a barrier and then hand painted the silver. After a back and forth between silver and O.D. I got a nice clean line.

Next was painting the fabric-covered control surfaces a light Tamiya Sky Gray. In looking at the photos of the Yankee Lady I saw a different color and clearly not metalic. Again, I masked the line and brush painted it. Again, that silver paint caused some problems and I had to do a lot of touch up. Frankly, I wouldn't recommend the Vallejo Liquid Metal paint. It is much too perishable and I'm not the gentlist worker so I'm having to fix it all the time. Tamiya silver holds up better and dries harder.

I started masking for the red wing tips and all those red tail feathers. I got the wing tips masked, but then had to take #2 grandson to a piano lesson. Since my time is so compressed I asked for and got special dispensation to work for an hour in the basement after dinner. 

The 3M blue tape is too agressive for the Vallejo paint and, as you'll see, pulled a lot of silver off in the de-masking process. So I was able to airbrush the red trim too.

In these two pictures you can see the difference in texture painting the control surfaces flat gray makes to the appearance. I used Tamiya flat red for these panels.

Here's the completed nacelles. The paints have different sheens, but it doesn't matter since there's going to be another clear gloss coat of Future (or Tamiya gloss), decalling, and then a flat clear, so any difference in gloss will be negated.

The only problem with using the Pledge Floor Finish (with Future) is its ridiculously slow drying time. It really takes a full 24 hours or more, and I don't have that luxury. On the other hand, the Tamiya gloss dries very fast. I have to mask and hand-paint the de-icing boots and then hand paint the exhaust headers and turbos. I need to rig the radio antennas with E-Z Line, and then there's a raft of decals to go on. Can I do this all in two days... hmmmm?

  • Member since
    March 2015
  • From: Streetsboro, Ohio
Posted by Toshi on Sunday, October 16, 2016 7:59 PM

Thank you for sharing the technical information in regards to the appropriation of the decal film.  It's very precise and I've never heard nor seen anything like this before.  WOW!

Toshi

On The Bench: Revell 1/48 B-25 Mitchell


Married to the most caring, loving, understanding, and beautiful wife in the world.  Mrs. Toshi


  • Member since
    March 2012
  • From: Louisville, KY
Posted by Builder 2010 on Sunday, October 16, 2016 5:45 PM

Thanks Toshi... I'm a big admirer of your work also.

Today is a rare Sunday input since I have a deal with my wife that no model or train work goes on during the weekend.

After figuring that the wing walk stripes are 12" scale, I decided the best approach would be to make decals of them. I have both clear and white-backed inkjet decal film, so I decided to lay them out and make them myself rather than masking and painting them. Here's the process

  1. Took an overhead picture of the wing and noted the overall length and width (11 13/16" X 4 3/4"
  2. I imported (placed) the image into Adobe Illustrator and after carefully aligning it square with the art board's edge, I put it on the bottom layer of the drawing and locked it.
  3. I added another layer and on it drew an un-filled rectangle with the same dimensions as the wing.
  4. I stretched the wing picture equally in both directions (in Illustrator holding the shift key while pulling a corner) and once it matched the rectangle I drew, I locked the imported image's layer. I now knew that the screen image size was the same as the model's wing.
  5. Using the actual plane's picture showing the stripes, I drew the 1/4" wide stripes to match the picture.

  6. I cut up this images (Digitally) so I would have several inter-connecting pieces and then copied and pasted them to another art board on the screen. I laid them out logically and labeled them as to left or right wing. To make the right wing's decals I mirrored the left design.

  7. I took a test print and found that some of the stripes were not perfectly horizontal leading to the edges having some very slight stair steps. To align them, I laid down guidelines that were in perfect contact with one corner, and then rotated the other corner to coincide with the guide lines. I then duplicated the entire array so I'd have two sets in case I screw a decal up.
  8. After printing out the decals, I gave them a clear coat of Tamiya clear lacquer since inkjet ink is water soluble. It would all wash off in the decal soaking water. 

  9. I know from experience, that this brand of inkjet decal film can't handle Solvaset decal setting solution. It works okay with Microsol. 

Tomorrow, I touch up the aluminum, fix the anti-glare panel shape on the wings, and then clear coat the silver before getting into painting the red panels and decaling including these newly created stripes.

  • Member since
    March 2015
  • From: Streetsboro, Ohio
Posted by Toshi on Saturday, October 15, 2016 7:45 PM

Everything is coming together very nicely!  I'm excited in not only following your progress but also awaiting the finished product.  Great job!

Toshi

On The Bench: Revell 1/48 B-25 Mitchell


Married to the most caring, loving, understanding, and beautiful wife in the world.  Mrs. Toshi


  • Member since
    March 2012
  • From: Louisville, KY
Posted by Builder 2010 on Saturday, October 15, 2016 12:31 PM
Thank you and nice work! I will look into that putty. The seams took an entire 4 hour session to do, and now that the aluminum is on, I see spots that could have had more. I should have used the Tamiya primer first, but it's solvent-based which means I would have to do it outside since I don't have a spray booth (yet). I really think I should invest in a booth if I want to continue doing major spraying projects and use solvent-based paints. I can get away of a couple shots with the spray cans as long as it doesn't fog up the basement (and then smells upstairs). Incidentally, I used the Flex-I-File with a medium grit band, but then I keep it wet. Without wetting, it plugs with filler very quickly and stops working. It's especially useful for sanding around the curves without developing flat spots. With the fragility of the Vallejo paint I'm thinking that I need to seal it before doing any other painting. I have all that red, the separate coloring of the fabric-covered flight surfaces, the de-icing boots, and then decaling and weathering to do, and with the paint as it is, it will be a mess before I'm finished. I'm not sure if I want to use Dullcoat or Tamiya Clear Lacquer. The Tamiya paint works very well.
  • Member since
    December 2010
  • From: Salem, Oregon
Posted by 1943Mike on Saturday, October 15, 2016 11:42 AM

Builder 2010:

Your work on this model is extraordinary. I wish I had the instincts for proceedure (instructions are just a guide AFAIC) and ability to build as you do.

Might I suggest trying PPP (Perfect Plastic Putty) if you haven't already. I find it lives up to its moniker. I love to be able to use a damp Q-tip to wipe away the excess and I really appreciate that it does not shrink - at least I've not noticed it doing so. I love the stuff.

Mike

"Le temps est un grand maître, mais malheureusement, il tue tous ses élèves."

Hector Berlioz

  • Member since
    March 2015
  • From: Close to Chicago
Posted by JohnnyK on Saturday, October 15, 2016 11:14 AM

You are correct about the vents in the wings behind the engines. Air would enter the wings through openings in the leading edge of the wings. The air would flow over the intercoolers and oil coolers and exit through the vents behind the engines. Very little, if  any, leaking oil would exit through the vents, just clean air.


I have been using Tamya Smoke for a while. I weathered the entire B-17 with Smoke. There are a couple of tricks when using it. Since it is an acrylic, it drys really fast and it cannot be removed when it is dry. I first wet the model with water then apply very thin coats of Smoke. Almost like dry brushing. A little goes a long way. You can always add more. I wish that I had done a better job of filling that long joint running the length of the body.

Your comments and questions are always welcome.

  • Member since
    March 2012
  • From: Louisville, KY
Posted by Builder 2010 on Saturday, October 15, 2016 9:35 AM

Anyone know how wide those black stripes on the wings are? I'm estimating 12", but I'd like a more definitive answer if someone has it.

Well... I think I figured it out. After taking the overhead image into Adobe Illustrator and finding out that the wing chord at the root was 19 feet, I measured the wing and the stripe in Illustrator and figured out the ratio between the two and it comes out to something over 11", so figuring the strips are 1 foot is a good estimate (1/4" in 1:48) and I'm going to go that route. I'm going to spray black on decal film and then cut my own decal stripes to apply to the wings.

  • Member since
    March 2012
  • From: Louisville, KY
Posted by Builder 2010 on Friday, October 14, 2016 6:05 PM

Today was the first painting day! So far, the Aleen's is holding up in its masking duties. First up today was stuffing the engine cowls with wet facial tissue and then CA'ing them to the wings. I was contemplating painting them off the model, but quickly disabused myself of that idea since the anti-glare needs to line up.

After wiping the whole deal with a paper towel with alcohol, I started painting the Vallejo Natural Metal. My only complaint about this paint is it's very fragile. As I was handling the model for further masking, I was damaging the already painted areas. But it looks really good.

After the paint set up, I sprayed the areas to be painted olive drab with Dullcoat to protect the paint a bit when masking. I masked all the anti-glare areas including the upper nose, and the interior upper facing nacelles. After looking at some pictures of the actual Yankee Lady I still need to add a bit more O.D. surface. The kit's instructions show this going around 180°. I was only bringing it around the midline. It actually goes around the nacelle until its tangent to the lower lip of the leading edge. I'll add that bit tomorrow.

Narrow Tamiya tape was used first followed by 3M Blue and packing paper.

I airbrushed all the parts and pulled the tape. I found one little spot that I missed. I'm going to have to shoot some more silver to touch up some damage so I can pick that spot up.

The nose painting came out nicely.

Here's an example of the fragility of thise paint. Some was pulled off the cowl. I'm hoping that after coating with Pledge acrylic that it will toughen it up. I'm going to do this before decaling and any weathering.

So here are all the parts ready for the next step. 

Regarding weathering. The Yankee Lady is an exhibition aircraft and is very clean. In looking at pictures, I see some slight exhaust streaks coming from the waste gate and around the edges of the turbo compartment. On the wing tops you can see here that there is very little staining of any kind. A lot B-17 builders like to streak from those four little slots behind the engine nacelles on the wing tops. All that comes out of them is air. They are air exits from the turbo intercoolers. Unless there was some kind of leak in the wing, normally fumes or oil shouldn't be passing out of them. The other area needing some discoloration is the skin immediatly behind the cowl flaps. I just bought some Tamiya Clear Smoke just for this application.

There's some more paining needed. The tail (minus the rudder) and wing tips (minus the Aileron) are inisgnia red. There are wide demarcation strips on the wings. For the strips, I'm going to paint some decal film and then apply that to the model.

  • Member since
    August 2016
Posted by Keyda81 on Thursday, October 13, 2016 10:07 PM

I'll have to give the Aileen's a try.  I used what I could find in a pinch, and it worked.  I didn't feel like running to the store yet again.  Seems I always need something, lol. 

  • Member since
    March 2012
  • From: Louisville, KY
Posted by Builder 2010 on Thursday, October 13, 2016 9:49 PM

Thank you! Like most work in progress projects, they look really bad until they suddenly look very good. I'm excited about starting the painting process. The end is in sight.

Elmer's and Aleen's are basically the same compound. Aleen's is more tacky so it's easier to control (IMHO) when smeering it around on the windows. It's also easier to remove any errant stuff where you don't want it.

JOIN OUR COMMUNITY!

Our community is FREE to join. To participate you must either login or register for an account.

SEARCH FORUMS
FREE NEWSLETTER
By signing up you may also receive reader surveys and occasional special offers. We do not sell, rent or trade our email lists. View our Privacy Policy.