SEARCH FINESCALE.COM

Enter keywords or a search phrase below:

Fujimi A-7D

3931 views
59 replies
1 rating 2 rating 3 rating 4 rating 5 rating
  • Member since
    March 2012
  • From: Corpus Christi, Tx
Posted by mustang1989 on Wednesday, September 21, 2016 9:11 AM

Looks like you're off to a good start here TB and that's a great lookin' 190 BTW!!!


 Forum | Modelers Social Club Forum (proboards.com) 

  • Member since
    November 2003
  • From: Naples, FL
Posted by tempestjohnny on Wednesday, September 21, 2016 4:01 PM
My mistake thought you were talking about the 1/72 scale 190. I have the 48th Ta152 in the,stash


  • Member since
    April 2005
Posted by Thunderbolt379 on Wednesday, September 21, 2016 7:05 PM

Hi guys,

Many thanks for the kind words on the 190 (and that's a beauty, Fermis, looking very "used" in that finish, a skill I've not yet mastered, though I may be starting to get over my fixation with satin lustre, my last Spitfire was toned way down!)

Thanks for the run-down on the HB kits -- the surgery to correct the intake is both inventive and clever, and I'd say way more work than I pesonally am up for. I'm astonished Quickboost hasn't produced a quickfix part, a one- or two-piece resin sucker that is just right -- I might drop them a line and suggest it! Old as they are, I might stick with Fujimi, I have ten in my stash at this time (must get some more!)

The photos are very nice! May I ask how you accented the panel lines on the Fujimi -D? My experience with their engraving so far is that it is too shallow to hold a wash, it simply wipes away completely at the clean-up point.

Mustang -- rhanks!

TJ -- no worries!

My agenda for today is to unmask and clean up the contact areas and mate up the intake, dress the joints and get a few of the small airframe detail parts installed, then make a call on whether to paint the wings off the bird, given the precision with which they butt up to the fuselage -- it looks like a lot of masking and handling can be avoided at cost of a hairline gap on the underside which will be behind the drop tanks anyway...

Cheers, Mike/TB379

http://worldinminiature.blogspot.com/

  • Member since
    January 2009
  • From: hamburg michigan
Posted by fermis on Thursday, September 22, 2016 4:09 AM

Thunderbolt379


Thanks for the run-down on the HB kits -- the surgery to correct the intake is both inventive and clever, and I'd say way more work than I pesonally am up for. I'm astonished Quickboost hasn't produced a quickfix part, a one- or two-piece resin sucker that is just right -- I might drop them a line and suggest it! Old as they are, I might stick with Fujimi, I have ten in my stash at this time (must get some more!)

The photos are very nice! May I ask how you accented the panel lines on the Fujimi -D? My experience with their engraving so far is that it is too shallow to hold a wash, it simply wipes away completely at the clean-up point.


I scribed the panel lines a little deeper (with a sewing needle in a pin vise), I also used a rivet wheel to add the rivet detail. In addition to pre-shading, I used a home made wash on the panel lines and rivets.

10 Fujimi A-7's???Surprise Color me jealous! The one I got is the only one I have ever seen on a vendor table (Testors boxing)...can't recall ever seeing one in a store either. Sure I could find em on ebay, but don't like messin with it.

My "fix" was actually an attempt at making a correction set(inspired by Zacto Models set for Trumpeters 1/32 A-7). I have to admit, I had zero experience with making molds and pouring resin....thus, it was a misserable failure!

On that Fujimi/Testors kit, I used an Aires (IIRC) cockpit set. I had bought it for the H/B kit, as it was marked as being for the H/B kit....but the instruction clearly showed the Fujimi kit in the drawing of the fuselage part. It was a near perfect fit. It would have taken a LOT of grinding/sanding and test fitting to make it fit the H/B kit.

The pit to the left is the resin set. The one to the right was for the Italeri kit...which used an old PE set, resin seat, and some scratch work.

Here, you can see what the kit gives you vs. what I scratched...


  • Member since
    April 2005
Posted by Thunderbolt379 on Thursday, September 22, 2016 8:07 AM

Fermis -- yep, ten, frankly I thought I had more! I've been buying from eBay since '04 and can't say I've ever had a problem. I had a quick count up today and I think I'll probably need about another ten to get round all the variants, schemes and markings I want to do. I foresee production-lining pairs at times, say two -Es, identically prepared until it comes to the decals.

Ah, the good old sewing needle! Yes indeed, an excellent and simple method -- I must do more with it. My pin vices are jammed at the moment, one has had the same drill bit in it for about five years, the other won't budge at all... :-( Must get some new ones!

The resin cockpits look good... I must have a go at one and do the canopy up one of these days. I was considering maybe a resin seat this time round, there's one from TD and another from Pavla, I think, either of which I may be able to source locally.

Today's progress: I got the intake into place and worked on the seam by adzing down the plastic standing proud of the main surface, then filling. For the long, narrow seam each side I haven't yet decided whether to use a lick of filler or a bead of white glue. I also fitted three small parts at the tail.

Tomorrow's agenda -- complete those seams, fit the refuelling probe, possibly one or two other small fuselage fittings, possibly get an order off for a seat, and start masking for main paint. I think I'll do the wings and tails separate, which will be a whole new experience.

Cheers, Mike/TB379

http://worldinminiature.blogspot.com/

  • Member since
    August 2005
  • From: Sydney, Australia
Posted by Phil_H on Thursday, September 22, 2016 8:15 AM

She's coming along nicely.

Thunderbolt379
For the long, narrow seam each side I haven't yet decided whether to use a lick of filler or a bead of white glue.

If you can get it, brush on a bead of Tamiya Liquid Surface Primer. Let it dry & wipe it down with a folded paper towel moistened with metho. It may need a few swipes to smooth it down, but no sanding, nice and easy Smile

  • Member since
    April 2005
Posted by Thunderbolt379 on Friday, September 23, 2016 7:58 AM

Thanks for the tip, Phil -- I've not heard of that one before. In the end I opted for the old standby of putty thinned with liquid cement and applied by brush, this seemed to work well; a couple of minor touch-up applications were needed, and everything was rubbed down with fine wet-or-dry and plenty of water. Here's the result:

The refuelling probe was fitted with a bit of finagling. As this was originally meant to be a -D, I of course did not open the holes from the inside, and I located them by drilling them out on a fresh -A kit for comparison, then marking the positions on the current project with a pen, simply eye-matched, and drilling them out. I was surprisingly accurate, as it happens.

There are a few more small parts to go and I'm thinking of completing the masking of all gear bay door attachment points before fitting them, to minimise potential damage during handling. Masking is underway with green liquid mask introduced to all drilled holes and the mounting slots for the surfaces. I've decided to paint them off the fuselage, this will be a whole new experience.

Target for tomorrow is to complete that masking and add the few small parts, which will bring me along closer to painting. I've inquired about some resin seats locally but I think I may go ahead and use the fairly poor kit seat on this one as the mounting lug for it in the cockpit should have been removed if a substitute was to be used, and it would be very difficult doing so at this point.

Thanks for looking!

Mike

http://worldinminiature.blogspot.com/

  • Member since
    April 2005
Posted by Thunderbolt379 on Sunday, September 25, 2016 2:58 AM

Hi folks, I was out and about yesterday and didn't work on the A-7, but I'm doing a bit today, presently applying the Eduard mask set for wheels and windscreen in prep for applying the black. I'll also paint the kit seat -- it'll be weeks before I can get some resins and I want this bird in the display case before then.

I'm leaning toward rescribing also, at least making the engraved lines more definite. My pin vice is jammed, the chuck is probably never going to move again, so I've ordered up a new one which should be here during the week. No photos in this update, my next task is to get the masks finished and apply the black -- which will probably be in the morning. Then I can finish the seat with brushwork, possibly make up some tape harness strips for completeness, and install it, add the main canopy over it and get those masks into place. Maybe by then I can firm up the panel lines, then it'll be over to last masking and on with the preshade.

Cheers, Mike/TB379

http://worldinminiature.blogspot.com/

  • Member since
    January 2009
  • From: hamburg michigan
Posted by fermis on Sunday, September 25, 2016 2:34 PM

Looks like you got a way better fit out of that intake than I did.

NICE


MOOOOORE!!!

  • Member since
    April 2005
Posted by Thunderbolt379 on Saturday, October 8, 2016 7:04 AM
It's been a while, guys, I've been mega busy (written over 30, 000 words since we last spoke!) but I finally did a bit on the A-7 today. I finally sprayed the black for the tires, AG panel, windscreen and canopy interior. Not a lot, but positive progress. Hopefully I'll move her along now and have some progress to show. The new pinvice arrived and now has a needle fitted for panel line enhancement, though it's very fiddly and I have an aversion to scratching up the bird and making extra work! Cheers, TB379

http://worldinminiature.blogspot.com/

  • Member since
    January 2009
  • From: hamburg michigan
Posted by fermis on Saturday, October 8, 2016 3:01 PM

YAYYYY!!!!

For scribing...drag the needle along the existing line...VERY lightly, a couple times...then add just a little pressure with each next pass. God knows...I've botched a few lines by adding too much pressure too soon!

  • Member since
    April 2005
Posted by Thunderbolt379 on Saturday, October 8, 2016 5:51 PM
Thanks, Fermis -- that's what I'm trying to do, but it jumped out of the groove a couple of times. I'll have another go today but I'll nat belabour the exercise. If I get a few bits of tape for harness onto the seat I can mount it, then add the canopy, mask the open front end, mask the AG panel, and I'm getting close to paint! TB379

http://worldinminiature.blogspot.com/

  • Member since
    April 2005
Posted by Thunderbolt379 on Thursday, October 13, 2016 7:47 AM

Right, I finally managed to do a bit more. Here's the seat finished and installed, with the AG panel and canopy framing masked and sprayed in interior black. The exhaust is also masked.

Next, mask for all pylons, attach the canopy and mask the open end, mask over the AG panel, then she's about ready for the grey and white...

M/TB379

Tags: Fujimi , 1:72 , A-7A

http://worldinminiature.blogspot.com/

  • Member since
    April 2005
Posted by Thunderbolt379 on Saturday, December 17, 2016 12:18 AM

Hi guys! Appologies for the two month hiatus... I did do some more work but never got around to posting it. The underside white went on and masking got under way, then I noticed the subject I was meaning to do had a decal crossing the area I had already installed the missile rail, and I had to grudgingly change to a different set of markings. Then... A friend coming to stay for a few weeks kinda interrupted the swing of things, then I got deeply into another area of creativity altogether (writing) and today was my first time back on the bench.

The alternate scheme has a white fin cap, so it was back to the AB... I also took the opportunity to lay down some white on parts for another Fujimi A-7 while it was in the jar. Now, I'll get back to masking tomorrow and hopefully be ready to apply some gray before very long.

Cheers, Mike/TB379

http://worldinminiature.blogspot.com/

  • Member since
    January 2009
  • From: hamburg michigan
Posted by fermis on Saturday, December 17, 2016 3:23 AM

YesYes

  • Member since
    April 2005
Posted by Thunderbolt379 on Monday, December 19, 2016 12:54 AM

Hi guys,

A couple of photos from some time back didn't get uploaded. Here's a look at the canopy masked open for the gull grey surround, while the windscreen is kept separate (in black), and the instrument coaming is sprayed black and protected with liquid mask:

Next, here's the white control surfaces outlined with strips of Tamiya tape:

And the most recent work, masking to recieve the gull grey -- she's a shaggy dog now!

The canopy simply fell off during handling, so will get reattached, then I'm pretty sure it's time to apply the grey. Then unmask, touch up as necessary, clear coat, and it's into the finshing process...

Cheers, M/TB379

http://worldinminiature.blogspot.com/

  • Member since
    April 2005
Posted by Thunderbolt379 on Tuesday, December 20, 2016 2:11 AM

Okay, grey is on! I used MM Acryl Flat Gull Grey and it laid down very nicely. It can harden off overnight, and tomorrow I'll do the unmasking, touchups and hopefully lay down a clearcoat to protect everything for the finishing to come. The fit of the canopy is very poor, this became aparent the moment grey oversprayed the interior black...

Mike/TB379

http://worldinminiature.blogspot.com/

  • Member since
    April 2005
Posted by Thunderbolt379 on Wednesday, December 21, 2016 1:01 AM

Today's progress -- unmasking complete, touchups done, clearcoat applied, panel wash applied, resealed with clear... I think that's enough for today, and tomorrow I'm onto decals.

That's the state of play, plus the panel lines on the weapons pylons are also done. I think I can see the home stretch now, hopefully by the weekend I'll be calling her done.

Cheers, M/TB379

http://worldinminiature.blogspot.com/

  • Member since
    January 2009
  • From: hamburg michigan
Posted by fermis on Wednesday, December 21, 2016 11:00 AM

This puts a smile on my face!

YesYes

  • Member since
    April 2005
Posted by Thunderbolt379 on Wednesday, December 21, 2016 5:32 PM

Thanks, Fermis!

Well, decals next. I notice vintage Superscale are not very forthcoming in the placement guide for their stencil data, nor size-wise for the insignia and service titles to be taken from generic sheets. I've had a look online to see if a guide was available but decided the easiest way was to use the guide from a more up to date release. To that end I ordered a Print Scale sheet which includes full stencil data and a comprehensive placement guide, the object being to match the items to the Superscale selection and proceed accordingly. I'm hoping it'll be delivered Friday -- if not, it'll be the other side of Christmas for applying the stencils and insignia, though I can proceed with the squadron markings in the meantime.

Cheers, Mike/TB379

http://worldinminiature.blogspot.com/

  • Member since
    April 2005
Posted by Thunderbolt379 on Thursday, December 22, 2016 12:45 AM

Okay, here's the work on decals so far. It's interesting to discover the vintage Superscales are not as precise on the model as they look on the sheet, nor their research fully accurate -- the "Lobo" decals are white on their sheet but black on a photo of the real aircraft. I'm considering using the black decal from a Fujimi kit featuring the same scheme -- if it's no good I can fall back on the Superscale and accept the colour inaccuracy.

Until I began the decals I was concerned the shade of grey wasn't quite right, too warm, but now it looks pretty good to my eye.

The question now is whether to stay with the satin I love so much or go to a flat finish, as the research photo of the real plane shows a very dull finish by May, 1977...

The real plane also does not seem to have any stencil data other than the rescue flashes -- which probably obviates going to the expense of that sheet I ordered this morning. Hey ho, it's a terrific selection which I'm sure will get a workout as I build through the old Fujimis in the stash...

Mike/TB379

http://worldinminiature.blogspot.com/

  • Member since
    December 2002
  • From: Northern California
Posted by jeaton01 on Thursday, December 22, 2016 1:03 AM

Looking real good!

John

To see build logs for my models:  http://goldeneramodel.com/mymodels/mymodels.html


  • Member since
    August 2013
Posted by Jay Jay on Thursday, December 22, 2016 9:28 AM

Man that's a great looking crusader, everythng is so precise. A wonderful inspiration and ty for sharing.


 I'm finally retired. Now time I got, money I don't.

  • Member since
    April 2005
Posted by Thunderbolt379 on Friday, December 23, 2016 12:15 AM

Thanks, John and Jay! It's been a lot of fun doing the decals, here's today's work:

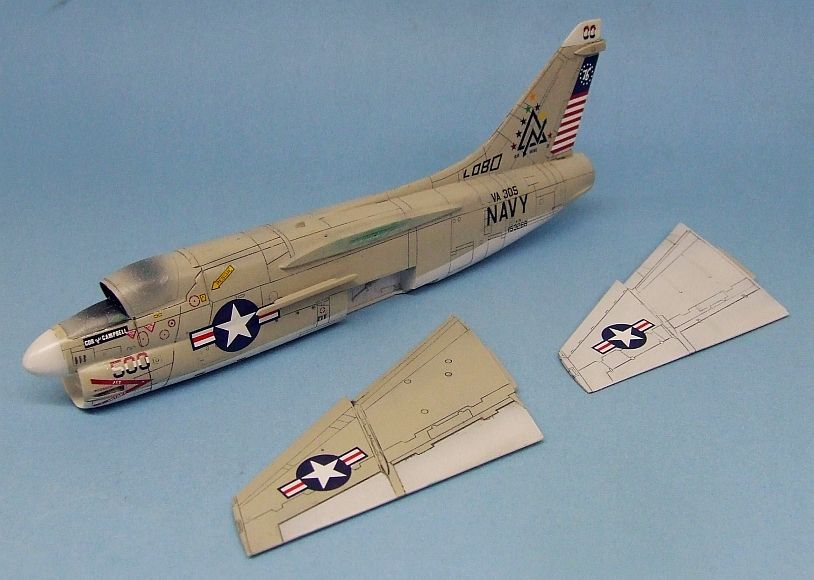
This particular aircraft did not seem to be carrying stencil data. I've found a couple of photos of the real bird and with the exception of the rescue flashes, intake warnings and such, there's no stencil data on her. That means I'm about done right now! I used the black "Lobo" decals from the Fujimi A-7A sheet, they were not enthusiastic about leaving the backing sheet until I tried hot water, but then behaved well enough.

The Superscale sheet includes no markings for the upper surface at all. I've found photos of bicentennial birds without upper squadron codes, but no photo of this particular bird from an angle which shows the top side. Was Superscale right, and this one was without dorsal codes? Or was Fujimi right to include them on their A-7A kit sheet? I'll leave them off, that way if research one day turns up evidence this plane had them, I'll go back and add them at that point.

Next, I need to clean the surface of the decal solution residues, then seal everything with another coat of clear. Satin or flat? Decisions, decisions! Then I'm into the finishing stretch, which means clean up and unmask mating surfaces, bring the units together, build up the landing gear, add the small bits, unmask the canopy, add the windshield... This plane, it turns out, had a small, eliptical antiglare panel, lapping over the radome, and I'm just not game to try masking and spraying it. A custom decal, one day, might do it...

Cheers, Mike/TB379

http://worldinminiature.blogspot.com/

  • Member since
    March 2012
  • From: Corpus Christi, Tx
Posted by mustang1989 on Friday, December 23, 2016 4:05 AM

This thing is really coming along nicely Mike. The weathering and decals look right on to me. 1/72nd scale too.............just blows me away.....


 Forum | Modelers Social Club Forum (proboards.com) 

  • Member since
    March 2015
  • From: Streetsboro, Ohio
Posted by Toshi on Friday, December 23, 2016 4:27 AM

Excellent build, especially at 1/72.  Looks like 1/48.  Great job!

Toshi

On The Bench: Revell 1/48 B-25 Mitchell


Married to the most caring, loving, understanding, and beautiful wife in the world.  Mrs. Toshi


  • Member since
    April 2005
Posted by Thunderbolt379 on Friday, December 23, 2016 5:35 AM

Thanks, Mustang and Toshi! I often tell myself 1:72 is too small for me these days, but it's so much easier to store and dispay than the big guys. I can see me doing the big Hasegawa A-7s, and I have a real itch to tackle Trumpeters 1:32 Crusader -- but where to put them?

I'm leaning toward satin for the final finish, and I should be into final assembly tomorrow -- more pics then!

Cheers, Mike?TB379

http://worldinminiature.blogspot.com/

  • Member since
    April 2005
Posted by Thunderbolt379 on Monday, December 26, 2016 5:09 AM

Okay, progress over Christmas (took Christmas Day off, honest!) includes wash weathering the gear bays, resealing the whole model with satin, bringing the main assemblies together, painting the running lights and unmasking the canopy. The fit was a bit curious -- left wing and right tail were very snug and tight, while right wing, left tail and jet pipe were slack to say the least...

Tasks remaining: possibly add some streaked oil/hydrualic fluid in a few places; the windscreen is not yet attached, there are a few touchups on the instrument coaming needed, plus I'll give it my best shot to fit the gunsight glass supplied in the kit. Then there's the landing gear to install, plus the pylons and wing tanks to fit, finishing up with about three tiny parts to fit and paint. With luck she'll be done tomorrow and the next pics will be the finished gallery shots.

Cheers, Mike/TB379

http://worldinminiature.blogspot.com/

  • Member since
    April 2005
Posted by Thunderbolt379 on Thursday, December 29, 2016 6:09 AM

Finished -- a few days later than hoped for. Here's my Fujimi A-7A; just to recap, she started life as a Testor boxing A-7D but the Navy small parts sprue was packed instead of the Air Force bits so I abandoned plans for a four-tone camo bird and went with a grey-over-white, using classic Superscale sheet 72-332 for some bicentennial markings.

She's virtually complete -- I amazed myself and mounted the gunsight glass, but the two tiny probes I was not game for. In larger scale, sure, but these I left off.

This is my first A-7 since I did the Airfix -E in the late 70s, forty years or so back...

I made some procedural errors, the next one will be easier and more accurate. The idea of completing the wings before mounting made painting a lot easier but the fit was not as precise as I had hoped -- I may build a jig for lining things up in future.

Well, here are the gallery shots, hope you like her!

Cheers, Mike/TB379

http://worldinminiature.blogspot.com/

  • Member since
    December 2002
Posted by Bossman on Thursday, December 29, 2016 10:44 AM

Really nice job Mike !

Chris

JOIN OUR COMMUNITY!

Our community is FREE to join. To participate you must either login or register for an account.

SEARCH FORUMS
FREE NEWSLETTER
By signing up you may also receive reader surveys and occasional special offers. We do not sell, rent or trade our email lists. View our Privacy Policy.