SEARCH FINESCALE.COM

Enter keywords or a search phrase below:

Fujimi A-7D

3939 views
59 replies
1 rating 2 rating 3 rating 4 rating 5 rating
  • Member since
    March 2012
  • From: Corpus Christi, Tx
Posted by mustang1989 on Wednesday, September 21, 2016 9:11 AM

Looks like you're off to a good start here TB and that's a great lookin' 190 BTW!!!


 Forum | Modelers Social Club Forum (proboards.com) 

  • Member since
    January 2009
  • From: hamburg michigan
Posted by fermis on Wednesday, September 21, 2016 8:49 AM

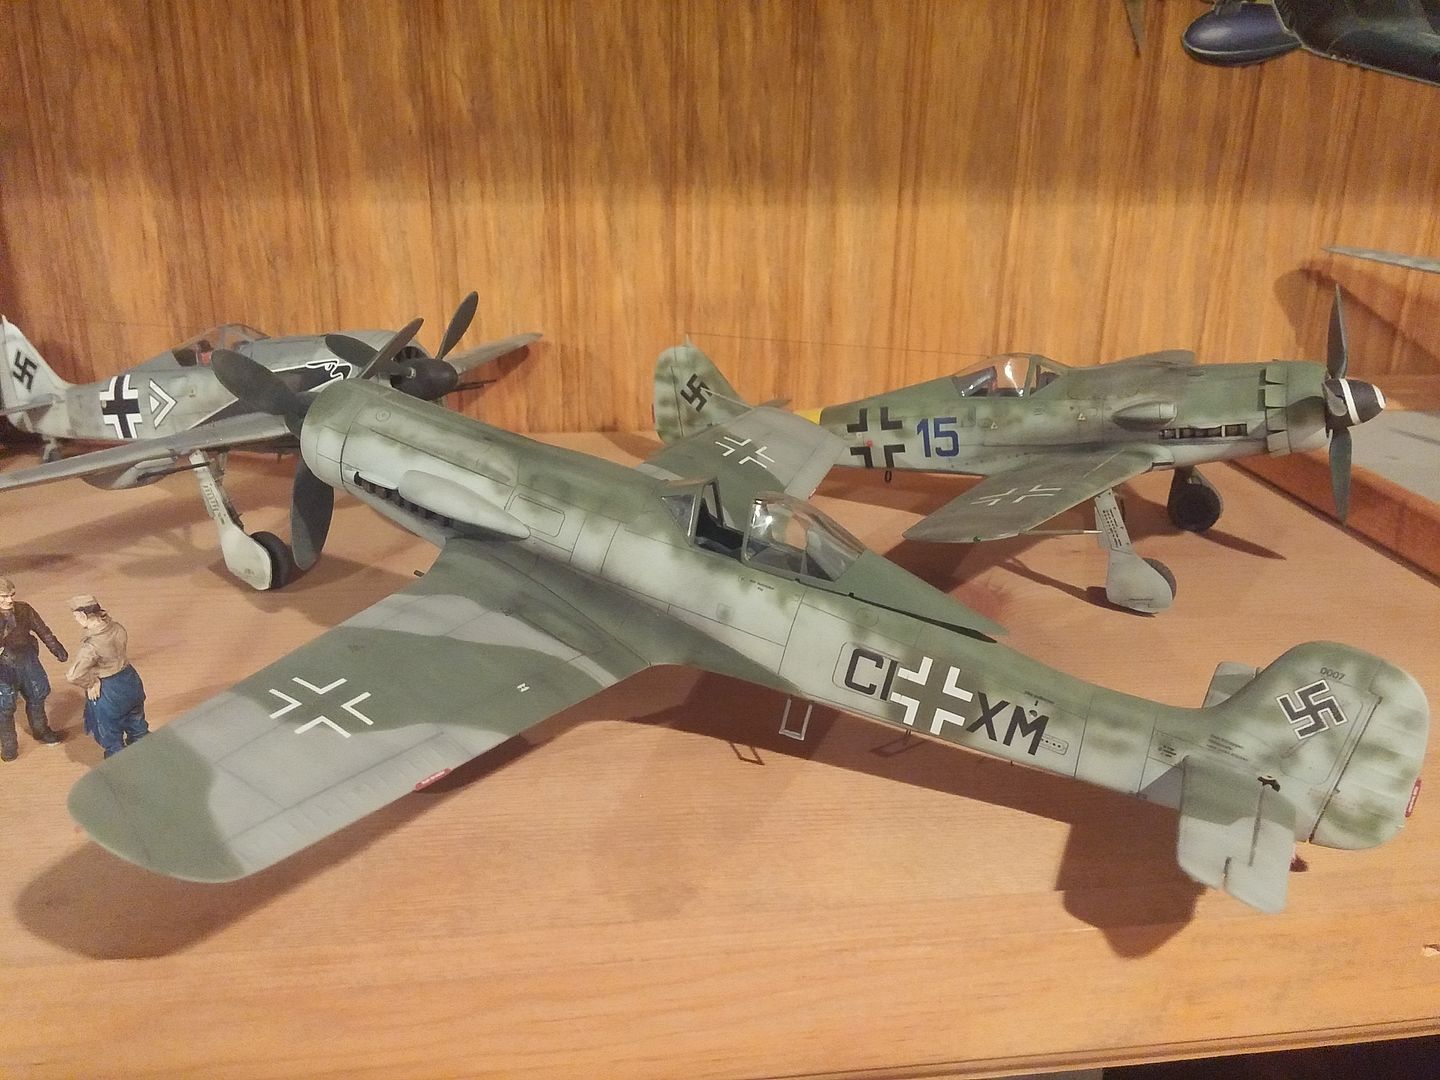
I did the H/B 190D as well (along with Tamiyas offering). Nice kit. 

Hobby Boss seems to be a bit hit-r-miss...as if there is 2-3 different design teams. Some kits have great detail, while others are pretty basic and beg for much more. The only consistancy is that they all (that I have done) have a pretty decent fit and a decent outward appearance. The vast majority, however, all seem to have some accuracy issues...some don't bug me at all, while others really do...which brings us back to the A-7.

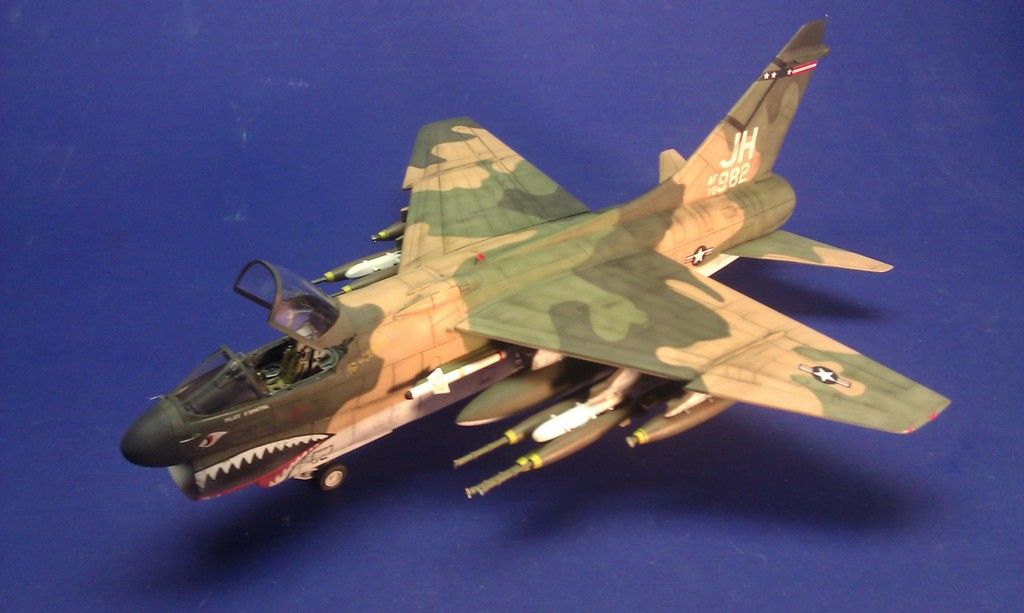
Of the 3 different kits I've done...Fujimi/Testors seems to be the most accurate, in terms of size, shape, and capturing the overall look. The Italeri offering was pretty close too. Hobby Boss was best in fit, detail and options...but then there's the shape issues. As is, it looks like the love child of an F-8 and A-7. The fuselage isn't quite tall enough...nose is a bit undersized and not quite as blunt as the real thing...canopy, as you mentioned, a bit wide and not tall enough...and my biggest issue, the intake. It comes off the fuselage just fine, but goes a tad wide and then is too flat across the bottom(hence the F-8 comment). These issues have not stopped me from building 4 of these kits...they also haven't stopped me from adding another 6 to the stash (plus a pair in 48th and Trumpy's 1/32 offering...and 3 of Hasegawas 1/48 kits)

I can look past the shallow fuselage...openning the canopy, kinda helps with the canopy issue. The nose can be sanded a bit to "blunt" it. The intake...well, that takes some work. It wasn't until my 4th H/B kit that I came up with a way to fix it. After gluing the intake parts together, I heated some scrap plastic over a candle, and pressed it over the bottom of the intake. Remove it, trim of excess and CAed it on the intake...repeat with another layer. Sand the edges down, so that there's nothing added to the sides of the intake, it should be tapered down the edge, having all the additional plastic on the bottom. I then sanded down the inside of the intake (mainly the bottom) to round it out and get rid of that flat spot. Having this extra plastic added, it pushes out the fuselage parts, which does leave a gap, but not to worry! I reapeted the "thermo-form/smash molding" process on the outside of the fuselage...a lot of sanding and rescribing is required. I also did the same thing with the intake lip piece. I can't say this gets a 100% mark, but it is a lot closer to accurate than what you start with!

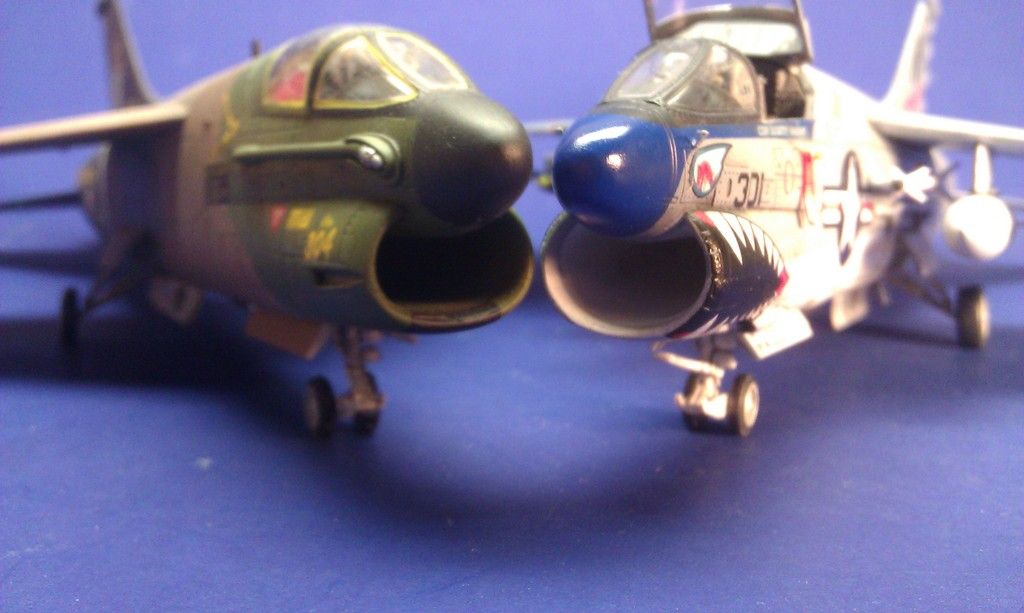
These are H/B kits. The one on the right having "the fix"...the next one will be better!

On the Fujimi kit...I had an issue with the intake fit. There was a pretty big "step" from the intake part to the fuselage, on the port side. I ended up adding a slab of plastic sheet to the intake (after being glued), sanded it down and rescribed.

Here's the finished Fujimi...

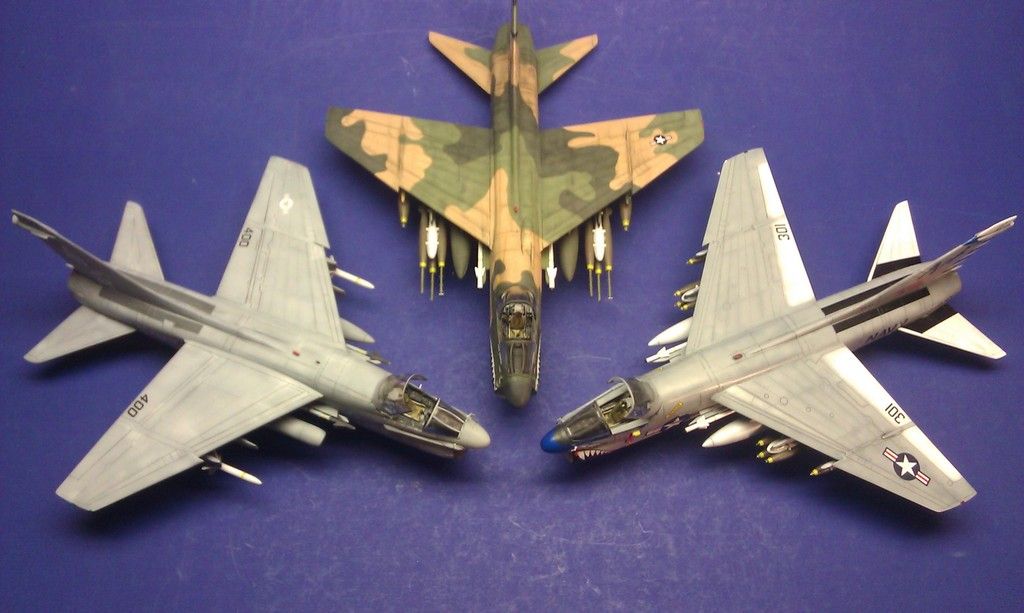
All three...Italeri(L), Fukimi(C) and Hobbu Boss(R)

  • Member since
    April 2005
Posted by Thunderbolt379 on Wednesday, September 21, 2016 7:35 AM

TJ -- it was Hobby Boss 81716, in 1:48th scale. The interior seemed the equal of anything I've done previously, there again I'm not too big on detaling interiors, especially with my eyesight these days. The engine accessory bay was detailed, and the overall surface detail and fit were easily the equal of Tamegawa.

A bit off-topic in an A-7 thread, but here she is, in Rudel's markings (Superscale):

Cheers. M/TB379

http://worldinminiature.blogspot.com/

  • Member since
    November 2003
  • From: Naples, FL
Posted by tempestjohnny on Wednesday, September 21, 2016 7:12 AM

Thunderbolt379

 I've not built much HB as yet, in fact my only completion is their Fw 190 D and I loved every moment of that build -- i wiouldn't build a -D from any other company now.

Cheers, Mike


Mike, was it the easy builder 190?  I built one of those. Other than the basic interior. I really liked the kit. John


  • Member since
    April 2005
Posted by Thunderbolt379 on Wednesday, September 21, 2016 2:17 AM

First WIP pic -- today I applied white (XF-2) to the intake area, and took the opportunity to do the landing gear, including bay doors, inside and out. All parts were then sealed with two coats of Micro Satin. The green is Gunze Mr. Masking Sol.

Next up will be to snug the intake into place and dress the seams.

Cheers, Mike

http://worldinminiature.blogspot.com/

  • Member since
    April 2005
Posted by Thunderbolt379 on Tuesday, September 20, 2016 6:44 PM

Fermis -- that's a very cool lineup, you have many of the schemes I inrtend to do myself! Thanks for the tip re the spare parts in the HB kit, I'll have to look into that. I've heard varying opinions of their A-7s -- lovely surface finish but the canopy is too flat, that sort of thing. I've not built much HB as yet, in fact my only completion is their Fw 190 D and I loved every moment of that build -- i wiouldn't build a -D from any other company now. How do you rate their A-7s?

I'm delighted to post WIP pics here! I'll be working on the dreaded intake today, getting it into paint before somehow coaxing it into place.

Cheers, Mike

http://worldinminiature.blogspot.com/

  • Member since
    January 2009
  • From: hamburg michigan
Posted by fermis on Tuesday, September 20, 2016 5:15 PM

fermis


ikar01

Don't make me pull this forum over and start my Hasegawa kit and Fujimi "D" kits.


I....triple...dog....dare....you!!!!!


Let's get some A-7 action goin here!!!


  • Member since
    January 2009
  • From: hamburg michigan
Posted by fermis on Tuesday, September 20, 2016 4:59 PM

ikar01

Don't make me pull this forum over and start my Hasegawa kit and Fujimi "D" kits.


I....triple...dog....dare....you!!!!!

  • Member since
    October 2004
  • From: Orlando, Florida
Posted by ikar01 on Tuesday, September 20, 2016 4:47 PM

Don't make me pull this forum over and start my Hasegawa kit and Fujimi "D" kits.

  • Member since
    January 2009
  • From: hamburg michigan
Posted by fermis on Tuesday, September 20, 2016 2:26 PM

I was going to mention that the Hobby Boss A-7 kits have parts for pretty much all variant...if ya had on on hand. Appears as though you're beyond needed that part now. That particular part was kinda crappy anyway...I used the fairing from the H/B kit on my Fujimi "D".

Keep a WIP going....there's nowhere near enough A-7 action in here!!!

  • Member since
    April 2005
Posted by Thunderbolt379 on Tuesday, September 20, 2016 8:15 AM
Hi TJ! If you're lucky you can pick them up for a bargain price but you need to haunt the listings to find them, otherwise they do indeed go for some very handsome sums now. Add in postage and, from my perspective, exchange rate, and bargain prices very quickly turn into big investments. It's a good thing I shopped intensively for kits years ago as I simply can't buy with impunity any more! M

http://worldinminiature.blogspot.com/

  • Member since
    November 2003
  • From: Naples, FL
Posted by tempestjohnny on Tuesday, September 20, 2016 8:06 AM
I was another that had a bunch of the latest Fujimi kits in the 80's. At one point I think I had 7 or 8 F-4's built. You can still get them on eBay but they are not giving them away. I have the F-4C/D and F-4G. Also the,KA-6D which was a bagged kit and is missing the drogue fairing on the underside


  • Member since
    April 2005
Posted by Thunderbolt379 on Tuesday, September 20, 2016 7:43 AM
Hi Ikar01, That's very true -- the first batch had the Navy system, I forget how many planes, sixteen, was it? The plane on the decal sheet is a somewhat later build seen in photos late 1972, so she needs it... I'll be angling for extra examples, and do this one as an -A, in a Bicentennial scheme. Cheers, Mike

http://worldinminiature.blogspot.com/

  • Member since
    October 2004
  • From: Orlando, Florida
Posted by ikar01 on Tuesday, September 20, 2016 5:49 AM

If it helps any, the early "D" models didn't have the refueling hump.

  • Member since
    April 2005
Posted by Thunderbolt379 on Tuesday, September 20, 2016 1:19 AM

Oh, Aussie too? Well met! Well, my LHS must have been gouging! It was Australian Hobby Centres, Adelaide branch, and they could sure get the oprices up there. I remember Dragon 1:35 armour on the shelf at $90 there in the late 80s, which was just over the horizon as far as I was concerned... I wish I'd had access to these kits at the sort of prices you were seeing!

Yes indeed, I think she'll look great, and it'll be my first grey and white in so long I can't remember.

Cheers, Mike

http://worldinminiature.blogspot.com/

  • Member since
    August 2005
  • From: Sydney, Australia
Posted by Phil_H on Tuesday, September 20, 2016 12:49 AM

Some nice colourful schemes there to choose from, she should look great.

Thunderbolt379
Their A-4s were Aus$36 on the shelf, and their MiG-21s passed the $40 mark

LOL Aussie here too. Hmm. $36.00 for the A-4's seems a tad high, considering they were from the same series (F) as the A-7's, which were, according to my boxes, priced domestically at 800Yen (Japanese kits have the domestic recommended retail price printed right on the box). As such, they should have been around about the same price as what I paid (ie. $14.95). My "G" series boxes (F-4's) were 1000Y, but I can't recall what the local price was - $17.95 perhaps? My "H" series boxes (A-6's & F7U's) were 1200Y and I paid $19.95 for those. (Remembering that these are late-80's prices) 

So I guess your LHS was either extremely optimistic or gouging when pricing their kits. 

Thinking about it now, I should have sprung for the A-4E/F kit as it had markings for a RAN bird..  

  • Member since
    April 2005
Posted by Thunderbolt379 on Monday, September 19, 2016 11:33 PM

After a pleasant rummage through my decal collection, I have settled on Superscale 72-332, a batch of three Bicentennial schemes. I've selected VA-303, at Alameda in '76, as a scheme I think I can pull off.

Here's the kit and proposed markings:

I look forward to the painting and decalling stage!

Cheers, Mike

http://worldinminiature.blogspot.com/

  • Member since
    April 2005
Posted by Thunderbolt379 on Monday, September 19, 2016 8:30 PM
$14.95? I'd have called that cheap for a kit of this sort! (I'm in Australia...) Their A-4s were Aus$36 on the shelf, and their MiG-21s passed the $40 mark Down in Aus -- the exchange rate was in our favor in those days, but probably not by more than 20%, so you can see how much they were in relative terms. No wonder I never built a Fujimi until modern times! Their Phantoms are very good indeed, I have a couple of dozen in my stash, and their second-generation tooling for the UK birds is sweet. I did an early F-4K a few years back, one of the training unit planes from about 1969 and she came up a treat. I have noticed that their first generation tooling has some flaws, one of which is that the panel lines are too fine -- they won't hold an accenting wash. That's a bit of a grumble for me as I love to define the lines, but unless I want to rescribe whole airframes I need to live with it! I have the Hasegawa weapons sets so am hoping I can pull Shrikes and Mavericks to complete the mission loadout for an A-7A. I'm quite excited to be doing a colourful bird from the old days!

http://worldinminiature.blogspot.com/

  • Member since
    August 2005
  • From: Sydney, Australia
Posted by Phil_H on Monday, September 19, 2016 8:16 PM

Building it as an "A" sounds like a good plan.

Yep, those kits were pricey in the day. Last night when I was looking at the parts in the A and E kits, the boxes still had the price tags (hey, remember price tags?) on them. It seems I paid $14.95 for each of those back in the late 80's.

If you can get hold of one, Fujimi's British Phantoms are impressive kits too. Smile

  • Member since
    April 2005
Posted by Thunderbolt379 on Monday, September 19, 2016 8:01 PM
That's a very good point, Phil, certainly companies these days have no qualms about providing huge numbers of parts that are unused -- maybe it's a way of selling more plastic? There again, thirty years ago Fujimi kits were trending very expensive (I could never afford them new!) so maybe they were looking for all possible ways to control cost. Yes indeed, you're quite right about those other parts, they would also need to be sourced, along with a small part on the underside further aft. I think I've been missing the obvious solution here -- as I have the Navy parts and am lacking the AF parts which define the -D model, why don't I just use what I have and finish her as a -A? I'll have an excuse to finally dip into those classic Superscale decal sheets and do a grey and white Vietnam era A-7. I'll set aside the excellent Scalemaster sheet from the -D kit (it was a Testor edition) until such time as I can source a couple of Fujimi -Ds with the correct AF parts, then I can build both options on the sheet (An SEA bird, Korat '72, plus a much later Euro 1 wraparound scheme). I also have the Superscale A-7D stencil data sheet so I can do them full justice. Changing direction might be the most practical option, enabling me to keep working at this time with the confident expectation of turning out a good looking plane in the near future. I'll put up some photos as I go! Cheers, and thanks for your advice! Mike

http://worldinminiature.blogspot.com/

  • Member since
    August 2005
  • From: Sydney, Australia
Posted by Phil_H on Monday, September 19, 2016 9:02 AM

I think you'll also need to acquire or reproduce parts 55(cannon fairing) and 53 (vent?). If your kit contained the sprue for the E model, you'd have those parts. Unfortunately it sounds as if you have one from one of the earlier variants. Parts 53-57 are common to both the D & E models.

From the look of the sprues for the various models, it looks like a common mould which is gated to produce model-specific parts. It would have been better if they'd just used a common sprue and had a few bits left over. 

  • Member since
    April 2005
Posted by Thunderbolt379 on Monday, September 19, 2016 7:33 AM
It should be easy enough to infer... If the nose gear can be modified by removing the forward extension seen on Navy birds (associated with the catapult, I wonder?), and if the discrepancy on the main wheels is something I can live with, then it's really only the refuelling fairing, and I can reproduce that, plus parts 54 and 57, in resin from a second kit...

http://worldinminiature.blogspot.com/

  • Member since
    August 2005
  • From: Sydney, Australia
Posted by Phil_H on Monday, September 19, 2016 7:21 AM

Yeah, if you had the dimensions, you could probably scratch one up out of a bit of plastic strip & a blob of epoxy putty.

  • Member since
    April 2005
Posted by Thunderbolt379 on Monday, September 19, 2016 7:04 AM
I have an -A model to hand and it has tanks, Shrikes, Sidewinders and Mavericks also, and as a Navy bird it features the small irregular sprue of Navy parts... I'm thinking my kit was packed in error with the Navy-specific parts sprue, which leaves me needing to source an unused AF parts tree from a 30-year old kit... That could be just about impossible, sadly. I had a look at Quickboost earlier to see if they made A-7 accessories but only flaps for the HB kit are on the list. It looks like the nose gear and main wheels are affected by the inter-service variation, and I may as well check out as many photos as I can find to determine just how much difference there is, and if it's something a little judicious modification might trick around... Cheers, M/TB379

http://worldinminiature.blogspot.com/

  • Member since
    August 2005
  • From: Sydney, Australia
Posted by Phil_H on Monday, September 19, 2016 4:33 AM

As it's a bagged kit, possibly you have the wrong kit bundled with the "D" instructions & decals. Not sure about the earlier versions, but the "E" came with Mavericks, Shrikes, Sidewinders & fuel tanks. The "D" only has Sidewinders, Snakeyes & fuel tanks.

  • Member since
    April 2005
Posted by Thunderbolt379 on Monday, September 19, 2016 4:21 AM

Phil_H


That's it! Looks like I have a sprue gone missing, darn... This was a bagged kit bought on eBay, so it may always have been missing, or might be around the workshop somewhere -- I guess I'd better have a good look, and if it's nowhere to be found I might look at sourcing another kit and reproducing the fairing in resin to complete the current project.

Many thanks, Phil!

Cheers, Mike/TB379

http://worldinminiature.blogspot.com/

  • Member since
    August 2005
  • From: Sydney, Australia
Posted by Phil_H on Monday, September 19, 2016 4:19 AM

Ahh, now I see. The equivalent sprue in the A/B/E kits also uses the same part number 46, except in those kits it's the probe (and yes, exactly as you described in the opening post).

Sounds as if your kit ended up packed with the wrong sprue.

  • Member since
    August 2005
  • From: Sydney, Australia
Posted by Phil_H on Monday, September 19, 2016 4:04 AM
  • Member since
    April 2005
Posted by Thunderbolt379 on Monday, September 19, 2016 4:01 AM

Phil_H

The Navy version has the probe alongside & just below the stbd cockpit sill. Looking at the instructions online, the front of the blister (46) is asymmetrical because of the curvature of the fuselage (the outer edge is longer).


Phil -- that matches the part on my tree. It's noted for the A, B and E versions, so I'm thinking there may be a special -D sprue, maybe even carrying just that one part, which is absent from my example... Angry

M/TB379

http://worldinminiature.blogspot.com/

  • Member since
    August 2005
  • From: Sydney, Australia
Posted by Phil_H on Monday, September 19, 2016 3:58 AM

The Navy version has the probe alongside & just below the stbd cockpit sill. Looking at the instructions online, the front of the blister (46) is asymmetrical because of the curvature of the fuselage (the outer edge is longer).

Again, looking at the instructions, 46 is one of a cluster of parts on a separate sprue for the AF version, including a noswheel leg without the catapult link.

JOIN OUR COMMUNITY!

Our community is FREE to join. To participate you must either login or register for an account.

SEARCH FORUMS
FREE NEWSLETTER
By signing up you may also receive reader surveys and occasional special offers. We do not sell, rent or trade our email lists. View our Privacy Policy.