SEARCH FINESCALE.COM

Enter keywords or a search phrase below:

(WIP) 1/32 Tamiya Mosquito

3567 views
23 replies
1 rating 2 rating 3 rating 4 rating 5 rating
  • Member since
    June 2013
  • From: Seattle, WA
(WIP) 1/32 Tamiya Mosquito
Posted by Kiwi on Friday, October 7, 2016 8:04 PM

Finally had a chance to put in a marathon session on the Mossie today. Before I realized it a solid 7 hours into the cockpit this afternoon/evening.

This is such a beautiful kit. Everything locks and fits perfectly and the detail is quite amazing. It is easily the nicest kit I have ever had (so far at least).

I also bought the "How to build the 1/32 Tamiya mosquito" book and that is extremely helpful in terms of how to attack the kit with tips and tricks etc.

Anyway, the cockpit went together nicely and I've been picking details out all evening. Will hopefully move onto the gun bay over the weekend. The detail of the Merlin engines, mounts and undercarriage is a little intimidating...

Will keep updated with pictuers!

The instrument panel before picking out fine detail and installing. (the reverse decals on the back of the clear panels is a really neat idea - creates a lens effect through the clear plastic, really cool).

Installed instrument panel into cockpit bulkhead.

The pilot and navigator positions with PE seatbelts (included in the kit), pilots cushion and a (still wet) MIG wash over the floor.

And a peek from the pilots side.

Early days yet but pretty excited about how the rest of this kit will come together!


  • Member since
    August 2016
  • From: Eufaula, Alabama
Posted by WannabeFarmboy on Friday, October 7, 2016 8:40 PM

Incredible. Can't wait to see this build progress. I really enjoy these big kits. 

  • Member since
    August 2009
  • From: MOAB, UTAH
Posted by JOE RIX on Friday, October 7, 2016 8:56 PM

That is outstanding. Really looking forward to seeing the rest. I must say, Tamiya certainly seems to be raising the bar on kit quality, engineering and detail.

"Not only do I not know what's going on, I wouldn't know what to do about it if I did". George Carlin

  • Member since
    April 2016
  • From: Parsons Kansas
Posted by Hodakamax on Friday, October 7, 2016 9:14 PM

My, that cockpit is looking good for sure. Looks to be a great build coming up, I'll keep track of this one. 1/32 is a fun build, not so hard to see for us old dudes. LOL!

Max

  • Member since
    March 2015
  • From: Streetsboro, Ohio
Posted by Toshi on Friday, October 7, 2016 10:07 PM

Great work, will be definately following your build!

Toshi

On The Bench: Revell 1/48 B-25 Mitchell


Married to the most caring, loving, understanding, and beautiful wife in the world.  Mrs. Toshi


  • Member since
    February 2012
  • From: Olmsted Township, Ohio
Posted by lawdog114 on Saturday, October 8, 2016 3:22 AM
Gorgeous...I wish I had room for a kit this size.

 "Can you fly this plane and land it?...Surely you can't be serious....I am serious, and don't call me Shirley"


  • Member since
    November 2011
Posted by Newtothis on Saturday, October 8, 2016 6:57 AM

Looking forward to watching this come together.

I've done a Tamiya Coursair and am now working on a Mustang, both had the same system for the instrument panel.  It works great, except that Tamiya's transfers can be horrible. . . My Mustang instruments were near disaster when the transfer fragmented when applying.  I got most of them mostly in the right spot though, and it looks not too bad.  So watch out for those transfers :) 

  • Member since
    December 2002
  • From: Northern California
Posted by jeaton01 on Saturday, October 8, 2016 2:32 PM

Gorgeous!

John

To see build logs for my models:  http://goldeneramodel.com/mymodels/mymodels.html


  • Member since
    June 2013
  • From: Seattle, WA
Posted by Kiwi on Saturday, October 8, 2016 8:02 PM

Thanks guys,

Little bit of progress on the Merlin V12 engines. Took over two hours just to put together one of them - easily 60+ individual parts to assemble - some of them seemed just for the sake of it but the detail is nice for a stock engine. Compared with a resin 1/48 scale Merlin V12 for comparison.

The kit has an extremely intricate bracket mount and firewall section for the engine to sit in. It actually came with plastic jigs to help assemble the engine properly - removed afterwards once complete. Again, the attention to detail and quality of this kit is quite amazing.

One of the really neat parts of the kit is that there are actually small magnets installed inside the piston heads on the engine. These correspond with magnets on the inside of the external engine panel covers - so they can be removed easily to show the detail underneath. These are included for both engines and the nose panel covereing the machine guns and canons, really good idea.

  • Member since
    March 2015
  • From: Streetsboro, Ohio
Posted by Toshi on Sunday, October 9, 2016 1:27 AM

Fantastic job on the Merlin engine.  I've built two Tamiya 1/35 P-51 Mustangs.  The Merlins on the Mustang kit looks very close to the ones on the mosquito kit.

Toshi

On The Bench: Revell 1/48 B-25 Mitchell


Married to the most caring, loving, understanding, and beautiful wife in the world.  Mrs. Toshi


  • Member since
    December 2002
  • From: Bury St Edmunds, Suffolk, England
Posted by Bish on Sunday, October 9, 2016 1:33 AM

Some really great work here so far, love the look of those engines. Look forward to seeing more.

I am a Norfolk man and i glory in being so


On the bench: Airfix 1/72nd Harrier GR.3/Fujimi 1/72nd Ju 87D-3

  • Member since
    June 2013
  • From: Seattle, WA
Posted by Kiwi on Sunday, October 9, 2016 4:56 PM

With the spousal-unit out of town I've had a chance to put another big session into the Mossie today. Mostly on fitting the two halves of the body together with the various bulkheads, assembling the second Merlin engine and doing a little bit of painting and detailing.

Having an almost fully assembled fueselage, it is strange to look at the box and feel like I haven't even made a dent in this kit, there are SO MANY PIECES.

The gun assembly in the nose went together well and the ammo belts out of the main box was fun to put together. I only broke one Browning barrel off and will fix that much later in the build. The nose cone fits well as does the magnetized cover panel that will sit on top of the guns.

The two fuselage halves went together almost perfectly. The rear half slotted together seamlessly (literally), and there was just a little bit of massaging of the bulkheads to get the nose section to snap together.

I have a little bit of cleaning up to do around the edges and where bulkheads join - mainly because I'm often a little too liberal applying superglue, but nothing a sharp Exacto and some sandpaper can't touch up...

The Merlins were fun once I had got overt how many hours it took to assemble them. There was only a little bit of colorful language as a few small parts found themselves on the workshop floor and had to be searched for.

Once airbrushed flat black I used a very thin Tamiya Steel mix, almost a wash, and a large bristled brush to bring up a metallic sheen on the engines. It looks a little glossy still but will dull down when I do a rust/dirt wash once it all dries.

Still having a lot of fun with this kit. Might take a week or so off before I attack the engine mounts. They are pretty intense, but looking forward to doing the exhausts, coolant tanks and piping that goes around the engine - a lot of color to add there which will really bring it all to life I think.

  • Member since
    December 2002
Posted by 7474 on Sunday, October 9, 2016 7:29 PM
Looking good. I just bought the latest issue of Weathering magazine and it's all about aircraft engines, one article was about building and painting a Merlin for a Spitfire.... Loooking forward to seeing you progress on this build because the Mossie is one of my favorites
  • Member since
    June 2013
  • From: Seattle, WA
Posted by Kiwi on Monday, October 17, 2016 10:59 PM

Quick update on the Mossie:

Airbrushed and detailed much of the firewalls, engine mounting brackets and piping/plumbing around the Merlin. It took a couple of hours just to mount the plumbing and engine mounts for one side but as expected it all went together beautifully. I got caught out in a few places where I had got ahead of the instructions or tried to do things in a different order to make my painting more efficient - was able to solve with some delicate brute force in a few places and lessons learned for when I tackle the second engine.

The engine itself actually screws into the firewall with two small threaded metal screws. They thread into two bolts that were strategically placed inside the engine during its assembly. Quite nice that it is so secure in there with about four other ball-socket type joins in the plastic. The Merlin is most certainly not coming out!

I estimate I am nearing the halfway point on this kit with about 50 hours into it and the box is still completely full of parts and sprues, it looks like I havent even started. The landing gear and bomb-bay assembllies look nice and complicated. That will certainly be a job for next week...

Tim

  • Member since
    December 2002
  • From: Bury St Edmunds, Suffolk, England
Posted by Bish on Tuesday, October 18, 2016 1:00 AM

Really nice work there, love the detail your putting into those engines.

I am a Norfolk man and i glory in being so


On the bench: Airfix 1/72nd Harrier GR.3/Fujimi 1/72nd Ju 87D-3

  • Member since
    March 2015
  • From: Streetsboro, Ohio
Posted by Toshi on Tuesday, October 18, 2016 6:20 AM

Great work on the engine details and mount.

Toshi

On The Bench: Revell 1/48 B-25 Mitchell


Married to the most caring, loving, understanding, and beautiful wife in the world.  Mrs. Toshi


  • Member since
    June 2013
  • From: Seattle, WA
Posted by Kiwi on Tuesday, October 25, 2016 11:06 PM

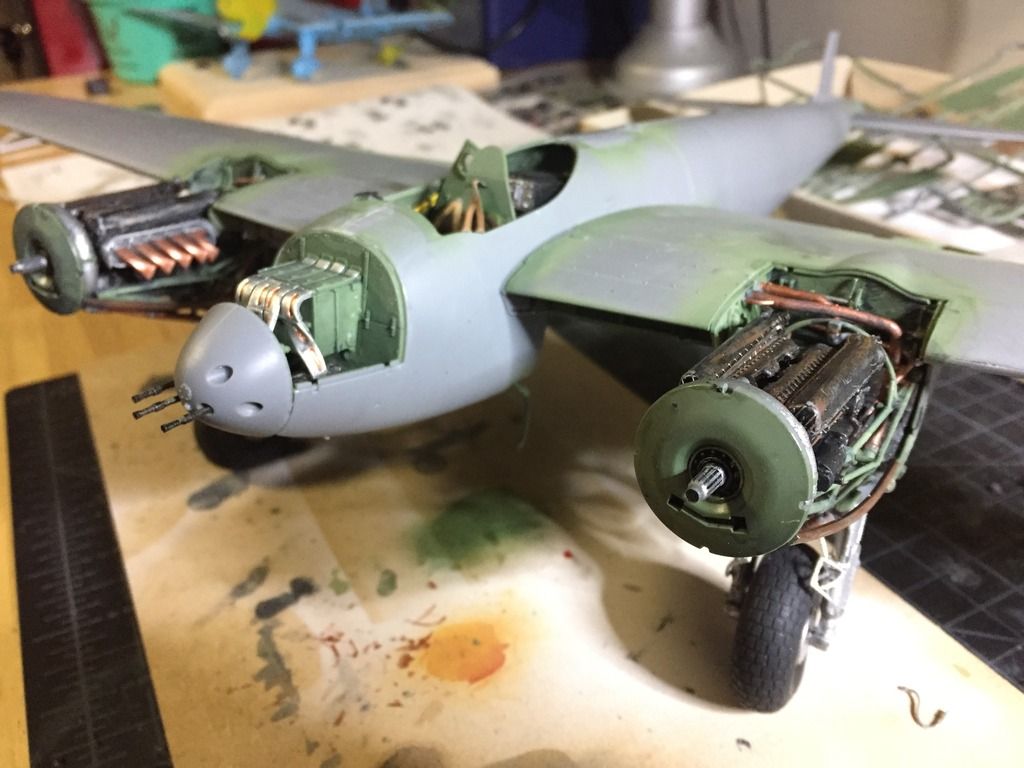
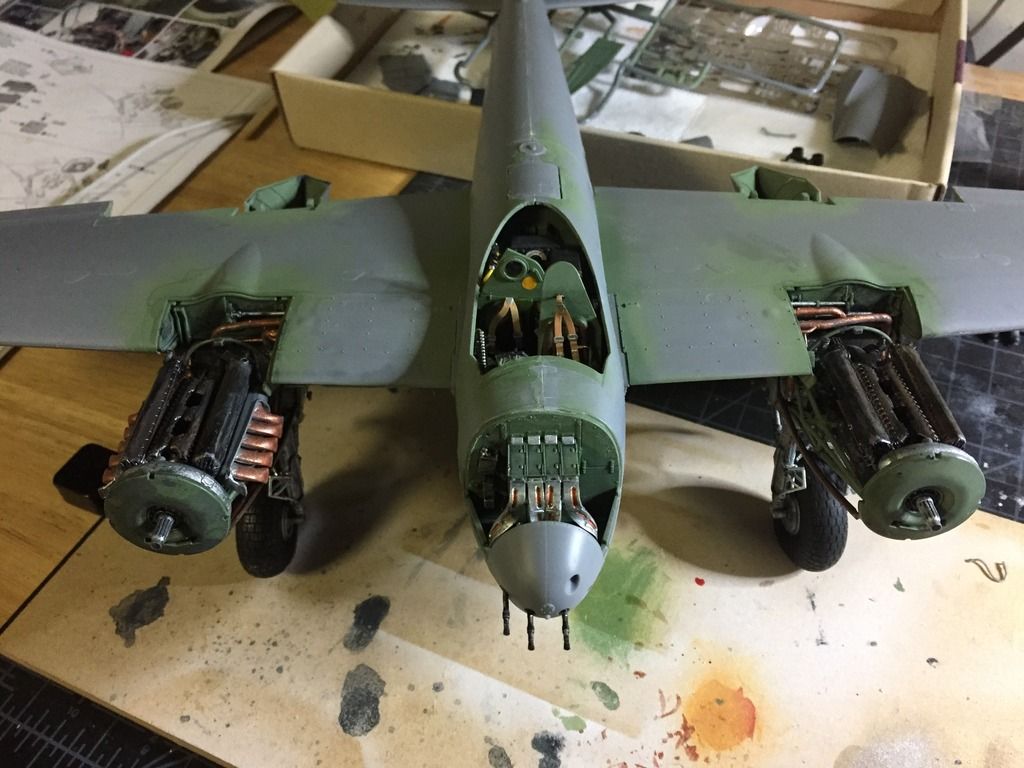
Put in a lot more work on the Mossie over the weekend and last few days. Was able to get the other engine mostly finished and mount both inside their permanent homes in the wings.

The wings were pretty cool to put together and actually have threaded screws to join them to the main cross section. Again everything went together perfectly and looks like it will fit just great into the main fueselage section eventually, yay!

Finally starting to feel like I've actually used some of the parts out of the box. There are still a LOT there but I guess that will be the bomb bay, landing gear and flap mechanisms. Also the canopy framing looks mighty complicated with lots of small parts that I'm already scared of breaking...

Anyway, here are a few pics.

This is the only part I've found so far that didn't perfectly fit. There is a tiny gap on the fuselage side fo the engine root where it didn't quite slot together. There are so many different parts that make up the contact surface and no matter of brute force, filing or filing could make it fit flush. I've filled it with liquid plastic and once it cures will sand it flat so should come up just fine in the end.

I think the engines look pretty cool now that they're secured into the wing. Such a neat aircraft

Where the magic happens!

What do you guys think so far? Any tips/feedback?


  • Member since
    March 2015
  • From: Streetsboro, Ohio
Posted by Toshi on Wednesday, October 26, 2016 1:57 AM

I think you're doing a fantastic job!  I also like your work bench and TV.  The magic always happens at the work bench!

Toshi

On The Bench: Revell 1/48 B-25 Mitchell


Married to the most caring, loving, understanding, and beautiful wife in the world.  Mrs. Toshi


  • Member since
    February 2007
  • From: Brunswick, Ohio
Posted by Buckeye on Wednesday, October 26, 2016 11:33 AM

Tips?  You should be giving me tips!  Very nice work there.  Can't wait to see more.

Mike

  • Member since
    April 2015
  • From: Detroit, MURDER CITY
Posted by RudyOnWheels on Wednesday, October 26, 2016 11:56 AM
Looks great! i'll have to get one of those 1:32 kits one of these days. Makes me want to put my 1:48 Mosquito next on the list! Not quite as cool, but still fun! Keep up the good work- Rudy
  • Member since
    June 2013
  • From: Seattle, WA
Posted by Kiwi on Tuesday, November 1, 2016 11:12 PM

Work has been this busy this week but managed to spend a little bit of time on her.

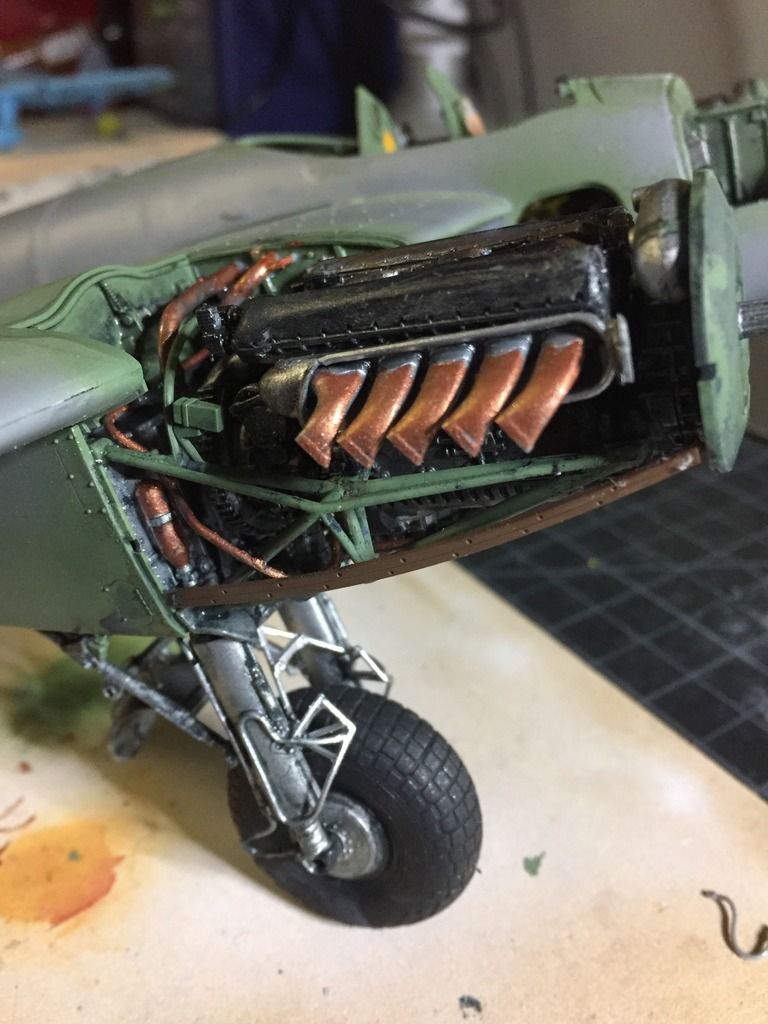
Had my first major mess up at the weekend - painting the landing gear while the assembly jigs were still in place. The paint dried and, of course, stuck the jigs in place. I got two out but the other two snapped off inside the landing gear. Drilled them out as much as I could with a hand drill but could only get in a centermeter or so. Shortened the corresponding legs by the amount I couldn't drill out and manged to get them all to come together properly. Completely my fault, should have removed the jigs but they made such nice grippers to hold everything while I painted it... rookie mistake.

The wings are not secured to the body of the aircraft and it's starting to look like a mosquito!!!

I'll attack the bomb bay and the canon assembly this weekend. The landing gear turned out to be really rather simple. I've weathered it with cold blue but I don't love how it's come up so may clean it up and have another go. Am finding that many of the small internal decals on the oil and coolant tanks are coming off with the Mig washes - never had the problem with the washes I've mixed myself so might go back to the DIY method and try and salvage the small decals - nothing major but interesting...

Few pics from this evening:


  • Member since
    December 2002
  • From: Northern California
Posted by jeaton01 on Wednesday, November 2, 2016 4:54 PM

Splendiferous!

John

To see build logs for my models:  http://goldeneramodel.com/mymodels/mymodels.html


  • Member since
    December 2002
Posted by 7474 on Wednesday, November 2, 2016 9:02 PM

You recovered well with the jig mishap, it's coming along nicely. I really dig the exhausts. THe mosquito is one of my favorites 

  • Member since
    March 2015
  • From: Streetsboro, Ohio
Posted by Toshi on Thursday, November 3, 2016 12:12 PM

Excellent recovery.  It's coming along beautifully!

Toshi

On The Bench: Revell 1/48 B-25 Mitchell


Married to the most caring, loving, understanding, and beautiful wife in the world.  Mrs. Toshi


JOIN OUR COMMUNITY!

Our community is FREE to join. To participate you must either login or register for an account.

SEARCH FORUMS
FREE NEWSLETTER
By signing up you may also receive reader surveys and occasional special offers. We do not sell, rent or trade our email lists. View our Privacy Policy.