SEARCH FINESCALE.COM

Enter keywords or a search phrase below:

Zvevda 1/48 Bf 109F-4 (Max Hellmuth Ostermann)

3857 views
21 replies
1 rating 2 rating 3 rating 4 rating 5 rating
  • Member since
    September 2014
Posted by rooster513 on Monday, December 4, 2017 8:36 AM

Thanks guys!

I've been posting in the 1942 GB the few updates I've had and wanted to give an update here too.

Took a long time, a lot of mistakes and some fustration but I was able to get the insignia crosses masked and painted using Maketar masks. I'm fairly happy with the results (the fulesage crosses sit a little low) and learned a lot from doing it. I do wish they were cut out a little more cleanly from the manufacturer as they tended to leave a ragged edge but that can be fixed by running a sharp knife along the cut lines. Luckily weathering can hide quite a bitWink

I need to repaint the right wing RLM 74/75 and touch up the left a little then on to decals!

Thanks for looking!


-Andy

  • Member since
    April 2015
Posted by Mopar Madness on Tuesday, October 24, 2017 6:35 PM

Excellent camouflage and mottling!

Chad

God, Family, Models...

At the plate: 1/48 Airfix Bf109 & 1/35 Tamiya Famo

On deck: Who knows!

  • Member since
    January 2016
  • From: A Galaxy Far, Far Away
Posted by Hunter on Tuesday, October 24, 2017 1:42 PM

Andy,

Great job sir...it is looking perfect!

Hunter 


  • Member since
    September 2013
Posted by blackdog62 on Tuesday, October 24, 2017 12:02 PM

rooster your kit is really going nicely. looking forward to the white camoflauge.

these kits are some of the favorite in my stash. from what I have read there great kits with plenty of detail. one of the things I like the most is the box art it's a outstanding painting.

jerry

  • Member since
    September 2014
Posted by rooster513 on Monday, October 23, 2017 10:57 AM

Been plugging away at this one and after fighting some fit issues with the canopy and cowling I've been able to get some paint on it. I used Mission Model paints for the RLM 74 & 75 and absolutely love these paints so far. For me they made mottling a breeze compared to other paints I've used. Most of this will be covered with a white wash (including the unpainted right wingtip:) but it made for good practice.

According to the instructions the fuselage sides had a heavy mottling of RLM 70 (in pictures I've seen it appears to be almost a solid color and the port side was mostly white washed for better winter camo. The RLM 70 will be a Tamiya mixture and I'll be ordering Mission Model white for the white wash.

Hopefully I'll have another update shortly!

-Andy

  • Member since
    September 2014
Posted by rooster513 on Wednesday, August 9, 2017 7:29 AM

Thanks for the support guys...hope I don't let you down lol!

Small update...got most of the engine assembled and painted. Added some hose and some wiring to busy it up a little. I may add a some more hose here or there and do some light weathering.

After looking at the picture I see some of the small wires broke off so I'll have to reattach those...oh well one step forward and two backSmile

-Andy

  • Member since
    February 2012
  • From: Olmsted Township, Ohio
Posted by lawdog114 on Sunday, August 6, 2017 8:57 PM
I look forward to your progress on this one. I enjoyed the one I built.

 "Can you fly this plane and land it?...Surely you can't be serious....I am serious, and don't call me Shirley"


  • Member since
    June 2014
Posted by BrandonK on Wednesday, August 2, 2017 9:08 AM

Andy, I went with those decals because I did want a different scheme. There is nothing wrong with the decals, they are very nice. I did use some of them on the kit. You will also have to display the lower engine cover open as well. The engine is corrrect in scale but with thick plastic panels the fit isnt there to close them. On my kit I had to file down a great deal of the engine in spots to get them to fit. With the real think and thin aluminum panels the fit is tight, with plastic it just won't work. I put a great deal of detail in on just one side of that engine and didn't feel like doing that for two more panels, so I filed and closed it up. I look forward to watching yours come together.

BK

On the bench:

A lot !! And I mean A LOT!!

2024 Kits on deck / in process / completed   

                         14 / 5 / 2  

                              Tongue Tied

  • Member since
    September 2014
Posted by rooster513 on Tuesday, August 1, 2017 12:55 PM

BK that is a nice looking build! Glad to hear you enjoyed yours. I plan to do both engine panels open so fit hopefully won't be a problem. I'm going to give drilling out the exhaust a go on this but if they don't turn out good I may grab the quickboost exhaust. They are meant for the Has kit I think but I'm sure I could make them work:) 

I see you went aftermarket with decals. Is that b/c you wanted a different scheme or did you have problems with the kit decals? I've heard good and bad things about them.

-Andy

  • Member since
    June 2014
Posted by BrandonK on Tuesday, August 1, 2017 12:35 PM

blackdog62
Like your work on the prop hub. subtle but defined

Thanks. If memory serves on this kit I added a resin prop and spinner and Eduard PE in the pit. Other than that it is the kit part. Seems to me that I remember seeing that the  prop and spinner were the incorrect shape for this F4. Honestly, the kit part was quite close so I wouldn't spend the money next time.

BK

On the bench:

A lot !! And I mean A LOT!!

2024 Kits on deck / in process / completed   

                         14 / 5 / 2  

                              Tongue Tied

  • Member since
    September 2013
Posted by blackdog62 on Tuesday, August 1, 2017 11:39 AM

Howdy brandonk... Your kit looks really sweet.  Nice job I love how you guys make that fine detail look so good. I always have a tricky time showing panel lines and rivets looking good. Like your work on the prop hub. subtle but defined. If that makes any sense. Lol

  • Member since
    September 2013
Posted by blackdog62 on Tuesday, August 1, 2017 11:32 AM

Don't know how I missed this one. I will be following it now. I have this kit and the 109-f2 version in my stash. In the box it looks great there the 2 109 kits I take out and look at a lot. So detailed dosent look like any after market parts are needed.

If have a way to get to model master paints they have a great line of labeled RLM paints in oil and acrylic.

Can't wait to started mine. I'm gona be following. Good luck.

  • Member since
    June 2014
Posted by BrandonK on Tuesday, August 1, 2017 9:22 AM

Andy, I built this kit. And I loved it. It has tons of small bits that will try your patience for certain. If you plan to show it with open engine then you'll have to have all the panels open and the engine is too big to allow any of them to close with it installed. I had to modify the engine to allow me to only have one panel open and it took a ton of work. If you show it all closed up then leave the engine out. It builds up nicely and has tons of great details. I'll be following this one for sure.

BK

On the bench:

A lot !! And I mean A LOT!!

2024 Kits on deck / in process / completed   

                         14 / 5 / 2  

                              Tongue Tied

  • Member since
    September 2014
Posted by rooster513 on Monday, July 31, 2017 10:52 AM

I've decided to finally dust this one off and try tackling it. I put it on the shelf many months ago as I was concerned about the "fiddly" bits that this kit is reported to have. I also had some concerns on doing the scheme for the kit supplied decals. There is the box art scheme shown below and another with half the fuselage overpainted with white. I've gotten a few more builds under my belt since I last looked at this kit and I'm excited to give it a go!

I may go aftermarket with decals yet but that decision can wait for nowBig Smile I've started on the engine and will hopefully have some pics up soon!

-Andy

  • Member since
    March 2010
  • From: MN
Posted by Nathan T on Thursday, November 10, 2016 10:46 PM

True, but it looks like we both have planes mixed up. The machine in the bottom photo is Reinhard Sielers mount. You are building the one pictured in the top photo correct?


  • Member since
    September 2014
Posted by rooster513 on Thursday, November 10, 2016 4:33 PM

Thanks for the info Nathan! so it looks like the lighter gray (rlm 02) was over sprayed on the regular mottling. Does that sound right? 

-Andy

  • Member since
    March 2010
  • From: MN
Posted by Nathan T on Wednesday, November 9, 2016 6:44 PM

Ok, sorry for the long wait. Here's some scans from the above mentioned book series. I'd say the wings are still definately 74, 75, and the fuselage looks to oversprayed with a lighter color, RLM 02? Hope these photos help, and aren't too late. 


  • Member since
    March 2010
  • From: MN
Posted by Nathan T on Friday, November 4, 2016 11:20 AM

I may have details on this particular bird from the Christer Bergstrom series...stand by...


  • Member since
    April 2006
  • From: ON, Canada
Posted by jgeratic on Friday, November 4, 2016 9:54 AM

I think their colour list was intended to match the appropriate RLM shades.   The 117 US light green is likely their suggested RLM 02 equivalent.


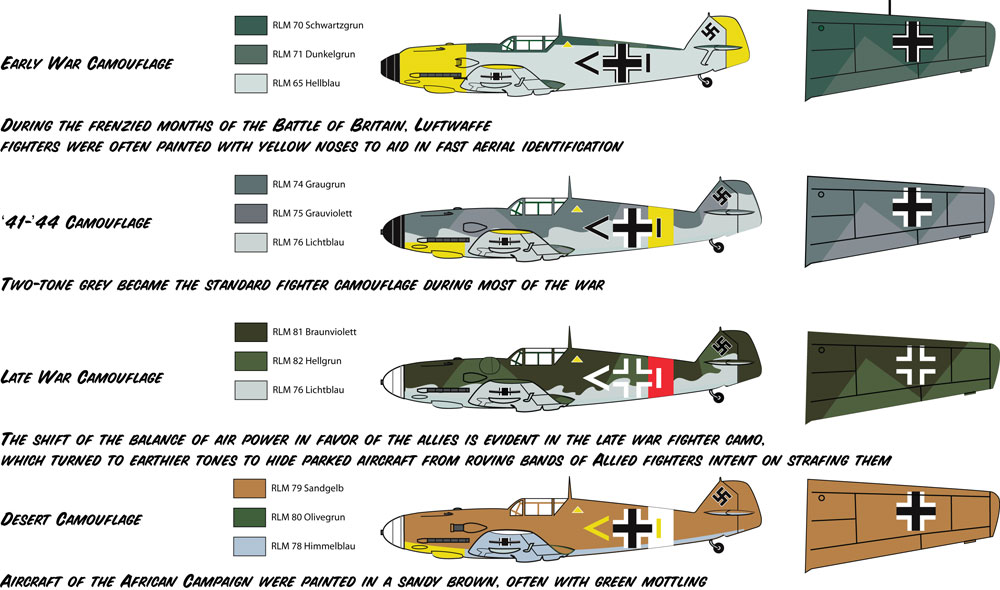
The above link is just an exmple, but for various reasons the images are not intended as an exact match!   As you can see though, the 74/75 is basically a grey on grey scheme.

Don't let the names fool you, many paint companys will not directly label their bottles as RLM so that they can be used on other non-Luftwaffe subjects.  Conversely, just becasue a paint bottle has RLM ## on it, doesn't necessarily mean it's an exact match either.

regards,

Jack

  • Member since
    September 2014
Posted by rooster513 on Friday, November 4, 2016 7:02 AM


I thougt so too Jack, but the paint guide says the underside should be Humbrol 145 Medium Grey and the top camo Humbrol 67 tank grey and 125 dark grey. Mottling calls for Humbrol 115 dark green and 117 US light green. I don't know much about German camo but I have not seen the grey over grey scheme before. Too many darn colors! LOL

-Andy

  • Member since
    April 2006
  • From: ON, Canada
Posted by jgeratic on Tuesday, November 1, 2016 3:26 PM

Standard factory finish at this time was RLM 74/75/76.  As is the custom with Lufwaffe units,  adding to and repainting was done in the field.   My best guess is RLM 70 was heavily mottled on the sides, perhaps on top of the wings too, to better match the environment they were operating in.

JG54 is known for setting extreme examples of  schemes.  You probably have come across it on your searches, but there is some  giving this particular mount an asymmetrical paint job, with the port side and part of the wings in a light grey.

regards,

Jack

  • Member since
    September 2014
Zvevda 1/48 Bf 109F-4 (Max Hellmuth Ostermann)
Posted by rooster513 on Tuesday, November 1, 2016 9:20 AM

So I've just started on Zvezda's BF1094F-4 flown by Max-Hellmuth Ostermann. I'm having some trouble nailing down the most accurate paint scheme for this bird. The instructions show significant mottling on the side of the plane after May 10th 1942 (before it was partly white). Problem is all the online pics I've seen don't really show any mottling but more of a uniform color on the side (a green of some kind?). Has anyone built this bird before and have some advice on the RLM colors I should be using? Thanks for any feedback!

-Andy

JOIN OUR COMMUNITY!

Our community is FREE to join. To participate you must either login or register for an account.

SEARCH FORUMS
FREE NEWSLETTER
By signing up you may also receive reader surveys and occasional special offers. We do not sell, rent or trade our email lists. View our Privacy Policy.