SEARCH FINESCALE.COM

Enter keywords or a search phrase below:

1/32 Revell Bell X-1 Finished

4303 views
37 replies
1 rating 2 rating 3 rating 4 rating 5 rating
  • Member since
    April 2010
Posted by Theuns on Saturday, December 31, 2016 10:49 AM

Very interesting subject, the colour really looks nice :-)


Theuns

  • Member since
    February 2014
  • From: Michigan
Posted by silentbob33 on Saturday, December 31, 2016 10:12 AM
Great job on this one. Your scratchbuilt pitot tubes are so much better than the kit ones.

On my bench: Academy 1/35 UH-60L Black Hawk

  • Member since
    March 2015
  • From: Streetsboro, Ohio
Posted by Toshi on Saturday, December 31, 2016 7:38 AM

Wow, the X-1 is a chameleon!  LOL!  In all seriousness, that's a fantastic build!  You did a great job on a historic aircraft.  

Toshi

On The Bench: Revell 1/48 B-25 Mitchell


Married to the most caring, loving, understanding, and beautiful wife in the world.  Mrs. Toshi


  • Member since
    December 2002
  • From: Bury St Edmunds, Suffolk, England
Posted by Bish on Saturday, December 31, 2016 1:14 AM

Great to see one of these buiilt, really nice job on it. Amazing how much differance taking pics out side can make. You can certainly see a lot more in the outside pics.

I am a Norfolk man and i glory in being so


On the bench: Airfix 1/72nd Harrier GR.3/Fujimi 1/72nd Ju 87D-3

  • Member since
    December 2002
  • From: Northern California
Posted by jeaton01 on Saturday, December 31, 2016 12:21 AM

Great job, Jeremy, looks like the real thing.  I suspect white balance is the culprit on the changing colors.

John

To see build logs for my models:  http://goldeneramodel.com/mymodels/mymodels.html


  • Member since
    April 2016
  • From: Parsons Kansas
Posted by Hodakamax on Friday, December 30, 2016 4:33 PM

Ah, good job on a cool aircraft! As a kid I was fascinated with that whole scene and followed it every step I could. Later in life it was really a great moment seeing it hanging in the Air and Space Museum along with the other milestones of flight. 

You have done it justice!

Max

  • Member since
    January 2009
  • From: hamburg michigan
Posted by fermis on Friday, December 30, 2016 3:36 PM

Revenant
Great improvement w the scratched pitots...funny how much of a tonal variation of the orange the indoor vs outdoor light causes! So when are you posting your year-end review!!! The World Wonders...
 

Thank you...just got the "round up" posted!

Crazy...indoor shots make it more orange, outdoor shots make it more red...to the eye, it's in between, leaning more toward the orange side.

  • Member since
    May 2016
Posted by Revenant on Friday, December 30, 2016 3:13 PM
Great improvement w the scratched pitots...funny how much of a tonal variation of the orange the indoor vs outdoor light causes! So when are you posting your year-end review!!! The World Wonders...
  • Member since
    January 2009
  • From: hamburg michigan
Posted by fermis on Friday, December 30, 2016 2:20 PM

Alright, last one for the year!


Final touch being new pitot tubes. Made from Albion Alloys aluminum tubing. Much better than the monsterous clunkers the kit provides.

I used a larger tube for the insert into the wing tips, to replicate what's on the real thing.


Glory shots...


I took the rest of the pics outside, inside pics are kinda blown out and the subtle variations can't be seen.


  • Member since
    January 2009
  • From: hamburg michigan
Posted by fermis on Wednesday, December 28, 2016 7:25 PM

rangerj

You could add a piece of a round tooth pick to simulate the stick Yeager used to latch the hatch. He had fallen off a horse the day before and injured his ribs so he needed the leverage to pull the hatch lever. If he had made his injuries known he would not have been allowed to make the flight. His flight was followed and observed by Bob Hoover in a T-33. Also note that almost all of these record breaking experimental flights were ended with a "dead stick" landing, that is with no power. You get one shot at the landing set up.

Great looking model. What was your ratio on the red/yellow mix? I did mine with the old Pactra orange enamel, but your orange looks better.


The kit does include a "broom handle". This is better replaced by something a bit thinner. I forgot to put it in there...but with that big open door, that's a non-issue.

I honestly couldn't give the exact ratio on the paint mix. I had mixed it up a couple years back, for a Coast Guard helo (amazed that it's still good!). Started with yellow...added red until it looked good to me.

  • Member since
    March 2003
Posted by rangerj on Wednesday, December 28, 2016 6:30 PM

You could add a piece of a round tooth pick to simulate the stick Yeager used to latch the hatch. He had fallen off a horse the day before and injured his ribs so he needed the leverage to pull the hatch lever. If he had made his injuries known he would not have been allowed to make the flight. His flight was followed and observed by Bob Hoover in a T-33. Also note that almost all of these record breaking experimental flights were ended with a "dead stick" landing, that is with no power. You get one shot at the landing set up.

Great looking model. What was your ratio on the red/yellow mix? I did mine with the old Pactra orange enamel, but your orange looks better.

  • Member since
    January 2009
  • From: hamburg michigan
Posted by fermis on Wednesday, December 28, 2016 5:12 PM

CrashTestDummy


fermis
CrashTestDummy

I'm guessing you put the blue painter's tape in place before you joined the fuselage halves together?


Negative...there's very little room at the bottom of the door where the floor meets it...I didn't want to get the tape stuck between the floor and the fuselage. I stuck it in before adding the canopy.


That makes sense, too.  Thanks for the update.  Nice work on the paint!  What color orange are you using there?  I have this kit in my stash. 

Gene Beaird,
Pearland, Texas


Thanks...and...

...well...orange...orange. I mixed Insignia Red and Insignia Yellow...so I guess it'd be Insignia Orange??? (MM enamels)

  • Member since
    January 2010
Posted by CrashTestDummy on Wednesday, December 28, 2016 2:43 PM

fermis
CrashTestDummy

I'm guessing you put the blue painter's tape in place before you joined the fuselage halves together?


Negative...there's very little room at the bottom of the door where the floor meets it...I didn't want to get the tape stuck between the floor and the fuselage. I stuck it in before adding the canopy.


That makes sense, too.  Thanks for the update.  Nice work on the paint!  What color orange are you using there?  I have this kit in my stash. 

Gene Beaird,
Pearland, Texas


G. Beaird,

Pearland, Texas

  • Member since
    January 2009
  • From: hamburg michigan
Posted by fermis on Wednesday, December 28, 2016 1:25 PM

Revenant

Stick out tongueLooking good...from my own extensive and expensive experience I know that yellow, white and orange are the most difficult final colors I spray.  Nicely done!


...it didn't 'orange peel' did it?  --see what I did there???


Yes, I do see whatchya did...there!....and No...went down nice and smooth.

I really have never had a problem painting those colors...so long as you put them down over white.


Decals are done...nice and simple!


  • Member since
    May 2016
Posted by Revenant on Wednesday, December 28, 2016 9:08 AM

Stick out tongueLooking good...from my own extensive and expensive experience I know that yellow, white and orange are the most difficult final colors I spray.  Nicely done!


...it didn't 'orange peel' did it?  --see what I did there???

  • Member since
    January 2009
  • From: hamburg michigan
Posted by fermis on Tuesday, December 27, 2016 3:59 PM

Painted and glossed, ready for decals.

There is a little bit of tonal variation there...camera doesn't really pick it up though.


  • Member since
    March 2015
  • From: Streetsboro, Ohio
Posted by Toshi on Friday, December 23, 2016 4:31 AM

Fermis, this looks great and thank you for the white on black tip.  Always learning from your threads.

Toshi

On The Bench: Revell 1/48 B-25 Mitchell


Married to the most caring, loving, understanding, and beautiful wife in the world.  Mrs. Toshi


  • Member since
    January 2009
  • From: hamburg michigan
Posted by fermis on Thursday, December 22, 2016 9:24 PM

Got the painting process started. Started with black, then went with white, leaving just a little tonal variation showing. Anytime I paint red or yellow, or anything in between, I always paint as though white was to be the final color, then "tint" it with color. I'll go a little heavier with the orange than I typically would, but still leaving a little variation...to keep from looking like a toy.

  • Member since
    January 2009
  • From: hamburg michigan
Posted by fermis on Monday, December 19, 2016 8:37 PM

CrashTestDummy

I'm guessing you put the blue painter's tape in place before you joined the fuselage halves together?

Negative...there's very little room at the bottom of the door where the floor meets it...I didn't want to get the tape stuck between the floor and the fuselage. I stuck it in before adding the canopy.

  • Member since
    January 2010
Posted by CrashTestDummy on Monday, December 19, 2016 10:43 AM

I'm guessing you put the blue painter's tape in place before you joined the fuselage halves together?

Agreed, nice work in the pit. 

Gene Beaird,
Pearland, Texas

G. Beaird,

Pearland, Texas

  • Member since
    August 2013
Posted by Jay Jay on Monday, December 19, 2016 7:15 AM

Fabulous work on the cockpit. The canopy masking is just perfect as well.


 I'm finally retired. Now time I got, money I don't.

  • Member since
    January 2009
  • From: hamburg michigan
Posted by fermis on Sunday, December 18, 2016 5:05 PM

Thanks all!

Got some more work done...scribed...all together and ready for the paint booth!


  • Member since
    February 2012
  • From: Olmsted Township, Ohio
Posted by lawdog114 on Thursday, December 8, 2016 12:54 AM
nice cockpit work...

 "Can you fly this plane and land it?...Surely you can't be serious....I am serious, and don't call me Shirley"


  • Member since
    May 2016
Posted by Revenant on Wednesday, December 7, 2016 9:12 PM

goldhammer

Nice work on the wood.


...yes...

  • Member since
    July 2004
  • From: Sonora Desert
Posted by stikpusher on Wednesday, December 7, 2016 5:25 PM

fermis


Revenant


Hmmmmmm...wonder what that BIG base is for???


A BIG boat!


Are you going to need a bigger boat?


F is for FIRE, That burns down the whole town!

U is for URANIUM... BOMBS!

N is for NO SURVIVORS...

       - Plankton

LSM


  • Member since
    August 2014
  • From: Willamette Valley, Oregon
Posted by goldhammer on Wednesday, December 7, 2016 5:14 PM

Nice work on the office and on the wood.  Have a chunk of oak in the rig to make a base for the 1/800 Kitty Hawk I'm doing for a friend's widow.  Going to have to make another 5 feet long for the other boat build next year.  But those will have a simple rabbet on the edges for a plexi cover.

  • Member since
    May 2016
Posted by Revenant on Wednesday, December 7, 2016 4:36 PM

fermis


Revenant


Hmmmmmm...wonder what that BIG base is for???


A BIG boat!


Smile Dots

  • Member since
    January 2009
  • From: hamburg michigan
Posted by fermis on Wednesday, December 7, 2016 2:48 PM

Revenant


Hmmmmmm...wonder what that BIG base is for???


A BIG boat!

  • Member since
    May 2016
Posted by Revenant on Wednesday, December 7, 2016 2:11 PM

fermis

Thanks guys!

It's sure nice to do something simple, for a change!


Revenant

Huh?Interesting, I guess those ship models you alluded to earlier are still in dry-dock....


Yes...and no.

I've been looking them over these last few days, planning out my attack...and trying to get myself the gumption to start snipping plastic.

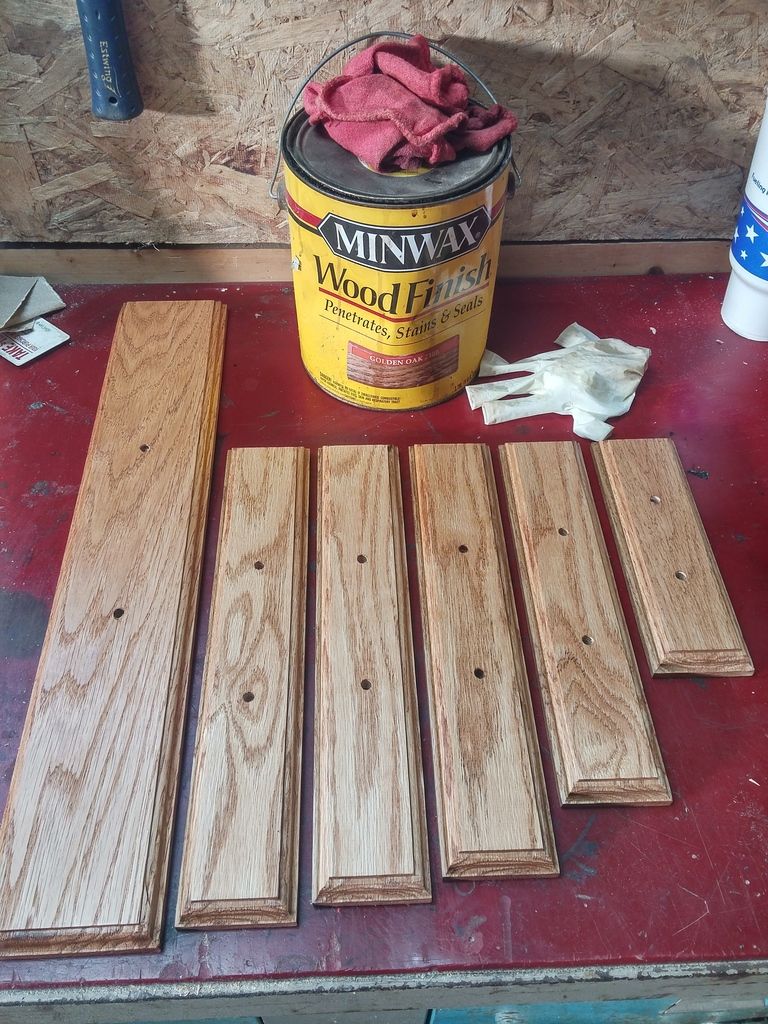
Today, I decided to take advantage of the last warm day (a balmy 34F) for the next while...forecast is for highs in the 20's for the next week. I cut up some oak and made bases for all the boat models I have. Cut em to length, ripped em down on the table saw for width, put em on the router table, drilled for the spindles and hit em with some "golden oak"....gotta let em dry, then varnish em.

I do have two more boats, but already had the bases made for those.


Hmmmmmm...wonder what that BIG base is for???

JOIN OUR COMMUNITY!

Our community is FREE to join. To participate you must either login or register for an account.

SEARCH FORUMS
FREE NEWSLETTER
By signing up you may also receive reader surveys and occasional special offers. We do not sell, rent or trade our email lists. View our Privacy Policy.