SEARCH FINESCALE.COM

Enter keywords or a search phrase below:

Finished: 1/48 Eduard Bristol F.2B

7117 views
48 replies
1 rating 2 rating 3 rating 4 rating 5 rating
  • Member since
    January 2015
Finished: 1/48 Eduard Bristol F.2B
Posted by BrandonD on Monday, June 26, 2017 6:20 PM

Well, it's time to dive into a WWI subject, and I wanted to do something RAF for the 100th anniversary group build.

I got started with this before realizing I may have picked one of the harder WWI subjects when it comes to the way the lower wing mounts and, of course, the rigging, but oh well, we will see.

As usual, work started with the cockpit. Nothing special here - Tamiya Desert Yellow with some oil paints for wood, and I built up the rest of the pit out of the box, which includes lots of PE as it's a Profipack kit, including the wicker pilot's seat.

Bristol F.2B


Bristol F.2B

Bristol F.2B

Bringing the fuselage halves together was pretty straightforward, and the flat spine of the airfraft made eliminating the seam pretty simple thanks to super glue.

Bristol F.2B

It appears I'll have to paint the whole thing largely disssembled, as the lower wing is suspended below the fuselage on several small struts, and no way will paint flow up in there.

I will be painting this in Mr. Paint's Clear Doped Linen and PC10 Late. I don't particularly care about this aircraft all that much, so I wanted to use it as my first attempt at rigging.

Thanks for looking!

-BD-

  • Member since
    January 2015
Posted by PFJN on Monday, June 26, 2017 9:54 PM

Hi,

That looks great so far.  Can't wait to see how it all turns out Smile

Pat

1st Group BuildSP

  • Member since
    April 2015
Posted by Mopar Madness on Monday, June 26, 2017 10:12 PM

She's a beauty!

Chad

God, Family, Models...

At the plate: 1/48 Airfix Bf109 & 1/35 Tamiya Famo

On deck: Who knows!

  • Member since
    October 2009
Posted by Ultra on Monday, June 26, 2017 11:20 PM

Holy smokes!  That looks like a good start.

  • Member since
    January 2015
  • From: Tumwater, WA.
Posted by M. Brindos on Monday, June 26, 2017 11:29 PM

Agreed!! Nice start Brandon! LOVE IT!

- Mike Brindos "Lost Boy"

  • Member since
    December 2010
  • From: Salem, Oregon
Posted by 1943Mike on Monday, June 26, 2017 11:40 PM

Brandon, you're doing a fine job so far.

I actually like some of the WWI aircraft more than some of the WWII planes. I'll certainly be following this build.

It's interesting to me that this aircraft internalized the forward mounted MG (The Vickers). The MG had a tube extending to an opening near the top of the radiator/cowl. I wonder if it was one of the first combat aircraft to have a gun design like this? I'm ignorant on that subject so some of you might chime in and educate me Smile.

Mike

"Le temps est un grand maître, mais malheureusement, il tue tous ses élèves."

Hector Berlioz

  • Member since
    March 2015
  • From: Streetsboro, Ohio
Posted by Toshi on Tuesday, June 27, 2017 7:28 AM

Great start, I'm pulling up my chair on this one with a cup of Earl Grey.

Toshi

On The Bench: Revell 1/48 B-25 Mitchell


Married to the most caring, loving, understanding, and beautiful wife in the world.  Mrs. Toshi


  • Member since
    January 2015
Posted by BrandonD on Wednesday, June 28, 2017 1:07 PM

Thanks, all!

Mike - yeah at first I thought it didn't have forward armament, but then saw the MG mounted in the cockpit and thought that was pretty cool. I wonder if having it so close to the propeller boss reduced the rate of fire. Theoretically, it would put the propeller in front of the gun for more time than one that was over the cowling and farther out on the arc, especially with a four-bladed prop. But it clearly worked, as the Brisfit did well when they flew it like a fighter.

I love the early aircraft, because there was so much they were just figuring out. Even the Fokker Eindecker was still using wing warping instead of ailerons. Crazy to think of flying in one, let alone taking one into combat.

-BD-

  • Member since
    January 2015
Posted by BrandonD on Wednesday, June 28, 2017 1:07 PM

I got some paint down on the Brisfit last night. I's really weird to me to switch to the biplane paint sequence, but it's also a nice change and problem solving exercise.

I wanted to highlight the rib tapes a bit without going overboard, so I decided to black base them and then spray the tapes individually before filling in the between areas and then overspraying to blend. It worked decently on the clear doped linen, but the PC10 is really too dark to notice much delineation. I may use lighter oils to enhance them later on, but I don't see too much variation on the real ones, so I may not.

Here is the process:

Bristol F.2B

And this is the result after putting on the lower wing ailerons and decals. If you build this kit, note that the instructions are wrong for the top ailerons, and they are reversed. I painted them per instructions before attaching them, so I need to respray them now. 

Bristol F.2B

I also attached the elevators to the horizontal stabilizer. I wanted them dropped slightly, so I glued one in place and let it set, then glued the other one. To maintain symmetry, I clamped them together.


Bristol F.2B

That's it for now. I think when it comes to rigging the dual wires, I'll drill two holes in a sturdy piece of plastic and use that as an alignment tool so my wires actually run parrallel. This is fun.

-BD-

  • Member since
    January 2015
Posted by BrandonD on Thursday, June 29, 2017 6:29 PM

Well, went home at lunch today to put the top roundels on. Aaaaaand... left one in the water too long Bang Head.

Email is off to Eduard inquiring about a replacement set.

In the meantime, I suppose I can get to work on the ordnance, propeller and undercarriage.

Ugh.

Bristol F.2B

-BD-

  • Member since
    October 2004
  • From: Colorado
Posted by StephenLawson on Sunday, July 2, 2017 5:57 PM

Photo bucket wants $400.00 to open your account for sharing images.


Stachel...unconfirmed by Armee means unconfirmed!!!!

  • Member since
    January 2015
Posted by BrandonD on Monday, July 3, 2017 1:06 PM

StephenLawson

Photo bucket wants $400.00 to open your account for sharing images.


Yeah, and Photobucket can light itself on fire and I won't even spit on it to put it out.

I'll be replacing my photos with another service soon. Just need to upload them to Flickr or Dropbox, whichever one I go with. Photobucket has been garbage for a long time, and the idea of throwing $4 their way for that is laughable, let alone $400.

-BD-

  • Member since
    January 2015
Posted by BrandonD on Friday, July 7, 2017 11:02 AM

Well, A+ support from Eduard. I wrote them telling them I messed up the decals, and even thoygh it was totally my fault, they said they'd toss in a replacement sheet for free on an order I was already makingon their site. Once it gets here, I'll be back in business.

-BD-

  • Member since
    December 2010
  • From: Salem, Oregon
Posted by 1943Mike on Friday, July 7, 2017 10:30 PM

Eduard is not cheap - and one must buy a minimum $ of merchandise from them before they'll ship - that's only sound business practice. I think they're a good company, have good products, and now - based on your experience - I guess they have excellent customer service as well.

Good to know you'll be continuing this WIP soon.

P.S. I second your thoughts regarding Photobucket. I'm now with Flickr - we'll see how they do.

Mike

"Le temps est un grand maître, mais malheureusement, il tue tous ses élèves."

Hector Berlioz

  • Member since
    April 2015
Posted by Mopar Madness on Saturday, July 8, 2017 11:12 AM

Good news indeed.  I've had to order another cockpit hood for a 1/72 Fw-190 that I lost in the floor and they sent an entire sprue that arrived in Texas a week after they sent it!  Great customer support.

Chad

God, Family, Models...

At the plate: 1/48 Airfix Bf109 & 1/35 Tamiya Famo

On deck: Who knows!

  • Member since
    January 2015
Posted by BrandonD on Monday, July 10, 2017 4:05 PM

1943Mike

Eduard is not cheap - and one must buy a minimum $ of merchandise from them before they'll ship - that's only sound business practice. I think they're a good company, have good products, and now - based on your experience - I guess they have excellent customer service as well.

Good to know you'll be continuing this WIP soon.

P.S. I second your thoughts regarding Photobucket. I'm now with Flickr - we'll see how they do.


I actually think that Eduard kits are cheap, when compared with what I need to make other kits meet their standard. You can get a weekend edition 109 for $20, which is about what you can get a Tamiya 109 for, and the Eduard one comes with a harness.

When it comes to Profipack kits, yeah, they're a bit more, but I typically am able to find them for $30-$35, and when you factor in the amazing decals, PE set(s) and paint masks, I think it's actually much better value than some other manufacturers, especially ones like Hasegawa, which charge at least that much.

-BD-

  • Member since
    January 2015
Posted by BrandonD on Monday, July 10, 2017 4:18 PM

Ok, so the one thing other than rigging that has always made me stay away from WWI models is replicating the look of the laminated wood propeller by paitning.

Looking from the top, the lines in the propeller should be parrallel, and looking from the front, they do some crazy twisty-turny patterns due to the shape of the prop.

I saw a guy on Facebook who carved his own, so I decided to try that out.

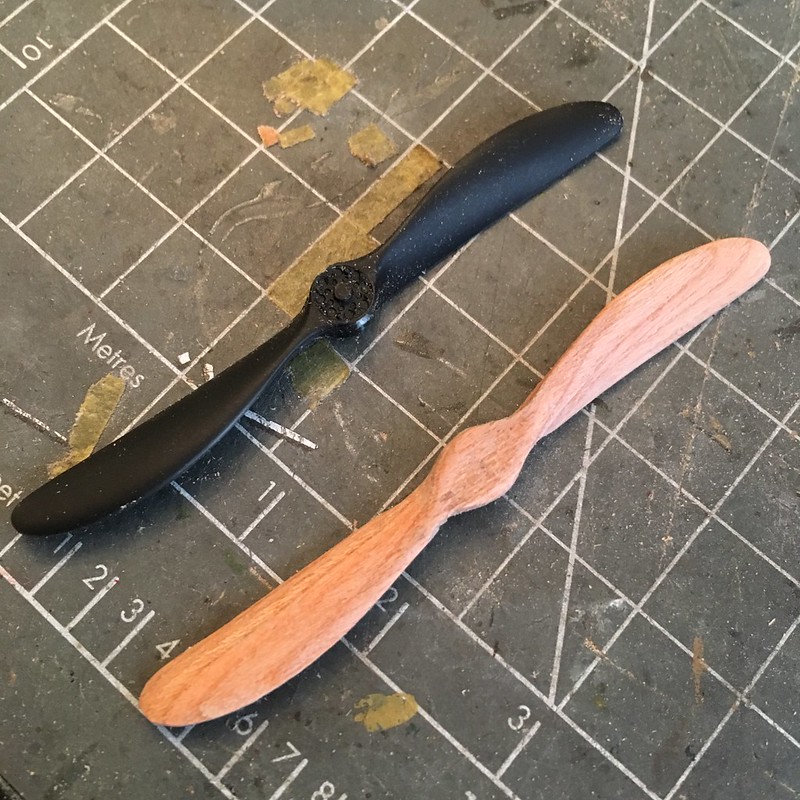
I started with thin walnut veneer I picked up at a local woodworking shop. $11 got me enough sheets to make about 36 1/48 walnut props, so it's pretty cost-effective.

I bought some Truebond Original wood glue at the clerk's recommendation, and I went home and cut strips of veneer with my X-acto knife.

Wooden Prop

The above strips are actually not what I ended up with, as the lighter ones were a different wood that didn't work out. Since this is an allied prop, and they didn't see the big contrast in wood types that Central Powers props did, I used all walnut (top, middle and bottom of the above). I ended up using 6 strips in the final prop.

I glued them and clamped them in a vise, then drew a rough outline of the prop on the top with pencil.

Wooden Prop

That was easy enough, so I cut it down with a razor saw and X-acto knife to get it roughly right, but still oversized.

Wooden Prop

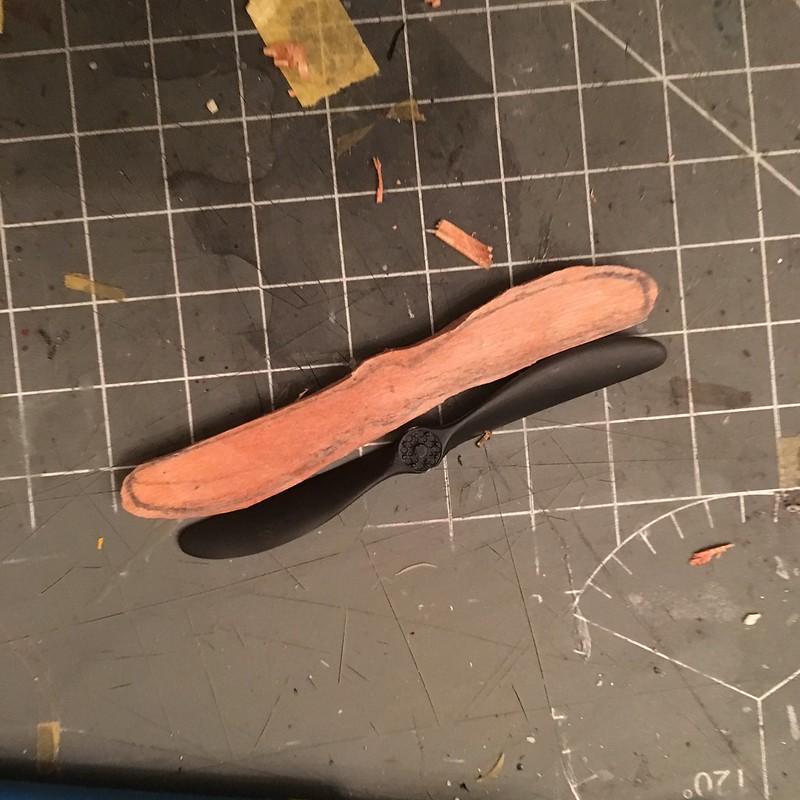
Next, I used flat, half-round and round files to shape it, then, when I had it where I wanted it, I used 600-grit sandpaper to smooth it out.

Wooden Prop

Wooden Prop

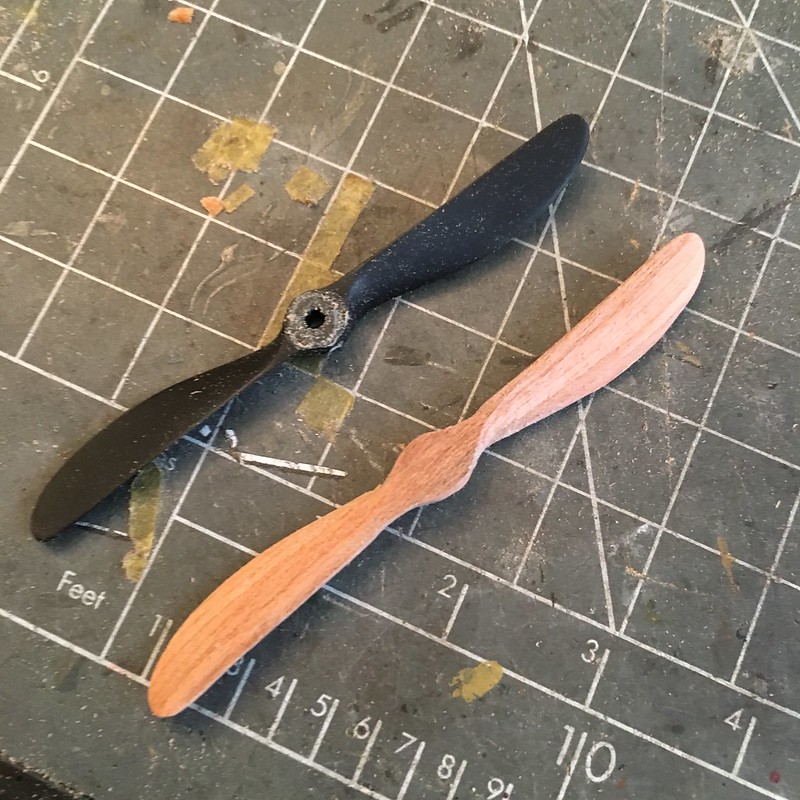
I ordered a set of Copper State Models photoetched prop bosses from Sprue Brothers just now, so I'll add that when they arrive. In the meantime, I'll spray this with Tamiya clear orange and clear yellow mixed to where I want it, drill the mounting hole and get back to the aircraft work so I'm ready to move forward when decals arrive.

-BD-

  • Member since
    April 2015
Posted by Mopar Madness on Monday, July 10, 2017 4:50 PM

That's some real craftsmanship right there! 

Chad

God, Family, Models...

At the plate: 1/48 Airfix Bf109 & 1/35 Tamiya Famo

On deck: Who knows!

  • Member since
    March 2015
  • From: Streetsboro, Ohio
Posted by Toshi on Monday, July 10, 2017 5:01 PM

Mopar Madness

That's some real craftsmanship right there! 


I completely agree!

On The Bench: Revell 1/48 B-25 Mitchell


Married to the most caring, loving, understanding, and beautiful wife in the world.  Mrs. Toshi


  • Member since
    December 2002
  • From: NYC, USA
Posted by waikong on Monday, July 10, 2017 11:01 PM
First off, great looking cockpit. Second, really like the paint job for the ribbing effect. But carving your own wooden propeller, over the top! Hats off to you.

My website: http://waihobbies.wkhc.net


  • Member since
    January 2015
  • From: Tumwater, WA.
Posted by M. Brindos on Monday, July 10, 2017 11:57 PM

If its not too late, try some oil washes on some scraps first. They may look better than tamiya clear orange. Maybe not. But give it a try before you commit it to that beautiful carving. :)

- Mike Brindos "Lost Boy"

  • Member since
    February 2012
  • From: Olmsted Township, Ohio
Posted by lawdog114 on Tuesday, July 11, 2017 2:39 AM
You should try paint on the roundels Brandon. Get a circle template and a sharp exacto. Nice work so far, especially the prop...wow.

 "Can you fly this plane and land it?...Surely you can't be serious....I am serious, and don't call me Shirley"


  • Member since
    January 2015
Posted by BrandonD on Tuesday, July 11, 2017 1:22 PM

lawdog114
You should try paint on the roundels Brandon. Get a circle template and a sharp exacto. Nice work so far, especially the prop...wow.
 

I know I should - probably what I'll do in the future with roundels. There's a really nice circle cutter I want to get, but it's like $50. Once I get the money set aside for that, I'll probably just paint them all. But also trying to see what I can do with the Silhouette Cameo machine we have at my office. I can use that to cut Kabuki and vinyl maks, which would then just require getting a file the right size, which should be really easy with just scanning the decal sheets and importing them to illustrator, then cutting them out.

TL;DR - weighing options.

-BD-

  • Member since
    January 2015
Posted by BrandonD on Wednesday, January 24, 2018 2:31 PM

It's hard to believe it's been six months since I have worked on this thing, but I got at it again and made some progress.

Eduard kindly sent me a free new decal sheet after I messed up the first one, so I was able to get the decals down and clear coat them...and then I left the plane alone for too long.

I decided to pull it back out and attach the lower wing. When selecting this kit as my first biplane, I didn't realize the lower wing is actually not in contact with the fuselage except for four rods and the landing gear struts. I think the geometry is slightly off side-to-side, which might make for...interesting fit on the cabane struts. We shall see. It's only 1-2mm, so hopefully not an issue.

Anyway, now it looks like about half an airplane. Next step is to finish the cabane and interplane struts like wood, then get the rigging going (gulp).


Untitled

Hoping to finish this one in thenext month or so.

-BD-

  • Member since
    April 2003
  • From: USA
Posted by keavdog on Wednesday, January 24, 2018 3:46 PM

Very cool of Eduard.  Love the prop - great idea.  I've been kicking around the idea of building a WWI bird - always loved the lines of the Albatross.

I'll be following.

Thanks,

John

  • Member since
    July 2016
  • From: NYC
Posted by Johnny1000 on Wednesday, January 24, 2018 4:40 PM

Wow. Great stuff. Dig the prop--that's some real modeling there.

I've been eyeing WWI subjects. All the things that make WWI stuff intimidating—wood, rigging, etc. is kind of perking my curiosity. 

I'll be following with interest.

-J

  • Member since
    August 2013
Posted by Jay Jay on Wednesday, January 24, 2018 6:29 PM

What could be better than real wood to simulate a wooden prop,WOW.  also think your interior is fabulous. how did you achieve the real leather look ?


 I'm finally retired. Now time I got, money I don't.

  • Member since
    January 2015
Posted by BrandonD on Wednesday, January 24, 2018 6:37 PM

Thanks, guys.

Jay Jay - I painted it Tamiya Red Brown and used a 4:1 mix of The Detailer Black and Brown washes, then stippled them when I took them off, just making sure they were still somewhat messy to give a dingy look to it.

-BD-

  • Member since
    August 2013
Posted by Jay Jay on Wednesday, January 24, 2018 7:22 PM

Thanks BD  I'll add that to my arsenal Yes


 I'm finally retired. Now time I got, money I don't.

  • Member since
    August 2016
Posted by Keyda81 on Wednesday, January 24, 2018 9:43 PM

Looking good!  I don't think I'll ever attempt anything with rigging.  I can see myself getting super irritated with it, lol. 

JOIN OUR COMMUNITY!

Our community is FREE to join. To participate you must either login or register for an account.

SEARCH FORUMS
FREE NEWSLETTER
By signing up you may also receive reader surveys and occasional special offers. We do not sell, rent or trade our email lists. View our Privacy Policy.