SEARCH FINESCALE.COM

Enter keywords or a search phrase below:

Finished: Eduard 1/48 Bf-109E3 Condor Legion

4722 views
34 replies
1 rating 2 rating 3 rating 4 rating 5 rating
  • Member since
    January 2015
Finished: Eduard 1/48 Bf-109E3 Condor Legion
Posted by BrandonD on Thursday, October 19, 2017 2:01 PM

Ok, I got started on this one for the Pride of the Luftwaffe Group Build. I am building the 1/48 Eduard Bf-109E-3 in Condor Legion markings from this boxing:
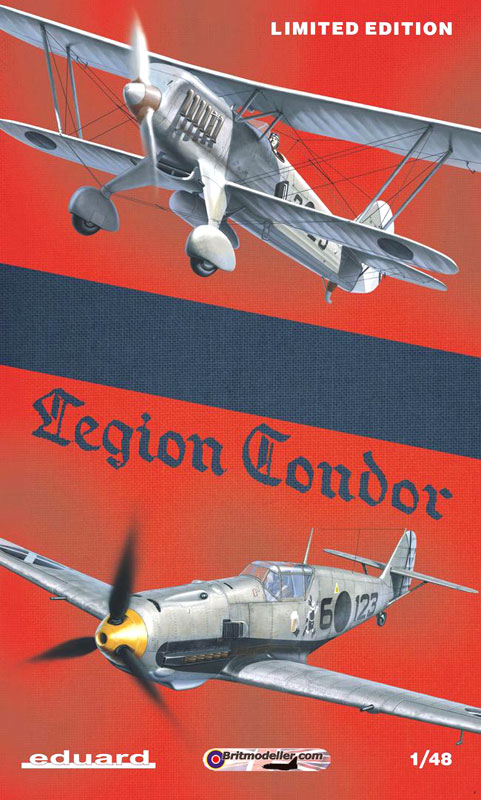
I'll be building the box art version, because it has a beer mug the pilot put on the plane in reference to a game that used to be played in the U.S., where he had spent time, that revolved around drinking beer.

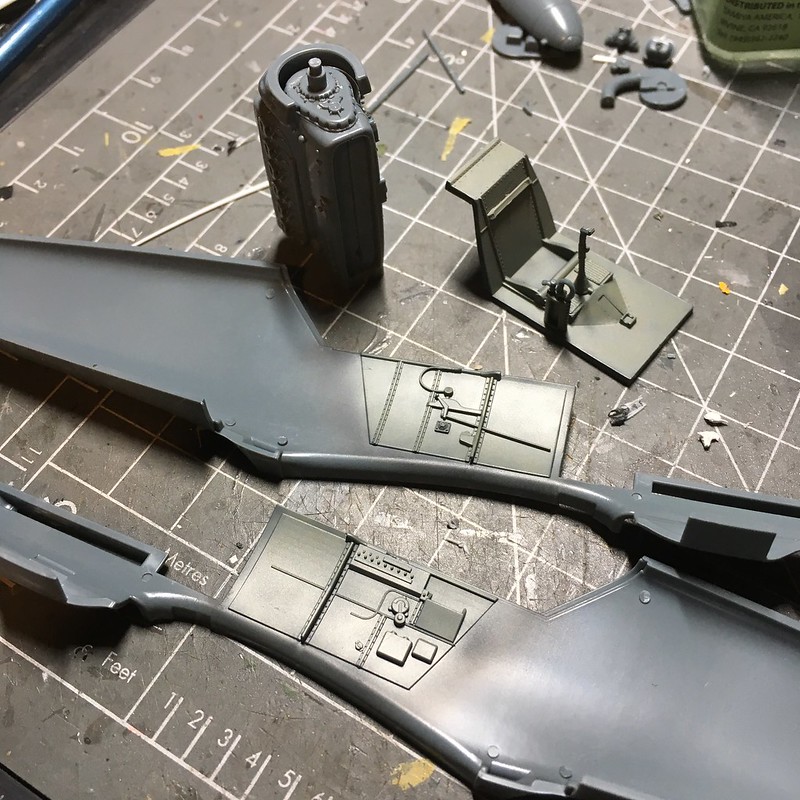
I started last night with some small cockpit buildup before I went to painting base coats.

I primed it with Mr. Surfacing Finisher 1500 Black, then sprayed it with Mr. Paint RLM 02. I'm not sure about the color, so I'm curious what you all think of the shade. It's a little different from Model Master RLM 02, which lookes pretty close to my eye, but in the end, I just really like the way Mr. Paint sprays, so I opted for it over Model Master.
Untitled

One thing I'm certain of is that the Eduard color PE gray looks pretty far off from RLM 02 to me, so while I will use it on the instrument panel, I am not using the switches on the right side of the cockpit and will opt to paint them instead.

I'm not going to weather this pit too heavily, as the pilot (and presumably the plane, as an E-3) arrived pretty late, and he didn't score any kills in the Spanish Civil War.

I built the shell of the engine, which is needed to hold the prop and exhausts, but I omitted most of the detail parts simply because I'm building this one with the cowl on. I already built one of their E-4s with the engine and guns exposed, which was fun.

As of now, it sits with the wing halves together, and I will do it with neutral ailerons, dropped flaps and extended leading edge slats.

That's all for now.

-BD-


  • Member since
    February 2005
  • From: Cleveland, OH
Posted by RadMax8 on Saturday, October 21, 2017 10:04 PM

Hey if you like how it sprays and it's close, it's good enough for me. I've found that it's not really worth it to get so bogged down in the minutia of details like that. You're the one enjoying the kit, right? 

A friend of mine recently picked up a ton on Eduard Bf109 kits, how do they go together? I've built a Tamiya E4 before, and of course that was a cracker of a kit. I don't really have much from the Luftwaffe in my stash, always looking to add to it. 

Looking forward to seeing more progress on this one. 

  • Member since
    January 2015
Posted by BrandonD on Thursday, October 26, 2017 4:07 PM

RadMax8

Hey if you like how it sprays and it's close, it's good enough for me. I've found that it's not really worth it to get so bogged down in the minutia of details like that. You're the one enjoying the kit, right? 

A friend of mine recently picked up a ton on Eduard Bf109 kits, how do they go together? I've built a Tamiya E4 before, and of course that was a cracker of a kit. I don't really have much from the Luftwaffe in my stash, always looking to add to it. 

Looking forward to seeing more progress on this one. 


Thanks! And yeah, the more I look at the color, the more OK I am with it.

As for how they go together, I think they are a little more fiddly than the Tamiya kit, but worth it for the increased detail.

THere aren't as many locating pins on the fuselage, but I found that adding the rear bulkhead and firewall to one side, then lining them up with the other side for drying, helps center the whole thing and keep it from drifting around when you close the fuselage halves.

The engine mount (if you're closing the cowl) is not idea (see next post). Other than that, it's an exceptional kit, and even the Weekend Edition Bf-109E7 tropical comes with superfabric seatbelts for around $20. The only problem with that kit in that boxing is that it doesn't give you anything to texture the extended tropical air filter (which has a PE shroud around it in other boxings). I ended up buying their detail set for cheap just for that part, but messed it up, and just built it with the cowl off to compensate.

-BD-

  • Member since
    January 2015
Posted by BrandonD on Thursday, October 26, 2017 4:07 PM

I got some work done on this one. I finished the cockpit and got the main assembly done last night.

I'm going to keep the rudder off and just paint the markings rather than dealing with the decals, and I'm considering painting the side markings with masks made with my sweet new Thinnerline circle cutter. 

Untitled


UntitledThe only thing I need to do before adding the cowl is mount the engine. The engine mount is the one place this kit really falls down on. With it all buttoned up, there doesn't seem to be room to use the actual mounts, and that leaves it just sitting without positive locating points inside the nose, which is problematic, given that's how the prop and exhausts mount.

I've built one of these with the cowl off, and it was fine, and I managed to add the exhaust at the end of the build, so I'm hoping to do that here, too, so I don't have to mask them. I'll probably stick the prop on it and use that to line it up inside, then super glue it wherever it touches inside, because the last thing I want is to go to add the prop at the end of the build, push it onto the nose, and break the attachment points so I'm left without a prop shaft and a rattling engine.

-BD-


  • Member since
    February 2005
  • From: Cleveland, OH
Posted by RadMax8 on Thursday, October 26, 2017 9:19 PM

Cockpit looks great so far. That’s a real shame about the motor. I think Eduard probably could have rigged up a better method for finishing it with the cowl closed. 

I read a lot about the Bf109 today (yes, I was bored at work and Wikipedia makes it through the firewall) and it amazes me how this plane was utilized for such a long time so successfully. Think of all the aircraft that were developed the same time that got obsoleted much quicker. Very cool!

  • Member since
    March 2015
  • From: Streetsboro, Ohio
Posted by Toshi on Friday, October 27, 2017 7:51 AM

Very cool WIP!  I love what you did with the cockpit, great job.  Looking forward to more.  And as always, your builds are of an exceptional quality.

Toshi

On The Bench: Revell 1/48 B-25 Mitchell


Married to the most caring, loving, understanding, and beautiful wife in the world.  Mrs. Toshi


  • Member since
    February 2012
  • From: Olmsted Township, Ohio
Posted by lawdog114 on Saturday, October 28, 2017 1:43 AM
Nice start. Be careful when assembling the top cowl gun deck area as it can be finicky. I would assemble the whole front end, gun deck then add the cockpit from underneath. I remember having issues there and this was how I solved it.

 "Can you fly this plane and land it?...Surely you can't be serious....I am serious, and don't call me Shirley"


  • Member since
    January 2016
  • From: A Galaxy Far, Far Away
Posted by Hunter on Sunday, October 29, 2017 2:44 PM

Brandon,

It's looking great sir....I'll be here watching!

Hunter 


  • Member since
    April 2015
Posted by Mopar Madness on Sunday, October 29, 2017 3:19 PM

Your moving right along.  Cockpit looks great!

Chad

God, Family, Models...

At the plate: 1/48 Airfix Bf109 & 1/35 Tamiya Famo

On deck: Who knows!

  • Member since
    January 2015
Posted by BrandonD on Tuesday, October 31, 2017 4:08 PM

lawdog114
Nice start. Be careful when assembling the top cowl gun deck area as it can be finicky. I would assemble the whole front end, gun deck then add the cockpit from underneath. I remember having issues there and this was how I solved it.
 

Thanks, Joe. That's the route I took, too. I feel like it helps center everything. I put the glue on it, then put the other fuselage half on to hold it in position while it dried, then I released it again before adding the rest. Really helps provide positive location when the locating pins are lacking a bit.

-BD-

  • Member since
    January 2015
Posted by BrandonD on Tuesday, October 31, 2017 4:10 PM

Thanks, all!

Well, I dropped it while masking the white wingtips and of course broke the tail wheel off just like I did last time I built Eduard's 109E.

They REALLY need to stop engineering them in a way that makes you add the tail wheel before closing the fuselage halves. THey did that on their new G and F series, too.

-BD-

  • Member since
    January 2015
Posted by BrandonD on Friday, November 17, 2017 1:18 PM

I have my 109 in its base paint scheme finally. Still need some touching up where I missed masking on the black parts, but that's pretty easy.

I used Model Master RLM 63 Lichtgrau for the topside, and while it looks a little light to my eye, some weathering will hopefully sort it out. The black around the exhaust and wing roots is just the primer, since I was being lazy. I used my Tamiya RLM 65 mix on the underside, and just straight Tamiya white sprayed thin over gray primer on the wingtips. 

UntitledI'm going to see if I can't hit the top of the engine with some black, as it's visibl through the vents. I'll try with a brush, but may have to mask and shoot it in there with the airbrush.

I also need to touch up some of the RLM 02 with my Mr. Paint under the slats (not yet glued down).

I was planning on masking the wing insignia, but then though, "Nah, Eduard decals are so good that I just don't want to deal with it." I am, however, masking and painting the rudder insignia.

I was happy to get the enamel top coat on before I head out of town. It'll be fully cured when I get back.

Unfortunately, I did break off the tail wheel strut, just like I did last time I built an Eduard -E, so I'll need to get some tubing or wire out, as well as add the tail antenna point thingy back since I managed to break that.

Thanks for looking!

-BD-


  • Member since
    January 2004
  • From: Brisbane Australia
Posted by ChrisJH666 on Friday, November 17, 2017 2:27 PM

Looking good!

In the queue: 1/48 Beech Staggerwing (RAAF), P38 (RAAF), Vultee Vengeance (RAAF), Spitfire Vb (Malta), Spitfire VIII x2 (RAAF), P39 x2 (RAAF), Martin Baltimore (Malta?), Martin Maryland (Malta), Typhoon NF1b, Hellcat x2 (FAA)


Chris

  • Member since
    April 2015
Posted by Mopar Madness on Friday, November 17, 2017 6:16 PM

Great masking on the wing tips and exhaust. These Condor Legion aircraft are pretty darn cool. 

Chad

God, Family, Models...

At the plate: 1/48 Airfix Bf109 & 1/35 Tamiya Famo

On deck: Who knows!

  • Member since
    January 2015
Posted by BrandonD on Friday, January 12, 2018 1:42 PM

Hi all,

It's been a while since I've been in here (holidays, health stuff blah blah), but I've finally had some time to get back at it and got most of this Spanish Civil War 109E together.

The Eduard decals went down as they always do - amazingly. I gave it a Flory Grime wash, attached the wheels and am going to flat clear it this weekend and hopefully add exhaust and exhaust stains and call it good.

I actually lost one of the wing guns to the carpet monster so had to buy a resin replacement.

Untitled


UntitledAnyway, that's where she sits now.

Glad to beback at the bench!

-BD-


  • Member since
    December 2002
Posted by 7474 on Sunday, January 14, 2018 10:10 AM
Great job on the Emil.
  • Member since
    April 2015
Posted by Mopar Madness on Sunday, January 14, 2018 10:14 AM

I like the paint and finish!  The exhaust masking looks great too.

Chad

God, Family, Models...

At the plate: 1/48 Airfix Bf109 & 1/35 Tamiya Famo

On deck: Who knows!

  • Member since
    March 2015
  • From: Streetsboro, Ohio
Posted by Toshi on Monday, January 15, 2018 4:42 AM

Glad to have you back at it.  It looks fantastic with those markings!  Keep up the great work!

You friend, Toshi

On The Bench: Revell 1/48 B-25 Mitchell


Married to the most caring, loving, understanding, and beautiful wife in the world.  Mrs. Toshi


  • Member since
    January 2015
Posted by BrandonD on Wednesday, January 24, 2018 12:51 PM

Thanks for the kind words, all. I'm working on the exhaust staining now, as well as some light weathering on the underside. Should have it wrapped soon.

-BD-

  • Member since
    February 2012
  • From: Olmsted Township, Ohio
Posted by lawdog114 on Thursday, January 25, 2018 12:34 AM
Looking sweet Brandon. Interesting with the yellow prop hub. I'm glad your feeling better. I hope it was nothing too serious.

 "Can you fly this plane and land it?...Surely you can't be serious....I am serious, and don't call me Shirley"


  • Member since
    January 2015
Posted by BrandonD on Thursday, January 25, 2018 6:47 PM

Thanks, Lawdog. Nothing too serious because I was alert to things that needed paying attention to, and I'm 100 percent now.

Yeah, the yellow hub is interesting, and I chose this scheme because of the beer under the canopy.

I got the flat clear on it last night and will hopefully get the exhaust staining on it soon and call it done.

-BD-

  • Member since
    January 2015
Posted by BrandonD on Wednesday, February 28, 2018 5:17 PM

Ok, I finished this one. I don't love the paint color, since it looks a little off to me, but that's what Model Master had for the RLM match and I went with it.

That said, this one is cleaner than I usually like to see, but it was also late to the game. I chose this scheme because I liked the beer on the side, and Mickey Mouse packing heat.

COndor Legion 109

COndor Legion 109 05

COndor Legion 109 04

COndor Legion 109 03

COndor Legion 109 02

COndor Legion 109 01

-BD-

  • Member since
    February 2012
  • From: Olmsted Township, Ohio
Posted by lawdog114 on Thursday, March 1, 2018 1:56 AM

Gotta love an armed Mickey...turned out great. Weathering looks fine to me. I agree the color seems off. Weren’t these overall RLM 02? I’m not too knowledgeable about pre 40 Luftwaffe. Great job none the less.

 "Can you fly this plane and land it?...Surely you can't be serious....I am serious, and don't call me Shirley"


  • Member since
    June 2014
Posted by BrandonK on Thursday, March 1, 2018 9:10 AM

Correct color or not, this is one very  cool looking scheme. I really like how this turned out. Well done, BD.

BK

On the bench:

A lot !! And I mean A LOT!!

2024 Kits on deck / in process / completed   

                         14 / 5 / 2  

                              Tongue Tied

  • Member since
    April 2013
  • From: Eleva, Wisconsin
Posted by Greatmaker on Thursday, March 1, 2018 2:45 PM

Very cool bird. Nice to see one with a different scheme.  She's a real beauty!


  • Member since
    February 2005
  • From: Cleveland, OH
Posted by RadMax8 on Thursday, March 1, 2018 3:18 PM

BD, I’d pick this scheme for the same reasons you outlined. Very cool subject, Condor Legion birds don’t get much love. 

Thanks for sharing. 

  • Member since
    September 2013
Posted by blackdog62 on Thursday, March 1, 2018 3:48 PM

howdy Brandon the build looks very nice the detail is awsom. model master dose not put it on there packaging but in there book it states there paints for 1/48  cut at 25% with white. I use there white primer that has a bit of blue in it.

the scale effects they list are as follows

1/32 10% white  1/48 25% white and 1/72 30% white. i think they should make this info more avalable being there product is sold everwhere. atleast in the states.

hope this helps in the future.

  • Member since
    January 2015
Posted by BrandonD on Thursday, March 1, 2018 4:03 PM

Thanks, all!

Joe - no, these were RLM 62 or 63. So, light gray or light green. Jury is apparently still out on that. Although RLM02 mixed with the color I used might be more what I actually wanted.

Blackdog - thanks for the info - that would esplain the cast to the color. I'm not sure I buy the whole "scale effect" thing, or we would have to allow for pink Ferraris, but I do think lighter colors sometimes just look better, so maybe I am a proponent after all and just don't know it.

-BD-

  • Member since
    July 2004
  • From: Sonora Desert
Posted by stikpusher on Thursday, March 1, 2018 4:12 PM

Excellent finish! I did not know that the E-3 made it to Spain and the Condor Legion.


F is for FIRE, That burns down the whole town!

U is for URANIUM... BOMBS!

N is for NO SURVIVORS...

       - Plankton

LSM


  • Member since
    September 2013
Posted by blackdog62 on Thursday, March 1, 2018 4:41 PM

howdy stickpusher while doing resurch on my 109-b im working on i also found out that the E-3 was indeed sent there. its seems the Luftwaffe sent there early birds  there in a fast program for testing.

JOIN OUR COMMUNITY!

Our community is FREE to join. To participate you must either login or register for an account.

SEARCH FORUMS
FREE NEWSLETTER
By signing up you may also receive reader surveys and occasional special offers. We do not sell, rent or trade our email lists. View our Privacy Policy.