SEARCH FINESCALE.COM

Enter keywords or a search phrase below:

1:48 Pratt & Whitney R-2800 Twin Wasp Match-up

8290 views
19 replies
1 rating 2 rating 3 rating 4 rating 5 rating
  • Member since
    June 2013
1:48 Pratt & Whitney R-2800 Twin Wasp Match-up
Posted by bvallot on Sunday, October 22, 2017 10:54 AM

This is a little side project I started doing which I thought I'd share here. I won't be starting my Hellcat until December, but I have a good feeling that I will be busier than I'd prefer. So I decided to start the engine now to keep from having to rush later. I will be using Eduard's Brassin R-2800 for that build. Everything I've seen about this resin engine looks like a delight to build and I'm happy to finally get to try it. I also picked up Vector's R-2800 to drop into the Corsair that will follow and decided to build them together to see how the two matched up. This is all rather straight forward so I'll just jump into it. =]

 Untitled by Britt Vallot, on Flickr

Here are the two sets of parts. Eduard's on the left and Vector on the right. The instructions for Vector are typical of those guys and seem to expect an experienced modeler who knows the engine well already (which I find kinda hard to argue with). One thing to point out is that the other doubled up parts are distributors for other blocks. It's not labeled and you wouldn't know it if you hadn't come across it in photo references. The Eduard's instructions are entirely opposite and read as well as one could ask. They honestly couldn't have made a better set of instructions. I don't have a picture of them here as it's four pages and I didn't feel it necessary. If you've purchased Eduard AM stuff in the past, then you likely already know. =] Both kits give an accurate interpretation of the P&W R-2800-10 engine. I lean a little bit to the Vector side for the cylinders, but for everything else I think the tie breaker goes to Eduard. The propeller reduction box is a little narrow on the Vector mold. Eduard's seems more accurate. Most kit manufactuers seem to go too narrow with this part I've noticed. I'd still place Vector ahead of the OOB builds though. It is noticably narrower compared to Eduard's but still quite sharp. The data plate is molded onto the Vector prop box and is absent on the Eduard. I used lead foil to represent it. You'll see this later on.

Moving on to primer and some paint. 

 Untitled by Britt Vallot, on Flickr

Eduard's Brassin engine is top and right while Vector is the bottom two left. Primer is Alclad's grey primer and the metal base color is Dark Aluminum. The intake manifold is done in Alclad's Exhaust Manifold as I find it a good color to show the heat and wear that this part still sees. The actual exhaust manifold that Eduard has molded has received the same color. This part is quite beautiful and better than I'd probably ever hope to scratch out. I'll be putting a couple other coats of rust colors to better represent this.

 Untitled by Britt Vallot, on Flickr

Eduard's Twin Wasp. As the name suggests, there is some PE that comes along with this to dress it up. In the past, I shied away from the PE wiring harness as I thought it to be too flat. Honestly though I don't feel it to be such a big deal here. Luckily, Eduard has allow some options to build with and offers two wiring harnesses and I chose to use the other for the Vector build in an effort to save time. With a little teasing and CA it goes on just fine. Eduard makes this build very quick and it is well engineered.
 Untitled by Britt Vallot, on Flickr

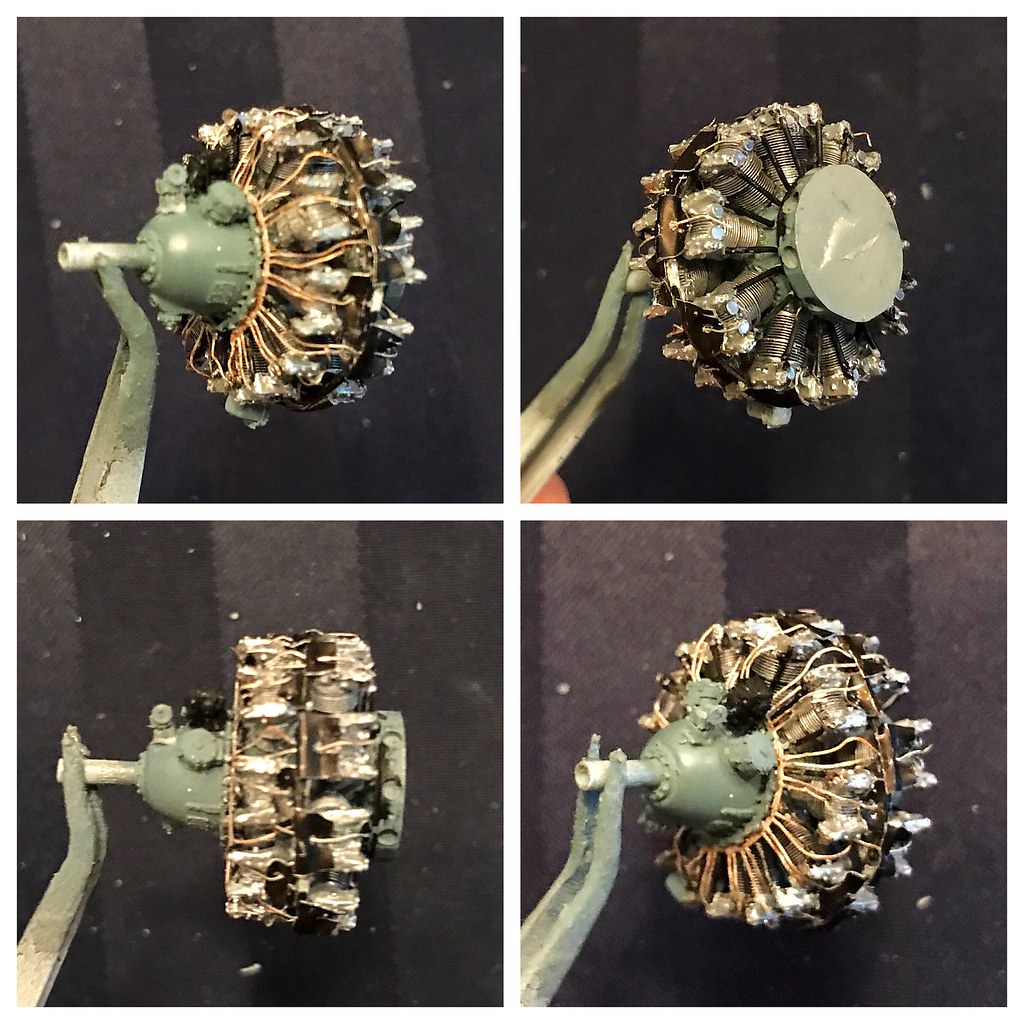
Vector's Twin Wasp. This one takes a little bit of knowing what you're doing. I use a very strong white glue which is a little forgiving at first to allow everything to be put together and then tightened up as needed where something may be out of allignment. Piston rods are plastic rod from Evergreen. Number 218 I believe. Kind of speaks for itself.

 Untitled by Britt Vallot, on Flickr

There's one thing the Vector kit didn't include and that's the ring mounted harness for the cables going to the pistons. Not too difficult to scratch out though. Some lead foil is used to make up the difference. 

 Untitled by Britt Vallot, on Flickr

 Untitled by Britt Vallot, on Flickr

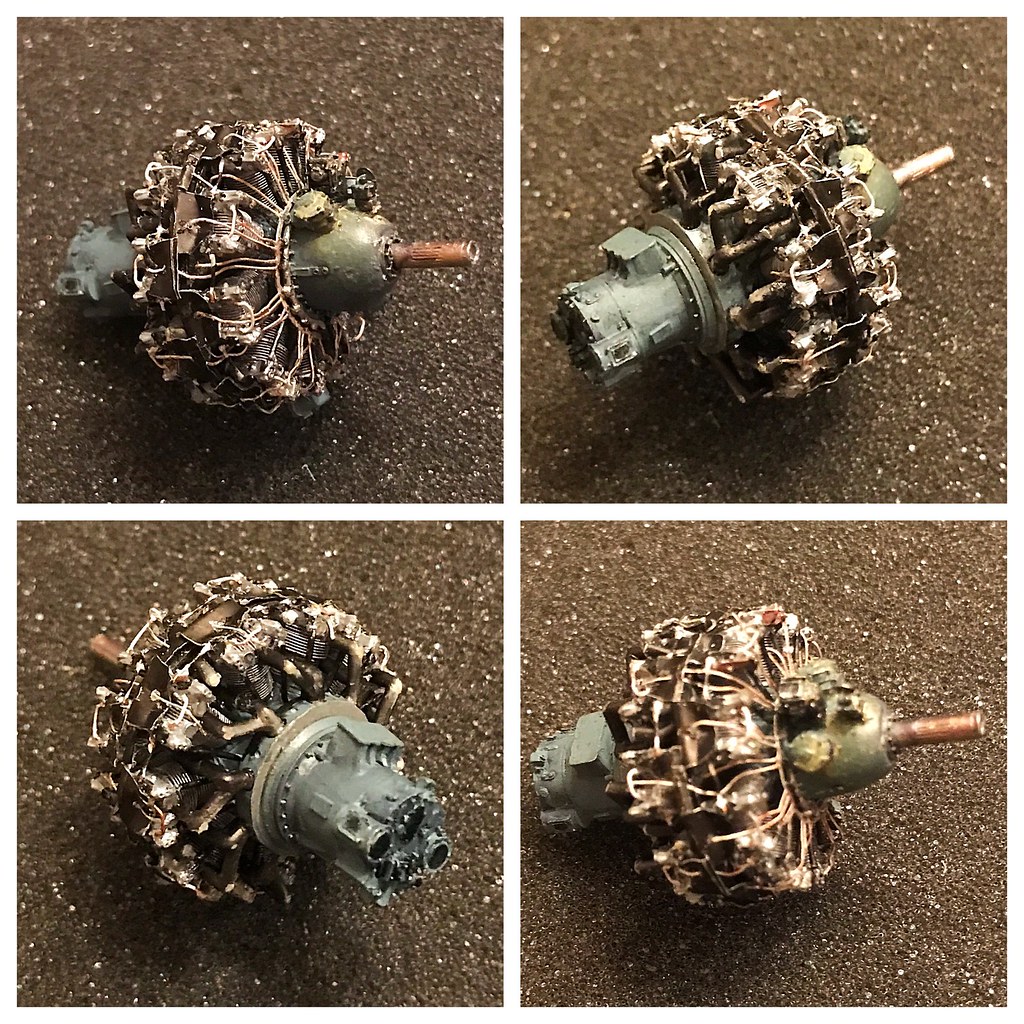
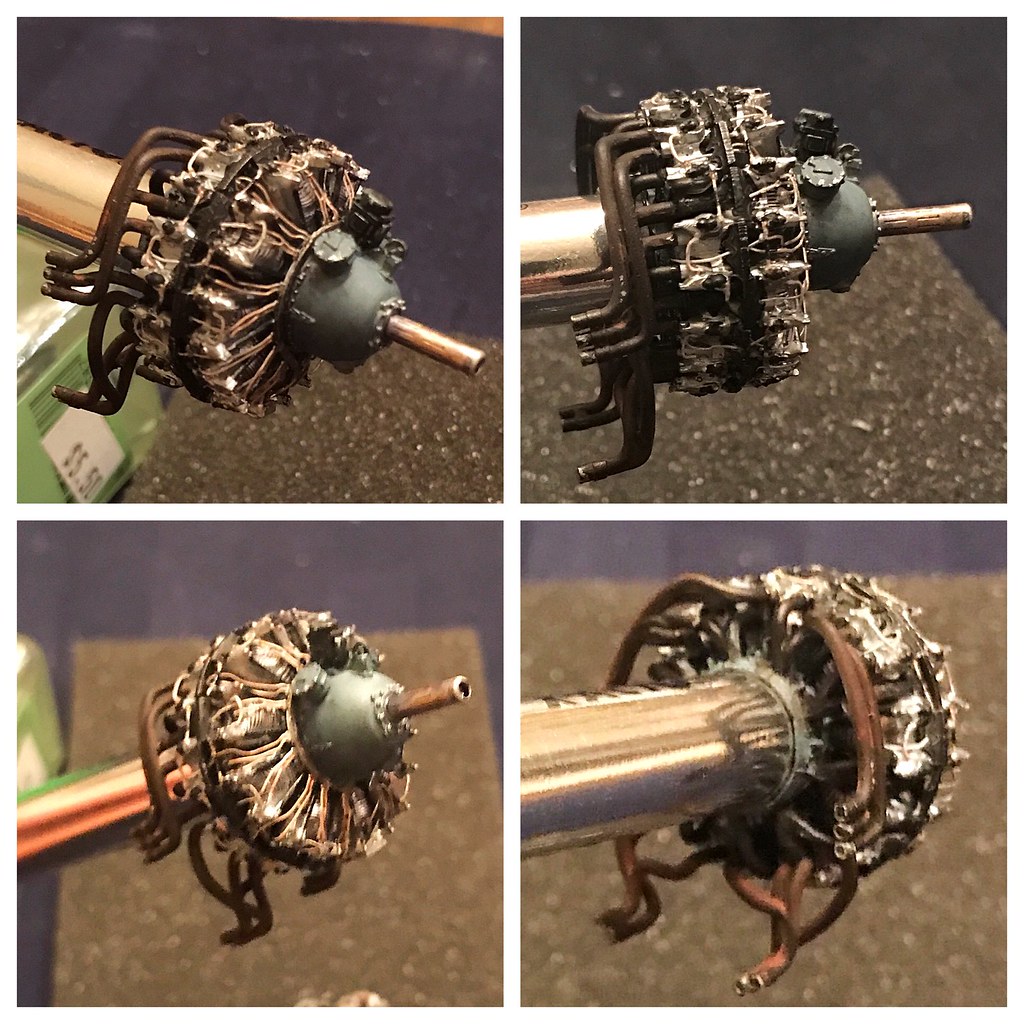
Vector on the left and Eduard on the right here. This is a good set up to see what you're getting. The oil rocker box at the bottom on the Vector engine is an incorrect part. I put that on there to see it's profile and if I might possibly reshape and use it as such...just to note. More or less looking at two solid engines though.

Here's a little bit more going on after all of the intercylinder oil drains and connections and a bit of weathering.

Vector
 Untitled by Britt Vallot, on Flickr

Eduard
 Untitled by Britt Vallot, on Flickr

 Untitled by Britt Vallot, on Flickr

The prop shaft is painted in Pale Burnt Metal from Alclad. The Detailer in Black to weather much of this. A little Tamiya Smoke was airbrushed onto all of this as well. I have just a little bit more of some bells and whistles to add...oil slump lines and the like are fiddly parts that get bent and broke so I add them last. Then, there's just a coat of Alclad's Light Sheen and some last bit of weathering for my Corsair engine and that'll be a wrap. =]

I hope this serves as something fun and informative to other modelers out there looking at all the pretty AM stuff, but hesitate to pull the trigger like me. Any comments or suggestions or especially questions are all welcomed. 

Be back with more.

On the bench:  

Tamiya F4U-1  Kenneth Walsh


  • Member since
    November 2009
  • From: Twin Cities of Minnesota
Posted by Don Stauffer on Sunday, October 22, 2017 10:59 AM

Looking nice!  Love the 2800.  Sure wish Williams Bros, or someone, would do a kit of it in 1:8 scale.  Love those existing WB engine kits, but they sure need to do the 2800!


Don Stauffer in Minnesota

  • Member since
    March 2013
Posted by patrick206 on Sunday, October 22, 2017 2:51 PM

I'm hoping to someday see the 4360, often referred to as the "Corncob." Troublesome and required intensive maintenance, but powerful and got the job done.

  • Member since
    May 2009
  • From: Poland
Posted by Pawel on Sunday, October 22, 2017 3:05 PM

Dang, those wires really look convincing!

Thanks for sharing and good luck with your modelling projects, have a nice day!

Paweł

All comments and critique welcomed. Thanks for your honest opinions!

www.vietnam.net.pl

  • Member since
    July 2016
  • From: NYC
Posted by Johnny1000 on Sunday, October 22, 2017 3:41 PM

Wow... Looking really good! 

Do you have a favorite between the two? 

-J

  • Member since
    November 2008
  • From: Far Northern CA
Posted by mrmike on Sunday, October 22, 2017 9:52 PM

What a great post! You put a lot of work into the WIP and it's very much appreciated; now we know exactly what we get in those AM powerplants and how to make them look their best.

Thank you!


  • Member since
    June 2014
Posted by BrandonK on Sunday, October 22, 2017 10:33 PM

Wow, those are super nice. I would love to put one of those in a new kit. Well done.

BK

On the bench:

A lot !! And I mean A LOT!!

2024 Kits on deck / in process / completed   

                         14 / 5 / 2  

                              Tongue Tied

  • Member since
    June 2013
Posted by bvallot on Monday, October 23, 2017 11:52 AM

Don Stauffer

Looking nice!  Love the 2800.  Sure wish Williams Bros, or someone, would do a kit of it in 1:8 scale.  Love those existing WB engine kits, but they sure need to do the 2800!


Thanks Don. I agree. I can't think of a good reason why they wouldn't have done it already. I would like to try something that big one day....one day. =]

On the bench:  

Tamiya F4U-1  Kenneth Walsh


  • Member since
    June 2013
Posted by bvallot on Monday, October 23, 2017 12:35 PM

patrick206

I'm hoping to someday see the 4360, often referred to as the "Corncob." Troublesome and required intensive maintenance, but powerful and got the job done.


Patrick, when I first saw the 4360 I literally felt panicked. It looks so busy visually that I immediately had to get it off my screen lol. =P  I thought to myself how am I ever going to put something together that crazy. And the fact that I felt I had possibly found my limit I think was a little unnerving. But in all honesty, I suppose it's like anything else...it's all the same fundamentally...just extra steps. I think the only thing keeping AM manufactuers from making it is the lack of kits to use it on. I can't think of any that are out there. No doubt there must be a few, but I'm guessing the cost ratio isn't there.

Still. That thing was a beast! I can't imagine what that much horsepower felt like =D

On the bench:  

Tamiya F4U-1  Kenneth Walsh


  • Member since
    June 2013
Posted by bvallot on Monday, October 23, 2017 12:52 PM


To Mike, BK, Pawel...many thanks. I'm happy to put it out there. =]

Johnny1000

Wow... Looking really good! 

Do you have a favorite between the two? 

-J


Johnny, honestly it's a bit of a toss up. If I were doing a Hellcat and didn't plan on opening more up to have to detail, then I would definitely go with the Eduard kit. But I really do like the little bit of extra work that the Vector kits allow/requre you to do for their engines. Makes me appreciate it more. It would be nice if Vector made the exhausts for a few of these kits that used the R-2800, but I don't mind the challenge I suppose. If Eduard had one of these for the Corsair, I might just say I'd end up leaning Eduard. They make the fit and engineering about as good as it gonna get for AM parts.

I guess it would depend on the plane and what I'm doing extra with it. They are both quite comparable. 

On the bench:  

Tamiya F4U-1  Kenneth Walsh


  • Member since
    July 2012
  • From: Douglas AZ
Posted by littletimmy on Monday, October 23, 2017 9:22 PM

Thank you for posting this !

I'v just started my P-61 build and this is just what I needed to detail the engines.

( I have been known to just take a copper spring and cut it in fourth's and just glue it wherever it falls...... I call this the 50 foot tecnique..... it looks good from 50 feet away.)

 Dont worry about the thumbprint, paint it Rust , and call it "Battle Damage"

  • Member since
    February 2017
Posted by ugamodels on Monday, October 23, 2017 10:13 PM

If you are ever in Seattle, go to the Boeing museum and you can see a 2800 plus hear a recording of one starting up. 

I type on a tablet. Please excuse the terseness and the autocorrect. Not to mention the erors. 

  • Member since
    September 2014
Posted by rooster513 on Tuesday, October 24, 2017 8:13 AM

Those came out awesome Britt! I like the way the Alclad Exhaust Manifold color looks. I'll have to keep that one in mind for the future. December is a long time away before we get to see them dropped into a fuselage but looking forward to itBig Smile

-Andy

  • Member since
    November 2009
  • From: Twin Cities of Minnesota
Posted by Don Stauffer on Tuesday, October 24, 2017 8:33 AM

ugamodels

If you are ever in Seattle, go to the Boeing museum and you can see a 2800 plus hear a recording of one starting up. 


If you google aircraft engine sounds, you will find sound clips for R-2800s, as well as sounds of various other popular engines. I created a folder on my computer just for "engine sounds" downloads, and have quite a few in the collection.  Also, some racing car engines.


Don Stauffer in Minnesota

  • Member since
    March 2015
  • From: Close to Chicago
Posted by JohnnyK on Tuesday, October 24, 2017 6:59 PM

Yikes!! Those are really rocking engines! Very impresive.

Your comments and questions are always welcome.

  • Member since
    May 2006
  • From: Chapin, South Carolina
Posted by Shipwreck on Wednesday, October 25, 2017 7:19 AM
Bvallot, I am really impressed with your R2800s; but do yo think that they would fit in a model, or do you plan on using them just for display?

On the Bench:

Revell 1/96 USS Constitution - rigging

Revell 1/48 B-1B Lancer Prep and research

Trumpeter 1/350 USS Hornet CV-8 Prep and research


  • Member since
    January 2015
  • From: Tumwater, WA.
Posted by M. Brindos on Wednesday, October 25, 2017 7:53 AM

ugamodels

If you are ever in Seattle, go to the Boeing museum and you can see a 2800 plus hear a recording of one starting up. 


Ive driven past a few times in the last month. I noticed they have a B-17 and a B-29 on display across the street. I haven't visited since I was a kid living just up the road from there.

Looks like I need to plan a visit.

Britt, those are fantastically gorgeous engines! They almost look real. So much detail! 

I think I like the look of the Eduard kit just a fraction more because of the shape, but it's a really close call there.

I can't wait to see them mounted up! :)

- Mike Brindos "Lost Boy"

  • Member since
    June 2013
Posted by bvallot on Friday, November 3, 2017 6:46 PM

Sorry I've been away everyone. This is a very busy time of year for me. I was virtually done with these, but I thought it would be better to display them on a cart and I've actually been waiting for an opportunity to build one, so I capitalized. Not sure when I will ever find myself in the Seattle area, but I will definitely make the time for the Boeing Museum out that way. Thanks for the mention. We have quite a few birds at the Boeing Center here in New Orleans as a part of the National WW2 musuem for anyone out there that's visiting. They are definitely worth visiting!

To the finish!

Here's a little walkaround to show you how they finished. I can't really say which I like better. Both build into great looking engines. It's really a matter of how you plan to use them. The price point retailwise is a little different...Eduard being a tad more costly. In all honesty, I love them both. 

Vector's R-2800

 Untitled by Britt Vallot, on Flickr

 Untitled by Britt Vallot, on Flickr

 Untitled by Britt Vallot, on Flickr

 Untitled by Britt Vallot, on Flickr

 Untitled by Britt Vallot, on Flickr

 Untitled by Britt Vallot, on Flickr

 Untitled by Britt Vallot, on Flickr

 Untitled by Britt Vallot, on Flickr

Eduard's R-2800

 Untitled by Britt Vallot, on Flickr

 Untitled by Britt Vallot, on Flickr

 Untitled by Britt Vallot, on Flickr

 Untitled by Britt Vallot, on Flickr

 Untitled by Britt Vallot, on Flickr

 Untitled by Britt Vallot, on Flickr

 Untitled by Britt Vallot, on Flickr

 Untitled by Britt Vallot, on Flickr

One point to mention. I'm just noticing now that I have the pictures larger in front of me that the exhausts openings read a little funny. I tried thinning down what was present but never quite finished apparently. Eduard's representation of the tips is perfectly fine, but I aim to bring them down a little thinner. I'll be taking care of that when I start the Hellcat in December.

There they are. =] You pick your favorite. I hope you all enjoy. Any questions, comments, or what not are welcomed and appreciated.

On the bench:  

Tamiya F4U-1  Kenneth Walsh


  • Member since
    March 2015
  • From: Streetsboro, Ohio
Posted by Toshi on Saturday, November 4, 2017 6:03 AM

They are both beautifully executed!

Toshi

On The Bench: Revell 1/48 B-25 Mitchell


Married to the most caring, loving, understanding, and beautiful wife in the world.  Mrs. Toshi


  • Member since
    February 2012
  • From: Olmsted Township, Ohio
Posted by lawdog114 on Saturday, November 4, 2017 11:57 PM
Very nicely done.

 "Can you fly this plane and land it?...Surely you can't be serious....I am serious, and don't call me Shirley"


JOIN OUR COMMUNITY!

Our community is FREE to join. To participate you must either login or register for an account.

SEARCH FORUMS
FREE NEWSLETTER
By signing up you may also receive reader surveys and occasional special offers. We do not sell, rent or trade our email lists. View our Privacy Policy.