SEARCH FINESCALE.COM

Enter keywords or a search phrase below:

Promodler 1/48 JU 88 A4

4217 views
50 replies
1 rating 2 rating 3 rating 4 rating 5 rating
  • Member since
    June 2014
Posted by BrandonK on Sunday, May 27, 2018 10:41 AM

That turned out very nice. I love what you did with the paint fading, it looks spot on. Super good looking kit and well done, Sir.!! YesYes

BK

On the bench:

A lot !! And I mean A LOT!!

2024 Kits on deck / in process / completed   

                         14 / 5 / 2  

                              Tongue Tied

  • Member since
    April 2003
  • From: USA
Posted by keavdog on Sunday, May 27, 2018 2:09 AM

Very nice!  Never throw away extra decals ;)

Thanks,

John

  • Member since
    March 2015
  • From: Streetsboro, Ohio
Posted by Toshi on Sunday, May 27, 2018 2:01 AM

It might have been an unpleasesent build for you but the end result turned out fantastic Thuens!  

Your friend, Toshi

On The Bench: Revell 1/48 B-25 Mitchell


Married to the most caring, loving, understanding, and beautiful wife in the world.  Mrs. Toshi


  • Member since
    April 2010
Posted by Theuns on Sunday, May 27, 2018 12:34 AM

Thanx lads, I will say agian - not a BAD kit but not as well fitting as I had hoped, but then it is my first pro modler....I thought it would be like the revell 110 i did.

Anyway, I still have a 1/48 revell ME 410 and 1/32 Arado 196 to add the the "gerry" shelf :-)


Theuns

  • Member since
    August 2012
  • From: Parker City, IN.
Posted by Rambo on Sunday, May 27, 2018 12:00 AM
Beautiful job on a tough kit

Clint

  • Member since
    December 2002
  • From: Northern California
Posted by jeaton01 on Saturday, May 26, 2018 10:53 PM

Well done, Theuns.

John

To see build logs for my models:  http://goldeneramodel.com/mymodels/mymodels.html


  • Member since
    December 2010
  • From: Salem, Oregon
Posted by 1943Mike on Saturday, May 26, 2018 10:24 PM

I think you did a fine job on this impudent kit!

I have the same kit in my stash and won't be putting it on the bench until I feel the need to be sorely challenged.

Mike

"Le temps est un grand maître, mais malheureusement, il tue tous ses élèves."

Hector Berlioz

  • Member since
    April 2015
Posted by Mopar Madness on Saturday, May 26, 2018 8:40 PM

Even with the issues you faced, it turned out to be a really nice looking Junkers! 

Chad

God, Family, Models...

At the plate: 1/48 Airfix Bf109 & 1/35 Tamiya Famo

On deck: Who knows!

  • Member since
    February 2011
  • From: Bent River, IA
Posted by Reasoned on Saturday, May 26, 2018 8:38 PM
Very nice indeed Theuns, I really like the Ju 88 and you did a great job on a challenging kit!

Science is the pursiut of knowledge, faith is the pursuit of wisdom.  Peace be with you.

On the Tarmac: 1/48 Revell P-38

In the Hanger: A bunch of kits

  • Member since
    April 2010
Posted by Theuns on Saturday, May 26, 2018 6:23 AM

I am rather happy this one is done, it was not a fun build :-(

However the end results is quite nice.

KG-51 "Eidelweiss geshwader" Russia.

Humbrol RLM enamels, alclad satin clearcoat.

 pro modler 1/48 JU 88 by Theunis van Vuuren, on Flickr

ME 110 and JU 88, interesting size comparason

 1/48 ME 110 and JU 88 by Theunis van Vuuren, on Flickr

 Promodler 1/48 JU 88 by Theunis van Vuuren, on Flickr

 Promodler 1/48 JU 88 by Theunis van Vuuren, on Flickr

 IMG_20180526_093929 by Theunis van Vuuren, on Flickr

 Promodler 1/48 JU 88 by Theunis van Vuuren, on Flickr

 pro modler 1/48 JU 88 by Theunis van Vuuren, on Flickr

Despite the fit issues, the detail on this kit is very nice


Theuns

  • Member since
    April 2010
Posted by Theuns on Monday, April 2, 2018 9:25 AM

weathering done, mattclear on.

 IMG_20180402_154944 by Theunis van Vuuren, on Flickr


Theuns

  • Member since
    April 2010
Posted by Theuns on Sunday, April 1, 2018 2:48 AM

The decals in this kit were totally US and just shattered in the water

 IMG_20180331_071525 by Theunis van Vuuren, on Flickr

 IMG_20180331_071623 by Theunis van Vuuren, on Flickr

I raided the spares box to come up with new Sqn codes and crosses.

 IMG_20180331_131812 by Theunis van Vuuren, on Flickr


Theuns


  • Member since
    April 2010
Posted by Theuns on Friday, March 30, 2018 11:36 PM

I masked off as per usual and then painted the darker colour, however I thinned the paint allot so that I could build it up and have a look of the lighter paint bleeding through as if faded.

I have found that with this RLM 70/71 scheme I got a very dark look if I used the black-green as is.


Theuns

  • Member since
    December 2010
  • From: Salem, Oregon
Posted by 1943Mike on Friday, March 30, 2018 12:11 PM

The subtle camo paint work looks very good to my eyes.

You said: "... I thinned it allot and sprayed on a few coats."

How did you (or did you?) mask for the thinned paint coat?

Mike

"Le temps est un grand maître, mais malheureusement, il tue tous ses élèves."

Hector Berlioz

  • Member since
    April 2010
Posted by Theuns on Friday, March 30, 2018 5:34 AM

I got the clear closs on, I now need to pollish it for decals.

 IMG_20180330_122042 by Theunis van Vuuren, on Flickr


Theuns

  • Member since
    April 2010
Posted by Theuns on Thursday, March 29, 2018 9:56 AM

Thanx Toshi.


I didnt like the way the black/green was to dark and would alter the look of the model so I thinned it allot and sprayed on a few coats to give the effect of faded paint, I mist say if I compare it to pix of full size, you need to look really carefully to see the demarcation line, I am rather pleased with the result.

 IMG_20180329_163619 by Theunis van Vuuren, on Flickr


Theuns

  • Member since
    March 2015
  • From: Streetsboro, Ohio
Posted by Toshi on Thursday, March 29, 2018 5:19 AM

Nice pre-weather technique.  Look forward to the end of this build.  Exceptional!

Your friend, Toshi

On The Bench: Revell 1/48 B-25 Mitchell


Married to the most caring, loving, understanding, and beautiful wife in the world.  Mrs. Toshi


  • Member since
    April 2010
Posted by Theuns on Wednesday, March 28, 2018 10:52 PM

I was defenately not impressed with the canopy, even with thin cement and being carefull I still managed to stuff it up :-(


Theuns

  • Member since
    December 2013
  • From: Orlando Florida
Posted by route62 on Wednesday, March 28, 2018 8:50 PM

You are moving right along.  I am a few steps behind on the same build.  I am keeping any eye on your progress.  So far so good.  I plan to do the desert scheme with the green spots.  How about that weird three piece top canopy!

  • Member since
    April 2010
Posted by Theuns on Wednesday, March 28, 2018 11:36 AM

Poor quality cell pic but you get the fell of it.

I have the RLM 70 on and went for a faded look.


 IMG_20180328_182729 by Theunis van Vuuren, on Flickr


Theuns

  • Member since
    November 2003
  • From: Naples, FL
Posted by tempestjohnny on Wednesday, March 28, 2018 4:48 AM
You're doing a fine job on this beastie. When I did my G there was issues but it came out looking good. And I have 5 more in the stash


  • Member since
    April 2010
Posted by Theuns on Tuesday, March 27, 2018 10:13 AM

This pic shows the colour and bottom detail a bit better.

 IMG_20180327_165441 by Theunis van Vuuren, on Flickr


Theuns

  • Member since
    February 2012
  • From: Olmsted Township, Ohio
Posted by lawdog114 on Tuesday, March 27, 2018 12:32 AM
Your walk has purpose though...it looks great! Good choice on fuselage band paint. Much easier than a decal. I look forward to the paint.

 "Can you fly this plane and land it?...Surely you can't be serious....I am serious, and don't call me Shirley"


  • Member since
    April 2010
Posted by Theuns on Monday, March 26, 2018 11:30 PM

Bob Seger sings when he was younger "my hands were strong and steady, my eyes were clear and bright" 

After yesterday , looking at my preshading efforts I think at 47 I dont poses either of these trates anymore  LOL!

Maybe because I was cleaning and prepping 2 C-47 elevators for a re-cover yesterday my hands were a little more shaky than usual.

The bottom has a lighter shading than on the top, the blue tends to take the shading quite well and on top the dark camo covers it fast so you need to  be carefull with painting it on.

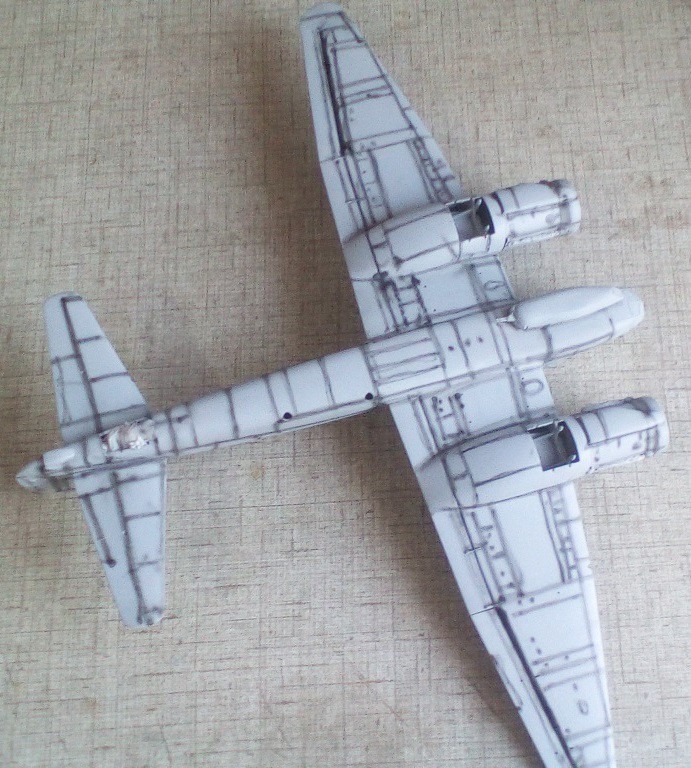
 IMG_20180326_171807 by Theunis van Vuuren, on Flickr

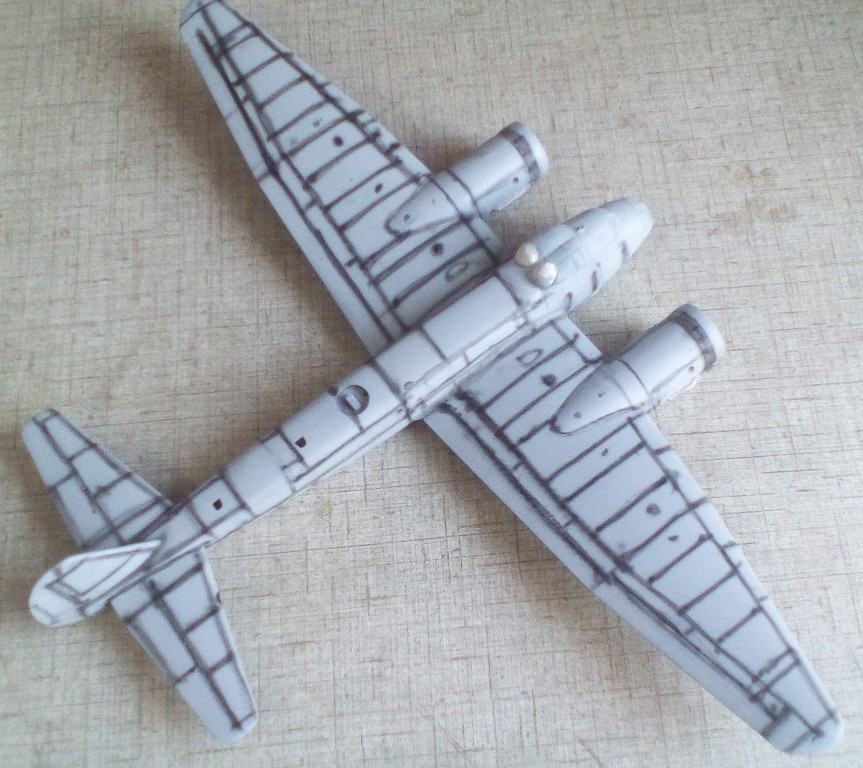
 IMG_20180326_171754 by Theunis van Vuuren, on Flickr

My cell pix dont show the color well but this is HU 65 with the shading just showing through to the naked eye so I am happy woith that

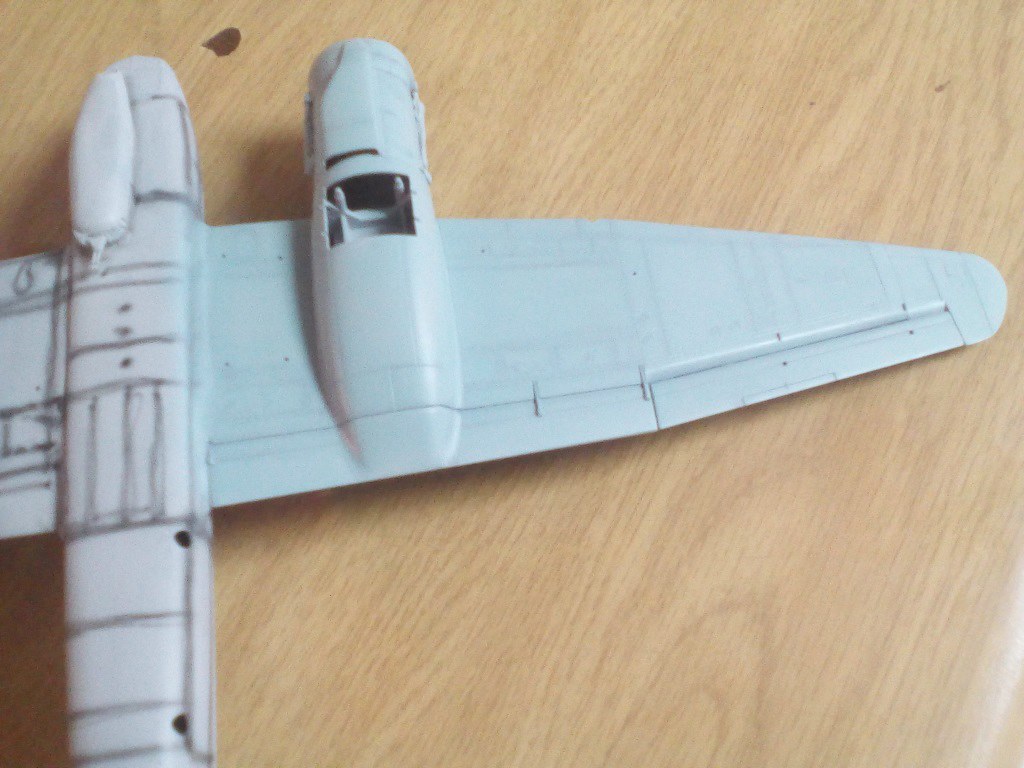
 IMG_20180326_173519 by Theunis van Vuuren, on Flickr

I decided to rather paint on the fuse ID band as I have not had allot of luck using them in decal form.

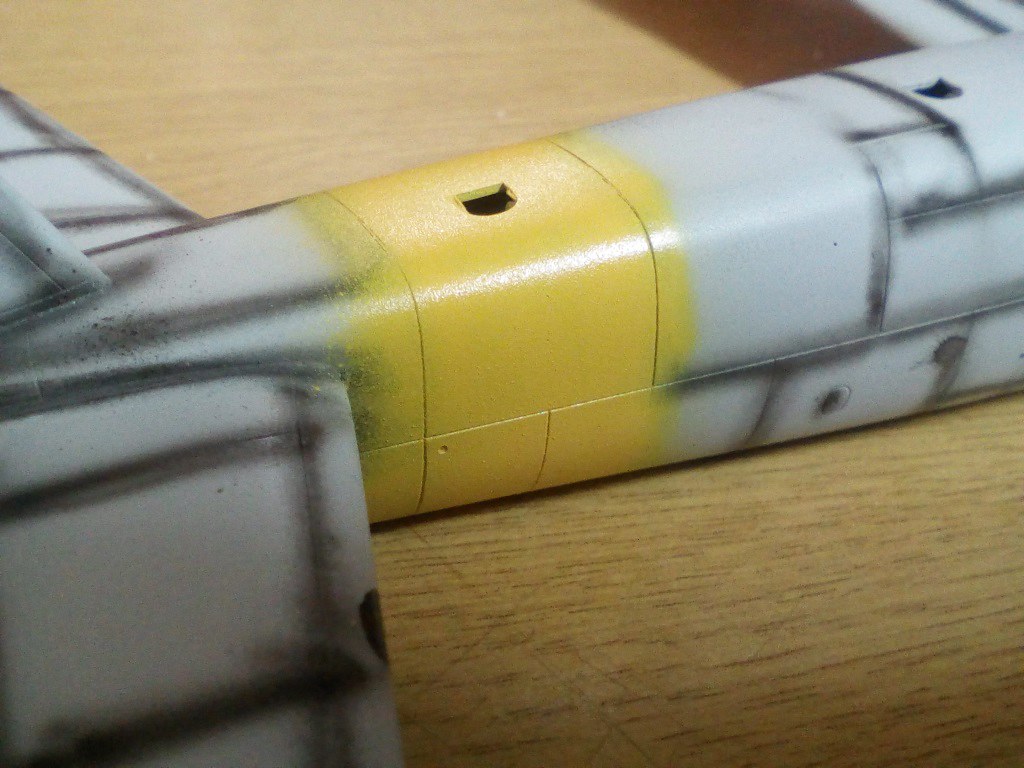
 IMG_20180326_190932 by Theunis van Vuuren, on Flickr


Hoping the weather is hot so I can get the painting done asap, I dont like leaving masking on clear bits to long.


Theuns


  • Member since
    December 2002
  • From: Northern California
Posted by jeaton01 on Sunday, March 25, 2018 11:09 PM

I think it's going to work out juuusssst Fiiine!

John

To see build logs for my models:  http://goldeneramodel.com/mymodels/mymodels.html


  • Member since
    April 2013
  • From: Eleva, Wisconsin
Posted by Greatmaker on Sunday, March 25, 2018 8:50 PM

Wow you might hate it but you did a fantastic job on the masking. To me it looked like precut masks


  • Member since
    February 2011
  • From: Bent River, IA
Posted by Reasoned on Sunday, March 25, 2018 2:52 PM
Looking good so far Theuns, glad to see you do a WIP on this turkey. I've got this kit in the stash (although it's been so long since I've built anything), bought it because the last I knew there's no A-1 version in 1/48. So I spent a bunch more on a conversion kit (think it had something to do with engine nacelles etc.) please keep posting for future reference.

Science is the pursiut of knowledge, faith is the pursuit of wisdom.  Peace be with you.

On the Tarmac: 1/48 Revell P-38

In the Hanger: A bunch of kits

  • Member since
    April 2010
Posted by Theuns on Sunday, March 25, 2018 12:17 PM

After a coat of primer and a light sanding I see hope for this model yet...

 IMG_20180325_184652 by Theunis van Vuuren, on Flickr

 IMG_20180325_184726 by Theunis van Vuuren, on Flickr

 IMG_20180325_185641 by Theunis van Vuuren, on Flickr


I am still not sure what scheme to go with, there are a few splinter ones, a mottle desert one and a splinter with meander lines....


Theuns

  • Member since
    April 2010
Posted by Theuns on Sunday, March 25, 2018 11:23 AM

Toshi I used tamiya tape and a sharp exacto blade ;-)


Theuns

JOIN OUR COMMUNITY!

Our community is FREE to join. To participate you must either login or register for an account.

SEARCH FORUMS
FREE NEWSLETTER
By signing up you may also receive reader surveys and occasional special offers. We do not sell, rent or trade our email lists. View our Privacy Policy.