SEARCH FINESCALE.COM

Enter keywords or a search phrase below:

Accurate Miniatures 1:48 P-51A Mustang

5378 views
20 replies
1 rating 2 rating 3 rating 4 rating 5 rating
  • Member since
    June 2013
Accurate Miniatures 1:48 P-51A Mustang
Posted by bvallot on Friday, March 1, 2019 11:43 AM

Hey everyone. This is a plane that's been done for quite a while now but I never posted. I put her on the side to complete a base before taking pictures and never exactly got around to making one. I've been carving out some time here and there and managed to finally get it ready. In lieu of doing a WIP, which already exists on a Mustang GB from about two years back, I settled for just posting a few pictures of the cockpit and canopy setup since I did a lot to correct all the radio equipment and what not. Since I wasn't brave enough at the time to cut the Squadron canopy and open it up (plus I didn't want to ruin the lines it makes closed) I thought it'd be worth it to show better what's going on underneath. 

The Kit

 Untitled by Britt Vallot, on Flickr

The kit is Accurate Miniatures P-51A. It's a great kit with a few issues that need to be addressed. Perhaps the most obvious is the prop which looks like boat paddles. A little sanding takes care of it with little fuss. I could've probably pushed it a little more. Ultracast makes a replacement, but really it's not necessary...a little elbow grease will do it. Apart from that there are a few extra bits you can do to spruce her up and sand things down to scale, open up vents, etc. and she makes a remarkable looking early mustang. =]

The Man

 Untitled by Britt Vallot, on Flickr

It's difficult to find much on James John England. Most of what I have on him is from an Osprey book about Mustang and Thunderbolt Aces of the Pacific Theather and CBI. He was a 10 kill ace with the 530th FBS of the 311th Fighter Bomber Group. By the middle of 1944 all three squadrons of the 311th FBG were outfitted with the P-51A mustang due to its beautiful operational ability below 15,000 ft which happened to be primarily where the Japanese were looking to fly and maneuver between island bases. The accounts listed in Osprey's don't mention any stories of heroic efforts against all odds, but do reflect a group of men that were accomplished pilots putting in the time and winning the day one scirmmish at a time. JJ England was absolutely a vital part of victory in the PTO.

 Untitled by Britt Vallot, on Flickr


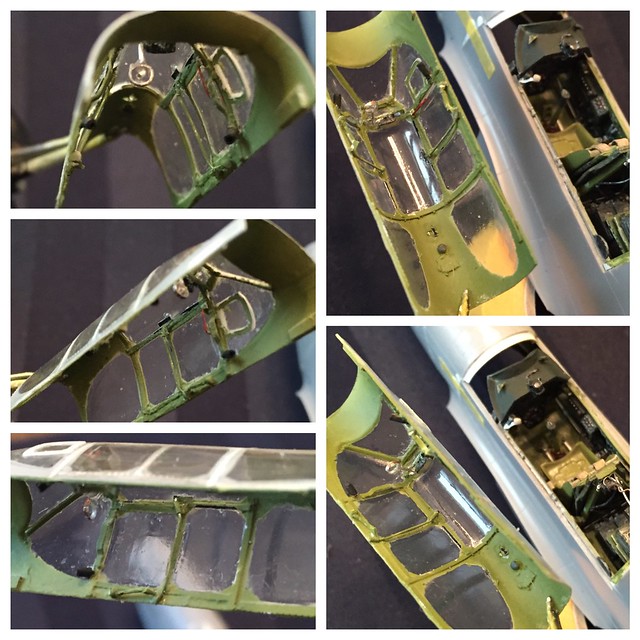
I recall looking over the front office parts and felt they were underdetailed and not as accurate as they could be. Fine for some sure, but if I ever only build one (fill in the blank) I always want it to be my best one. So I went to work with scratching out some new parts and upgrading existing parts. In hindsight, some of this is a little larger in scale than what it should be. That's just part of the learning curve. Mostly speaks for itself. I don't want to be too long winded here. I referenced as much as I could for P-51A radio equipment and gave it my best shot. Anything that is remotely visible, I built. The Squadron canopy was a tricky SOB to marry to the fuselage, but absolutely worth it in the end. I left it closed because it just makes absolutely beautiful lines that way, plus it is much thinner than the AccuMin parts. This makes viewing the interior much easier without all the warping of light that would otherwise make more difficult.

Cockpit

 Untitled by Britt Vallot, on Flickr

 Untitled by Britt Vallot, on Flickr

 Untitled by Britt Vallot, on Flickr

 Untitled by Britt Vallot, on Flickr

Cowling opened up...

 Untitled by Britt Vallot, on Flickr

Radio equipment

 Untitled by Britt Vallot, on Flickr

 Untitled by Britt Vallot, on Flickr
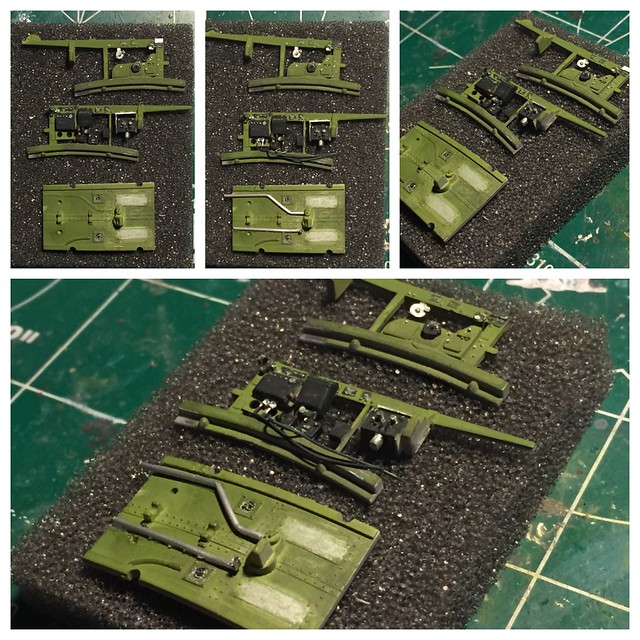
Radiator


Sort of speaks for itself. If it looks like I shoved a bunch of plastic rod in here to create a textured look of a radiator, then yes. I was a little out of my mind apparently and yes, I did that. I still do like the look. 

 Untitled by Britt Vallot, on Flickr

 Untitled by Britt Vallot, on Flickr

 Untitled by Britt Vallot, on Flickr

cockpit parts

 Untitled by Britt Vallot, on Flickr

 Untitled by Britt Vallot, on Flickr

Tail gear

I wanted to beef this part up to keep it strong and also try improving the detail/scale while adding a little more life. One of the first times doing something like this. Wasn't too bad.

 Untitled by Britt Vallot, on Flickr

Here's more from the cockpit/canopy/cowling areas.

 Untitled by Britt Vallot, on Flickr

 Untitled by Britt Vallot, on Flickr

 Untitled by Britt Vallot, on Flickr

 Untitled by Britt Vallot, on Flickr

 Untitled by Britt Vallot, on Flickr

 Untitled by Britt Vallot, on Flickr

 Untitled by Britt Vallot, on Flickr

 Untitled by Britt Vallot, on Flickr

 Untitled by Britt Vallot, on Flickr

 Untitled by Britt Vallot, on Flickr
 Untitled by Britt Vallot, on Flickr

 Untitled by Britt Vallot, on Flickr

radiator...

 Untitled by Britt Vallot, on Flickr

elevators...

 Untitled by Britt Vallot, on Flickr

props...

 Untitled by Britt Vallot, on Flickr

landing light...

 Untitled by Britt Vallot, on Flickr

radiator door...if this thing had an onboard espresso machine I'd likely build that too. LOL =]

 Untitled by Britt Vallot, on Flickr

I'll end the first part of this post here and include completed pictures next. I'm having an issue getting photos to load onto Flickr as well. They seem to be busy today.

=]

On the bench:  

Tamiya F4U-1  Kenneth Walsh


  • Member since
    January 2015
Posted by GreenStyrene48 on Friday, March 1, 2019 2:33 PM

Really fantastic work, especially on the inside of the canopy!  I used the vac canopy on an A-36 and getting the rear butt joint to close was the hardest part of the build.  I think I'll make the cut short and bevel the edge for support next time. 


One note, the radiator exit door is actually the rectantular panel in front of the hole.  Good news is, if you open it you'll really be able to show off more of your great looking radiator.  


  • Member since
    February 2012
  • From: Olmsted Township, Ohio
Posted by lawdog114 on Friday, March 1, 2019 3:05 PM

Looks awesome Britt!  Incredible detail  in the pit. 

 "Can you fly this plane and land it?...Surely you can't be serious....I am serious, and don't call me Shirley"


  • Member since
    June 2013
Posted by bvallot on Friday, March 1, 2019 4:04 PM

GreenStyrene48

One note, the radiator exit door is actually the rectantular panel in front of the hole.  Good news is, if you open it you'll really be able to show off more of your great looking radiator.  


Thanks. That was actually one of the hardest things to reference. I never really found much talk or any photos of this area of the plane. The kit instructions were quite crude and unhelpful to say the least. My Squadron book on the P-51A/A-36 was  THE only saving grace on an early mustang radiator. 

On the bench:  

Tamiya F4U-1  Kenneth Walsh


  • Member since
    June 2013
Posted by bvallot on Friday, March 1, 2019 4:08 PM

lawdog114

Looks awesome Britt!  Incredible detail  in the pit. 


Thanks Joe! I’ll be able to post the rest of my shoot later tonight. I was trying to sort out whatever troubles Flickr had going on and didn’t have time enough to fool with the rest. 

On the bench:  

Tamiya F4U-1  Kenneth Walsh


  • Member since
    January 2004
  • From: Brisbane Australia
Posted by ChrisJH666 on Friday, March 1, 2019 4:20 PM

That's a fabulous build. Definitely getting saved as a favourite for future reference

In the queue: 1/48 Beech Staggerwing (RAAF), P38 (RAAF), Vultee Vengeance (RAAF), Spitfire Vb (Malta), Spitfire VIII x2 (RAAF), P39 x2 (RAAF), Martin Baltimore (Malta?), Martin Maryland (Malta), Typhoon NF1b, Hellcat x2 (FAA)


Chris

  • Member since
    June 2013
Posted by bvallot on Friday, March 1, 2019 8:46 PM

Kind of you to say Chris. I've got more than a few myself marked as "go to."

On the bench:  

Tamiya F4U-1  Kenneth Walsh


  • Member since
    June 2013
Posted by bvallot on Friday, March 1, 2019 9:20 PM

And here's the rest. =] 

I suppose there's plenty I can say about all the things happening here. I guess I can recap. Quickboost exhausts (if I recall correctly), Squadron canopy, and plenty of scratchbuilding as you saw above. I sanded the boat oars that are supposed to be props. Thinned out the intake walls on top the cowl. Opened up the vents on the starboard side cowling. Scratched out a new landing light with a piece of scotch tape that worked beautifully as glass. Montex masks for the insignia and numbers. Plenty of other knick-knacks in between but of the usual suspect variety. 

I did put a good bit of effort into the Olive Drab color scheme. For such a seemingly "drab and boring" color camo scheme, it's actually quite busy as it begins to fade and weather. I recall this first being pointed out by Lawdog some years back. It made me pay more attention to a color scheme I had paid little to no mind at that point in time. I poured through pages of books and pics online of how the Olive Drab faded to browns and had patches of dark greens especially where greasy and slicked up with oil and fuel stains. So I wanted to make that a main staple during this build as these aircraft out in the PTO were quite abused by the sun and salty sea air. 

So, here we are with a little walkaround.

 Untitled by Britt Vallot, on Flickr

 Untitled by Britt Vallot, on Flickr

 Untitled by Britt Vallot, on Flickr

 Untitled by Britt Vallot, on Flickr

 Untitled by Britt Vallot, on Flickr

 by Britt Vallot, on Flickr

 Untitled by Britt Vallot, on Flickr

 Untitled by Britt Vallot, on Flickr

 Untitled by Britt Vallot, on Flickr

 Untitled by Britt Vallot, on Flickr

 Untitled by Britt Vallot, on Flickr

 Untitled by Britt Vallot, on Flickr

 Untitled by Britt Vallot, on Flickr

 Untitled by Britt Vallot, on Flickr

 Untitled by Britt Vallot, on Flickr

 Untitled by Britt Vallot, on Flickr

 Untitled by Britt Vallot, on Flickr

Thanks for watching. =]

Tags: JJ England

On the bench:  

Tamiya F4U-1  Kenneth Walsh


  • Member since
    March 2005
  • From: Lancaster, South Carolina
Posted by Devil Dawg on Saturday, March 2, 2019 1:33 AM

Looks outstanding, Britt! I've never tried to make a base for any of my builds. Might hafta give it a try now. You're looks great!

Gary Mason


Devil Dawg

On The Bench: Tamiya 1/32nd Mitsubishi A6M5 Model 52 Zeke For Japanese Group Build

Build one at a time? Hah! That'll be the day!!

  • Member since
    August 2013
Posted by Jay Jay on Saturday, March 2, 2019 7:56 AM
I like how you weathered the overall OD, it looks so real. Now I feel compelled to re-do all of my OD painted subjects


 I'm finally retired. Now time I got, money I don't.

  • Member since
    June 2013
Posted by bvallot on Saturday, March 2, 2019 9:35 AM

Devil Dawg

Looks outstanding, Britt! I've never tried to make a base for any of my builds. Might hafta give it a try now. You're looks great!

Gary Mason


Thanks Gary. Some of that thinking comes from schooling. How big to make a block like this has been an on going idea for several years now. This is what I’ve come up with for anything 1:48 scale and up. It's about 2 3/4" tall and 7" square for this size airplane...varys with wheelbase but most single engine fighters I do will be right at 7". The Jug I've got planned a few builds from now might need to be tweeked. ;) The wood is a piece of sinker cypress sourced from around Pontchatoula, Louisiana near where I live. I found a large piece from an old tree that I've been using for the bases on these past couple of builds. I keep the left over parts for little odds and ends projects. Nothing goes to waste. =] It's a fun way to marry two different worlds. 


Thanks Jay. I often feel the same way when I see some of these pretty builds here on the forum. 

On the bench:  

Tamiya F4U-1  Kenneth Walsh


  • Member since
    May 2013
  • From: Indiana, USA
Posted by Greg on Saturday, March 2, 2019 10:09 AM

Excellent! Thank you for sharing. YesYes

You were lucky to have that Accurate Miniatures kit to build. They are pretty hard to come by, aren't they?

  • Member since
    June 2014
Posted by BrandonK on Saturday, March 2, 2019 10:39 AM

Excellent work. I didn't realize this kit needed this much attention. I'll have to bookmark this one for future reference. 


BK


On the bench:

A lot !! And I mean A LOT!!

2024 Kits on deck / in process / completed   

                         14 / 5 / 2  

                              Tongue Tied

  • Member since
    July 2008
Posted by Est.1961 on Saturday, March 2, 2019 11:36 AM

Great detail and thanks for posting all those pictures, there does appear to be a hick up Imgur is giving me Jip. 

  • Member since
    May 2016
Posted by Hobbie on Saturday, March 2, 2019 12:29 PM

Greg : the 51A has been reboxed by Italeri, the B by Academy ;-) 

Awesome build, an overlooked version of a famous plane, your pit and weathering work are gorgeous!

Arguing with an engineer is like wrestling with a pig in the mud : after a while, you realize the pig likes it.

  • Member since
    February 2005
  • From: Cleveland, OH
Posted by RadMax8 on Saturday, March 2, 2019 11:37 PM

Britt, I’ve just started the photo recon version, and I’ve either got a lot of work ahead of me, or maybe I should just put it back in the box. The extra details you’ve added are excellent, it looks as if someone could hop in and fire it up. 

I’m just going to try to improver one step at a time... could you elaborate on your technique for using scotch tape for the landing light please? I feel like that’s a solid tip for all future builds.

Phenominal job. Thanks for sharing!

  • Member since
    June 2013
Posted by bvallot on Sunday, March 3, 2019 6:35 PM

Greg

Excellent! Thank you for sharing. YesYes

You were lucky to have that Accurate Miniatures kit to build. They are pretty hard to come by, aren't they?


I usually keep an eye out on ebay for the next series of planes I'm looking to take on to see when I can get a deal and I usually see a good handful of them that are reasonably priced. I was just looking the other day as well for a detailed -A I plan to do with the engine and gun bays opened up. Won't be for a little while though. I saw at least a dozen or so. Give ebay a look see. =]

And thank you. =]

On the bench:  

Tamiya F4U-1  Kenneth Walsh


  • Member since
    June 2013
Posted by bvallot on Sunday, March 3, 2019 6:42 PM

BrandonK

Excellent work. I didn't realize this kit needed this much attention. I'll have to bookmark this one for future reference. 


BK


Thanks Brandon! No, it's not too bad. The cockpit is decent enough compared to other OOB cockpits. I was just getting really excited about my -A after reading so much about what other pilots liked about flying it compared to the heavier -D. I wanted to do it right and I felt it was a good opportunity to stretch my scratchbuilding legs so to speak to see what I could come up with. So I went at it. The AccuMin kit is a really good kit all in it's own and if you want to do more then it's a really good start. Looking back I see things I could've pushed a little further. The props could be a little thinner. Same for the trailing edge of the wings, ailerons, and elevators and rudder. Stuff like that. But I find AccuMin usually has a solid build. 

Thanks again. =]

On the bench:  

Tamiya F4U-1  Kenneth Walsh


  • Member since
    May 2013
  • From: Indiana, USA
Posted by Greg on Sunday, March 3, 2019 7:23 PM

Hobbie
Greg : the 51A has been reboxed by Italeri, the B by Academy ;-)

Good info. Thank you, Hobbie. Most thoughtful of you.

  • Member since
    May 2013
  • From: Indiana, USA
Posted by Greg on Sunday, March 3, 2019 7:24 PM

bvallot


Greg

Excellent! Thank you for sharing. YesYes

You were lucky to have that Accurate Miniatures kit to build. They are pretty hard to come by, aren't they?


I usually keep an eye out on ebay for the next series of planes I'm looking to take on to see when I can get a deal and I usually see a good handful of them that are reasonably priced. I was just looking the other day as well for a detailed -A I plan to do with the engine and gun bays opened up. Won't be for a little while though. I saw at least a dozen or so. Give ebay a look see. =]

And thank you. =]


bv, I never seem to think of ebay. Thanks for the ideas!

  • Member since
    June 2013
Posted by bvallot on Sunday, March 3, 2019 7:26 PM

'61 and Hobbie, many thanks. Very kind to say. =] Happy to share.

RadMax8

Britt, I’ve just started the photo recon version, and I’ve either got a lot of work ahead of me, or maybe I should just put it back in the box. The extra details you’ve added are excellent, it looks as if someone could hop in and fire it up. 

I’m just going to try to improver one step at a time... could you elaborate on your technique for using scotch tape for the landing light please? I feel like that’s a solid tip for all future builds.

Phenominal job. Thanks for sharing!


RM8, I remember looking at the F-6 and recall thinking how awesome it'd be to build up that one with the camera and all. Instead I came across William Shomo's F-6D and figured I could easily convert Tamiya's P-51D into an F-6D. Wasn't too bad at all. A little scratchbuilding and some Milliput went a long way. 

All these extras aren't so bad really. Just take it one step at a time. Before you know it, voila, you've got a radio, then an IP, and so on. You just can't be in a rush. As long as you know what you're going to do, it doesn't take quite as long as you think. Of course I say that but nowadays it takes me about 6-7 months to complete a build LOL. But basically it's not too hard to add some extra life. Just be whole-assed and go all in. =]

As for the scotch tape...absolutely! Great question. I saw this trick on a P-51B or C with DDay stripes when I was building this. My solution was to take the kit glass piece and with a new No. 11 blade cut out some tamiya masking tape that was placed on top of it. Carefully. You could also trace it out with a pen or pencil and cut it on a mat or what have you. When you're ready to handle the tape use a gloved hand to prevent finger prints. Use your masking tape pattern to cut the shape of the "glass" by placing a strip of clear scotch tape onto the (clean) masking tape. What I did was to cut a little bit of extra along the sides (left to right as it would fit onto the wing) so it has enough to bite on once you apply it. When you have it cut out, a good pair of tweezers will help to place it and the bottom end of a paint brush will aide in laying down. I started on top first to get it set and pulled it around as I laid it down on the surface. It really wasn't too bad. And honestly, if you mess one up...you've likely still got plenty of scotch tape right?! I think I got mine on the first try. I even recall my hands shaking badly as I probably had to much coffee...with each heartbeat my hands bounced crazily. I had to steady my arms on the table surface to keep my hands still. I actually finished the build just after Christmas of 2016 and two years later I haven't seen any dust or anything collect and stick to it. 

Hope that's of some use. Let me know when you try it. Especially if you come up with any better tweeks to that. ;)


On the bench:  

Tamiya F4U-1  Kenneth Walsh


JOIN OUR COMMUNITY!

Our community is FREE to join. To participate you must either login or register for an account.

SEARCH FORUMS
FREE NEWSLETTER
By signing up you may also receive reader surveys and occasional special offers. We do not sell, rent or trade our email lists. View our Privacy Policy.