SEARCH FINESCALE.COM

Enter keywords or a search phrase below:

Tamiya 1:48 P-51D Mustang

4980 views
17 replies
1 rating 2 rating 3 rating 4 rating 5 rating
  • Member since
    June 2013
Tamiya 1:48 P-51D Mustang
Posted by bvallot on Tuesday, January 14, 2020 4:36 PM

Hello everyone. It's been a while since I've had the chance hop on the FineScale. I did manage to sneak in some time here and there to wrap up a build that's been on the to-do list for the past three years. Many thanks to Stikpusher who was kind enough to send me a set of hard to find decals for this build which without would've meant I might not have even embarked on building it at all since my time is so limited. So again, thanks Stik!!

I had previousy built an F-6D recon mustang piloted by William Shomo during his MOH flight in the PTO for which he earned the named The Flying Undertaker. That particular plane was shot down shortly after with another pilot flying it and another plane was allocated to Shomo and dressed up for the press piece done about gutsy encounter with the japanese. This build represents the P-51 made famous in those photos.

 Untitled by Britt Vallot, on Flickr

William Shomo

 Untitled by Britt Vallot, on Flickr

 Untitled by Britt Vallot, on Flickr

The man in the pictures below is Shomo's Crew Chief, Ralph Winkel, who was a good friend of Shomo. It's because of him there still exists most of these other photos. As I understand it he loved doing what he did and took excellent care of his aircraft. So, Ralph, you'll have to forgive me for not locking up the landing gear doors on this build...I had to show off some the detail from that Aires landing gear bay. =]

 Untitled by Britt Vallot, on Flickr

 Untitled by Britt Vallot, on Flickr
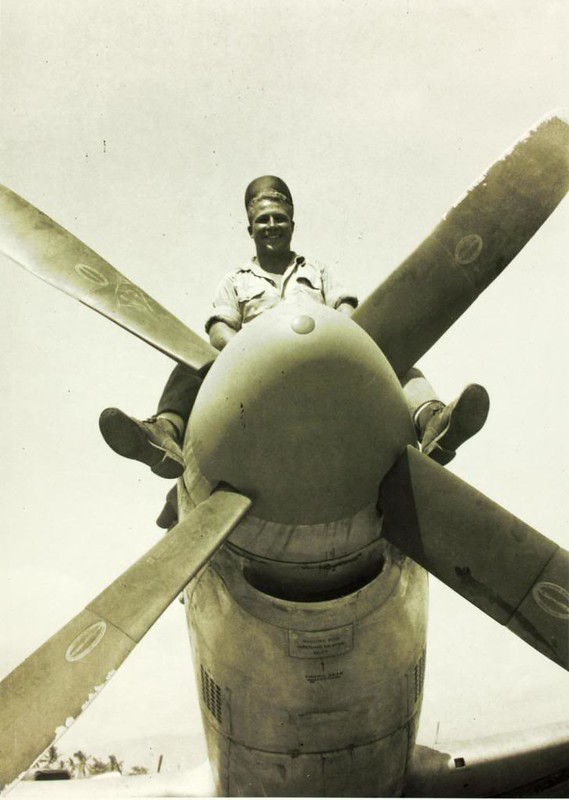
I won't do the background on this particular post since my time is limited, but I can drop a link to the other build where I went into some detail about Shomo's and Lipscomb's massive brass balls.

http://cs.finescale.com/fsm/modeling_subjects/f/2/t/176684.aspx

No WIP this time, but I did want to share a few pics of what was going on here and there as it's naturally hard to see some of this once it's closed up. 

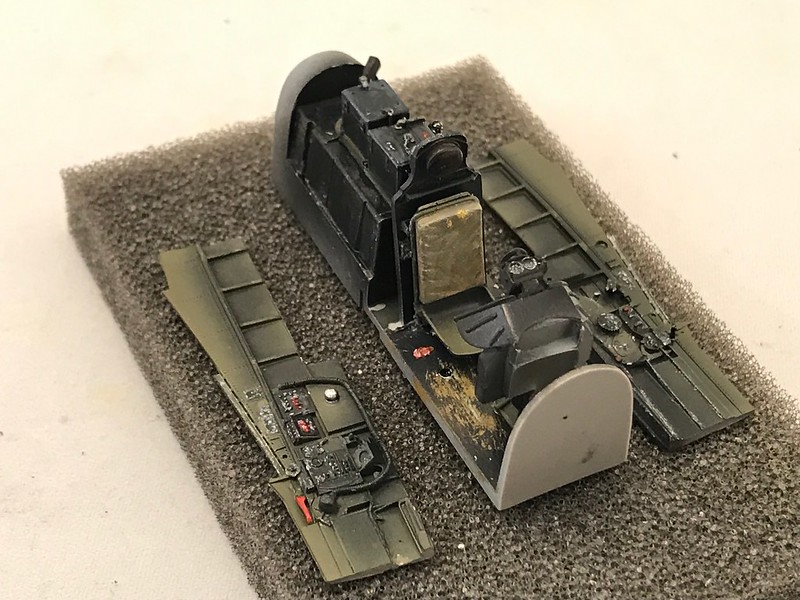
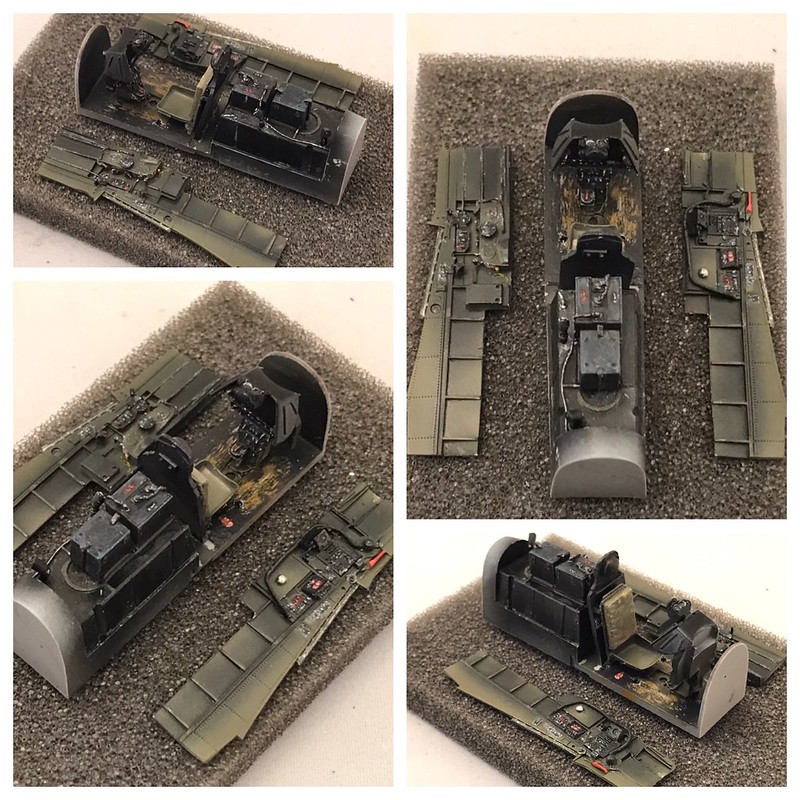
Cockpit

The cockpit is from Aires. The detail is beautiful of course. I added a few scratched parts to pick it up a bit. I originally intended to save myself some time by have a few AM sets to drop in so I wouldn't be so tied up with scratchbuilding, but best intentions....

 Untitled by Britt Vallot, on Flickr

 Untitled by Britt Vallot, on Flickr

 Untitled by Britt Vallot, on Flickr
 Untitled by Britt Vallot, on Flickr
 Untitled by Britt Vallot, on Flickr

 Untitled by Britt Vallot, on Flickr
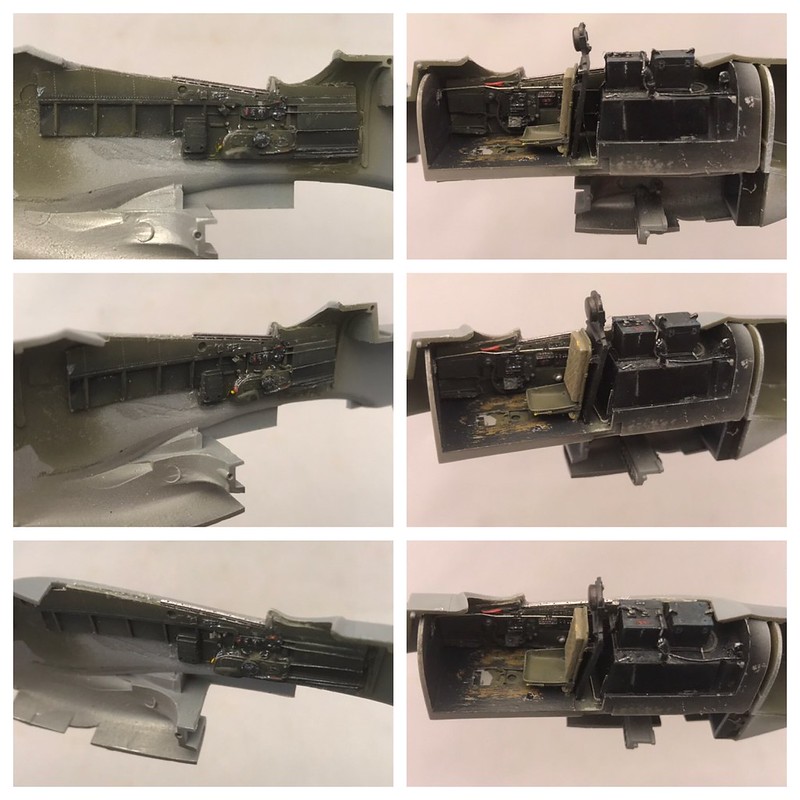
Landing Gear bay/Radiator

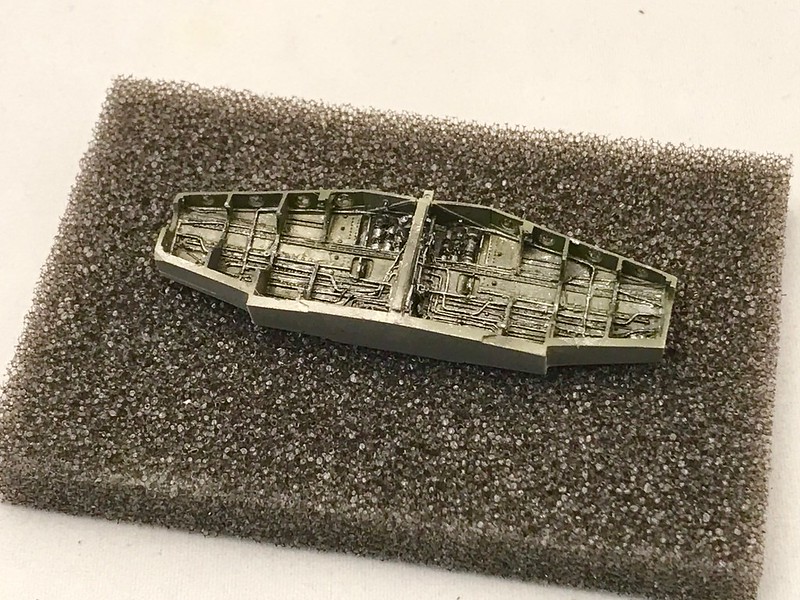
Another from Aires. Lots of detail. If you can find one affordably priced, it's definitely worth it. I do want to try my hand at this on my own next time, but this did help me understand how to scale all the plumbing down to size for 1:48. Also, this was a bit difficult to pick out with painting and detailing. 

 Untitled by Britt Vallot, on Flickr

 Untitled by Britt Vallot, on Flickr
 Untitled by Britt Vallot, on Flickr

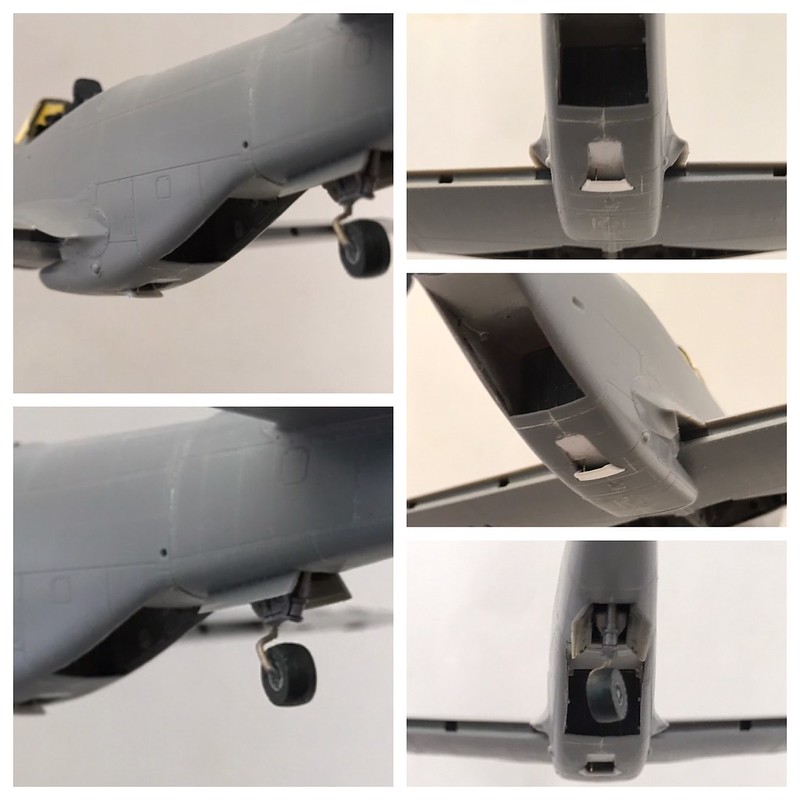
Decided to not let that seam on the bottom push me around this time. Here I removed the kit part to the smaller vent door and made my own. I built up the space here as well and created the actuating rod for it also.

 Untitled by Britt Vallot, on Flickr

 Untitled by Britt Vallot, on Flickr

Much cleaner...
 Untitled by Britt Vallot, on Flickr

Windscreen/Canopy

 Untitled by Britt Vallot, on Flickr

Lead foil makes up the interior of the windscreen. I "rivet" the side to be glued to create the rivets seen from the interior. The windscreen and canopy are from Squadron. Slow and careful trimming make this AM part absolutely worth it. Not a huge fan of the Tamiya canopy, but what I've found is that by separating the molded canopy part from the Squadron vacuum mold I can add just the perspex canopy to the Tamiya kit part and marry the two so that the canopy fixes to the airframe better. I did a much better job this time. You'll see this later. 

 Untitled by Britt Vallot, on Flickr

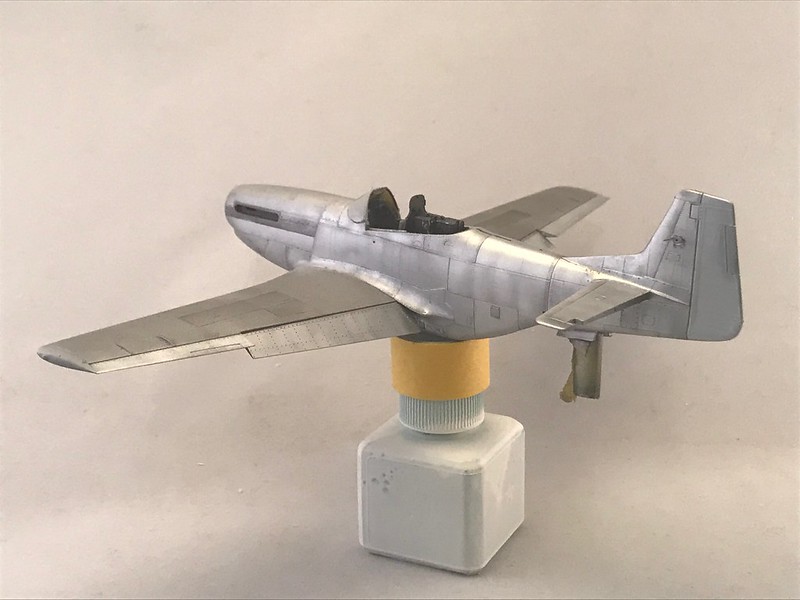
Here's two quick pics of my priming for the this NMF paint job. Since this can be a tricky subject to paint, I wanted to offer one way to go about a mildly weathered NMF mustang. I painted this exclusively in Alclad paints save for the stripes and anti-glare... etc. The grey primer is pretty standard as a primer choice and works for the non-high shine alclads. Gloss Black must go down to correctly display high shine alclads. In studying pictures of mustangs in particular, I've noticed the back half end to generally stand out with higher shine as compared to the dirtier front end. For the purposes of this build and modeling a mildly weathered mustang that was photo op worthy, I laid down Aluminum on the front half of the fuselage (with some variation along the cowling) and Polished Aluminum on the back end of the fuselage. The Polished Aluminum requires Gloss Black to shine as it's supposed to. For a harsher, more weathered look you could place the P. Aluminum over grey to tone it done considerably. Flaps and undersurfaces also saw a the P. Aluminum. 

 Untitled by Britt Vallot, on Flickr

 Untitled by Britt Vallot, on Flickr

And here's a couple views of that in bare NMF.

 Untitled by Britt Vallot, on Flickr

 Untitled by Britt Vallot, on Flickr
I'll break here and post the completed pictures next. That way I don't get lost in all the coding. =]

On the bench:  

Tamiya F4U-1  Kenneth Walsh


  • Member since
    June 2013
Posted by bvallot on Tuesday, January 14, 2020 4:57 PM

And here's a walkaround of completed pics.

 Untitled by Britt Vallot, on Flickr

 Untitled by Britt Vallot, on Flickr

 Untitled by Britt Vallot, on Flickr

 Untitled by Britt Vallot, on Flickr

 Untitled by Britt Vallot, on Flickr

 Untitled by Britt Vallot, on Flickr

 Untitled by Britt Vallot, on Flickr

 Untitled by Britt Vallot, on Flickr

 Untitled by Britt Vallot, on Flickr

 Untitled by Britt Vallot, on Flickr

 Untitled by Britt Vallot, on Flickr

 Untitled by Britt Vallot, on Flickr

 Untitled by Britt Vallot, on Flickr

 Untitled by Britt Vallot, on Flickr

 Untitled by Britt Vallot, on Flickr

 Untitled by Britt Vallot, on Flickr

 Untitled by Britt Vallot, on Flickr

 Untitled by Britt Vallot, on Flickr

 Untitled by Britt Vallot, on

Flickr Untitled by Britt Vallot, on Flickr

 Untitled by Britt Vallot, on Flickr

 Untitled by Britt Vallot, on Flickr

 Untitled by Britt Vallot, on Flickr

 Untitled by Britt Vallot, on Flickr

And that's a wrap...

 Untitled by Britt Vallot, on Flickr

 Untitled by Britt Vallot, on Flickr


Thanks for stopping by. =]  Happy to answer any questions as always and I'm happy to get to share this with all of you here on the forum.

On the bench:  

Tamiya F4U-1  Kenneth Walsh


  • Member since
    August 2013
Posted by Jay Jay on Wednesday, January 15, 2020 8:48 AM
OH MY , that is the most incredible paint and weathering job I've seen . Best of any show in my book. I should live so long to be able to achieve the results you have here.


 I'm finally retired. Now time I got, money I don't.

  • Member since
    January 2015
  • From: Katy, TX
Posted by Aggieman on Wednesday, January 15, 2020 10:15 AM

Wow, you knocked that one out of the park!  Simply gorgeous.

  • Member since
    June 2014
Posted by BrandonK on Wednesday, January 15, 2020 10:18 AM

Britt, what a gorgeous aircraft and super bada** pilot. Glad to see you back and with another killer build. Super well done, just superb!!

I think I have a P-39 in my stash with his markings. I had forgotten about it, till now.

BK

On the bench:

A lot !! And I mean A LOT!!

2024 Kits on deck / in process / completed   

                         14 / 5 / 2  

                              Tongue Tied

  • Member since
    April 2015
Posted by Mopar Madness on Wednesday, January 15, 2020 2:42 PM

What an awesome metallic finish!

Chad

God, Family, Models...

At the plate: 1/48 Airfix Bf109 & 1/35 Tamiya Famo

On deck: Who knows!

  • Member since
    November 2003
  • From: Naples, FL
Posted by tempestjohnny on Wednesday, January 15, 2020 6:39 PM
I definitely will need to keep this bookmarked. The weathering is outstanding.


fox
  • Member since
    January 2007
  • From: Narvon, Pa.
Posted by fox on Thursday, January 16, 2020 2:32 PM

Outstanding build! Toast Toast Toast Toast Toast

Fantastic photos too.

Jim  Captain

 Main WIP: 

   On the Bench: Artesania Latina  (aka) Artists in the Latrine 1/75 Bluenose II

I keep hitting "escape", but I'm still here.

  • Member since
    May 2016
Posted by learmech on Thursday, January 16, 2020 2:58 PM
Beautiful build!! I think I would berate my crew chief if he let my plane get that dirty.
  • Member since
    December 2002
  • From: Northern California
Posted by jeaton01 on Thursday, January 16, 2020 3:41 PM

Well done, Britt.  That's one hard working Mustang.

John

To see build logs for my models:  http://goldeneramodel.com/mymodels/mymodels.html


  • Member since
    February 2015
Posted by skyraider0609 on Thursday, January 16, 2020 4:40 PM
Wow. That’s amazing BV. I’m truly impressed with that finished work. How did you do the worn areas on the cockpit wood floor, if I can ask?
  • Member since
    February 2012
  • From: Olmsted Township, Ohio
Posted by lawdog114 on Thursday, January 16, 2020 10:31 PM
Outstanding weathering. Awesome subject too. You don’t see too many Pacific Mustangs.

 "Can you fly this plane and land it?...Surely you can't be serious....I am serious, and don't call me Shirley"


  • Member since
    July 2019
Posted by Hoss WA on Sunday, January 19, 2020 1:37 PM

Holy smokes!  That is one awesome Mustang! The Tamiya kit looks like it builds up nicely and the add-ons go the extra mile. I love the shading in the cockpit. The finish and weathering is out of sight. Congrats on a top shelf build. 

  • Member since
    October 2009
Posted by JacknewbIII on Sunday, January 19, 2020 1:47 PM

Beautiful build on that 51!! I admire the weathering on the metal finish for sure!

  • Member since
    June 2013
Posted by bvallot on Monday, January 20, 2020 10:57 AM

Thank you everyone. =] You are all very kind. Some of this comes together rather simply when you're set up right, but I will admit to a fair amount of cursing through certain parts. I lost the pitot tube and had to scratch a new one. I lost the landing light (twice) literally right in front of my eyes with no carpet to gobble it up. Cannot understand how. Had to scratch a new one after I calmed down. Always a new trick to learn after each mistake though.

--I think I have a P-39 in my stash with his markings. I had forgotten about it, till now.

BK

I've longed considered which P-39 to do once I get around to it. Perhaps I'll give his a shot and complete the set, lol. I saw a Finescale magazine from about 6 or so years ago that highlighted sprucing up a P-39 so I've got some thoughts about what I might do.  You should jump on it!! I'd love to see someone superdetail that big cannon it lugged around.

--Wow. That’s amazing BV. I’m truly impressed with that finished work. How did you do the worn areas on the cockpit wood floor, if I can ask?

Skyraider0609

It wasn't so bad really. With a fine tip brush I thinned out some Tamiya paints that approximated my colors I needed to create a blonde looking piece of plywood. It was maybe three or so different colors ranging from Desert Yellow, Flat Brown, and maybe a grey...I can't recall right now. The first thin coat went over a primer of course and was allowed to dry. Then, I built up some character by thinning these other colors down and lightly dragging them over the base color in a fashion that simulates the patterns seen in the wood grain of plywood (letting them mix slightly). Nothing so specific as you won't generally see much of it. I came back again with the Desert Yellow to correct anything that got away from me and then a Flat coat went over it to seal it away. Next, I used a quick swipe of hairspray to use as an in between layer for the Flat Black color to go on top. Then, with the back side of my No. 11 blade scalpel, I very carefully notch out a wood grain pattern that approximates the wearing difference in hardness between the heartwood and sapwood. I work slowly here so this doesn't get overdone. The fine scratches are just meant to break through the black coat and not cut into the cockpit floor. I keep the marks small to better approximate the scale and I limit the marks to only the high wear from feet when climbing in and out of the aircraft.

--Outstanding weathering. Awesome subject too. You don’t see too many Pacific Mustangs.

lawdog114

Thanks Joe, you're right you don't. Eduard just released a kit with PTO markings that looks pretty promising. They did some re-engineering of certain parts that look interesting to see in action. I'm pretty jazzed about it and plan to get one eventually, but I've gotta put it on the back list to build. I've got a Corsair up and then that new Tamiya P-38 G/H and a F-4E for a friend that I promised long ago. You should check into it though. I think Eduard's kit will top the new Airfix and possible even the Tamiya. 

--Holy smokes!  That is one awesome Mustang! The Tamiya kit looks like it builds up nicely and the add-ons go the extra mile. I love the shading in the cockpit. The finish and weathering is out of sight. Congrats on a top shelf build. 

Hoss WA

Thanks Hoss. The Tamiya kit is absolutely a nice kit to work with. The only thing about it is the seam on the bottom that runs the length of the radiator. You have to be committed to working it down early. Also, the canopy is a bit troublesome. Other than that, it's  quite accurate and gives you a great mustang. 


Again, thank you all for the very kind remarks. =] See you around.

On the bench:  

Tamiya F4U-1  Kenneth Walsh


  • Member since
    June 2013
Posted by bvallot on Monday, January 20, 2020 11:00 AM

Thank you everyone. =] You are all very kind. Some of this comes together rather simply when you're set up right, but I will admit to a fair amount of cursing through certain parts. I lost the pitot tube and had to scratch a new one. I lost the landing light (twice) literally right in front of my eyes with no carpet to gobble it up. Cannot understand how. Had to scratch a new one after I calmed down. Always a new trick to learn after each mistake though.

BrandonK

I think I have a P-39 in my stash with his markings. I had forgotten about it, till now.

BK

I've longed considered which P-39 to do once I get around to it. Perhaps I'll give his a shot and complete the set, lol. I saw a Finescale magazine from about 6 or so years ago that highlighted sprucing up a P-39 so I've got some thoughts about what I might do.  You should jump on it!! I'd love to see someone superdetail that big cannon it lugged around.

--Wow. That’s amazing BV. I’m truly impressed with that finished work. How did you do the worn areas on the cockpit wood floor, if I can ask?

Skyraider0609

It wasn't so bad really. With a fine tip brush I thinned out some Tamiya paints that approximated my colors I needed to create a blonde looking piece of plywood. It was maybe three or so different colors ranging from Desert Yellow, Flat Brown, and maybe a grey...I can't recall right now. The first thin coat went over a primer of course and was allowed to dry. Then, I built up some character by thinning these other colors down and lightly dragging them over the base color in a fashion that simulates the patterns seen in the wood grain of plywood (letting them mix slightly). Nothing so specific as you won't generally see much of it. I came back again with the Desert Yellow to correct anything that got away from me and then a Flat coat went over it to seal it away. Next, I used a quick swipe of hairspray to use as an in between layer for the Flat Black color to go on top. Then, with the back side of my No. 11 blade scalpel, I very carefully notch out a wood grain pattern that approximates the wearing difference in hardness between the heartwood and sapwood. I work slowly here so this doesn't get overdone. The fine scratches are just meant to break through the black coat and not cut into the cockpit floor. I keep the marks small to better approximate the scale and I limit the marks to only the high wear from feet when climbing in and out of the aircraft.

--Outstanding weathering. Awesome subject too. You don’t see too many Pacific Mustangs.

lawdog114

Thanks Joe, you're right you don't. Eduard just released a kit with PTO markings that looks pretty promising. They did some re-engineering of certain parts that look interesting to see in action. I'm pretty jazzed about it and plan to get one eventually, but I've gotta put it on the back list to build. I've got a Corsair up and then that new Tamiya P-38 G/H and a F-4E for a friend that I promised long ago. You should check into it though. I think Eduard's kit will top the new Airfix and possible even the Tamiya. 

--Holy smokes!  That is one awesome Mustang! The Tamiya kit looks like it builds up nicely and the add-ons go the extra mile. I love the shading in the cockpit. The finish and weathering is out of sight. Congrats on a top shelf build. 

Hoss WA

Thanks Hoss. The Tamiya kit is absolutely a nice kit to work with. The only thing about it is the seam on the bottom that runs the length of the radiator. You have to be committed to working it down early. Also, the canopy is a bit troublesome. Other than that, it's  quite accurate and gives you a great mustang. 


Again, thank you all for the very kind remarks. =] See you around.

jeaton01

Well done, Britt.  That's one hard working Mustang.


On the bench:  

Tamiya F4U-1  Kenneth Walsh


  • Member since
    June 2013
Posted by bvallot on Monday, January 20, 2020 11:03 AM

Thank you everyone. =] You are all very kind. Some of this comes together rather simply when you're set up right, but I will admit to a fair amount of cursing through certain parts. I lost the pitot tube and had to scratch a new one. I lost the landing light (twice) literally right in front of my eyes with no carpet to gobble it up. Cannot understand how. Had to scratch a new one after I calmed down. Always a new trick to learn after each mistake though.

BrandonK

I think I have a P-39 in my stash with his markings. I had forgotten about it, till now.

BK

I've longed considered which P-39 to do once I get around to it. Perhaps I'll give his a shot and complete the set, lol. I saw a Finescale magazine from about 6 or so years ago that highlighted sprucing up a P-39 so I've got some thoughts about what I might do.  You should jump on it!! I'd love to see someone superdetail that big cannon it lugged around.

[/quote user="Skyraider0609"]

Wow. That’s amazing BV. I’m truly impressed with that finished work. How did you do the worn areas on the cockpit wood floor, if I can ask?

Skyraider0609

[/quote]

It wasn't so bad really. With a fine tip brush I thinned out some Tamiya paints that approximated my colors I needed to create a blonde looking piece of plywood. It was maybe three or so different colors ranging from Desert Yellow, Flat Brown, and maybe a grey...I can't recall right now. The first thin coat went over a primer of course and was allowed to dry. Then, I built up some character by thinning these other colors down and lightly dragging them over the base color in a fashion that simulates the patterns seen in the wood grain of plywood (letting them mix slightly). Nothing so specific as you won't generally see much of it. I came back again with the Desert Yellow to correct anything that got away from me and then a Flat coat went over it to seal it away. Next, I used a quick swipe of hairspray to use as an in between layer for the Flat Black color to go on top. Then, with the back side of my No. 11 blade scalpel, I very carefully notch out a wood grain pattern that approximates the wearing difference in hardness between the heartwood and sapwood. I work slowly here so this doesn't get overdone. The fine scratches are just meant to break through the black coat and not cut into the cockpit floor. I keep the marks small to better approximate the scale and I limit the marks to only the high wear from feet when climbing in and out of the aircraft.

[/quote user="lawdog114"]

Outstanding weathering. Awesome subject too. You don’t see too many Pacific Mustangs.

lawdog114

[/quote]

Thanks Joe, you're right you don't. Eduard just released a kit with PTO markings that looks pretty promising. They did some re-engineering of certain parts that look interesting to see in action. I'm pretty jazzed about it and plan to get one eventually, but I've gotta put it on the back list to build. I've got a Corsair up and then that new Tamiya P-38 G/H and a F-4E for a friend that I promised long ago. You should check into it though. I think Eduard's kit will top the new Airfix and possible even the Tamiya. 

[/quote user="Hoss WA"]

Holy smokes!  That is one awesome Mustang! The Tamiya kit looks like it builds up nicely and the add-ons go the extra mile. I love the shading in the cockpit. The finish and weathering is out of sight. Congrats on a top shelf build. 

Hoss WA

[/quote]

Thanks Hoss. The Tamiya kit is absolutely a nice kit to work with. The only thing about it is the seam on the bottom that runs the length of the radiator. You have to be committed to working it down early. Also, the canopy is a bit troublesome. Other than that, it's  quite accurate and gives you a great mustang. 


Again, thank you all for the very kind remarks. =] See you around.

On the bench:  

Tamiya F4U-1  Kenneth Walsh


  • Member since
    June 2013
Posted by bvallot on Monday, January 20, 2020 11:04 AM

Thank you everyone. =] You are all very kind. Some of this comes together rather simply when you're set up right, but I will admit to a fair amount of cursing through certain parts. I lost the pitot tube and had to scratch a new one. I lost the landing light (twice) literally right in front of my eyes with no carpet to gobble it up. Cannot understand how. Had to scratch a new one after I calmed down. Always a new trick to learn after each mistake though.

BrandonK

I think I have a P-39 in my stash with his markings. I had forgotten about it, till now.

BK

I've longed considered which P-39 to do once I get around to it. Perhaps I'll give his a shot and complete the set, lol. I saw a Finescale magazine from about 6 or so years ago that highlighted sprucing up a P-39 so I've got some thoughts about what I might do.  You should jump on it!! I'd love to see someone superdetail that big cannon it lugged around.

Skyraider0609

Wow. That’s amazing BV. I’m truly impressed with that finished work. How did you do the worn areas on the cockpit wood floor, if I can ask?

Skyraider0609

It wasn't so bad really. With a fine tip brush I thinned out some Tamiya paints that approximated my colors I needed to create a blonde looking piece of plywood. It was maybe three or so different colors ranging from Desert Yellow, Flat Brown, and maybe a grey...I can't recall right now. The first thin coat went over a primer of course and was allowed to dry. Then, I built up some character by thinning these other colors down and lightly dragging them over the base color in a fashion that simulates the patterns seen in the wood grain of plywood (letting them mix slightly). Nothing so specific as you won't generally see much of it. I came back again with the Desert Yellow to correct anything that got away from me and then a Flat coat went over it to seal it away. Next, I used a quick swipe of hairspray to use as an in between layer for the Flat Black color to go on top. Then, with the back side of my No. 11 blade scalpel, I very carefully notch out a wood grain pattern that approximates the wearing difference in hardness between the heartwood and sapwood. I work slowly here so this doesn't get overdone. The fine scratches are just meant to break through the black coat and not cut into the cockpit floor. I keep the marks small to better approximate the scale and I limit the marks to only the high wear from feet when climbing in and out of the aircraft.

lawdog114

Outstanding weathering. Awesome subject too. You don’t see too many Pacific Mustangs.

lawdog114

Thanks Joe, you're right you don't. Eduard just released a kit with PTO markings that looks pretty promising. They did some re-engineering of certain parts that look interesting to see in action. I'm pretty jazzed about it and plan to get one eventually, but I've gotta put it on the back list to build. I've got a Corsair up and then that new Tamiya P-38 G/H and a F-4E for a friend that I promised long ago. You should check into it though. I think Eduard's kit will top the new Airfix and possible even the Tamiya. 

Hoss WA

Holy smokes!  That is one awesome Mustang! The Tamiya kit looks like it builds up nicely and the add-ons go the extra mile. I love the shading in the cockpit. The finish and weathering is out of sight. Congrats on a top shelf build. 

Hoss WA

Thanks Hoss. The Tamiya kit is absolutely a nice kit to work with. The only thing about it is the seam on the bottom that runs the length of the radiator. You have to be committed to working it down early. Also, the canopy is a bit troublesome. Other than that, it's  quite accurate and gives you a great mustang. 


Again, thank you all for the very kind remarks. =] See you around.

On the bench:  

Tamiya F4U-1  Kenneth Walsh


JOIN OUR COMMUNITY!

Our community is FREE to join. To participate you must either login or register for an account.

SEARCH FORUMS
FREE NEWSLETTER
By signing up you may also receive reader surveys and occasional special offers. We do not sell, rent or trade our email lists. View our Privacy Policy.