SEARCH FINESCALE.COM

Enter keywords or a search phrase below:

Tamiya F4U-1 Corsair "Birdcage" 1/32

3642 views
12 replies
1 rating 2 rating 3 rating 4 rating 5 rating
  • Member since
    January 2015
  • From: Katy, TX
Tamiya F4U-1 Corsair "Birdcage" 1/32
Posted by Aggieman on Tuesday, December 29, 2020 4:14 PM

As I state in my Revell Corsair post, I had an eye on closing out this year with Tamiya's big Birdcage Corsair.

I'm going to talk a little about this kit.  This kit is right up there with Tamiya's P-51, Spitfire, and Zero 1/32 warbird kit (have not built their Mosquito, but I'm assuming that one would be equivalently awesome).  There is almost enough in the box to build it right out of the box.  The detail is great.  The kit also goes together with little difficulty.  If you've built any of their other 1/32 warbirds, or their 1/48 Corsair, then you should know what to expect if you tackle this one.  I will rank this one as one of their best overall (and wonder why they have not put out a 1/32 version of their wonderful 1/48 P-47 Thunderbolt).  But I will say that as a nearly life-long modeler, I am rarely intimidated by any kit; this one is an exception.  I probably spent half a month just looking at the many parts on the many sprues, thinking about how I was going to tackle some of the component parts.  The kit's only flaws:  it is completely missing a prominent detail of the actuator cable on the cowl flaps, and the rubber tires feature an unremovable (by me, at least) seam right down the middle of the tire.  I recommend replacing with an aftermarket set (I bought a set from Eduard for this build).

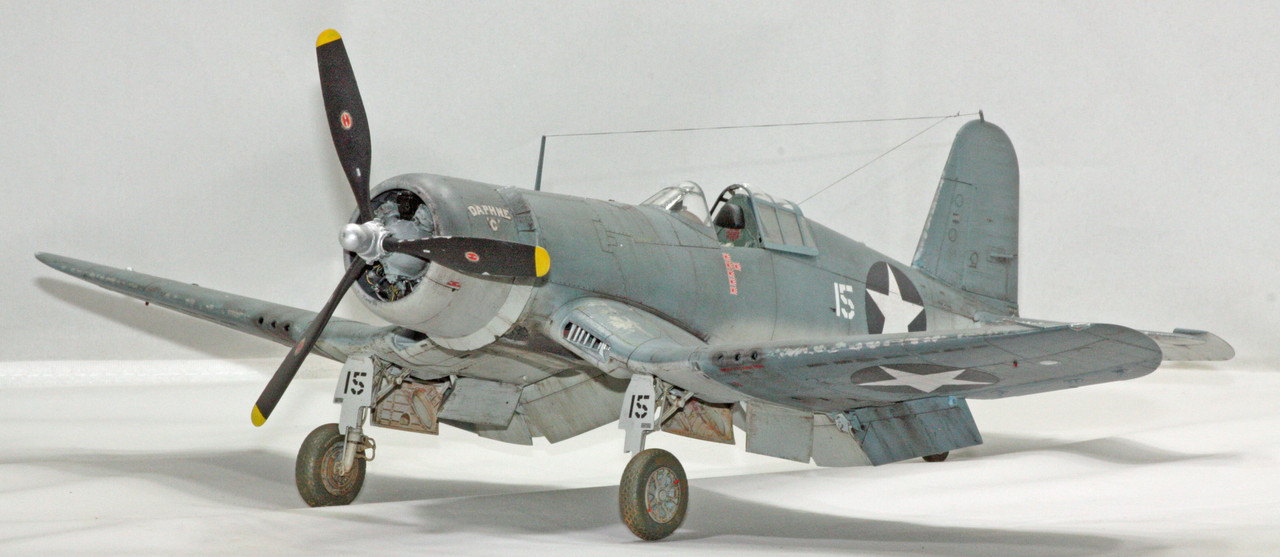
I decided early on to use one of the kit markings, the "Daphne 'C'".  This Corsair operated with VMF-213 of the United States Marine Corps, and was piloted by Lt. James N. Cupp.  The only photo I found of him shows him standing in front of a Corsair with a different ID number (no idea if 13 preceded or followed 15, the aircraft my build represents).

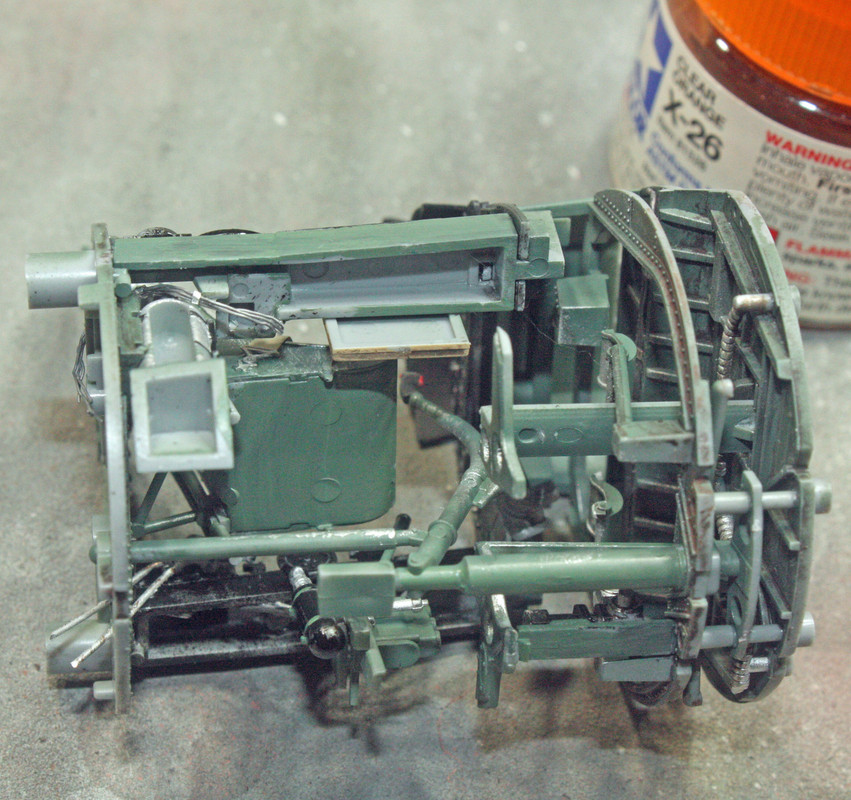
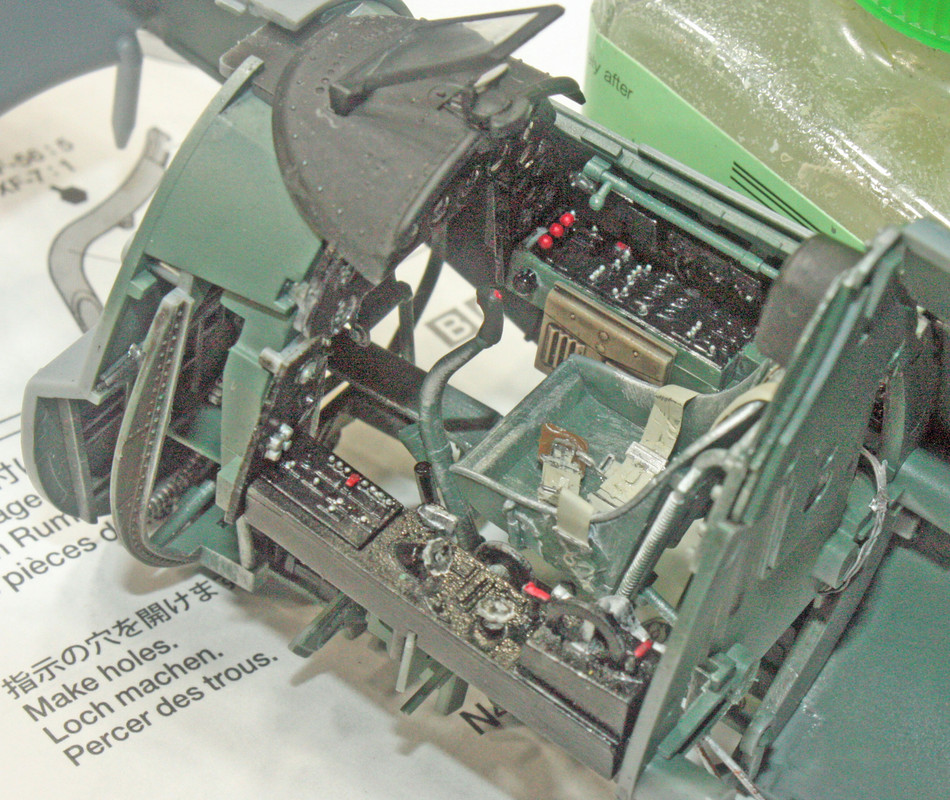
As I did last year with the Tamiya P-51D 1/32, I used a lot of .2mm, .3mm, and .4mm lead wire to augment the great detail already in this kit.  Some is not visible on the completed build, and some is.

Cockpit

The Tamiya R-2800 engine looks pretty good but is devoid of some details (oil connectors and ignition wiring).  I added both of those with lead wiring and some small diameter copper wiring.

I mentioned the lack of the cowl flap actuator.  I did a crude representation of that system by cutting small pieces of thin styrene and then running .2mm lead wire around the inside of the cowl flaps.

On to the wheel wells.  Unlike Revell, Tamiya gives the modeler a very fine representation of the Corsair's primary wheel wells, but in studying photos I found so much more detail that I could add with various sizes of lead wire.  I added a bunch of wires to the wing spar that forms a part of the wheel well in this kit.
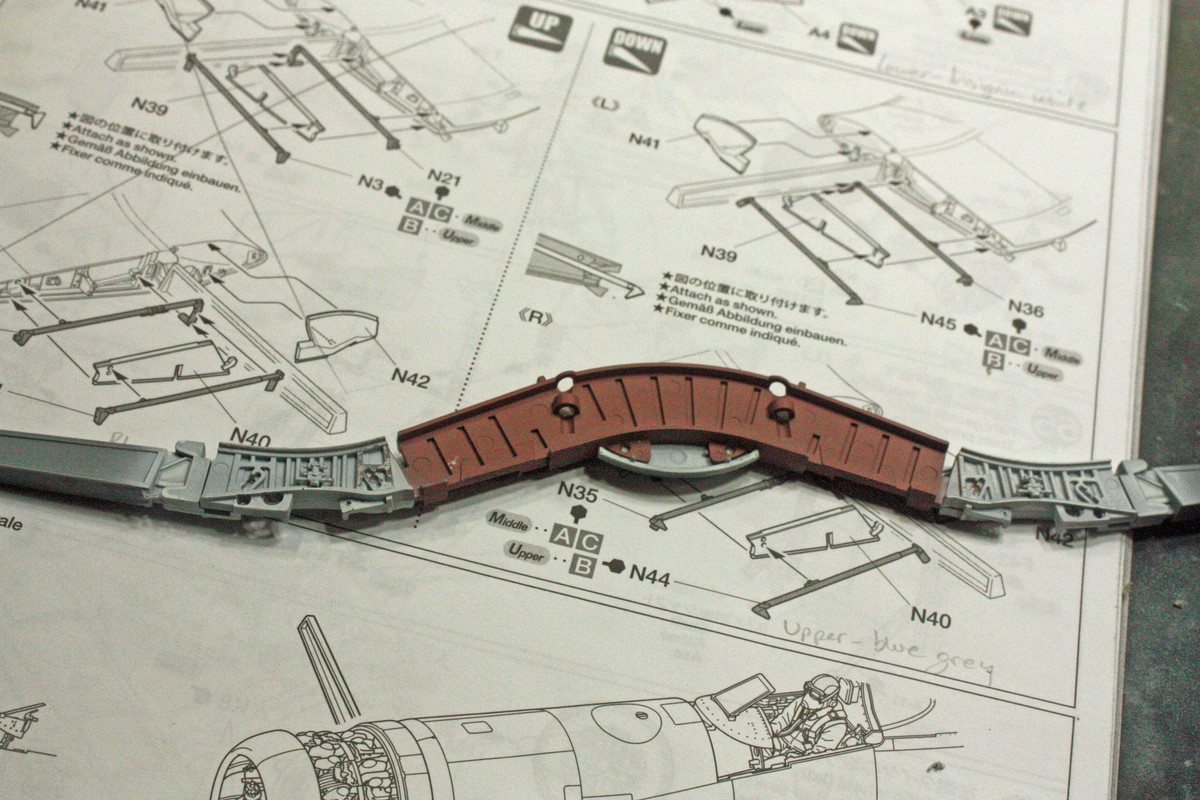
While the Revell kit gives you what is essentially a 2D representation of the prominent air intakes along the inner wing, Tamiya gives you a full 3D intake

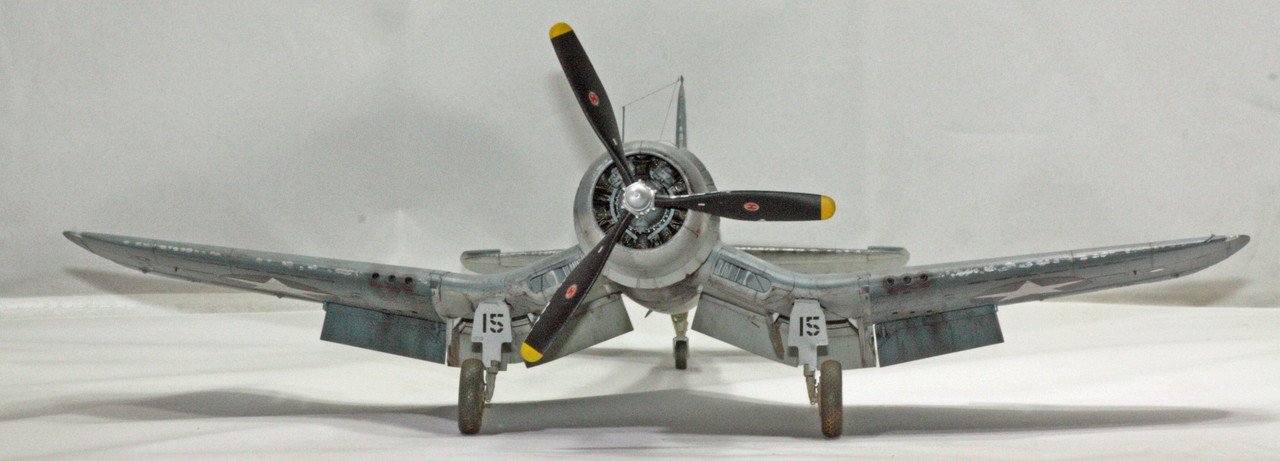
Another thing that Tamiya does not include is anything resembling machine guns.  This could be due to the engineering of the kit that includes a heavy spar going right through what would be the gun bay.  In any event, that leaves six holes in the front of the wings that should at least appear to have something in them.  I cut some tube to replicate machine guns.

I utilized Bert Kinzey's Detail and Scale, Squadron's Walk-Around, and Tamiya's Building the F4U-1 books for this build, as well as studying a bunch of photos to see what a war weary Corsair should look like.  The Corsair was known to leak oil proficiously, to which ground maintenance guys typically put white tape over panels prone to leaks; but this was not always the case, especially early in the Corsair's active duty.  As far as I could tell, Cupp's White-15 did not have the tape.  This was an early F4U-1 carrying a paint scheme prior to the introduction of the tri-color scheme, so I used Vallejo's light gull gray and US blue grey to achieve this look.

To get to the chipped paint look that Corsairs were notorious for, I opted not to do the salt treatment as I did with the Revell.  Instead, I dabbed some liquid masking goo in the areas where I wanted the chipped paint, and followed the same process of painting AK Interactive XTreme Metal aluminum over a grey Stynylrez primer, and Mission Models green zinc chromate over the aluminum after putting down some of that liquid mask.  This worked out better than the salt, and also did not give me the chemical reaction that I saw on the Revell.

I spent a lot of time weathering this kit, using ground up pastels to replicate dirt on the tires and rear gear doors, the AK Interactive streaking grime to effect leaked oil, and Flory dark dirt wash.

So on to the completed build photos.

After I took all of these pictures, I saw in a few of them that I'd neglected to remove the mask from the window that was right beneath the pilot's feet.  So here is a shot of the window now unmasked.

And now I'm hearing a line from a song in a Disney movie ... "For the first time in forever ..." I have no idea what I want to build next.  I do know that this is the last model I'm doing this year (obviously, not even I build that fast).  But given how many I did over the course of 2020, I'm pretty much done with the hobby for the time being.  I'm sure I'll get back to it sooner than I'm currently thinking, though.

Happy New Year everyone!

  • Member since
    December 2002
  • From: Northern California
Posted by jeaton01 on Tuesday, December 29, 2020 9:45 PM

Awesome, Stephen.  A fine looking war weary Corsair.  I'll give you a week before you are bench time starved!

John

To see build logs for my models:  http://goldeneramodel.com/mymodels/mymodels.html


  • Member since
    June 2018
  • From: Ohio (USA)
Posted by DRUMS01 on Tuesday, December 29, 2020 11:10 PM

I see a lot of dedication and detail put into this build. I also like the dirty bird stressed wartime paint. Very well done sir!

Ben

"Everyones the normal until you get to know them" (Unknown)

LAST COMPLETED:

1/35 Churchill Mk IV AVRE with bridge - DONE

NEXT PROJECT:

1/35 CH-54A Tarhe Helicopter


  • Member since
    September 2011
Posted by fightnjoe on Tuesday, December 29, 2020 11:53 PM

Two beautiful works.  


I hope mine looks half as good.  


Joe

Veterans,

Thank You For Your Sacrifices,

Never To Be Forgotten

Where you can find me:

Workbench on FaceBook  Google Plus  YouTube

  • Member since
    January 2015
  • From: Katy, TX
Posted by Aggieman on Thursday, December 31, 2020 3:00 PM

fightnjoe

Two beautiful works.  


I hope mine looks half as good.  


Joe


Thank you Joe!  Be sure to share when you finish, and I'm certain you will produce a fantastic Corsair.

  • Member since
    January 2015
  • From: Katy, TX
Posted by Aggieman on Thursday, December 31, 2020 3:01 PM

DRUMS01

I see a lot of dedication and detail put into this build. I also like the dirty bird stressed wartime paint. Very well done sir!

Ben


Thank you Ben!

  • Member since
    January 2015
  • From: Katy, TX
Posted by Aggieman on Thursday, December 31, 2020 3:04 PM

jeaton01

Awesome, Stephen.  A fine looking war weary Corsair.  I'll give you a week before you are bench time starved!


Thank you John!

I actually have a nice out regarding when I get back to the bench.  I typically tape down a big spread of old newspaper over the MDF surface of the work bench.  I'd had the same newspaper taped down most of this year, so I decided it was a good time to replace it.  When I yanked all that paper off, I noticed a lot of what looks to be water damage to the underlying MDF.  Lots of welts that make the surface rather uneven.  So I've decided to replace the surface of the bench.  It'll be at least some time next week before I even get over to Lowe's for new bench material (and I'm still trying to decide if I want MDF again, or should I get 1/2" or 3/4" plywood.)

  • Member since
    June 2014
Posted by BrandonK on Thursday, December 31, 2020 3:18 PM

Sir, that is one stunning Corsair. Such fine work and details. Your work is top notch on every kit you build. Thanks for sharing another one.

BK

On the bench:

A lot !! And I mean A LOT!!

2024 Kits on deck / in process / completed   

                         14 / 5 / 2  

                              Tongue Tied

  • Member since
    April 2020
  • From: Central CT
Posted by xenon55 on Thursday, December 31, 2020 9:29 PM

Aggieman

Thank you John!


I actually have a nice out regarding when I get back to the bench.  I typically tape down a big spread of old newspaper over the MDF surface of the work bench.  I'd had the same newspaper taped down most of this year, so I decided it was a good time to replace it.  When I yanked all that paper off, I noticed a lot of what looks to be water damage to the underlying MDF.  Lots of welts that make the surface rather uneven.  So I've decided to replace the surface of the bench.  It'll be at least some time next week before I even get over to Lowe's for new bench material (and I'm still trying to decide if I want MDF again, or should I get 1/2" or 3/4" plywood.)


Excellent work. The Corsair is my favorite prop plane. Although I'm partial to the -1A and have Tamiya's kits in 1/32 and 1/48 in my stash. One day my skills will be where I want them to be and will build them.

Look into melamine or TFL coated MDF if you're looking for durability for your bench top. Not sure what size you're looking for, but it's available in 3/4" 4'x8' sheets and also smaller sizes.

  • Member since
    January 2015
  • From: Katy, TX
Posted by Aggieman on Saturday, January 2, 2021 8:56 AM

BrandonK

Sir, that is one stunning Corsair. Such fine work and details. Your work is top notch on every kit you build. Thanks for sharing another one.

BK


Thank you Brandon!

  • Member since
    January 2015
  • From: Katy, TX
Posted by Aggieman on Saturday, January 2, 2021 9:00 AM

xenon55


Aggieman

Thank you John!


I actually have a nice out regarding when I get back to the bench.  I typically tape down a big spread of old newspaper over the MDF surface of the work bench.  I'd had the same newspaper taped down most of this year, so I decided it was a good time to replace it.  When I yanked all that paper off, I noticed a lot of what looks to be water damage to the underlying MDF.  Lots of welts that make the surface rather uneven.  So I've decided to replace the surface of the bench.  It'll be at least some time next week before I even get over to Lowe's for new bench material (and I'm still trying to decide if I want MDF again, or should I get 1/2" or 3/4" plywood.)


Excellent work. The Corsair is my favorite prop plane. Although I'm partial to the -1A and have Tamiya's kits in 1/32 and 1/48 in my stash. One day my skills will be where I want them to be and will build them.

Look into melamine or TFL coated MDF if you're looking for durability for your bench top. Not sure what size you're looking for, but it's available in 3/4" 4'x8' sheets and also smaller sizes.


Thank you Xenon!  

Just keep building, and you'll get there.  

I believe my current bench top is TFL coated MDF, but it has been there for going on 14 years now.  The measurements are 2' deep, 4' long, and I think it's 3/4" thick.  I'll have to rip 4'x8' sheets on my table saw, but now I'm thinking of some upgrades I've wanted to do after so long of using this bench.  Stuff like putting in wire storage, and ensuring that all the surfaces extend 2" past the underlying structure to allow for more room for clamping stuff to the bench.

  • Member since
    July 2019
Posted by Hoss WA on Saturday, January 2, 2021 9:05 AM

Awesome. The work you put into the extra detail on the engine, cockpit and wheel wells really shows. That's what a war and weather weary Corsair should look like. Congrats!  

This kit is on my list at some point when I build up the courage to tackle this monster. 

  • Member since
    January 2015
  • From: Katy, TX
Posted by Aggieman on Saturday, January 2, 2021 11:31 AM

Hoss WA

Awesome. The work you put into the extra detail on the engine, cockpit and wheel wells really shows. That's what a war and weather weary Corsair should look like. Congrats!  

This kit is on my list at some point when I build up the courage to tackle this monster. 


Thank you Hoss!

The detail OOB is pretty good, which actually with regard to a Tamiya kit seems to be a bit of a negative.  The engine is missing the oil plumbing that connects each of the cylinders, yet Trumpeter includes similar parts of their 32nd scale Hellcat and Dauntless, both of which I did last year.  I don't know that they could do a reasonable job in molding all that plumbing in the wheel wells, but with the lead wire it's not too difficult.  Just have to have good reference photos.

I'd love to build the 1A Corsair as well as another P-51, Zero, and Spitfire, but there is a problem of display space.  I'm not really considering the Mosquito as I did an Airfix 1/24 Mossie that takes up a lot of space.  And I'd rather see Tamiya issue some new 1/32 warbirds - P-47 primarily.

JOIN OUR COMMUNITY!

Our community is FREE to join. To participate you must either login or register for an account.

SEARCH FORUMS
FREE NEWSLETTER
By signing up you may also receive reader surveys and occasional special offers. We do not sell, rent or trade our email lists. View our Privacy Policy.