SEARCH FINESCALE.COM

Enter keywords or a search phrase below:

1/48 Sopwith Camel F.1*** FINISHED Pg.4

12275 views
123 replies
1 rating 2 rating 3 rating 4 rating 5 rating
  • Member since
    July 2004
  • From: Sonora Desert
Posted by stikpusher on Sunday, April 25, 2021 9:33 AM

Joe and TB, thank you. Tanker, I would love to fly in such a machine. It's like driving in an early roadster to me, the same sort of appeal, an original machine type calling for those who will accept the challenge.


F is for FIRE, That burns down the whole town!

U is for URANIUM... BOMBS!

N is for NO SURVIVORS...

       - Plankton

LSM


  • Member since
    October 2019
  • From: New Braunfels, Texas
Posted by Tanker-Builder on Sunday, April 25, 2021 7:35 AM

Ooh,OOh Boss!

 Da Plane ,Da Plane!!

 Now that looks downright scary. Would you want to fly in that bundle of Sticks, Mechanicals and Wires? I would'nt. BUT, This plane looks well built and painted for it to be too fragile, Hey Stik-Could I ? Could I take her for a flight? Please? Nice looking  bird my friend.

  • Member since
    March 2012
  • From: Corpus Christi, Tx
Posted by mustang1989 on Sunday, April 25, 2021 7:21 AM

That looks really sharp Carlos. Excellent rigging and the paint work is just all that AND a whole bag of party mix. Really good work man.


 Forum | Modelers Social Club Forum (proboards.com) 

  • Member since
    July 2004
  • From: Sonora Desert
Posted by stikpusher on Saturday, April 24, 2021 11:15 PM

Today was a knuckle down session. The finish line edges ever closer. Two plus hours of gluing snipping, etc. and the rigging was done! EZ Line for the flying surfaces control cables, .008” music wire for bracing wires on the landing gear, and .010 music wire for the wings to landing gear “flying wire”.


Next up, touch up painting, flat coat, add the prop and finito! 


F is for FIRE, That burns down the whole town!

U is for URANIUM... BOMBS!

N is for NO SURVIVORS...

       - Plankton

LSM


  • Member since
    July 2004
  • From: Sonora Desert
Posted by stikpusher on Friday, April 23, 2021 4:29 PM

So yesterday I did a couple of small additions that I needed to do before final bits of rigging. First I added some control line horns to the ailerons that were not molded in place, but needed in order to properly add those lines. I made them up from small pieces of aluminum rod then flattened and filed them them to a more airfoil shape once glued in place.


I also attached the control line thru the rudder using EZ Line and CA.


No rigging today as my fine motor skills are toast after a long bike ride this morning... tomorrow I’ll resume the rigging, and possibly finish it. Then final touch up painting is next on the agenda.


F is for FIRE, That burns down the whole town!

U is for URANIUM... BOMBS!

N is for NO SURVIVORS...

       - Plankton

LSM


  • Member since
    July 2004
  • From: Sonora Desert
Posted by stikpusher on Wednesday, April 21, 2021 9:44 PM

Thank you Nick. These rigging sessions are edging me closer to the finish line, slow but sure.


F is for FIRE, That burns down the whole town!

U is for URANIUM... BOMBS!

N is for NO SURVIVORS...

       - Plankton

LSM


  • Member since
    August 2015
  • From: the redlands Fl
Posted by crown r n7 on Wednesday, April 21, 2021 8:14 PM

That is a fine job Yes


 Nick.

  • Member since
    July 2004
  • From: Sonora Desert
Posted by stikpusher on Wednesday, April 21, 2021 5:19 PM

Today I added the bracing wires on the stabilizers


next up, the flying surfaces control lines on the tail. That is gonna take some finesse... 


F is for FIRE, That burns down the whole town!

U is for URANIUM... BOMBS!

N is for NO SURVIVORS...

       - Plankton

LSM


  • Member since
    July 2004
  • From: Sonora Desert
Posted by stikpusher on Tuesday, April 20, 2021 5:01 PM

One step at a time here. In today’s session I finished up the wing rigging. Except for one wire on each wing that I can’t add until I have the landing gear strut assembly glued in place. Which I have left off for ease of handling up to this point. Next stage will be the tail area. Once I have that completed, I’ll add the landing gear and the final wires up there.


In the meantime...


More progress to show hopefully tomorrow...


F is for FIRE, That burns down the whole town!

U is for URANIUM... BOMBS!

N is for NO SURVIVORS...

       - Plankton

LSM


  • Member since
    July 2004
  • From: Sonora Desert
Posted by stikpusher on Monday, April 19, 2021 4:48 PM

Next update on my Camel with a bit more progress. I rigged up the cross wire braces on the cabane and wing struts using some .008” steel wire. This took about and hour and 45 minutes or so over a couple of sessions.


I’m not sure how many more sessions that it will take to fully rig this Camel...


F is for FIRE, That burns down the whole town!

U is for URANIUM... BOMBS!

N is for NO SURVIVORS...

       - Plankton

LSM


  • Member since
    July 2004
  • From: Sonora Desert
Posted by stikpusher on Wednesday, April 14, 2021 4:09 PM

Attempt 1 on the beginnings of the rigging last week was a crash and burn. Biplanes are outside my usual area, and rigging them way more so... so back off a week, got some advice elsewhere, and had another go at it.

Well, attempt 2 went far better than attempt 1. It did not turn out perfect, but I am not gonna put everything else on hold until I do get it perfect. My order of effort was: attach the EZ line to the upper front cabane strut/upper wing junction, cut a slice of tubing and thread the EZ line thru the hole in the slice, attach the EZ line to the front cabane strut/fuselage junction after achieving proper tension, adjust the position of the metal tube slice and position it. Unfortunately, due to the tension on the lines, it would not position properly, so this was the best that I could do. A better way would be to attach top ends of the line, position the tube slice and fix it in in proper place, then tension and attach the bottom ends of the lines. Live and learn. Anyways...


Now I can start working my way out from that area...


F is for FIRE, That burns down the whole town!

U is for URANIUM... BOMBS!

N is for NO SURVIVORS...

       - Plankton

LSM


  • Member since
    July 2004
  • From: Sonora Desert
Posted by stikpusher on Friday, April 2, 2021 11:02 AM

Joe & TJ, thank you. I'll get the rigging started on this next week. No bench time this weekend.


F is for FIRE, That burns down the whole town!

U is for URANIUM... BOMBS!

N is for NO SURVIVORS...

       - Plankton

LSM


  • Member since
    November 2003
  • From: Naples, FL
Posted by tempestjohnny on Friday, April 2, 2021 6:23 AM
What's already been said. You really hit this one out


  • Member since
    March 2012
  • From: Corpus Christi, Tx
Posted by mustang1989 on Friday, April 2, 2021 6:17 AM

That............looks KILLER with the cals on 'er Carlos!! 


 Forum | Modelers Social Club Forum (proboards.com) 

  • Member since
    July 2004
  • From: Sonora Desert
Posted by stikpusher on Tuesday, March 30, 2021 11:27 PM

Mikeym_us
Stik I would suggest drilling out the seat leaving it open save for the center making it look like a bar and using thin cut tamiya tape and making a wicker weave inside and out. It might make it look more like a wicker seat from a distance and at least give the impression of it.

Kinda too late for that at this point. The kit is 98% assembled and painted now. 


F is for FIRE, That burns down the whole town!

U is for URANIUM... BOMBS!

N is for NO SURVIVORS...

       - Plankton

LSM


  • Member since
    March 2004
  • From: Kincheloe Michigan
Posted by Mikeym_us on Tuesday, March 30, 2021 10:47 PM

stikpusher

Thanks John. Same here on when the last time was that I built this particular kit. It is definitely something of a “nostalgia build”.


Last night I began construction. Actually though it was mostly just paint work.


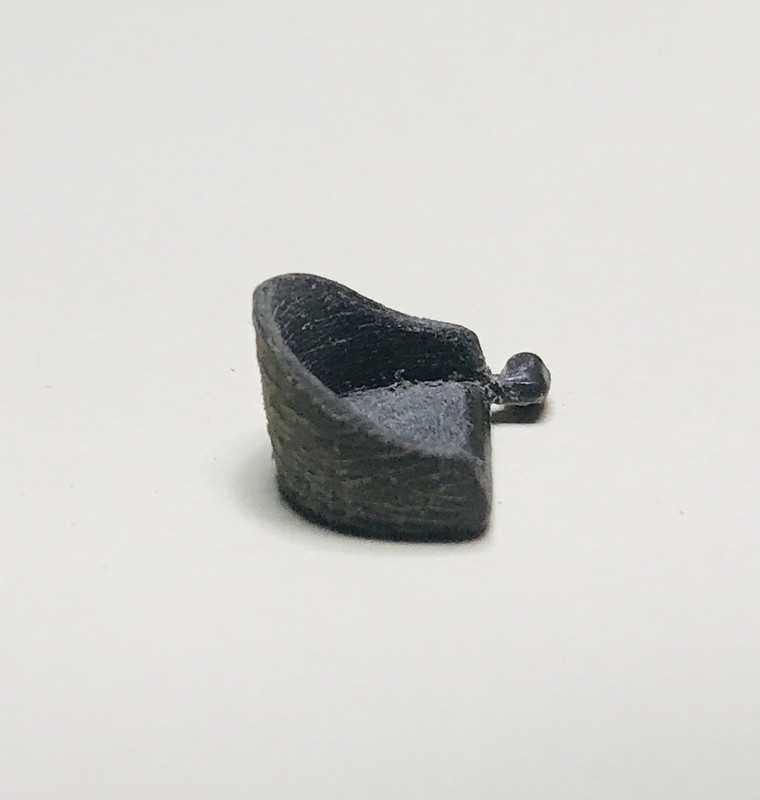
First I took a razor saw along the seat to give it some texture to suggest that of the wicker seats actually used. Once painted and with a wash it should look more the part.


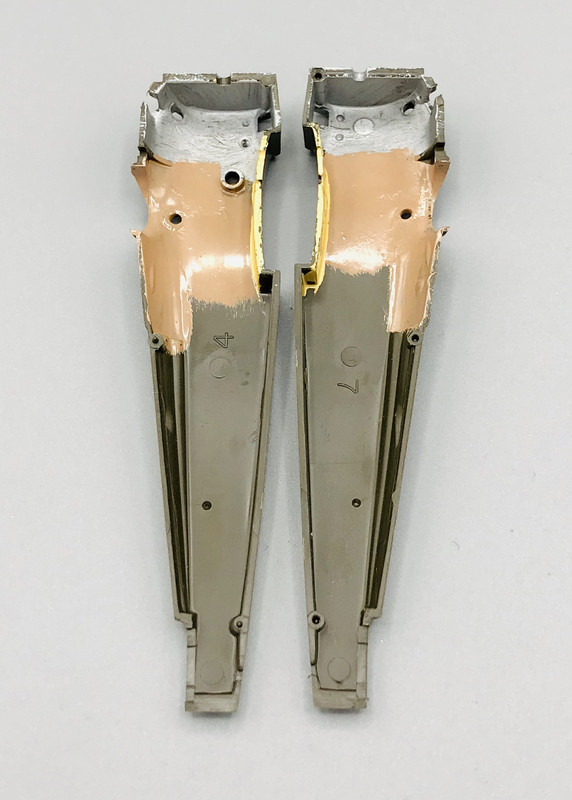
Then I painted up other cockpit components, and the interior of the fuselage halves. Just getting the base colors on for now. I’m not gonna use the kit pilot, so behind the seat is a glaring empty space. I searched thru my spares/salvaged parts and came up with a fuel tank to fill the void. It somewhat resembles the real thing. I’m not going for 100% accuracy, just stuff to suggest what should be there. I’m sure that must sound like blasphemy to some modelers.


I’ll get to work on detail painting and washes over the next few days, plus whatever mods I intend to scratch up for the cockpit. 


Stik I would suggest drilling out the seat leaving it open save for the center making it look like a bar and using thin cut tamiya tape and making a wicker weave inside and out. It might make it look more like a wicker seat from a distance and at least give the impression of it.

On the workbench: Dragon 1/350 scale Ticonderoga class USS BunkerHill 1/720 scale Italeri USS Harry S. Truman 1/72 scale Encore Yak-6

The 71st Tactical Fighter Squadron the only Squadron to get an Air to Air kill and an Air to Ground kill in the same week with only a F-15   http://photobucket.com/albums/v332/Mikeym_us/

  • Member since
    December 2002
  • From: Northern California
Posted by jeaton01 on Tuesday, March 30, 2021 10:24 PM

Wire has never worked for me, can't get them all tight, especially after my shaky fingers whack them a few times.  EZLine and similar for me.

John

To see build logs for my models:  http://goldeneramodel.com/mymodels/mymodels.html


  • Member since
    July 2004
  • From: Sonora Desert
Posted by stikpusher on Tuesday, March 30, 2021 2:53 PM

plasticjunkie

You can make your own turnbuckles to any scale by simply stretching over a candle the hollow plastic handles from the cheap Dollar Store Q Tips. Cut them to proper length and insert the rigging and secure with a small drop of thin CA. I like using EZ line for it.


Oh I am going a much simpler route. Fine wire cut to proper length and super glued in place. Maybe I'll go the turnbuckle route on one of the more detailed biplane kits in my stash somewhere down the road. But I'm keeping this build simple. I still want to get a few more biplanes under my belt before I dive into the fancy stuff with my Eduard and Roden kits.


F is for FIRE, That burns down the whole town!

U is for URANIUM... BOMBS!

N is for NO SURVIVORS...

       - Plankton

LSM


  • Member since
    November 2008
  • From: Central Florida
Posted by plasticjunkie on Tuesday, March 30, 2021 1:15 PM

You can make your own turnbuckles to any scale by simply stretching over a candle the hollow plastic handles from the cheap Dollar Store Q Tips. Cut them to proper length and insert the rigging and secure with a small drop of thin CA. I like using EZ line for it.

 GIFMaker.org_jy_Ayj_O


Too many models to build, not enough time in a lifetime!!

  • Member since
    July 2004
  • From: Sonora Desert
Posted by stikpusher on Tuesday, March 30, 2021 11:04 AM

RG, I just went with a tan that was close to those gum erasers or the sidewalls on some of my old bike tires. 

Thank you Crown. They are some good looking markings, both the squadron symbol and the aircraft code letters on the fuselage. 


F is for FIRE, That burns down the whole town!

U is for URANIUM... BOMBS!

N is for NO SURVIVORS...

       - Plankton

LSM


  • Member since
    August 2015
  • From: the redlands Fl
Posted by crown r n7 on Tuesday, March 30, 2021 5:38 AM

very sharp!


 Nick.

  • Member since
    May 2011
  • From: Honolulu, Hawaii
Posted by Real G on Tuesday, March 30, 2021 1:40 AM

I had read that the natural rubber tires used in WW I were indeed a pinkish color (like those grade school erasers!).  I also read that the Germans had synthetic rubber, which was the more familiar grey/black.

Such minutiae was never considered back when those Aurora kits came out!


“Ya ya ya, unicorn papoi!”

  • Member since
    July 2004
  • From: Sonora Desert
Posted by stikpusher on Monday, March 29, 2021 9:47 PM

Thank you John. It definitely looks better now.


F is for FIRE, That burns down the whole town!

U is for URANIUM... BOMBS!

N is for NO SURVIVORS...

       - Plankton

LSM


  • Member since
    April 2003
  • From: USA
Posted by keavdog on Monday, March 29, 2021 8:52 PM

Looks great Carlos!

Thanks,

John

  • Member since
    July 2004
  • From: Sonora Desert
Posted by stikpusher on Monday, March 29, 2021 8:35 PM

Ranger, I do hope that Atlantis got ahold of the old Aurora/Monogram WWI kit molds. I'd love to see the ones that I did not build get reissued. I was able to find most of those kits on eBay years ago. But there were a few that I couldn't get ahold of. Just maybe we will see them again.

Joe, I had remembered reading something about the tire color, and had to look it up to confirm. And that does add a nice different splash of color on the wheels.

And the decals are now on! 


Next challenge is the one that I do not look forward to... rigging... yikes!


F is for FIRE, That burns down the whole town!

U is for URANIUM... BOMBS!

N is for NO SURVIVORS...

       - Plankton

LSM


  • Member since
    March 2012
  • From: Corpus Christi, Tx
Posted by mustang1989 on Sunday, March 28, 2021 2:12 PM

Now see.....I didn't know that about the tire color so I would've been stumped on the color of those. Lookin' good Carlos. Can't wait to see this one with some cals on it.


 Forum | Modelers Social Club Forum (proboards.com) 

  • Member since
    March 2003
Posted by rangerj on Sunday, March 28, 2021 1:25 PM

I'm lovin' this build Stick. I built everyone of those old Aurora WWI biplane kits and have a few in my collection including a Gotha bomber. Monogram got a few of those old molds and reproduced the kits. I used to collect empty milk bottles and soda bottles to take back to the grocery store and get the deposit money to buy kits with. If I recall that Camel kit was $0.79 and the Gotha bomber was $0.99 (expensive). Those were the days.

I heard, or read somewhere a long time ago, that many of the old Aurora molds were destroyed in a train wreck. Anybody know what did happen to their molds, other than the ones Monogram has (had?).

As an aside, I had a 3 foot stuffed "Snoopy the WWI ACE" stuffed animal that my 3 year old grandson laid claim to and it is now in his bedroom. DRAT!

  • Member since
    July 2004
  • From: Sonora Desert
Posted by stikpusher on Saturday, March 27, 2021 10:51 PM

I assembled, painted, and test fitted the landing gear. In case you’re wondering about the tan tires, apparently during WWI, carbon had not started to be added to rubber, so the natural color was tan, like a gum easer.


Now it’s all ready for decals


F is for FIRE, That burns down the whole town!

U is for URANIUM... BOMBS!

N is for NO SURVIVORS...

       - Plankton

LSM


  • Member since
    July 2004
  • From: Sonora Desert
Posted by stikpusher on Thursday, March 18, 2021 6:50 PM

Thanks Joe. And that reminds me that I have a stalled old Monogram SBD to finish up one day... one day...


F is for FIRE, That burns down the whole town!

U is for URANIUM... BOMBS!

N is for NO SURVIVORS...

       - Plankton

LSM


  • Member since
    March 2012
  • From: Corpus Christi, Tx
Posted by mustang1989 on Thursday, March 18, 2021 6:28 PM

stikpusher

How many of us here built this same kit when we were kids. I know that I did. And it's fun to build these old kits with grown up skills and all these modern tools and techniques. Not that I'm using much of the latter... lol.


First off, I just had a chance to catch up on this thread and have to say that I'm liking what I'm seeing very much. I pulled this same stunt with a Monogram Dauntless a few years back and had a great time just as you are here Carlos. Amazing work fella.


 Forum | Modelers Social Club Forum (proboards.com) 

JOIN OUR COMMUNITY!

Our community is FREE to join. To participate you must either login or register for an account.

SEARCH FORUMS
FREE NEWSLETTER
By signing up you may also receive reader surveys and occasional special offers. We do not sell, rent or trade our email lists. View our Privacy Policy.