SEARCH FINESCALE.COM

Enter keywords or a search phrase below:

My First Time Group Build

36098 views
323 replies
1 rating 2 rating 3 rating 4 rating 5 rating
  • Member since
    April 2013
Posted by SchattenSpartan on Sunday, July 21, 2013 1:32 PM

Are you building "Ridge-Runner"? I'll build "Feeble Eagle" (the one at the top) for the NMF GB, using Tamiya's big Mustang.

  • Member since
    October 2005
  • From: New Port Richey
Posted by deattilio on Sunday, July 21, 2013 4:39 PM

SCHATTEN SPARTAN,  I am finishing this one as Ridge Runner, a much simpler rendition is offered out of the box - as stickers no less.  I wasn't willing to settle for the kit's markings and am glad I came across this set of decals.  The kit itself isn't really a top pick or winner but is a reboxing of the first kit I built and am using it as a practice bed for other NMF kits such as my CMR P-51H.

I'll be sure to check out your build progress on the Tamiya Mustang.


WIP:
Trying to get my hobby stuff sorted - just moved and still unpacking.


"Gator, Green Catskill....Charlie On Time"


  • Member since
    April 2013
Posted by SchattenSpartan on Sunday, July 21, 2013 5:30 PM

Do you have any experience using those Eagle decals? I never used them, but I ordered 2 sets... (1/32 Mustang, 1/48 Fw 190D)

  • Member since
    October 2005
  • From: New Port Richey
Posted by deattilio on Sunday, July 21, 2013 8:01 PM

SchattenSpartan
Do you have any experience using those Eagle decals? I never used them, but I ordered 2 sets... (1/32 Mustang, 1/48 Fw 190D)

If memory serves correctly, I used a set on a 1/72 Bf-109, well a Buchon painted as a -109 that is and they worked well.  But, that was couple years back I think.  Hopefully I can get couple of the decals onto my Mustang and I'll be able to show how they will look on NMF. 


WIP:
Trying to get my hobby stuff sorted - just moved and still unpacking.


"Gator, Green Catskill....Charlie On Time"


  • Member since
    April 2005
  • From: Australia
Posted by taxtp on Wednesday, July 24, 2013 6:43 PM

More progress on the Frog P-47. I'll add the undercarriage and stores and spray a flat coat on it later today. Oh, and replace the aerial that I broke off.

The original Frog decals had perished, so these ones are from an Academy kit, which depicted the same aircraft. They silvered horribly, but for some reason it was easy to seep Future under them to fix it. I guess two coats of Future didn't make it glossy enough for them.

Cheers

Tony

I'm just taking it one GB at a time.

  • Member since
    April 2005
  • From: Australia
Posted by taxtp on Thursday, July 25, 2013 12:36 AM

Hi everyone,

This is as far as I go with this one. I hope you like it. I haven't done an extensive weathering job or anything special at all. I just wanted to finish it as Frog intended. I don't think modelers were doing panel line washes and weathering techniques beyond some exhaust stains and gun discharge marks back in the 60s and 70s.

Cheers

Tony

I'm just taking it one GB at a time.

  • Member since
    December 2002
  • From: Bury St Edmunds, Suffolk, England
Posted by Bish on Thursday, July 25, 2013 1:07 AM

Tony, that's sweet, great looking build. Thanks for taking part.

I am a Norfolk man and i glory in being so


On the bench: Airfix 1/72nd Harrier GR.3/Fujimi 1/72nd Ju 87D-3

  • Member since
    December 2002
  • From: Bury St Edmunds, Suffolk, England
Posted by Bish on Thursday, July 25, 2013 1:11 AM

One week to go guys, hopefully we can get a couple more on the front page before we wrap this up.

I am a Norfolk man and i glory in being so


On the bench: Airfix 1/72nd Harrier GR.3/Fujimi 1/72nd Ju 87D-3

  • Member since
    April 2013
Posted by SchattenSpartan on Thursday, July 25, 2013 6:41 AM

Update time!

First, a pic I forgot to post:: A photo of the IP with decals and gloss paint (Alclad) added:

Now the real update:

Fuselage and wings are glued together:


The stabilizers and tail fillet are not glued in place yet:


Another pic of the cockpit: I had some issues getting it all lined up and I hpe everything looks OK...

I added the stabilizers and fuselage spine since i took those pics. Next task is building the Engine and cowling...

I hope you like it...

Cheers, Clemens

  • Member since
    April 2013
Posted by SchattenSpartan on Thursday, July 25, 2013 6:42 AM

Nice work, Tony! I like it!

  • Member since
    September 2009
  • From: Guam
Posted by sub revolution on Sunday, July 28, 2013 7:38 PM

Tony that's a neat looking build! Maybe a little factory fresh, but looks darn good!

Uh-oh, I didn't realize this build ended so soon! I just hopped on here tonight because I finally got mine cracked back open. Bad news is, somewhere during the move process, I lost one of the ejection seats! So rather than try to fabricate another one, I think I'm just going to slap the cockpit together and have the canopies close. Nobody's going to see anything through those tiny windows. So if I do that and forget the conversion I had contemplated, I can get this thing finished up quick. May be a week late, but done nonetheless.

-Budd

NEW SIG

  • Member since
    October 2005
  • From: New Port Richey
Posted by deattilio on Sunday, July 28, 2013 9:51 PM

Tony, your Thunderbolt looks good, I intend to follow the same track and forgo or minimalize weathering.

SchattenSpartan, the Thunderbolt is looking like an impressive work.


I got some work done on my Mustang, although most of my free time was spent on outdoor chores thanks to last week’s storms around here.  The painting is about 85% complete; the pilot needs painting before I can secure the canopy.  With the majority of the work done I got some decals applied too.  Initially they didn’t respond well to MicroSol, curdling up on the wing is how the insignia showed that but seems to of settle down well over the last several hours.  I only used MicroSet for the rest of the decals and did not have the same reaction so will stick to the recipe for the remainder of the decals.


WIP:
Trying to get my hobby stuff sorted - just moved and still unpacking.


"Gator, Green Catskill....Charlie On Time"


  • Member since
    April 2013
Posted by SchattenSpartan on Sunday, July 28, 2013 10:27 PM

Nice, flawless decal spplication! Nice work!

I got everything but the engine cowling assembled by now. I ran into a problem though...

The fit of the wings to the fuselage wasn't good at all. I had to rescribe the panel lines where the wings meet the fuse (one on each side at the bottom and the whole wing-root panel line on the right wing's upper surface)

The lines on the bottom came out quite broad, but I think they wll look alright with some microfiller applied.

The line at the top was really challenging though. I tried to rescribe it, but the wing broke loose a bit, so I had to fill the resulting gap with superglue (plastic glue would create a total mess in this situation). That made all the scribing a real pain (i only have a hobby knife and a razor saw for this task). That particular panel line has some slight curves as well, to make things even worse... I just hope this looks nice with the microfiller sprayed on... You can't hide anything with paint when building a NMF bird...

  • Member since
    December 2002
  • From: Bury St Edmunds, Suffolk, England
Posted by Bish on Monday, July 29, 2013 12:48 PM

Budd, no problem. As long as its started, which I know it is, just carry on posting once the GB is closed. O the joy of moving.

The Mustang is looking good.

I am a Norfolk man and i glory in being so


On the bench: Airfix 1/72nd Harrier GR.3/Fujimi 1/72nd Ju 87D-3

  • Member since
    September 2009
  • From: Guam
Posted by sub revolution on Tuesday, July 30, 2013 10:55 PM

Thanks Bish! You're awesome!

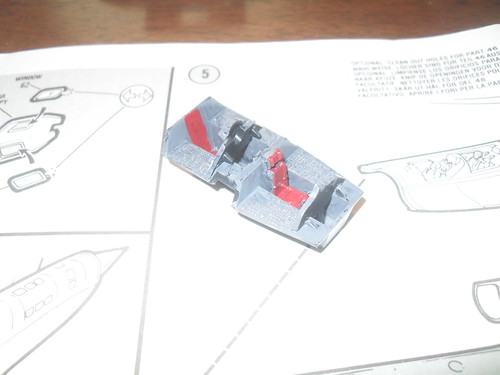
So here's the cockpit. Like I said before, no point in doing anything too ridiculous with it, since I am now missing a seat. I did, however, paint some red where the seat would be to try and fool anyone who actually looks through the tiny window in the back.


SDC13338


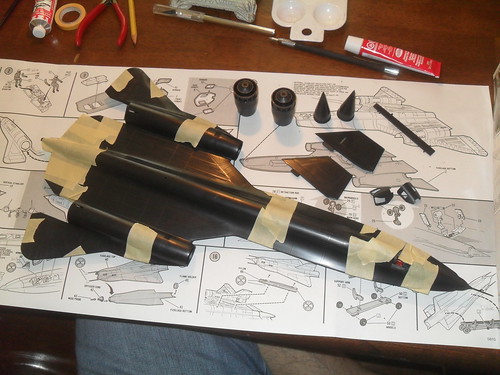
 Here it is all buttoned up. You may have noticed that the main construction consists of two large pieces, an upper and lower half, that form the wings and body. Maybe it's because the kit was not that good to begin with, maybe it's just because it's old, but whatever the reason, let's just say that this joining was not a match made in heaven. As you can see, I had to practically wrap it in tape to get it to stay together. And pretty much the entire join left a very noticeable gap between the two pieces, which I filled in tonight. Tomorrow I will see just how effectively I can sand it down to form. Oh, and the backpiece was a really royal pain.

SDC13340

More to follow...

-Budd

NEW SIG

  • Member since
    April 2013
Posted by SchattenSpartan on Wednesday, July 31, 2013 9:35 AM

Looking good so far, Budd!

Bish: I just noticed that my Jug (1/48 Tamiya) is not on the list. Could you do me a favour and add it?

  • Member since
    December 2002
  • From: Bury St Edmunds, Suffolk, England
Posted by Bish on Wednesday, July 31, 2013 9:46 AM

Sorry buddy, it is now.

Ok guys, we are in the closing stretch. The end date is Aug 1st. I will take that as the end of Aug 1st at the last place on earth to see the setting sun, namely American Samoa. This is 12 hours behind UK time, so the build will close at midday BST on Fri.

After that, if you have already started, your more than welcome to carry on posting your up dates and those all important pics and rightfully claim your badge.

I am a Norfolk man and i glory in being so


On the bench: Airfix 1/72nd Harrier GR.3/Fujimi 1/72nd Ju 87D-3

  • Member since
    April 2013
Posted by SchattenSpartan on Wednesday, July 31, 2013 7:05 PM

Thanks mate!

  • Member since
    September 2009
  • From: Guam
Posted by sub revolution on Wednesday, July 31, 2013 8:33 PM

Alright, so I wasn't going to bore you guys with another picture already, but then I got hit with a wave of nostalgia tonight. For those who don't remember my original post, the SR-71 wasn't really the first model "I" built, it was the first one my dad built for me (with me "helping," of course.) Amazingly the thing survived up until I left for the Navy, then disappeared with a lot of other things.

So anyway, my dad was never much of a modeler, so it was pretty much glued together and then had the decals slapped on, that was it. But for a 6 (or so) year old who had just gotten interested in airplanes, it was more than enough to make me happy. Tonight as I added the last major components, I suddenly got struck with the memory of holding that first model 20+ years ago.


SDC13341

More to follow...

-Budd

NEW SIG

  • Member since
    December 2002
  • From: Bury St Edmunds, Suffolk, England
Posted by Bish on Monday, August 5, 2013 7:48 AM

OPP's, looks like I forgot to officially close this. But never mind, I think we all got the message.

Thanks to all those who took part and those still building. Feel free to finish the builds and I will still post them on the front page.

Budd, looking forward to seeing this painted. Are you planning any weathering.

I am a Norfolk man and i glory in being so


On the bench: Airfix 1/72nd Harrier GR.3/Fujimi 1/72nd Ju 87D-3

  • Member since
    October 2005
  • From: New Port Richey
Posted by deattilio on Saturday, August 10, 2013 9:45 PM

Albeit behind schedule, I have completed my 1/72 Snap-Tite P-51D.  I know I have lavished far more skill and time than Monogram ever imagined would be dedicated to this little beginners kit.  I can also attest that this attempt is a better finished project than the first time I snapped one of these together all those many years ago.


Tags: 1/72 , GB , P-51D , Monogram


WIP:
Trying to get my hobby stuff sorted - just moved and still unpacking.


"Gator, Green Catskill....Charlie On Time"


  • Member since
    December 2002
  • From: Bury St Edmunds, Suffolk, England
Posted by Bish on Sunday, August 11, 2013 2:11 AM

That's a sweet looking stang. I am sure Monogram would be proud. Added it to the front page.

I am a Norfolk man and i glory in being so


On the bench: Airfix 1/72nd Harrier GR.3/Fujimi 1/72nd Ju 87D-3

  • Member since
    April 2013
Posted by SchattenSpartan on Sunday, August 11, 2013 6:33 AM

She looks really nice!

I made some progress on my Jug as well. The cowling is now painted and waiting for assembly and the flaps are glued together. I'll post some pics on Thursday (I'm travelling to Munster, so I don't have access to my pics untill then)

  • Member since
    December 2002
  • From: Bury St Edmunds, Suffolk, England
Posted by Bish on Sunday, August 11, 2013 3:41 PM

No problem Clemens. Will look forward to seeing them Thurs.

I am a Norfolk man and i glory in being so


On the bench: Airfix 1/72nd Harrier GR.3/Fujimi 1/72nd Ju 87D-3

JOIN OUR COMMUNITY!

Our community is FREE to join. To participate you must either login or register for an account.

SEARCH FORUMS
FREE NEWSLETTER
By signing up you may also receive reader surveys and occasional special offers. We do not sell, rent or trade our email lists. View our Privacy Policy.