SEARCH FINESCALE.COM

Enter keywords or a search phrase below:

P-40 GB 2014

55361 views
508 replies
1 rating 2 rating 3 rating 4 rating 5 rating
  • Member since
    December 2003
  • From: Charleston, SC
Posted by sanderson_91 on Thursday, July 10, 2014 8:12 PM

Bv, amazing work on that Allison!!

Steve


  • Member since
    November 2003
  • From: State of Mississippi. State motto: Virtute et armis (By valor and arms)
Posted by mississippivol on Thursday, July 10, 2014 9:41 PM

It would be a shame to cover all of that up, BV...

GAF
  • Member since
    June 2012
  • From: Anniston, AL
Posted by GAF on Thursday, July 10, 2014 10:21 PM

ajd3530

Thanks missvol.

Question guys. The area of the fuselage underneath the glass behind the cockpit; what color is it supposed to be? Interior color, or exterior color?

Odd.  I read just recently that the darn things were removable so that area could be painted whatever color was needed.

I'll see if I can find out where I saw that.  Read it in passing and filed it away in the failing Mk. 1 Brain for future reference... yeah, fat lot of good that does!

Gary

PS>  Yeah, that didn't take long.

http://www.ipmsstockholm.org/magazine/2004/02/stuff_eng_interior_colours_us_part2.htm

  • Member since
    June 2013
Posted by bvallot on Thursday, July 10, 2014 10:31 PM

Gary: Yeah, I know I've seen a number of times where the color matched what was next to it.  They would get removed to complete whatever camo scheme was being painted onto the exterior.

Steve and MSVol: Thanks! =]  I do plan on making this part visible.  But I do want to be able to put the panel on so I can see that shark smile.  =D  Hopefully, I'll tackle this effectively.  

On the bench:  

Tamiya F4U-1  Kenneth Walsh


  • Member since
    November 2003
  • From: State of Mississippi. State motto: Virtute et armis (By valor and arms)
Posted by mississippivol on Friday, July 11, 2014 10:58 PM

Well played, aj!

  • Member since
    June 2013
Posted by bvallot on Monday, July 14, 2014 12:17 AM

Definitely, ajd.  I will certainly tuck that trick away. =]

I got the .50 MGs matched up to the gun ports.  It's very hard to see here (I am sorry about that but there's not much to see.)  I ended up making a shim for the shelf they sit on.  I misaligned the shelf by about 3mm which put the barrels off.  So now they are back on.  The one thing I did accomplish here.  The nickel tube you see I have left long to keep the barrel true while it was setting up from the CA and epoxy. (not screwing around here on this part. =] )  I'll cut this tube to the appropriate size for the the .50 barrels.  The left side I believe I will leave removable.

 image by brittvallot, on Flickr

Here are some brass sheets I cut to make the riveting frame for the panels.  Unfortunately, I haven't been able to match them up and glue them in yet.  

 image by brittvallot, on Flickr

This is moving slower than anything I've done before...grrr.

On the bench:  

Tamiya F4U-1  Kenneth Walsh


  • Member since
    November 2003
  • From: State of Mississippi. State motto: Virtute et armis (By valor and arms)
Posted by mississippivol on Monday, July 14, 2014 10:30 PM

BV, who'd have thought that a 50 year old mold with less than fifty parts could take so long!

  • Member since
    June 2013
Posted by bvallot on Tuesday, July 15, 2014 7:38 AM

LMAO. This actually had me laughing so hard my fiancĂ© next to me in bed had to ask what was wrong. =D  I know, I know...

On the bench:  

Tamiya F4U-1  Kenneth Walsh


  • Member since
    December 2003
  • From: Charleston, SC
Posted by sanderson_91 on Tuesday, July 15, 2014 5:40 PM

Bv, your P-40 keeps getting better and better!

Steve


  • Member since
    June 2013
Posted by bvallot on Wednesday, July 16, 2014 10:22 AM

Alright!! =] Finally made some headway. I've been a bit anxious about rushing any one part of getting this engine installed before I finished certain necessary steps, but now I think I'm finally rolling with this.  Of course I had to dress this Allison up a little nicer.  I couldn't help myself.  I knew I'd never get every single hose and tube in place at such a tiny scale (especially my first time attempting this) but after I found a beautifully pictured walkaround book on the P-40B/C...I just had to follow through.  And I took a play out of lawdog's playbook and pulled my light box out to film with so these pictures come out better.  But first I wanted share one trick I come up with for working this tiny.  Obviously, some of the detail will be unseen...like origin and insertion points. So here's a photo of what I did when two or more lines were going to the same general location.  The origin gets doubled over which helps to make a tab to anchor it down and allows you to accomplish more with less mess.
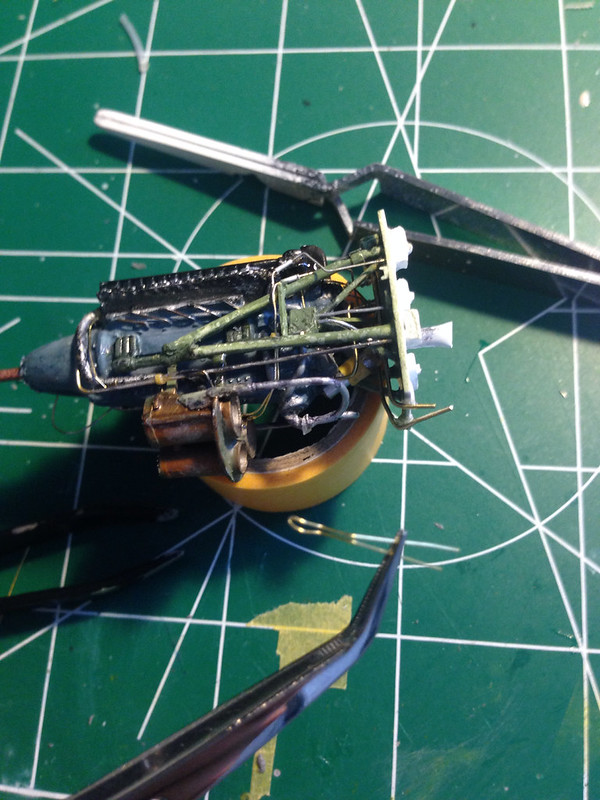
 image by brittvallot, on Flickr

The other trick I used which I can't find a picture of now...was when two lines were next to each other running virtually parallel, I would make a similar tab as outlined above, but here I would hook it onto the the part already in place.  Kind of like threading a needle but instead you're just dropping it onto (the "eye" is just a hook). This helps all this fiddly stuff to be a bit more sturdy.  Hope some finds that useful.

Here's the Allison V-1710-33:
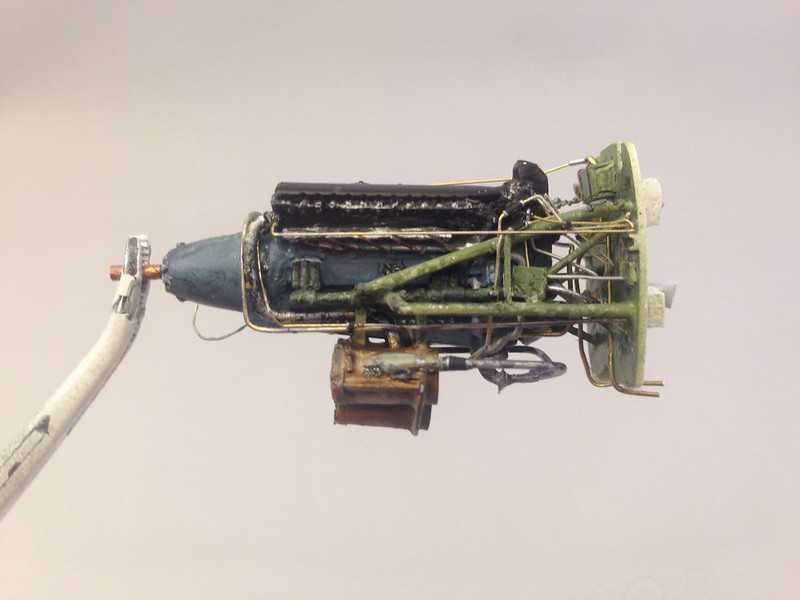
 image by brittvallot, on Flickr

 image by brittvallot, on Flickr
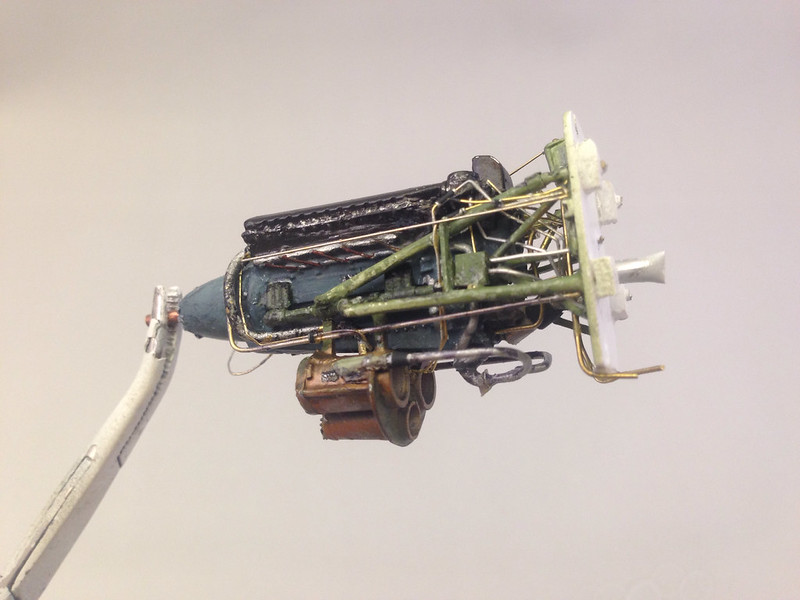
Here's a view of the coolant expansion tank/line and the linkage for the carb.
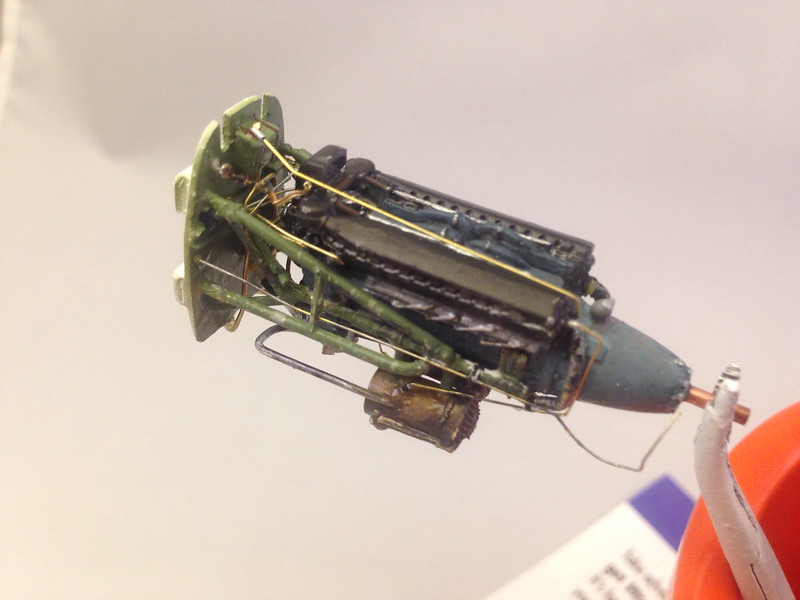
 image by brittvallot, on Flickr

 image by brittvallot, on Flickr
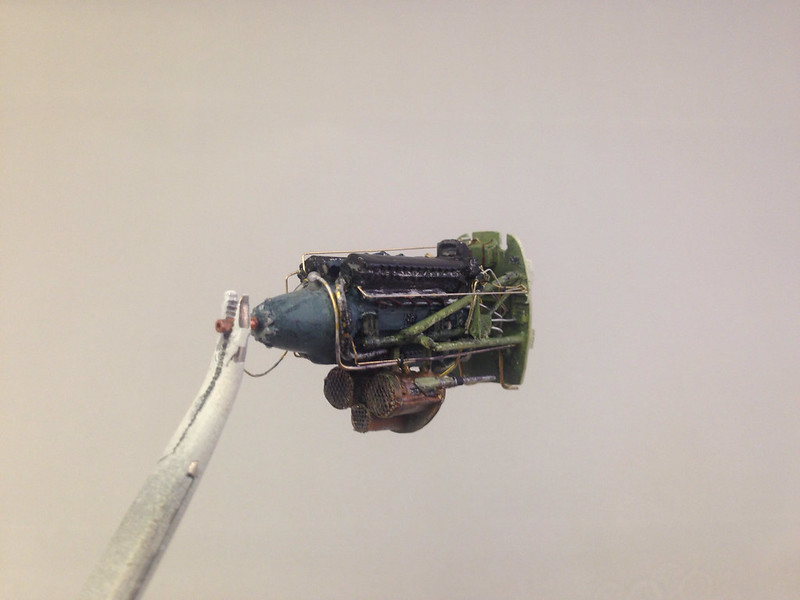
I touched up the paint here and there as needed.  Weathered a bit more...and painted in some placards.  I'm pretty happy with it.  =]

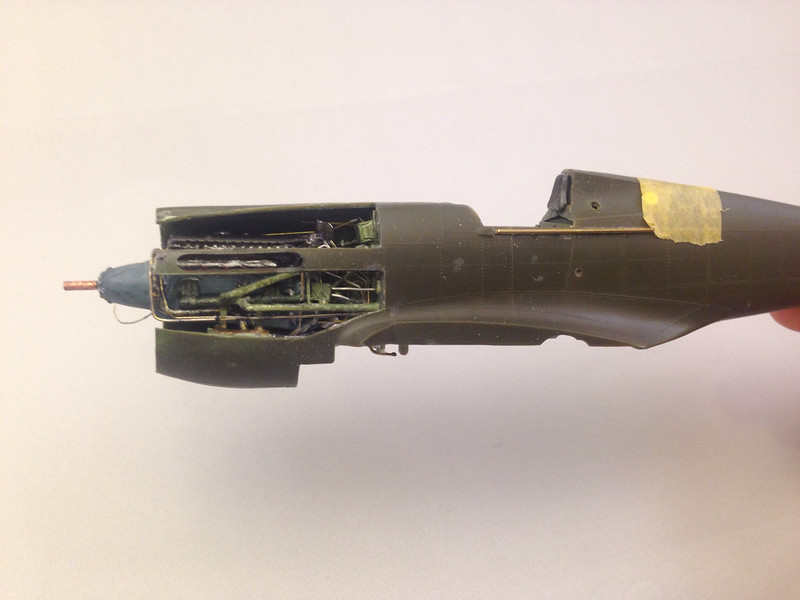
When they say measure twice, cut once...holy sh!t my father would be so happy. =]  Talk about a tight fit!!  Had to be very careful placing this old girl in there as I have some of the fuselage already glued together.  There is absolutely no play left in this engine area.  Which I suppose is actually a good thing...everything should be snug and in it's place which makes me glad I triple checked the fitting every time I added a new major component to this Allison.  So here it is:
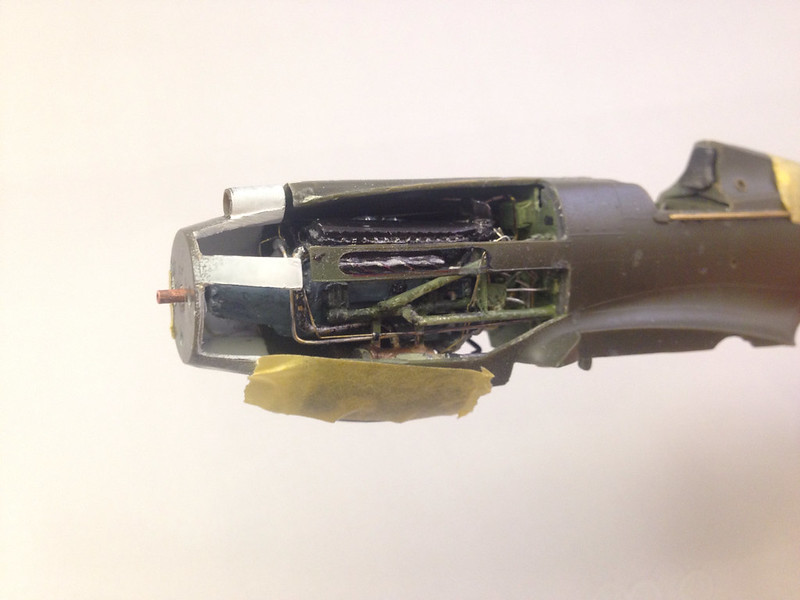
 image by brittvallot, on Flickr

url=https://flic.kr/p/om1Eiu] [/url]image by brittvallot, on Flickr
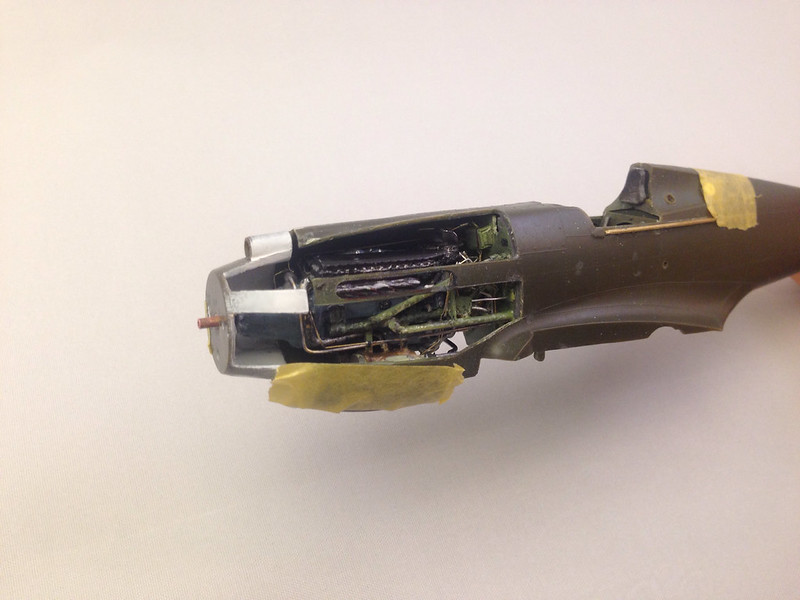
 image by brittvallot, on Flickr

 image by brittvallot, on Flickr
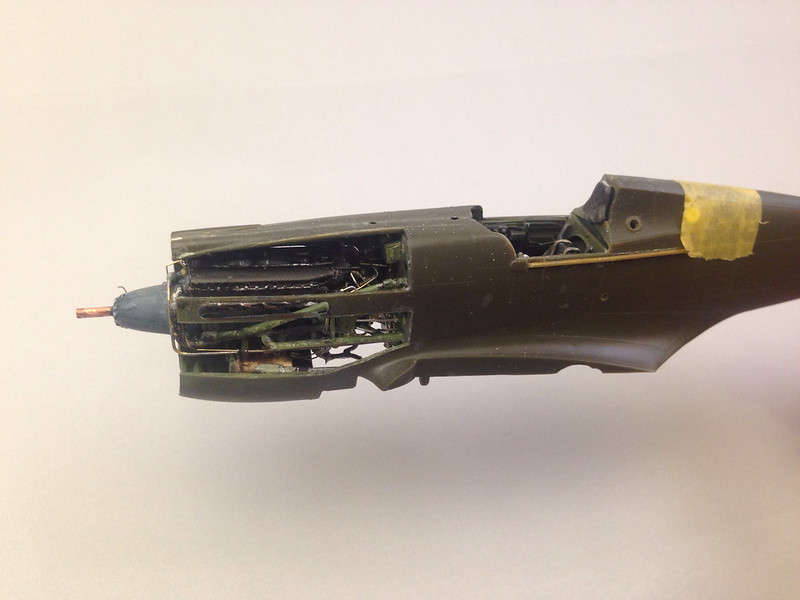
So that's that for now.  I have the Dzus railing to put on next, the intake scoops, misc trimmings, and then solve the magnet problem, and then I can move on to fitting the wings to the fuselage.  =]

On the bench:  

Tamiya F4U-1  Kenneth Walsh


  • Member since
    November 2003
  • From: State of Mississippi. State motto: Virtute et armis (By valor and arms)
Posted by mississippivol on Wednesday, July 16, 2014 10:46 AM

Sweet mercy!

  • Member since
    June 2013
Posted by bvallot on Wednesday, July 16, 2014 7:23 PM

=] Thanks MSvol.  I'm so happy to get past this point.  

On the bench:  

Tamiya F4U-1  Kenneth Walsh


  • Member since
    October 2013
Posted by ajd3530 on Thursday, July 17, 2014 3:51 PM
Let me just take a moment to say that my absolute hate for using/sanding filler is rivaled only by doing drywall work... Actually when you think about it, its pretty much the same thing. Makes sense now..
  • Member since
    June 2013
Posted by bvallot on Thursday, July 17, 2014 6:51 PM

LOL.  I can totally relate to that as I am not a professional of either one.  =]

On the bench:  

Tamiya F4U-1  Kenneth Walsh


  • Member since
    October 2013
Posted by ajd3530 on Wednesday, July 23, 2014 6:11 PM
Well lets put some paint on her. Looks like I should be done before the deadline.


  • Member since
    June 2013
Posted by bvallot on Friday, July 25, 2014 1:03 AM

FINALLY!

Salvation.  I've finally moved on to this thing called "building the rest of the aircraft."  I first fixed up the gap underneath, sanded and smoothed that shape back.  I played with trying to insert the rear venting duct that fits behind the radiator but there's just not enough room to safely place it in there.  And since I'm trying to reveal the interior, I guess I don't mind leaving that part out.  I admit I would have liked to have included it.

Here's where I'm at.  Fixed the gap/seam.

 image by brittvallot, on Flickr

Backing up a bit, before I fixed the wings to the fuselage I tried fitting everything put together so far and found a tiny space between the undersurface of the flaps.  I came up with this as a solution.  I made a paper mask to make my cuts and applied them to the brass sheet.

 image by brittvallot, on Flickr

Next, before I closed up the rest of the fuselage and tail, I had decided (a while back) that I would fix the tab that would hold the radio aerial line.  I sanded a small strip of plasticard thin and cut it to shape and placed a very small hole for the spring to fit.  I gave it some space so that it would not become weak near the edge and break.  For the spring, I took the smallest piece of brass wire I have and coiled it around the second smallest brass rod and kept it tight so that I could have a tougher spring than the pulled sprue I came up with for the Corsair.  I think this is going to work out a lot better.  It's a lot stronger too. =]

 image by brittvallot, on Flickr

Here's the wings placed up.

 image by brittvallot, on Flickr

 image by brittvallot, on Flickr

 image by brittvallot, on Flickr

This is where I'm at for now.  It'll have to wait until Monday before I can do anything more. Then it'll be a mad dash for the finish line!! =D

One other note.  I do want to recognize how much "play" I've found in this decades old kit.  This is the first time I worked on one like it.  It hasn't offered me too much trouble either.  I'm finding out that it's got some pretty good "bones" and I think that's making all the difference.  With a little extra love and attention, she's turning out to be a real treat. 

On the bench:  

Tamiya F4U-1  Kenneth Walsh


  • Member since
    October 2013
Posted by ajd3530 on Friday, July 25, 2014 3:24 PM

Ok, let the middlestone cure some, and got some poster tack on it for msking..

Now let me say, when I have used Model Master enamels, I've been using the Testors airbrush thinner with it in the prescribed 3 parts enamel, one part thinner.. Well after the farce last night with the middlestone last night, I broke down and went to Wallyworld and got myself a jug of Klean-strip paint thinner. And a bit ago when I started putting on the dark earth, I mixed it an even one part enamel to one part thinner. It looked far too thin in the jar, and I was skepticle. It may have not looked right, but it went on GREAT. I look forward to seeing the  finished product after another coat.

  • Member since
    October 2013
Posted by ajd3530 on Friday, July 25, 2014 5:09 PM
Well I an very pleased with how that worked out for me. Only downside is my topside green won't be here until probably Monday.

  • Member since
    November 2003
  • From: State of Mississippi. State motto: Virtute et armis (By valor and arms)
Posted by mississippivol on Friday, July 25, 2014 7:00 PM

Those are coming along great, y'all

  • Member since
    April 2010
Posted by Theuns on Saturday, July 26, 2014 12:59 AM

Very nice!

Theuns

  • Member since
    October 2013
Posted by ajd3530 on Monday, July 28, 2014 8:12 PM
Finally got the right paint in the mail. Let me just say the Tamiya AS line goes on like a dream.


Now just a little bit of touch up, then put a gloss coat on and let it sit overnight. Decals tomorrow!
  • Member since
    October 2004
  • From: Northern Virginia
Posted by ygmodeler4 on Tuesday, July 29, 2014 10:23 AM

AJD.... great looking paint job I can't tell that the middlestone went on to thick.

BV your p-40 is looking fantastic as ever, I agree, I never thought such a cheap kit could be made to look so detailed and good.

-Josiah

  • Member since
    June 2013
Posted by bvallot on Tuesday, July 29, 2014 10:45 PM

adj: This is turning out really nice.  Tamiya does make it easy.  Still, your demarcation lines came out great.  =]  Nice job on the painting here.  Sometimes that AS line can be tricky.

ygmodeler: Thank you very much.  Next to the mustang, this is probably the longest build I've done considering how many pieces the kit originally came.  lol  The end is definitely near.  I still have plenty of GBs on the menu.

On the bench:  

Tamiya F4U-1  Kenneth Walsh


  • Member since
    June 2013
Posted by bvallot on Wednesday, July 30, 2014 7:58 PM

Here's just a repost from my WIP.  I will add by saying after getting the horizontal stabilizers on I was disappointed with how secure the fit was.  I used a combination of CA on the inside of the tabs and Tamiya Extra Thin cement to cook it to the fuselage where it is received.  Still, I would probably encourage others to to make some considerations to stiffen these parts when you're ready to deal with it. 

I've put some more work in.  Everything is virtually together save for the ailerons.  I am having a bit of trouble with some seams.  I wouldn't say it's really any fault of the kit.  Everything test fitted just fine.  This is more to do with all the modifications I've been making.  I am trying not to ruin any existing surface detail, but that may be inevitable.

Here's where I'm at:

Went to town with the Milliput.  Reshaped the gun ports to even them out and to keep a truer profile.  Reshaped the intake on top since there was a bit of step from the kit part.  Made that to be a more accurate shape.  I sanded and smoothed all this down and I have to say how pleased I am to be able to fix things like this now.  I used to think from only a "continue to cut and sand" vs. "adding something more" to the surface.  Not anymore!! =]  Anyone out there that doesn't already know...you should really check this stuff out.  It was just what I needed to sculpt the top part of the cowl on fuselage.

 image by brittvallot, on Flickr

 image by brittvallot, on Flickr

Here's that seam that is mostly cooperating:

 image by brittvallot, on Flickr

For the landing gear, I notice by further reviewing the walkaround book (I got on P-40Bs from my LHS) that the nubs that are included on the kit parts are crudely representing the joint here.  I meant to snap a quick picture before I cut the other one, but here is a picture of what it is and the hole I drilled out to better capture this.  There will be a small pin with an eyelet for lack of a better term for this piece of engineering. 

 image by brittvallot, on Flickr

Here's a shot with a coat of primer to identify any troubleshooting...there is some.  So I'll be back with that. =]

 image by brittvallot, on Flickr

More to come.

On the bench:  

Tamiya F4U-1  Kenneth Walsh


  • Member since
    November 2003
  • From: State of Mississippi. State motto: Virtute et armis (By valor and arms)
Posted by mississippivol on Wednesday, July 30, 2014 8:00 PM

Homestretch, BV!

  • Member since
    June 2013
Posted by bvallot on Wednesday, July 30, 2014 8:05 PM

*HOOT HOOT!  =D

On the bench:  

Tamiya F4U-1  Kenneth Walsh


  • Member since
    January 2011
  • From: Commonwealth of Virginia
Posted by Tal Afar Dave on Wednesday, July 30, 2014 8:25 PM

Great looking work gentlemen!!! Can't wait to see your builds completed!

2022 New Year's Resolution:  Enter 1 group build and COMPLETE a build this year!!  Why Photobucket did you rob me of my one Group Build Badge???  Must be part of the strong anti-Monogram cartel!!!

 ]

  • Member since
    October 2013
Posted by ajd3530 on Wednesday, July 30, 2014 10:50 PM
Ok, decals on, letting that micro sol do its thing over night.
JOIN OUR COMMUNITY!

Our community is FREE to join. To participate you must either login or register for an account.

SEARCH FORUMS
FREE NEWSLETTER
By signing up you may also receive reader surveys and occasional special offers. We do not sell, rent or trade our email lists. View our Privacy Policy.