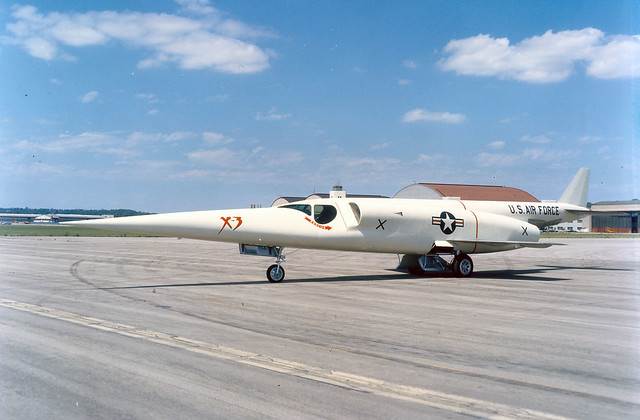
SEARCH FINESCALE.COM

Enter keywords or a search phrase below:

The X-Files Group Build

15852 views
209 replies
1 rating 2 rating 3 rating 4 rating 5 rating
GAF
  • Member since
    June 2012
  • From: Anniston, AL
Posted by GAF on Sunday, March 24, 2024 3:55 PM

Looks great, John!  What color did you use?

Gary

  • Member since
    November 2009
  • From: SW Virginia
Posted by Gamera on Monday, March 25, 2024 7:58 PM

That looks great John!!! 

Even more like a fire-cracker!!! 

"I dream in fire but work in clay." -Arthur Machen


  • Member since
    December 2002
  • From: Northern California
Posted by jeaton01 on Monday, March 25, 2024 10:27 PM

Thanks, Cliff and Gary.  I used Gunze Red Madder for the color, it looked good to me and I had it in the drawer.

This one is a wrap.  All the main gear doors are photoetch on this one, and they are rather weird on the real thing, with one door covering most of the gear well and standing way out from the gear strut. Very delicate! The decals were thin and liked to break, I had to find alternates for the insignia on the fuselage as the kit decals were hopeless. A good coat of Future covered all sins. It really wasn't a very large airplane as you can see in the last photo with a Mustang and D-7.

John

To see build logs for my models:  http://goldeneramodel.com/mymodels/mymodels.html


GAF
  • Member since
    June 2012
  • From: Anniston, AL
Posted by GAF on Tuesday, March 26, 2024 5:55 PM

That's spectacular, John!  That red really stands out!  Congrats!

I'll get you up on the front page ASAP.

Gary

  • Member since
    November 2003
  • From: Nashville, TN area
Posted by bobbaily on Tuesday, March 26, 2024 6:36 PM

Nice build John-love the red!

Bob


  • Member since
    November 2003
  • From: Nashville, TN area
Posted by bobbaily on Thursday, March 28, 2024 1:45 PM

Back at it-spent some time masking for the metallic grey for the lower body work-a red pin stripe decal goes above it so the front will be the more challenging task-a clear coat of Tamiya Clear Gloss after tape to hopefully prevent any paint seepage-noticed some 'dirt pimples' (as we called them in the automotive sheet metal stamping sector) that I attempted to polish out but went a bit too far and will require another coat of silver before clear coat....anyway, hopefully I can paint the grey tomorrow.

It appears that the good folks at Imgur have made some changes on posting formats, so I'll be researching for a bit....grrrrrr

Edit-looks like the folks at Imgur do give the option of using the prior format-thankful for that.....anyway, here's the Aerotech before trim work.  Gonna try to get the engine and suspension wraped up next week...


Bob


  • Member since
    December 2002
  • From: Northern California
Posted by jeaton01 on Thursday, March 28, 2024 9:10 PM

Thanks, Gary and Bob.  Looks like you are getting pretty close, Bob.  I hate dirt pimples but they are certainly attracted to my paint jobs!

John

To see build logs for my models:  http://goldeneramodel.com/mymodels/mymodels.html


GAF
  • Member since
    June 2012
  • From: Anniston, AL
Posted by GAF on Friday, March 29, 2024 6:59 AM

Nice, Bob!  Off to the paint booth!  The "dirt pimples" will sand out.

Gary

GAF
  • Member since
    June 2012
  • From: Anniston, AL
Posted by GAF on Friday, March 29, 2024 7:05 AM

Douglas X-3

The Douglas X-3 Stiletto was the sleekest of the early experimental aircraft, but its research accomplishments were not those originally planned. It was originally intended for advanced Mach 2 turbojet propulsion testing, but it fell largely into the category of configuration explorers, as it never met its original performance goals due to inadequate engines. The goal of the aircraft was ambitious—it was to take off from the ground under its own power, climb to high altitude, maintain a sustained cruise speed of Mach 2, then land under its own power. The aircraft was also to test the feasibility of low-aspect-ratio wings, and the large-scale use of titanium in aircraft structures.

Construction of a pair of X-3s was approved on 30 June 1949. During development, the X-3's planned Westinghouse J46 engines were unable to meet the thrust, size and weight requirements, so lower-thrust Westinghouse J34 turbojets were substituted, producing only 4,900 pounds-force (22 kilonewtons) of thrust with afterburner rather than the planned 7,000 lbf (31 kN). The first aircraft was built and delivered to Edwards Air Force Base, California, on 11 September 1952.

The X-3 featured an unusual slender, streamlined shape having a very long, gently-tapered nose and small trapezoidal wings. The aim was to create the thinnest and most slender shape possible in order to achieve low drag at supersonic speeds. The extended nose was to allow for the provision of test equipment while the semi-buried cockpit and windscreen were designed to alleviate the effects of "thermal thicket" conditions. The low aspect ratio, unswept wings were designed for high speed and later the Lockheed design team used data from the X-3 tests for the similar F-104 Starfighter wing design. Due to both engine and airframe problems, the partially completed second aircraft was cancelled, and its components were used for spare parts.

With the completion of the contractor test program in December 1953, the X-3 was delivered to the United States Air Force. The poor performance of the X-3 meant only an abbreviated program would be made, to gain experience with low aspect ratio wings. Lieutenant Colonel Frank Everest and Major Chuck Yeager each made three flights. Although flown by Air Force pilots, these were counted as NACA flights. With the last flight by Yeager in July 1954, NACA made plans for a limited series of research flights with the X-3. The initial flights looked at longitudinal stability and control, wing and tail loads, and pressure distribution.

NACA pilot Joseph A. Walker made his pilot checkout flight in the X-3 on 23 August 1954, then conducted eight research flights in September and October. By late October, the research program was expanded to include lateral and directional stability tests. In these tests, the X-3 was abruptly rolled at transonic and supersonic speeds, with the rudder kept centered. Despite its shortcomings, the X-3 was ideal for these tests. The mass of its engines, fuel and structure was concentrated in its long, narrow fuselage, while its wings were short and stubby. As a result, the X-3 was "loaded" along its fuselage, rather than its wings. This was typical of the fighter aircraft then in development or testing.

These tests would lead to the X-3's most significant flight, and the near-loss of the aircraft. On 27 October 1954, Walker made an abrupt left roll at Mach 0.92 and an altitude of 30,000 feet (9,100 metres). The X-3 rolled as expected, but also pitched up 20° and yawed 16°. The aircraft gyrated for five seconds before Walker was able to get it back under control. He then set up for the next test point. Walker put the X-3 into a dive, accelerating to Mach 1.154 at 32,356 ft (9,862 m), where he made an abrupt left roll. The aircraft pitched down and recorded an acceleration of -6.7 g (-66 m/s²), then pitched upwards to +7 g (69 m/s²). At the same time, the X-3 side-slipped, resulting in a loading of 2 g (20 m/s²). Walker managed to bring the X-3 under control and successfully landed.

The post-flight examination showed that the fuselage had been subjected to its maximum load limit. Had the acceleration been higher, the aircraft could have broken up. Walker and the X-3 had experienced "roll inertia coupling," in which a maneuver in one axis will cause an uncommanded maneuver in one or two others. At the same time, several North American F-100 Super Sabres were involved in similar incidents. A research program was started by NACA to understand the problem and find solutions.

For the X-3, the roll coupling flight was the high point of its history. The aircraft was grounded for nearly a year after the flight, and never again explored its roll stability and control boundaries. Walker made another ten flights between 20 September 1955 and the last on 23 May 1956. The aircraft was subsequently retired to the National Museum of the United States Air Force.

Although the X-3 never met its intention of providing aerodynamic data in Mach 2 cruise, its short service was of value. It showed the dangers of roll inertia coupling, and provided early flight test data on the phenomenon. Its small, highly loaded unswept wing was used in the Lockheed F-104 Starfighter, and it was one of the first aircraft to use titanium. Finally, the X-3's very high takeoff and landing speeds required improvements in tire technology.

  • Member since
    November 2009
  • From: SW Virginia
Posted by Gamera on Friday, March 29, 2024 8:26 PM

John: Whoa! She looks fantastic! Great job!!! Heart

Bob: Great to see her coming along! I always get the same 'dirt pimple' or dust or something in all my finishes. 

"I dream in fire but work in clay." -Arthur Machen


  • Member since
    November 2003
  • From: Nashville, TN area
Posted by bobbaily on Monday, April 8, 2024 4:32 PM

Making some progress on the Aerotech-got the dark metallic grey painted-not perfect but close enough

The front end was a bigger concern with the curvature-not sure if the decal will match but if not, I can live without the red stripe

The upper cowling will fit snugger so the seam should be minimal-it does show on the real vehicle.

Drivers seat attached

Indycar bodywork is attached to the Aerotech body, engine is maybe 85% complete-hope to have the ignition wiring & rest of the engine & chasis complete tomorrow (maybe)

Most flaws will be hidden by the body....Whistling

Gary-thanks for posting the info for the Douglas X-3 Stiletto-I've added the Lindberg kit to my stash, along with some other X-Files types for future GB's....or maybe this one if I get on a streak....

Bob


  • Member since
    November 2009
  • From: SW Virginia
Posted by Gamera on Monday, April 8, 2024 11:03 PM

Bob: That looks perfect to me! Love how the finish came out. Heart

"I dream in fire but work in clay." -Arthur Machen


GAF
  • Member since
    June 2012
  • From: Anniston, AL
Posted by GAF on Wednesday, April 10, 2024 12:17 AM

Excellent work, Bob.  She'll be a beauty once finished!

Gary

  • Member since
    November 2003
  • From: Nashville, TN area
Posted by bobbaily on Wednesday, April 17, 2024 6:34 PM

Thanks Gamera & Gary....having said that, I realized that I needed to add the cooling scoops to the body work-something that should have been done prior to prime/paint.  Here is the gap from the underside:

Attempted to do some Tamiya white putty, sanding & painting-not happy with it:

Also, thie pics don't show it but the Frog tape (and Tamiya 6mm also) left residue-I'm sure from not allowing the clear coat to cure but I could not get the seams to an acceptable finish and really didn't want to deal with removing the paint at this point.

Fortunatly, thanks to a very generous forum member who had the same kit he was willing to part with for a very fair price, I had picked up another kit to build the long tail version in the future. I had primed the short tail from the new kit prior (for some unknown reason), used the new kit front body work & added the cooling scoops and added Tamiya grey putty (had used Tamiya white for the initial attempts above) .  Also taped off the seams to minimize putty cleanup.   After sanding, happier with it-won't know until I prime (using Tamiya grey this time). 

after filing & sanding:

Gonna be tied up until Monday but hopefully/maybe I'll get finished by the end of the month....or not..

Cheers


Bob


  • Member since
    November 2009
  • From: SW Virginia
Posted by Gamera on Wednesday, April 17, 2024 9:07 PM

Oh wow, good luck Bob! Gawd I hate gloss finishes... 


Finally got the FV4005 washed and the flat finish on. Hopefully pictures before not too much longer. 

BTW: I've been calling it a FV four-oh-oh-five. 

But being British I guess it should be a FV four-naught-naught-five... 

"I dream in fire but work in clay." -Arthur Machen


GAF
  • Member since
    June 2012
  • From: Anniston, AL
Posted by GAF on Wednesday, April 17, 2024 9:29 PM

Great work, Bob!  Gloss finishes are a pain... really!

Gamera> A double-nought tank?  Reminds me of this. Wink

https://www.youtube.com/watch?v=1MWq6L19eNo

Gary

  • Member since
    November 2009
  • From: SW Virginia
Posted by Gamera on Thursday, April 18, 2024 7:52 PM

LOL Gary, the Hillbillies were a classic! 


Or I guess FV Four, Zed, Zed, Five would be British too.... 

"I dream in fire but work in clay." -Arthur Machen


  • Member since
    December 2002
  • From: Northern California
Posted by jeaton01 on Wednesday, May 22, 2024 11:10 PM

Double post due to 504 errors

John

To see build logs for my models:  http://goldeneramodel.com/mymodels/mymodels.html


  • Member since
    December 2002
  • From: Northern California
Posted by jeaton01 on Wednesday, May 22, 2024 11:13 PM

I started another X-Plane, one that I have had in the workshop pile for 10 years or so.  It is the 1/48 Czech Models XP-56.  It has resin detail parts and the rest is fairly good limited run injection moldings.  Fit is very good so far but bring a rough file for the pour stubs.

The cockpit tub positioning wasn't too bad and it locks the nosewheel bay in place.  The main gear bays fit well once all of the pour remnants were belt sanded down to flush with the perimeters.  I painted the cockpit interior green as well as the gear bays.  The inside of the tip venturies were painted flat black but it might have been good to put some sheet plastic in there to block the see through.  I installed the wings to the fuselage halves and taped the assembly together to check for any ballast requirements but the model appears to be balanced well to stay on the nosewheel without any.  I didn't install two subpanels that fit at an angle to the main panel as it looked like getting them in the right spot was going to be difficult and they would be hard to see anyway.  There were no instrument panel decals in the kit but there is sufficient detail on the panels for some drybrushing.

The wing to fuselage joins needed some work due to the fuselage mating detail being a little too wide in the vertical dimension.  A large exacto blade shaped to a curve scraped things into a close shape followed by a rough file and some Tamiya Putty.  The putty was held to a narrow area by Tamiya Tape applied on both sides of the problem areas.

The vacuform canopy fitted nicely, I cut it close with Tamiya nippers and did the final shaping with a low powered Dremel like tool from Harbor Freight.  I used a 2 inch carborundum wheel running at the lowest speed so that process wasn't too exciting.  I took photos of the canopy and scaled them to size in Corel Draw, outputted a dxf file and cut them in a Silhouette Cameo vinyl cutter.  Once masked some interior green was sprayed on for the interior color.

1/16 aluminum tubing was inserted into holes drilled at an angle in the depressions the kit had for the exhaust and glued in with CA.  I should have roughed up the outside of the tubing first as that gives the tubing some tooth for the CA but I forgot.  That made it so I couldn't be as aggressive as I would have liked to be when I hollowed out the tubing.  Before hollowing the tubing out I clipped the stubs off at an angle and filed them down flush with the fuselage skin.

John

To see build logs for my models:  http://goldeneramodel.com/mymodels/mymodels.html


  • Member since
    December 2002
  • From: Northern California
Posted by jeaton01 on Thursday, May 23, 2024 1:32 PM

Working up the propellers this morning. 3/32 brass tubing and 1/16 music wire for the bearings and shafts. The kit did call for the shaft but not the bearings but things run truer and smoother with the brass bearings. All the prop blades are individual and there is no fixture for alignment so that was all Mk 1 eyeball. I know I have the blade faces correct and pitched for opposite rotation but I could have the rotation backwards on both. Who will know?


John

To see build logs for my models:  http://goldeneramodel.com/mymodels/mymodels.html


  • Member since
    December 2002
  • From: Northern California
Posted by jeaton01 on Thursday, May 23, 2024 3:17 PM

Working up the propellers this morning. 3/32 brass tubing and 1/16 music wire for the bearings and shafts. The kit did call for the shaft but not the bearings but things run truer and smoother with the brass bearings. All the prop blades are individual and there is no fixture for alignment so that was all Mk 1 eyeball. I know I have the blade faces correct and pitched for opposite rotation but I could have the rotation backwards on both. Who will know?


 https://www.youtube.com/watch?v=gfrek7gZO1E
 

John

To see build logs for my models:  http://goldeneramodel.com/mymodels/mymodels.html


GAF
  • Member since
    June 2012
  • From: Anniston, AL
Posted by GAF on Thursday, May 23, 2024 7:47 PM

That looks neat, John! Something you don't see everyday.  And as for the propellers, the worst that could happen is it will fly backwards!  Big Smile

The odd thing about this aircraft is the "swept" wings.  I always hear about how the Germans did all this research which we used on fighter jets, but in 1942 they were designing a swept wing aircraft at Northrop.  Wonder what happened to that research?

I'll get you up on the front page.

Gary

  • Member since
    November 2009
  • From: SW Virginia
Posted by Gamera on Friday, May 24, 2024 8:35 PM

John: That looks cool! I've got the same kit, it's such a weird odd bird I had to have the kit. She's been sitting in my stash for probably twenty years now since I've not had the guts to start the darn thing! 

Good progress, neat work you're doing there on the contra-rotating prop. I'd not thought it'd be that much work to modify. 

"I dream in fire but work in clay." -Arthur Machen


  • Member since
    December 2002
  • From: Northern California
Posted by jeaton01 on Wednesday, May 29, 2024 5:48 PM

Gary, there was nothing new about the use of swept wings, the first I can think of at the moment was the Burgess Dunne designs that preceded WW I.  In tail-less designs longitudinal stability is improved.  What the Germans did was realize that there were benefits in lower drag at high speeds.  Interestingly the sweep of the Me 262 wings was intended for balance purposes, Messerschmitt did not do that in anticipation of lower drag.

Going to stop where I am, though I would have liked to have worked on the panel lines a bit more. The fragility of the landing gear made that too difficult for me and my shaky hands. Apparently the maker really wanted a scale size landing gear and that resulted in very weak struts, made worse by the flexibility of the limited run soft plastic. They will hold the finished model up but won't tolerate any kind of side loads. The design of the gear is very complex.  Like the Grumman Bearcat there is a sort of trapese mechanism such that the top of the strut is moved outboard as it retracts.  It was interesting to install the antenna post on the vacuform canopy, it was a resin part and I used a drop of five minute epoxy. The antenna wire is Uschi Fine, with just enough tension to stay straight, also attached to the fin with a drop of 5 minute epoxy. I may continue the use of epoxy with antenna wires, it worked very well.

 The last photos are with a Collect-Air Curtiss XP-55. So far as I know there is no Vultee XP-54 in 1/48, so this may be as far as I can go in 1/48 with this series of out there experimental WW II fighters.


The instructions have  a few gotchas, they say to install the main gear struts with the axles outboard, but pictures and logic say otherwise.  They also show you to put the lower wing insignia on the left wing, but we all know better than that (but I still checked photos!).


John

To see build logs for my models:  http://goldeneramodel.com/mymodels/mymodels.html


  • Member since
    April 2003
  • From: USA
Posted by keavdog on Wednesday, May 29, 2024 9:28 PM

Nice job on quite an interesting subject.  Never seen that little bird before.

Thanks,

John

GAF
  • Member since
    June 2012
  • From: Anniston, AL
Posted by GAF on Thursday, May 30, 2024 1:52 AM

John,

That's an excellent job on an unusual model, especially considering the fragility.

You got any preference for which photo to use?

Gary

  • Member since
    December 2002
  • From: Northern California
Posted by jeaton01 on Thursday, May 30, 2024 2:18 PM

You can choose, Gary since you run the show, but I do like the one with the prop spinning.

John

To see build logs for my models:  http://goldeneramodel.com/mymodels/mymodels.html


GAF
  • Member since
    June 2012
  • From: Anniston, AL
Posted by GAF on Thursday, May 30, 2024 8:06 PM

The Black Bullet is posted, John.  Again, good work!

Gary

  • Member since
    November 2009
  • From: SW Virginia
Posted by Gamera on Sunday, June 9, 2024 1:22 PM

John: She looks terrific!!! Great work!!! 

Sorry, I missed you before, the site has been so wonky I've been missing a lot... 

"I dream in fire but work in clay." -Arthur Machen


  • Member since
    December 2002
  • From: Northern California
Posted by jeaton01 on Monday, June 10, 2024 12:19 AM

Thanks!  Yeah the site has been hard to work with lately.  Works well tonight, though.

John

To see build logs for my models:  http://goldeneramodel.com/mymodels/mymodels.html


JOIN OUR COMMUNITY!

Our community is FREE to join. To participate you must either login or register for an account.

SEARCH FORUMS
FREE NEWSLETTER
By signing up you may also receive reader surveys and occasional special offers. We do not sell, rent or trade our email lists. View our Privacy Policy.