SEARCH FINESCALE.COM

Enter keywords or a search phrase below:

Achtraden! 8x8 Group Build '09-'10

45327 views
373 replies
1 rating 2 rating 3 rating 4 rating 5 rating
  • Member since
    August 2009
  • From: Cary, North Carolina
Posted by M1Carbine on Tuesday, February 9, 2010 11:52 AM

Chris................LOOKS SCHAWEEEEEEEET!


Bob

  • Member since
    August 2003
  • From: Connecticut, USA
Posted by Nachtflieger on Tuesday, February 9, 2010 4:00 PM

Wow! Nice job Chris. I love the articulated wheels, and the dusty look you've achieved.....well done!

Nate


  • Member since
    May 2009
  • From: Hobart, Tasmania
Posted by Konigwolf13 on Tuesday, February 9, 2010 6:36 PM

Got some time yesturday, but amazing how much time PE stuff takes up. Oh well heres the current sitrep.

Andrew

  • Member since
    April 2009
  • From: Carmel, IN
Posted by deafpanzer on Tuesday, February 9, 2010 6:37 PM

Chris, 

YesCHAMP! Yes It looks great after weathering for sure!  Glad you are done so you can get the badge! 

Not for me as everything has stopped for me because it is still way too cold for me to do airbrushing in my  garage... the temp has been in 20-30's for several weeks.  What is happening to the global warming... just another hoax? GRIN  I am afraid to take a risk to airbrush and ruin my work unless anybody has a suggestion.  Nope, I don't have an airbrushing vent or paint booth so I can not do it inside the house or my wife would be more than happy to kill me.  Super Angry

Andy

  • Member since
    August 2003
  • From: Connecticut, USA
Posted by Nachtflieger on Wednesday, February 10, 2010 3:24 AM

Looking good Andrew, really starting to take shape!Yes

Nate


  • Member since
    April 2005
Posted by Thunderbolt379 on Wednesday, February 10, 2010 7:05 AM

Andrew -- excellent progress! You make me want to grab out that LAV from the stash and have a go myself! I'm really looking forward to seeing this one move along to completion!

I've made some progress on my Stryker. She's well along now, an hour each evening has got construction within reach of the finish line.

Here's a shot taken a few days ago, with forty-something parts added to the upper hull:


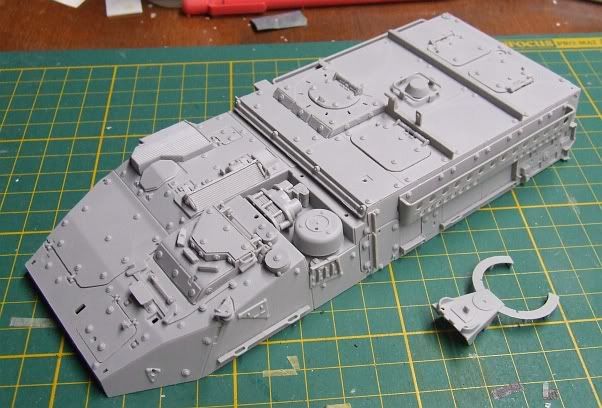
Shortly after this was taken I joined the upper and lower hulls, the fit was quite excellent and required only a little pressing here and there:


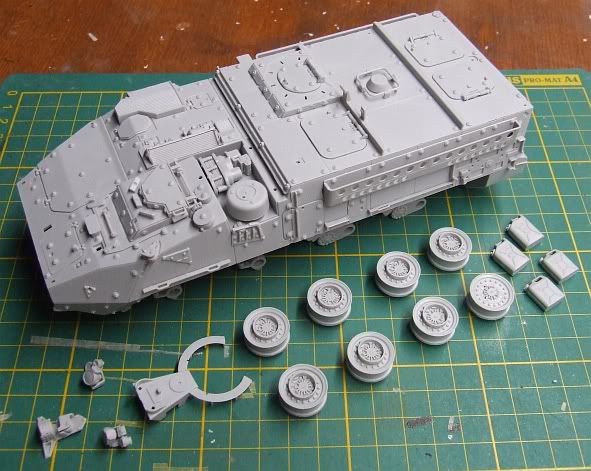
From this point there are a few dozen parts to go. The hatches were loosely attached, and removed for fitting of the periscopes. These were painted Humbrol bronze and masked with Tamiya tape in 1.5 x 5mm pieces. I was considering a topcoat of clear gloss with a smidgeon of red in it, but the bare bronze actually reminds me quite strongly of the prismatic orange colour the periscopes have in photos, so I decided to leave them as-is:


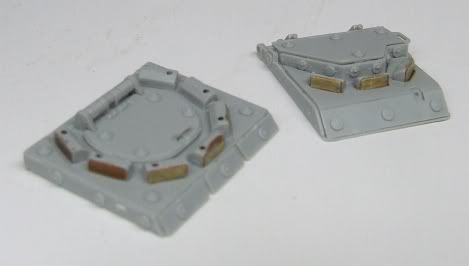
Appologies on the focus in that last shot. Next, finish the hatches and attach them, attach the headlight arrays, build up the weapon mount for the top hatch, smooth off one or two places, and think about the PE bits.

Cheers, Mike/TB379

http://worldinminiature.blogspot.com/

  • Member since
    May 2009
  • From: Hobart, Tasmania
Posted by Konigwolf13 on Wednesday, February 10, 2010 7:36 AM

Thanks Mike and Nate

Mike, what brand is your LAV, er sorry  Stryker? Looks well detailed.

Well 5 or six houes work this evening got 1/2 the turret completed and everything on the hull finished except the small fiddle bits I dont want to break. I spent nearly an hour just doing one side storage area.

Will post pics tomorrow morning

Andrew


  • Member since
    August 2009
  • From: Cary, North Carolina
Posted by M1Carbine on Wednesday, February 10, 2010 3:36 PM

Konigs, Mike......looking real good gents.  I love'em both.


Bob

  • Member since
    May 2005
  • From: Dublin Rep Of Ireland
Posted by terry35 on Wednesday, February 10, 2010 6:43 PM

Chris excellent Puma, the articulation of the wheels brings a great sense of realism to the model and I love the tire colour.

Andrew cool LAV.  Stupid question but does it share running components with the stryker.

Mike cool stryker, I thought I had it bad withthe centauro thingy, lumps bumps and grab handles, oh so many handles. Thanks for the tip with the periscopes, gonna try that one, sounds like a gem.

Terry.

  • Member since
    May 2009
  • From: Hobart, Tasmania
Posted by Konigwolf13 on Thursday, February 11, 2010 1:43 AM

Terry best I can do is point you here. The Mowag Family tree. Past that I dont really know.

Andrew

  • Member since
    April 2005
Posted by Thunderbolt379 on Thursday, February 11, 2010 6:46 AM

KW13 -- The Stryker is Trumpeter #00375. AFV Club brought out their version soon after this one but it would have to be going some to be substantially better than this, I've been very pleasantly surprised at the quality. Those more acquainted with the vehicle would probably be able to point out the inaccuracies or areas of moulding compromise, but so far she seems visually pretty sweet, and is a friendly build.

Cheers, Mike/TB379

http://worldinminiature.blogspot.com/

  • Member since
    August 2009
  • From: Cary, North Carolina
Posted by M1Carbine on Thursday, February 11, 2010 11:00 AM

Mike - the moulding detail is excellent from what I can tell in the pictures.  I will have to pick that kit up.


Bob

  • Member since
    February 2010
Posted by gygax on Friday, February 12, 2010 1:44 PM

Hello there!

Is it too late to join in on this one?  I have an Italeri 234/2 Puma (1/35th scale) that is dying to be constructed and added to the recon division forming here. 

Lemme know, and happy building.


  • Member since
    April 2005
Posted by Thunderbolt379 on Friday, February 12, 2010 5:12 PM

Gygax -- not at all, welcome aboard! i'll add you to the leaderboard, and look forward to seeing your Puma -- it's certainly been the most popular type in this build. I'll be most interested to see your rendition.

Cheers, Mike/TB379

http://worldinminiature.blogspot.com/

  • Member since
    May 2005
  • From: Dublin Rep Of Ireland
Posted by terry35 on Saturday, February 13, 2010 7:25 PM

THanks Andrew just reading through that page was interesting, 2 of the 4  pic's are or Irish vehicles. I didn't know we had 8X8 vehicles i thought we only had the 6x6.

Thanks,

Terry.

  • Member since
    April 2005
Posted by Thunderbolt379 on Wednesday, February 17, 2010 7:26 AM

Hi guys,

A little progress -- the Trumpeter 1:35 Stryker is essentially done building and ready for paint. Here she is yesterday:


And tonight, with the photoetched parts added (with the exception of the two loose ones seen below, which simply don't fit).


And a closer angle:


This is my first time folding brass and I'm cautiously optimistic, it seemed to work fairly well, though the stuff is pretty fragile. We'll see what the future brings...

Paintjob next, I'm not sure exactly when I'll get to it but hopefully soon.

Cheers, Mike/TB379

http://worldinminiature.blogspot.com/

  • Member since
    August 2009
  • From: Cary, North Carolina
Posted by M1Carbine on Wednesday, February 17, 2010 10:08 AM

Mike....That is beautiful with out paint...................LOL


Great build, what camo are you doing?


Bob

  • Member since
    May 2009
  • From: Hobart, Tasmania
Posted by Konigwolf13 on Wednesday, February 17, 2010 8:22 PM

Mike, Love it :)

Cant wait for the paint job. Except for grab handles mines finished, ready for paint been spending time on my Yamato. Will do a proper post later, 1/2 way through lunch at moment Chef


Andrew

  • Member since
    April 2009
  • From: Carmel, IN
Posted by deafpanzer on Thursday, February 18, 2010 11:12 AM

Mike,

Ditto  Your kit looks great without paint! Yes Do you really have to paint it? Kidding!  Looking forward to your next posting.

Andy

  • Member since
    March 2007
  • From: NJ
Posted by JMart on Saturday, February 20, 2010 2:09 PM

I was just going over this GB… LOADS of great stuff! Those Pumas are just gorgeous.

I just joined the anti-aircraft GB with the 1:35 Italieri LAV 25 Air Defence with Eduard Zoom PE. Can I cross-over in here? If time permits, what I REALLY want to do is crack open my old copy of the Testors/Italieri 1:35 234/2 PUMA and shamelessly copy the main great build ideas and techniques displayed in this GB, like Mike’s  camo job : )  of course, seeing the Dragon kit, I feel like giving the Old Puma the firecracker treatment lol


  • Member since
    May 2005
  • From: Dublin Rep Of Ireland
Posted by terry35 on Saturday, February 20, 2010 4:31 PM

Mike that is some serious progress, beautiful  vehicle. Now I only have to stay away from HLJ for the evening. ha..ha...

Well here is my update.

 I got a lot done since the first post but I must admit  that I am not happy with the images as the plastic does not seem to like being photographed.I got most of the welds done and I am pretty satisified with the results. Trumpeter included some photo etch parts, what I have used so far I found pretty ill fitting and they would probably have been betterr done in plastic but that is only a personal opinion.I hope to get the turret done asap and then on with the paint. I am very undecided as to the weathering and I will wait until the vehicle is p[ainted before I decide.

Well on with the pics

This just about shows some of the weldind up close.

I painted over the anti slip stuff only for my own reason and that was just to see it.

That is a big turret and this is going to be a big puppy. the wheels are just fine and I don't want to go off the OOB track. The subject is not important to me and the kit seems fine.

One reason for not adding too much extra detail to the suspension, its done well enough in theh kit and will be covered by thos monster wheels.

I took this one just to show people the tools they are fine even against photos of the real thing.

http://www.afvplanet.com/especial/centauro/pages/P5227221.html

Thanks for looking in again.

Terry.

  • Member since
    April 2009
  • From: Carmel, IN
Posted by deafpanzer on Sunday, February 21, 2010 9:50 AM

Jmart- I don't have any problem for you to join us.  More the merrier I always say as long as we still have time until end of April. 

My process has been stalled because it was too cold to do airbrushing in the garage but thanks to Bob (M1carbine) as he pushed me to take the risk using a space heater and it worked out.  I think I need a bigger one to keep ME warm not just the kit! 

Used MM Italian Brown as primer... I am plan to paint first coat of MM Panzer Dunkelgelb 1943 today! 

Andy

  • Member since
    April 2009
  • From: Carmel, IN
Posted by deafpanzer on Wednesday, February 24, 2010 1:20 AM

After painting MM Italian Brown as primer, I painted all corners, edges & outlines black hoping that it will show different shades of color that I learned from Doog or somebody's forum earlier.  I think it worked and it was easy and fun...

After allowing the black paint to dry overnight, I painted MM Afrika Grunbraun instead of MM Panzer Dunkelgelb 1943 because I wanted the color to match the camo of 234/1 drawing that I really liked very much in one of my reference books.

I am pleased with the process to ensure that the paint is not looking too monotoned so far... reading the forums really helps.  I will let it try for couple of days before I can paint camo.  Feel free to make comments.  Yup I am still using that little space heater to allow me do airbrushing in the freezing garage. Stick out tongue  No major disaster yet... knocking wood!

Andy

  • Member since
    November 2006
  • From: Coastal Maine
Posted by dupes on Wednesday, February 24, 2010 3:50 PM

Man, you guys are cranking out some great stuff! Hoping I might find a way to cobble something together that qualifies before the end of April. Yes

  • Member since
    May 2005
  • From: Dublin Rep Of Ireland
Posted by terry35 on Wednesday, February 24, 2010 5:28 PM

Andy great Puma, I like the pre-shading, theh effort seems to have paid off, subtle but noticable will make for good viewing as you progress.

Ha...Dupes..... God I know you love group builds, I think this one has an over run.

Sorry I hoipe this one has an over run.............might need it .

Guys the weather is killing me here. Rain rain and even snow..... can't get outside to prime.

Terry.

  • Member since
    April 2009
  • From: Carmel, IN
Posted by deafpanzer on Wednesday, February 24, 2010 8:36 PM

Dupes, don't be shy... come and join us!  I have been watching your last build... that Japanese tank with winter camo using white spots only was freakin' awesome!  

Why don't you build Sd.Kfz.234/4?  I don't think anybody has done it for our GB as we have one or two 234/1, several PUMAs 234/2 and one 234/3 which was signed up but not built yet if I am correct.  It would be cool to hit all four bases... home run we can say!

Terry, many thanks!  Will do camo and weathering so I am not sure how much of shading I will see at the end. 


Andy

  • Member since
    May 2009
  • From: Hobart, Tasmania
Posted by Konigwolf13 on Thursday, February 25, 2010 7:50 AM

All parts on, except for a few to go on after the final paint job (eg tail lights, spare tire storage, tools, etc). I lost a couple of parts. most of note one of the smoke grenade lauchers the other being a tie down handle. I wont be adding the propeller guards for two reasons, one I've seen some ASLAVs with out them and two, some fool glued the props on upside down so they wont fit anywaysPropeller.

Here's the pics

All in all I  know I've made a few "errors" in this build, probably the worst bit being a few messy bits around the PE, but being the first kit I've ever done with more than 3 PE parts to use I'm not dissapointed. I also used it as a practice build for my next pair of ASLAVs with planned interiors on them, so I have taken plenty of notes of innacurate parts or my stuff ups or easier ways. Example being the storage area mesh should go on the inside bottom trumpeter have it on the outside bottom. I learnt the hard way to trim first before making the correct fit to trim it first or it gets messy.

Andrew

  • Member since
    April 2005
Posted by Thunderbolt379 on Thursday, February 25, 2010 4:23 PM

Dupes -- hey, buddy, if you wanna come aboard with an eight-legger, you're more than welcome! Just let me know what to put on the leaderboard!

K\W13 -- the LAV is looking GREAT! The PE came out very nicely, especially for a first shot. My Stryker is my first PE job as well, it's a whole new technique, isn't it? Remind me, which PE set is that? I have the same kit and would love to add the metal as it seems to address the shortcomings picked up on by reviewers.

Speaking of the Stryker, I picked up NATO Green yesterday and I'm hoping to get the paint on today -- pics tonight, all being well.

Cheers, Mike/TB379

http://worldinminiature.blogspot.com/

  • Member since
    May 2009
  • From: Hobart, Tasmania
Posted by Konigwolf13 on Thursday, February 25, 2010 5:08 PM

Mike, the PE comes standard with trumpy's ASLAV(kit 00392), so theres no AM its all OOB.

Andrew

  • Member since
    April 2005
Posted by Thunderbolt379 on Thursday, February 25, 2010 5:22 PM

Oh! I must check and see if I have the same edition, because the PE fret was not included when the kit was first released (It was reviewed in FSM and at the time it had vinyl mesh, and no grills or wire cutters). I have the same box, so hopefully there's brass in there!

Cheers, Mike/TB379

http://worldinminiature.blogspot.com/

JOIN OUR COMMUNITY!

Our community is FREE to join. To participate you must either login or register for an account.

SEARCH FORUMS
FREE NEWSLETTER
By signing up you may also receive reader surveys and occasional special offers. We do not sell, rent or trade our email lists. View our Privacy Policy.