SEARCH FINESCALE.COM

Enter keywords or a search phrase below:

60th Anniversary Korean War Group Build- extended for the duration

764411 views
3335 replies
1 rating 2 rating 3 rating 4 rating 5 rating
  • Member since
    July 2004
  • From: Sonora Desert
Posted by stikpusher on Saturday, August 11, 2012 2:47 PM

a few updates on my H-13

here is a better shot of the IP with the instrument dials decal in place

the pilot figure with base colors painted on

tail rotor painted and installed

and overall...


F is for FIRE, That burns down the whole town!

U is for URANIUM... BOMBS!

N is for NO SURVIVORS...

       - Plankton

LSM


  • Member since
    September 2003
  • From: Australia
Posted by Helo H-34 on Saturday, August 11, 2012 6:48 PM

Hi everyone ;

My apologizes for my absence of late , I've been really busy on the home front .

But first off , a big congrats' to Andy for the awesome F-84 dio . Everything looks great around the aircraft .

I would be taking that back home along with the firstaid station you built Andy , when you leave Korea . Their much too nice to leave behind .

Stik , awesome WIP on your H-13 build . I'm really tempted to go and buy one of those Academy kits as I have some really old MASH figures I could re-paint and include in a dio .

These original builds have been sitting in one of the spares box's for quite a few years now and if I remember correctly they were some of the first builds I ever did , probably about 25 years ago now .

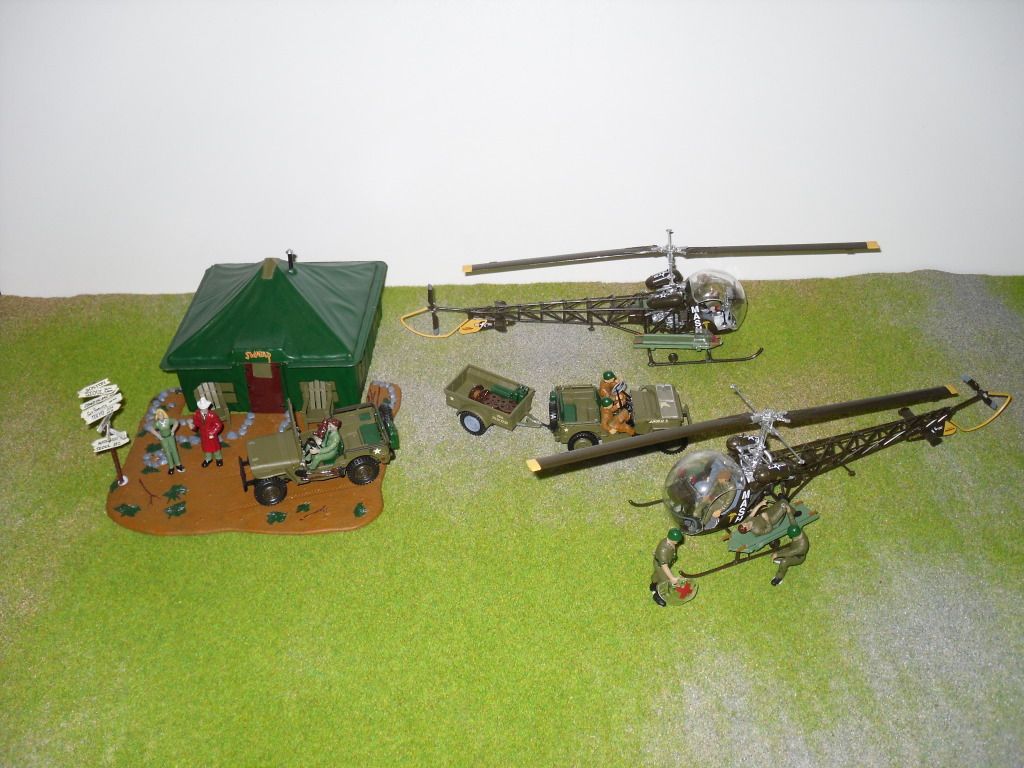
The two MASH helicopters ( obviously in correct as Korean War H-13 versions ) were built and painted in one of those two day - gluue everything together and not much painting involved sessions .

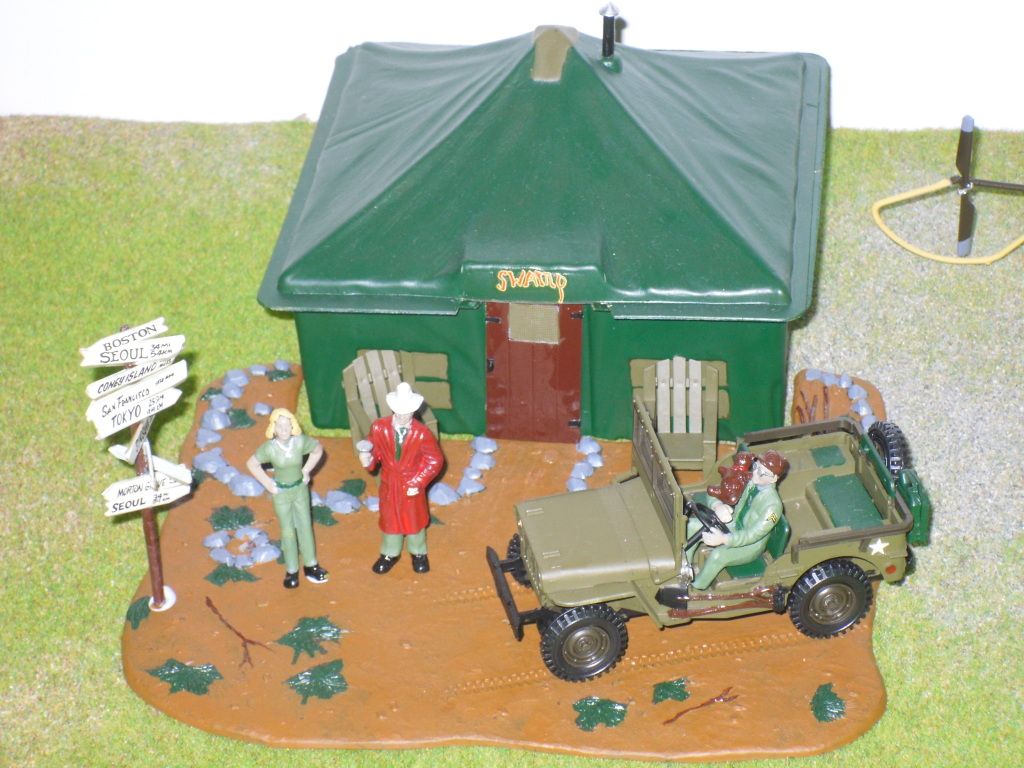
A litttle more paint to the Figures and jeep but also finished in about a day

Am I to understand correctly Stik from that picture you posted earlier that the Academy kit doesn't have the Stretcher shields included , perhaps I could use one set from the revell H-13

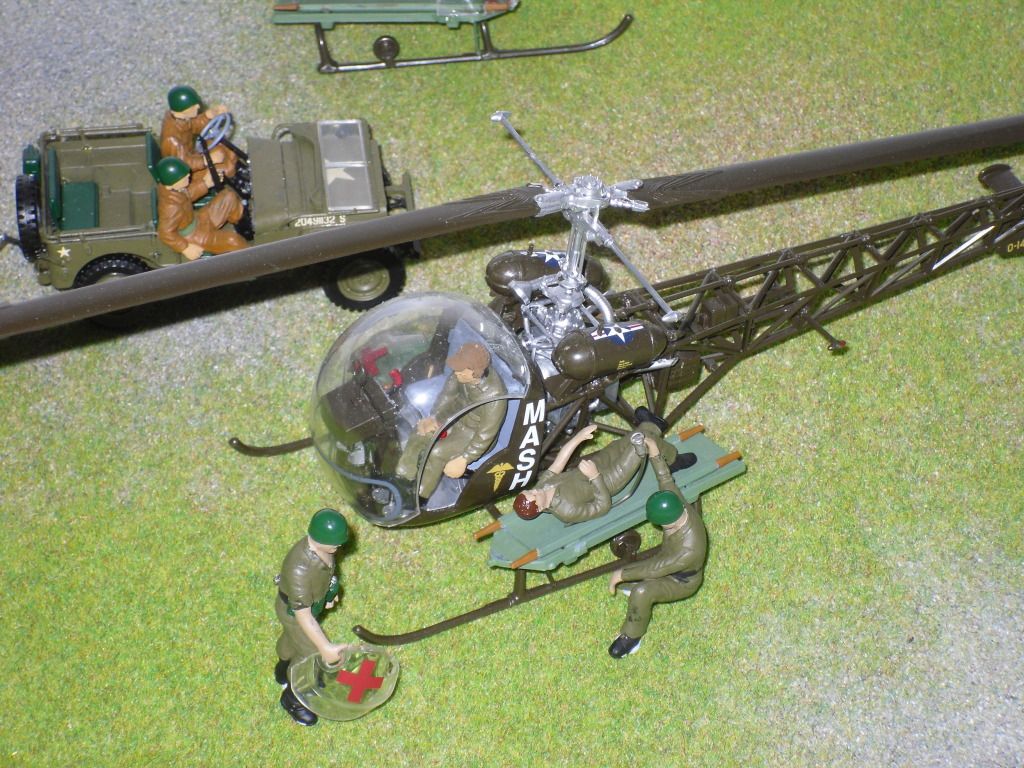
I suppose I could rebuild my original Revell H-13 as Vietnam War Helo's ? I wonder if there are any weapons sets available to replace the stretchers ???

I sure am tempted to buy one of those nice Academy 1/35 H-13's Stick out tongue

John .


  • Member since
    September 2003
  • From: Australia
Posted by Helo H-34 on Saturday, August 11, 2012 11:58 PM

I just realized that the 1/35 H-13D is a MRC kit not academy as I wrongly refered to it . Anyway after a bit of a search on ebay I found a MRC H-13D for $11 with $20 shipping . Certainly a lot cheaper than some of the on-line LHS here in my neck of the woods , they were asking for $49 which didn't include shipping ; (usually another 14 bucks) . So I bought the ebay kit , which according to the item desription does include weapons for the skids ....."I hope that's correct"

I then carefully removed some of the pieces from my original Revell H-13 build and I'll clean them up and re-paint the parts seperatly for a more accurate Vietnam H-13H

I'll place the figures and jeep in a plastic container and spray some Mr Muscle oven cleaner over them and seal down the lid for a day , hopfully that will remove most of the old humbrol paint

The jeep came apart nicely , mostly because I went and found the old instruction sheet in the files and saw how Revell provided rubber tyres and they came off easierly and the wheels themselves just click onto the axles anyway .

I hadn't planned on anything for the Korean War GB in 1/35 scale , so it's kinda wierd how this just came about ; A nice H-13D kit at a great price and I'll be able to breathe life into an older H-13H build as well Wink

John .

  • Member since
    July 2004
  • From: Sonora Desert
Posted by stikpusher on Sunday, August 12, 2012 12:29 AM

Helo, I am building the Revell kit. And yes it came with the bubbles to fit over the litters.


F is for FIRE, That burns down the whole town!

U is for URANIUM... BOMBS!

N is for NO SURVIVORS...

       - Plankton

LSM


  • Member since
    November 2009
  • From: SW Virginia
Posted by Gamera on Sunday, August 12, 2012 7:07 PM

She's coming along nicely SP!

And not too shabby for an early build there John, a little glossy but you did a good job painting everything.

Well, here's the Jeep in progress. You can see some of the Terra Cotta paint on the side I've been using for mud, I went over and repainted everything today and added the pre-shading- hopefully I'll get to decals tomorrow.

Funny, I'm reminded of the time Klinger tried to prove his insanity by eating a Jeep piece by piece:

Then it seems the crew all ended up decapitated by a Chinese tripwire and had the wheels and tires stolen by vandals (BTW attached heads to the figures today too!)

The M40 with a non-standard travel lock for the main gun. I had no idea how big this thing was till I started the kit.

"I dream in fire but work in clay." -Arthur Machen


  • Member since
    July 2004
  • From: Sonora Desert
Posted by stikpusher on Sunday, August 12, 2012 10:35 PM

Obvously Klinger never knew about Catch 22... now I dont know anything about wires across roads but those folks messing with jeep rims...


F is for FIRE, That burns down the whole town!

U is for URANIUM... BOMBS!

N is for NO SURVIVORS...

       - Plankton

LSM


  • Member since
    November 2009
  • From: SW Virginia
Posted by Gamera on Sunday, August 12, 2012 11:21 PM

Ack! The vandals are everywhere! Indifferent

"I dream in fire but work in clay." -Arthur Machen


  • Member since
    September 2003
  • From: Australia
Posted by Helo H-34 on Monday, August 13, 2012 6:58 AM

Nice WIP on the jeep and crew cliff , as well as the huge M40 . I like the attention to the detail on the figures .

I had a quick look on ebay for one of those 1/35 MASH truck & figure Medical Scene kits . There's two on offer but both sellers are only shipping within the United States only . Oh well , it would have been nice to snag a truck and figures to go with my tent scene .

John .

  • Member since
    December 2010
  • From: Yangju, Gyeonggi-Do, Korea
Posted by the_draken on Monday, August 13, 2012 11:34 AM

Little bit of good news for you Helo!  The M-41 is back in production at Milicast.  I've got one on the way as well as replacements for my M-32 and M- 90mm gun.  Although they no longer even LIST their M-15...  Sad

In other news:  No, the wife refuses to build the M*A*S*H kit.Crying  But she's given ME permission to build it! span="" id="mce_marker" data-mce-type="bookmark"> span="" id="mce_marker" data-mce-type="bookmark">

Also, I've gotten back into the final build of mine on the Korean Peninsula!  I'm getting into short time!  I get on the airplane on the 6th of Sept.  Not long from now.  So here's the only WIP pictures that I have of my PB4Y-2:


It's REALLY hard to tell, but I've opened up the weapons bay and added the bomb racks and bombs from the Academy H kit, as well as the landing gear and props.  I messed up and y cat got at it and I lost a bunch of parts as it smashed to the floor.    Luckily it was just the fuselage, but I had to all but re-assemble it, lost one barrel of one of the side mount guns,  had to re=install those panels, as well as refit, putty, and sand the bomb bay area.  At least I found all of the bombs!  There's a lot of detail painting to be done, bumps and lumps to add, decals, and shoot the whole thing gloss.

________________________________________________________________________________

Andy Hill (the_draken) landrew.hill(at)live.com <*> ASE Master Auto Tech, Imaca certified.  >^.^<

PADI OWSI Certified, BA Poli Sci (NDSU), BS Secondary ED-Social Studies MSUM (Sigma *** Laude)

  • Member since
    December 2010
  • From: Yangju, Gyeonggi-Do, Korea
Posted by the_draken on Monday, August 13, 2012 12:44 PM

A couple more comments on the kit:  I think that the instructions have it backwards, the figures do not go into the dorsal turrets, they go into the tail and nose turrets.  I had a deil of a time trying to get the OE turrets to fit and couldn't get the aftermarket clear parts to fit without the base from the OE turrets!  Having already assembled of the nose and tail turrets, I'm SURE that they had ample room for the figures.  

If I  had to do this kit again I'd definitely do a better job with the interior!  The nose bombadier panel shows the entire interior of the kit.  This needs some panels installed or equipment.  I was in a rush so I just bypassed it all.  I also had serious issues putting the tail turret together!  It seemed like nothing back there fit at all!  It was only held together with the single kit clear part.  And since there's no interior parts to it, I didn't want to go with the aftermarket vacu-formed turret.  

Come to think of it, I didn't use a lot of the vacu-formed parts.  I found that creating the nose turret wouldn't allow for movement of the turret.  The front bombadier's nose piece didn't provide the necessary support for the nose turret, and the dorsal turrets weren't tall enough to use (although I had to use one after losing the kit part.).  I'd definitely recommend that anyone doing this kit also invest in an Academy kit.  The extra parts made for a LOT of ease of assembly.  And the added detail of the parts makes the kit look so much better.

Anyway, I've got a few of the bumps and lumps on, a few more parts, and the last thing lect before decals is three aerials per side on the lower forward fuselage.  I'm using a combination of decals from Eagle Strike for the A-1 Skyraider, Some random kit, the OE kit decals, and some Microscale White Letter decals from sheet 72-50 (white and red RAF letters) since they're close enough to USN letters and numbers.

How's yours going, John?

________________________________________________________________________________

Andy Hill (the_draken) landrew.hill(at)live.com <*> ASE Master Auto Tech, Imaca certified.  >^.^<

PADI OWSI Certified, BA Poli Sci (NDSU), BS Secondary ED-Social Studies MSUM (Sigma *** Laude)

  • Member since
    July 2004
  • From: Sonora Desert
Posted by stikpusher on Tuesday, August 14, 2012 1:13 AM

Draken, that Privateer is gonna be sweet! I can't wait to see that one finished!Stick out tongue

Some minor progress to the finish line for my H-13 today. First up a wash on the pilot figure...

I also did a pin wash in the cockpit, followed by some dry brushing of aluminum in likely high wear areas. After which I glued the cockpit bubble to the fuselage frame.

All that is left of the airframe to glue on is the fuel tanks. Once those are on, I need to go back and do touch ups on the OD, and I can apply a gloss coat, the decals, and do the final finishing.


F is for FIRE, That burns down the whole town!

U is for URANIUM... BOMBS!

N is for NO SURVIVORS...

       - Plankton

LSM


  • Member since
    September 2003
  • From: Australia
Posted by Helo H-34 on Tuesday, August 14, 2012 6:14 AM

The pin wash to the cockpit looks great Stik , did the little circle thing on top of the consol get bent accidently Sad ; It looks fixable though .

Andy , nice work so far on the Privateer . I've barely touch mine as all my 1/72 big wing bird builds have long since stalled . But I have been copying what you have written about the Privateer and the Neptune build you did as well .

I had a little spare time these past two evenings , so I cleaned up the resin parts from the Magna Models AD-4 Skyraider for my AD-4W version

The wings and tail planes fit nicely up against the fuselage , I am wondering if it would be wise to drill holes for pins in the wing and locating holes in the fuselage for strength .

There are two larger window openings just behind the lower fuselage entry doors , which I first tried filling with Tamiya putty but when I came to sand the putty later on , the putty just fell out . So I tried some two part epoxy and this worked out much better

Magna Models provide a metal seat for the cockpit but that's it ; I'm thinking of using some Aiwaves PE for a better looking cockpit and hopfully it will fit okay . There is a template on the instruction sheet for a floor and rear bulkhead to be made from sheet plastic , I'll make those next .

Not much progress but some anyway .

  • Member since
    November 2009
  • From: SW Virginia
Posted by Gamera on Tuesday, August 14, 2012 7:30 AM

Andy: Is the Privateer not an Academy kit? I built one of their B-24s couple of years ago.

SP: Nice work there, I tend to let washes get out of control!

John: Thanks and good luck on finding another MASH set. Good job on the Skyraider, yeah epoxy- love the stuff, unlike superglue once you epoxy something it ain't ever coming lose again!

Pulled out the decals for the Jeep last night and found myself in an impasse. Tamiya provides the white star in a circle for the hood. I was thinking that the circle was only used for late WW2 and a Korean War Jeep should have just a simple star. Looked around but couldn't find a good photo of the hood of a Jeep to check. Guys, should I cut the star out of the circle and just apply it by itself???

"I dream in fire but work in clay." -Arthur Machen


  • Member since
    December 2010
  • From: Yangju, Gyeonggi-Do, Korea
Posted by the_draken on Tuesday, August 14, 2012 9:34 AM

Although Academy does make a B-24J/PB4Y-, the PB4Y-2 Privateer is originally a Matchbox 3 colour kit now offered in light grey by Revell-Germany.  It's very clunky, toy like.  Obviously meant for the younger age set and it therefore lacks a fair amount of detail.  And like all Matchbox kits has massive trenches for panel lines.  This could really stand to have a good aftermarket set made for it, although I suppose that almost any B-24J aftermarket set would do for the interiors.  The only main external difference is the single vertical tail, the aft bulb guns, the second dorsal turret and the engines.  On the Privateer they're provided with a rotating fan (like a lot of German and Russian engines) in front of the radials, as well as no longer being super charged and having been rotated 90 degrees.  The gear, cockpit, nose and bomb bay are the same for the B-24J.

Another big drawback is that the manufacturer tries to do three major versions of the airframe.  The Canadian cargo plane, and two different maritime patrol aircraft.  Thus, you've got two noses, two rear fuselages, windows that can be cur out, and a lot more.  In the end, it's like a Frankenstein's monster trying to be too many things at once.  I'd really love for Academy to come out with all three separate versions of this in their Liberator line...

While I'm at it, why don't I wish for some Academy Korean war subjects in 1/72 scale, a few more Vietnam era armour and jets in 1/72 scale, a million dollars, and a truck load of diamonds...  That'll happen!

Speaking of land vehicles, I saved all of the .50 cals off of the Academy H kit and will be building a GMC CCKW 353 Korean War gun truck when I get home.  They were used with supply convoys in the south part of Korea during and shortly after the war due to the threat of Communist guerrillas.  Should be a fun build!  I don't know if I'm going to use the Academy hard body Studebaker or the Airfix soft top Chevy...

________________________________________________________________________________

Andy Hill (the_draken) landrew.hill(at)live.com <*> ASE Master Auto Tech, Imaca certified.  >^.^<

PADI OWSI Certified, BA Poli Sci (NDSU), BS Secondary ED-Social Studies MSUM (Sigma *** Laude)

  • Member since
    October 2009
  • From: Texas
Posted by Gregbbear on Tuesday, August 14, 2012 11:41 AM

Nice work guys!  Sorry I have been absent lately.

Cool Privateer Draken!  I have one in my stash too.  It looks very impressive.  I have been slowly accumulating what I need for it.  So far, just the Squadron vacuform, and True Details wheels, with some decals.  The decals are on a recent Wolfpak sheet.  It needs a lot more stuff though!  Academy B-24's seem kind of pricey here.  Not as bad as a Hase, but waaaay over a Revell.  The Detail and Scale on the B-24 has a nice section on the Privateer too.  As for AM, this is what I know is available:  Cobra Company resin detail set, very comprehensive $58, Engines and Things makes an engine set that fit the Matchbox, that with the Squadron and TD stuff is all I know.  Wolfpak decals are the only Korean War Privateer decals I have seen (set also comes with an RF-51D, F4U-4 for KW and 3 non-Korean planes, F-80,T-28 and F-86D.)

I finally painted my Corsairs prop and bombs.  Just gotta let them dry so I can put them on.  That will be my last KW build for awhile.  Not like I build fast anyways!  My son bought me a belated Father's Day gift.  He saved up for months to get me a 1/24 Ford Gt, Matech Racing Lemans 2010 car.  So, needless to say, I need to shelf some things to work on this car.

I also need to go back a few pages, as I apparently have missed a lot here!

Cheers,

Greg


- yat yas!


  • Member since
    November 2009
  • From: SW Virginia
Posted by Gamera on Tuesday, August 14, 2012 11:59 AM

Andy: I know what you mean, I built a few Matchbox kits years ago and was never very much impressed with them. And my recent build of a Hasegawa P-40 with two fuselage plugs that didn't fit that well I think I'd have tossed the Privateer at the wall by now.

Greg: Sounds cool, the Privateer was a neat and somewhat different a/c. And though not really a car guy those kits sound really nice too!

"I dream in fire but work in clay." -Arthur Machen


  • Member since
    July 2004
  • From: Sonora Desert
Posted by stikpusher on Tuesday, August 14, 2012 1:51 PM

Helo H-34

The pin wash to the cockpit looks great Stik , did the little circle thing on top of the consol get bent accidently Sad ; It looks fixable though .

Yup, I must have bent  the DF antenna while installing the cockpit bubble onto the fuselage. I already bent it back in place Wink

This morning I glued on the fuel tanks so the airframe is now done. I will be doing the OD touch ups shortly here, and then get some pics up. I also dipped the canopy bubble in Future and did an overall wash of Burnt Sienna on the pilots bare skin area for a sunnier skin tone Cool I just need to do some dry brushing of highlights and paint his hair and he will be ready to put together to see how he looks seated.


F is for FIRE, That burns down the whole town!

U is for URANIUM... BOMBS!

N is for NO SURVIVORS...

       - Plankton

LSM


  • Member since
    July 2004
  • From: Sonora Desert
Posted by stikpusher on Tuesday, August 14, 2012 4:50 PM

Well, everything is painted (except for the tires, which I will not do until after the final flat coat), and the Pilot glued together. For the most part, I think he came out really good. Angling his head makes home look more lifelike than the standard straight ahead stare...

and I placed the windscreen bubble on for these pics. I will not glue it on until after the final flat coat is dry...

almost done!!!Big Smile


F is for FIRE, That burns down the whole town!

U is for URANIUM... BOMBS!

N is for NO SURVIVORS...

       - Plankton

LSM


  • Member since
    November 2009
  • From: SW Virginia
Posted by Gamera on Wednesday, August 15, 2012 7:50 AM

Hey, great work there SP! The pilot looks great, love the leather jacket!

Should be done decaling the Jeep now, couldn't find any photos on one with a circle star on the hood so I wussed out and just applied the plain star. Looks ok to me. Now just need to clear coat, assemble,  spray the mud/dirt on the chassis and lower body and I'll try to get some more photos up before I cut into the washes and drybrushing etc...

"I dream in fire but work in clay." -Arthur Machen


  • Member since
    July 2004
  • From: Sonora Desert
Posted by stikpusher on Wednesday, August 15, 2012 12:31 PM

Circle + Star was only used in ETO and MTO in WWII. That was because Allied airmen complained that the star could be mistaken for a cross to easily from the air. So the circle was added. It was never used in the PTO or after WWII.

Thanks for the compliments on the pilot, I do wish that they had molded him a bit better. I think I finally have my figure painting technique down. Shockingly I even used Tamiya Flesh hand brushed...!!!!


F is for FIRE, That burns down the whole town!

U is for URANIUM... BOMBS!

N is for NO SURVIVORS...

       - Plankton

LSM


  • Member since
    July 2004
  • From: Sonora Desert
Posted by stikpusher on Wednesday, August 15, 2012 3:53 PM

I airbrushed on a coat of Future a short while ago.... once it's dy I can start of applying the decals later this evening.


F is for FIRE, That burns down the whole town!

U is for URANIUM... BOMBS!

N is for NO SURVIVORS...

       - Plankton

LSM


  • Member since
    April 2005
  • From: Australia
Posted by taxtp on Wednesday, August 15, 2012 7:35 PM

Hi Stik,

Couple of questions re spraying Future, I haven't always enjoyed doing it.

Do you thin Future before you spray it  ? How wet is the coat ?  Do you spray it over the canopy framing as well and just rely on the flat coat to dull it down later, or do you mask the entire canopy ?

Thanks

Tony

I'm just taking it one GB at a time.

  • Member since
    July 2004
  • From: Sonora Desert
Posted by stikpusher on Wednesday, August 15, 2012 10:42 PM

I airbrush on Future at full strength- no need to thin it. But I have only airbrushed it on a canopy once and will not due that again. I will stick to dipping those in Future. After the canopy has been dipped and dried, I mask off the clear areas and leave the Future coated framework exposed for painting, and usually attach it to model for painting. I usually will attach the windscreen and try to eliminate any seams, but the overhead sliding/lifting portions I often only tack down. That way the painting will match the surrounding areas. Paint whatever colors are needed, apply the Future coat, and the the final top coat. The coat "wetness depends upon how heavy you spray it. I apply multiple light passes rather than heavy coats.


F is for FIRE, That burns down the whole town!

U is for URANIUM... BOMBS!

N is for NO SURVIVORS...

       - Plankton

LSM


  • Member since
    July 2004
  • From: Sonora Desert
Posted by stikpusher on Wednesday, August 15, 2012 11:12 PM

OK, here are the pics of after the decals were applied...

cockpit and engine area

tail rotor area

lower side of the main rotor

and how it looks now overall


F is for FIRE, That burns down the whole town!

U is for URANIUM... BOMBS!

N is for NO SURVIVORS...

       - Plankton

LSM


  • Member since
    November 2009
  • From: SW Virginia
Posted by Gamera on Thursday, August 16, 2012 11:01 AM

SP: Thanks, I had a hard time finding a good photo of the hood of a Korean War Jeep, I found lots of WW2 photos and plenty of restored Jeeps but the few Korean photos were mostly blurry. So I figured the plain star was the 'default' option here! Nice to know I made the right decision for a change!

Nice work there on the chopper. Odd that there's some silvering even with the gloss coat. I assume you're going to try to punch a few holes in the decals and flood them with setting solution?

Tony: I've seen lots of people recommend Future and if it works for you great! But for me if I applied it light I always got orange peel even after turning down the pressure and mixing some retarder into the Future so it will dry more slowly. Applying it thick it always ran and I'd end up with big globs on the underside where it congealed as drips and hardened.  I use MM acrylic gloss for everything now except dipping canopies in Future. And it's good for 'sealing' a mask by airbrushing a light coat on a model you just masking, the Future will ooze into any cracks and seal them, you've still got overspray but it's clear so it doesn't show!!!

"I dream in fire but work in clay." -Arthur Machen


  • Member since
    July 2004
  • From: Sonora Desert
Posted by stikpusher on Thursday, August 16, 2012 1:53 PM

Gamera, those pics were taken almost immediately after I applied the decals. That s not silvering, it is the Micro set interacting with Future as it does its magic. Today they all look good, although I do need to hit the fuel tank stars with another zap of Solvaset- after some accupuncture. The filler caps under the upper portion really create a difficult surface underneath. And I am glad to be of help with the hood star.


F is for FIRE, That burns down the whole town!

U is for URANIUM... BOMBS!

N is for NO SURVIVORS...

       - Plankton

LSM


  • Member since
    November 2009
  • From: SW Virginia
Posted by Gamera on Thursday, August 16, 2012 2:08 PM

Ahhh, great to hear! When I first saw it I was 'gee friggin' whiz he did all that work and the #%@#@ decals silvered!!!' Tongue Tied

Very relieved to hear they're all ok! Yes

"I dream in fire but work in clay." -Arthur Machen


  • Member since
    July 2004
  • From: Sonora Desert
Posted by stikpusher on Thursday, August 16, 2012 2:24 PM

Nah, just my impatience to get pics posted ASAP showing again... I gotta remember to put up a disclaimer about that next time that happens like I did with my Mirage and Super Saber builds last week....


F is for FIRE, That burns down the whole town!

U is for URANIUM... BOMBS!

N is for NO SURVIVORS...

       - Plankton

LSM


  • Member since
    December 2010
  • From: Yangju, Gyeonggi-Do, Korea
Posted by the_draken on Friday, August 17, 2012 5:37 AM

"Good news everybody!  I've invented a machine that makes you read this in my voice!"  ~Professor Farnsworth

Yeah, I know, works better with a picture next to it.  Geeked

But there is good news!  I've found someone to take the models off of my hands!  WOOHOO!  I went to the 2ID Museum at Cp Red Cloud today to get pictures and just tour the facility again after four years.  I had a really good time talking with the LtCol (Ret) in charge and as I was leaving I asked him if he knew anyone that might be interested.  He said, "give to me!  I'll find something to do with them!"

So, the plan is that they will go to the 2ID museum at Cp Red Cloud, including the dioramas! Big SmileBeerToastYeah

________________________________________________________________________________

Andy Hill (the_draken) landrew.hill(at)live.com <*> ASE Master Auto Tech, Imaca certified.  >^.^<

PADI OWSI Certified, BA Poli Sci (NDSU), BS Secondary ED-Social Studies MSUM (Sigma *** Laude)

  • Member since
    November 2009
  • From: SW Virginia
Posted by Gamera on Friday, August 17, 2012 11:17 AM

Good news Andy! Glad to see your models find a good home.

"I dream in fire but work in clay." -Arthur Machen


JOIN OUR COMMUNITY!

Our community is FREE to join. To participate you must either login or register for an account.

SEARCH FORUMS
FREE NEWSLETTER
By signing up you may also receive reader surveys and occasional special offers. We do not sell, rent or trade our email lists. View our Privacy Policy.