SEARCH FINESCALE.COM

Enter keywords or a search phrase below:

The group build to end all group builds - THE GREAT WAR

156075 views
1091 replies
1 rating 2 rating 3 rating 4 rating 5 rating
  • Member since
    June 2010
  • From: Austin, TX
Posted by DoogsATX on Monday, April 4, 2011 1:32 PM

Just found what I need for rigging work...

On the Bench: 1/32 Trumpeter P-47 | 1/32 Hasegawa Bf 109G | 1/144 Eduard MiG-21MF x2

On Deck:  1/350 HMS Dreadnought

Blog/Completed Builds: doogsmodels.com


  • Member since
    August 2003
  • From: Connecticut, USA
Posted by Nachtflieger on Monday, April 4, 2011 3:55 PM

Jack, and Dogs:

Great work to both of you!Yes

Nate


  • Member since
    February 2010
  • From: Ontario, Canada
Posted by Bockscar on Monday, April 4, 2011 6:55 PM

DoogsATX

Just found what I need for rigging work...

'); // -->


Hey, your work is about as close to micro surgery as I've seen.

As for the video, if the manufacturers of the manipulators have their force-feedback calibrations right, a person can aquire the sensation of actually 'feeling' the work at 'hand.'

If i ever need another ripped knee ligament rejoined, i'm calling you!Wink


  • Member since
    February 2006
  • From: Smithers, BC, Canada
Posted by ruddratt on Monday, April 4, 2011 7:33 PM

Marc, nice pickup on the Macchi! Yes You gonna be building if for this GB?

Jack, great work on the figure, and that base is awesome! Gotta hand it to you figure guys! Yes

Doogs, man you're really raising the bar in this GB. That is some incredible stuff! I love the 'pits on these WWI birds, and yours has really lit a fire under my kiester to get cracking on mine.......so I did!

Got the engine built, and the base coats are on the fuselage halves as well as on many of the office components....should have some pics up soon.

Mike

 "We have our own ammunition. It's filled with paint. When we fire it, it makes pretty pictures....scares the hell outta people."


  • Member since
    June 2010
  • From: Austin, TX
Posted by DoogsATX on Monday, April 4, 2011 10:52 PM

ruddratt

Doogs, man you're really raising the bar in this GB. That is some incredible stuff! I love the 'pits on these WWI birds, and yours has really lit a fire under my kiester to get cracking on mine.......so I did!

Got the engine built, and the base coats are on the fuselage halves as well as on many of the office components....should have some pics up soon.

Dude - coming from you, I'm taking that as mega-huge praise! After the work you did on the Pfalz...can't wait to see the Hisso!

Have to get cracking on the frame rigging on the other side tonight...thankfully I found the new bit set I received a few days ago (small black case, black car seats = bad combo!). Hopefully they're a bit higher quality than the ones I've been muddling along with.

Have to admit, I'm having real trouble with the cowl panels. The rubber cement chipping didn't work out the way I wanted (too stark/uniform), and neither did sanding back to the silver. About to give up and go for the old silver pencil/drybrush combo method.

Man, these bipes are addicting!

On the Bench: 1/32 Trumpeter P-47 | 1/32 Hasegawa Bf 109G | 1/144 Eduard MiG-21MF x2

On Deck:  1/350 HMS Dreadnought

Blog/Completed Builds: doogsmodels.com


  • Member since
    April 2005
  • From: Piscataway, NJ!
Posted by wing_nut on Tuesday, April 5, 2011 7:38 AM

PLASTIC HAS BEEN CUT, MOLD LINES SANDED AND PIN MARKS FILLED.  IT HAS BEGUN!

In simpler terms... I've startedStick out tongue

Mike, your warning has been well heeded.  The wings are NOT flat.  Not being sure which ejector pin marks inside the fuselage will be visible... I filled 'em all.  Sanding them is going to be a girlie dog.  The side of the seat look more rounded in the photos so I added some sheet plastic to the side to thicken them up.   "Film at 11"Wink

Marc  

  • Member since
    June 2010
  • From: Austin, TX
Posted by DoogsATX on Tuesday, April 5, 2011 8:01 AM

Marc - awesome! Another bipe coming out to play!

I rigged up the other side of the cockpit frame last night...took the lazy route since I got a case of itwon'tbevisible-itis. Looking very forward to moving on to things like the actual cockpit tonight.

Also read, either on this or the Camel thread, someone who knew Rickenbacker, and that apparently they often-as-not used ropes for seat belts, since the actual belts wore out. Think that could be a LOT of fun...especially since the WnW PE belts  seem ridiculously out-of-scale. Well, unless the seatbelts were copies of the heavyweight champion belt... 

On the Bench: 1/32 Trumpeter P-47 | 1/32 Hasegawa Bf 109G | 1/144 Eduard MiG-21MF x2

On Deck:  1/350 HMS Dreadnought

Blog/Completed Builds: doogsmodels.com


  • Member since
    February 2006
  • From: Smithers, BC, Canada
Posted by ruddratt on Tuesday, April 5, 2011 9:35 AM

Doogs -  hey man, I've seen your work and I know what you can do - it's awesome and I knew we were all in for a treat with the 'Pup once you got your teeth into 'er, but some of the stuff you've put into your build, I was like "holy &%$#, I never would have thought of that!" Stellar work! Yes

Marc, be very careful with those wing adjustments - at the same time, you have to monitor the spacing between upper and lower so it doesn't throw off the fit of the struts.

Mike

 "We have our own ammunition. It's filled with paint. When we fire it, it makes pretty pictures....scares the hell outta people."


  • Member since
    June 2010
  • From: Austin, TX
Posted by DoogsATX on Tuesday, April 5, 2011 3:08 PM

Hey Marc - can you pull the Nieuport 17 down? I'm still planning on building it, but with the decal situation (Academy's decal reputation + no really great aftermarket options), I'm going to give it over to the Wild Wings GB and paint it up in the two-tone blue camo the 56th FG used with their P-47Ms. Figure that would take it a bit away from the WWI theme.

I WILL be adding another kit. Not sure what yet, exactly. Curious to try out a Roden kit, so maybe the Spad VII or Nieuport 28 (or Soppy Tripe).

On the Bench: 1/32 Trumpeter P-47 | 1/32 Hasegawa Bf 109G | 1/144 Eduard MiG-21MF x2

On Deck:  1/350 HMS Dreadnought

Blog/Completed Builds: doogsmodels.com


  • Member since
    April 2006
  • From: ON, Canada
Posted by jgeratic on Tuesday, April 5, 2011 5:19 PM

***completd pics***

Alrighty, colour this one as done.
Please excuse the darkness of some of the photos.  Although taken in natural light, the forward leaning of the figure made it a tad difficult to get decent frontal shots.

Thanks in advance for any comments and crits.
 regards,

Jack

  • Member since
    February 2010
  • From: Ontario, Canada
Posted by Bockscar on Tuesday, April 5, 2011 7:47 PM

DoogsATX

The excitement continues in this morning's Pupdate!

First...Gator's Grip glue, while generally excellent, yeah, not so much for eyeholes. Too much give. Ended up having to CA all the eyeholes back in place, including one that broke after the other side was already rigged. That one...well, if they made 1/32 duct tape and zip ties, the fix would have been the rough equivalent.

So...eyelets of ultrawire + .004 monofilament + 0.5mm nickel tubing. String the mono through the eyelet, then run both ends of the mono through a small length of tubing as though it's a bolo tie. Run the tubing "up" the monofilament until it's a short distance from the eyelet. Apply small drop of thin CA to the top of the tubing. 

Here's where I learned a valuable lesson - use one pair of tweezers to hold the "main" mono line taut. And a second pair to hold the "spare" line away at an angle. Otherwise the thin CA will run between them and they'll stick.

http://i780.photobucket.com/albums/yy86/doogsatx/Sopwith%20Pup%20RNAS/74496bc8.jpg

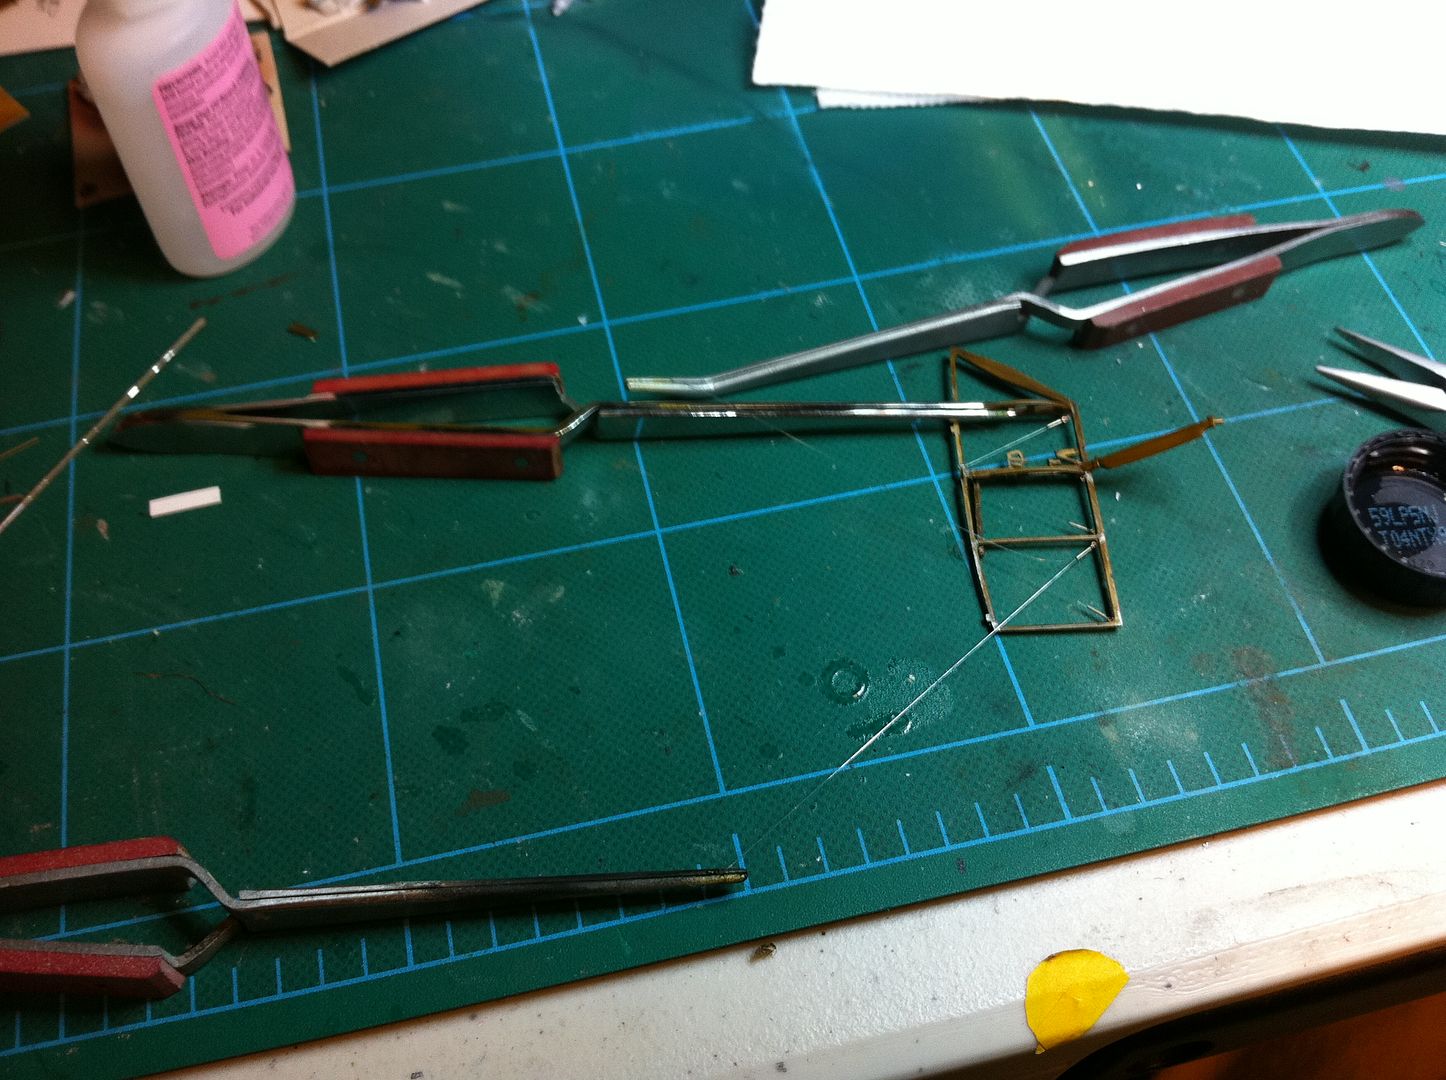
Run main mono line through holes in the bottom of the frame. CA at the top, trim at the bottom. 

http://i780.photobucket.com/albums/yy86/doogsatx/Sopwith%20Pup%20RNAS/e34ebeb9.jpg

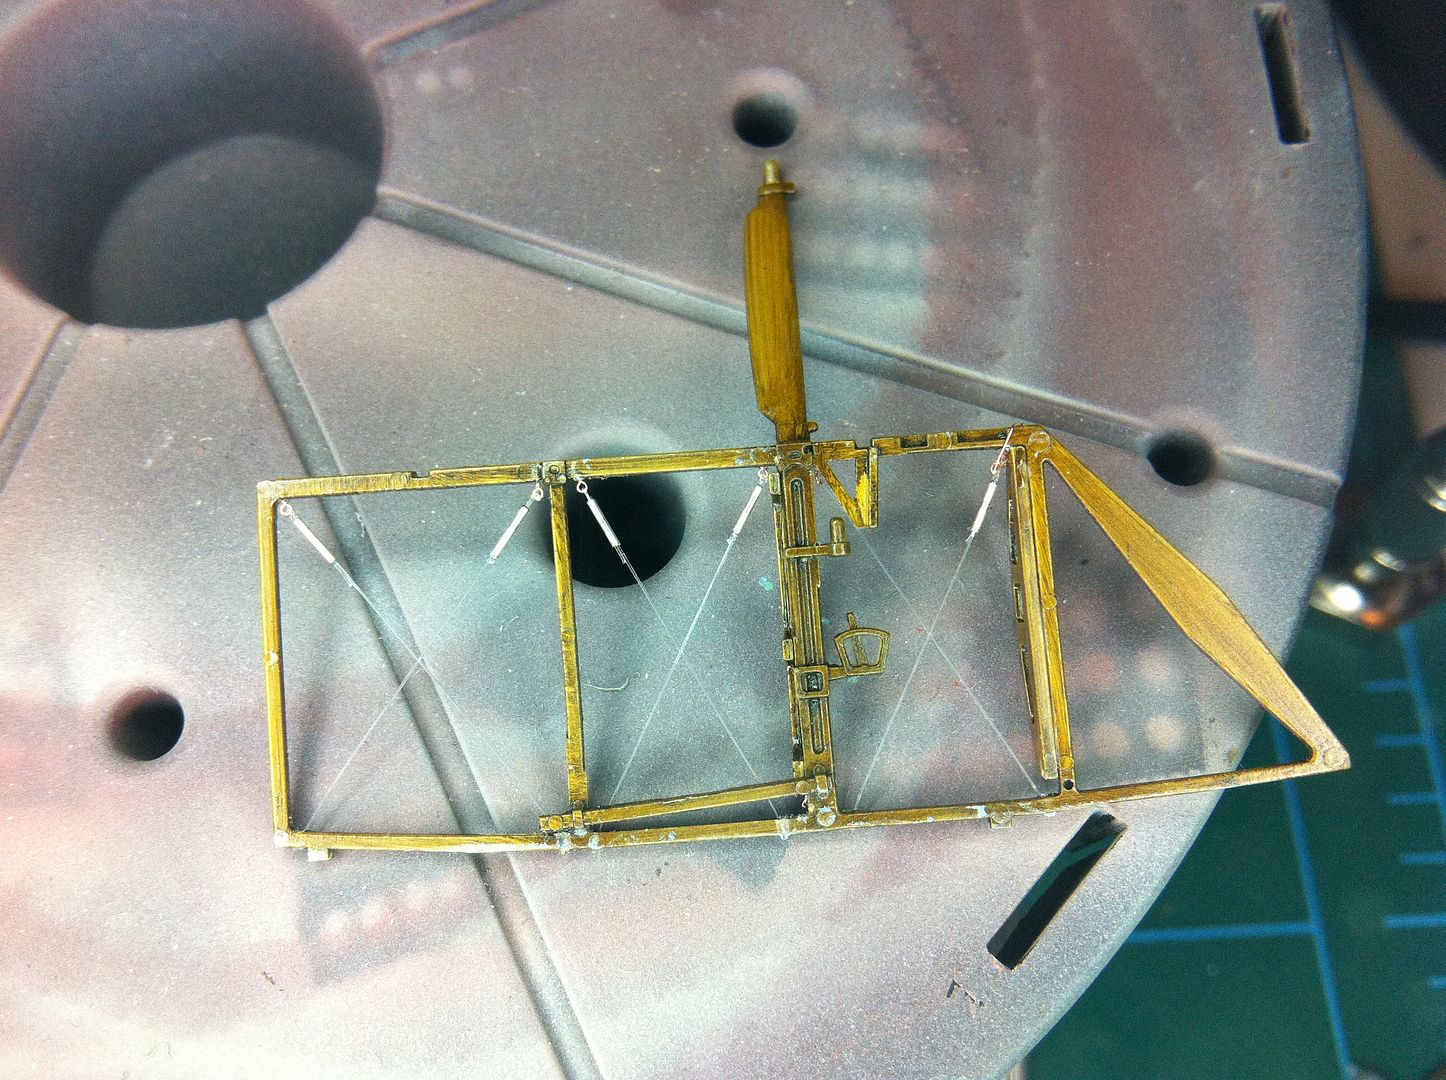
Overall...making the holes was far and away the most tedious part of the operation. That, and dealing with the forward eyelet, which broke away after everything was rigged. Couldn't reposition with tweezers, so I ran a piece of ultrawire through the eye, pulled taut, and twisted. The extra ultrawire around the frame held the eyelet fast and gave the thin CA more to grab. Still...when I rig the plane, eyeholes and other connection points wil have PLENTY of depth.


Doogs;

You mentioned "First...Gator's Grip glue, while generally excellent, yeah, not so much for eyeholes. Too much give. Ended up having to CA all the eyeholes back in place, ...", if I got that right, CA crystalizes and isn't as 'plastic', the Gator 'gives' or stretches a micro too much?

Also, does the Gator have anywhere near the capillary flow of the CA?

Thanks


  • Member since
    February 2006
  • From: Smithers, BC, Canada
Posted by ruddratt on Tuesday, April 5, 2011 8:14 PM

Wow, another completed build! Great job Richard! You figure guys never cease to amaze me! Yes

Mike

 "We have our own ammunition. It's filled with paint. When we fire it, it makes pretty pictures....scares the hell outta people."


  • Member since
    February 2010
  • From: Ontario, Canada
Posted by Bockscar on Tuesday, April 5, 2011 10:34 PM


http://pic20.picturetrail.com/VOL165/1109940/23691929/396102880.jpg

Hey jgeratic1; mustta' been early morning, he has no shadow (not a critWink), the shading and colours are excellent. BTW, nice job on the base and accreditations!

Given the figure, you got the 'leaning' spot on. i sure hope your guy lived to tell the tale!

Great work pal!Big Smile

  • Member since
    June 2010
  • From: Austin, TX
Posted by DoogsATX on Tuesday, April 5, 2011 10:53 PM

Bockscar


Doogs;

You mentioned "First...Gator's Grip glue, while generally excellent, yeah, not so much for eyeholes. Too much give. Ended up having to CA all the eyeholes back in place, ...", if I got that right, CA crystalizes and isn't as 'plastic', the Gator 'gives' or stretches a micro too much?

Also, does the Gator have anywhere near the capillary flow of the CA?

Thanks

Exactly. Gator's Grip has excellent shear strength because it's not as brittle as CA. Once CA "cracks", that's it. Whereas Gator can "bounce back". I've found it very useful for a lot of applications, but in this one, maybe it's a matter of the miniscule surface area, but it has too much give to really lock the eyebolts into their holes. CA, meanwhile, has excellent tensile properties in that regard. It's the constant low-level tension on the lines that causes the problems.

Was hoping to get around the somewhat unforgiving nature of CA...oh well.

Also, nowhere near the capillary flow of CA. At least not extra thin CA. It's pretty close to white glue. Maybe a slight bit thicker.

On the Bench: 1/32 Trumpeter P-47 | 1/32 Hasegawa Bf 109G | 1/144 Eduard MiG-21MF x2

On Deck:  1/350 HMS Dreadnought

Blog/Completed Builds: doogsmodels.com


  • Member since
    February 2010
  • From: Ontario, Canada
Posted by Bockscar on Tuesday, April 5, 2011 11:35 PM

DoogsATX


 Bockscar:


Doogs;

You mentioned "First...Gator's Grip glue, while generally excellent, yeah, not so much for eyeholes. Too much give. Ended up having to CA all the eyeholes back in place, ...", if I got that right, CA crystalizes and isn't as 'plastic', the Gator 'gives' or stretches a micro too much?

Also, does the Gator have anywhere near the capillary flow of the CA?

Thanks


Exactly. Gator's Grip has excellent shear strength because it's not as brittle as CA. Once CA "cracks", that's it. Whereas Gator can "bounce back". I've found it very useful for a lot of applications, but in this one, maybe it's a matter of the miniscule surface area, but it has too much give to really lock the eyebolts into their holes. CA, meanwhile, has excellent tensile properties in that regard. It's the constant low-level tension on the lines that causes the problems.

Was hoping to get around the somewhat unforgiving nature of CA...oh well.

Also, nowhere near the capillary flow of CA. At least not extra thin CA. It's pretty close to white glue. Maybe a slight bit thicker.

That's pretty mucha print. I've found the extra thin CA is fab for really tight applications, and anything else will not 'capillarize'. 

Also, CA when polymerized becomes very brittle and unforgiving. Also, beyond pure tensile, it gives way dramatically when induced to other forces (alternative vectors).

Besides, having had a pound or two of it's fumes, I am way beyond allergic!Ick!Dead

Again thanks for your notes on your build and materials, the comment about what happens when your wires get crossed with CA were appreciated....will keep several tools on hand...


  • Member since
    June 2010
  • From: Austin, TX
Posted by DoogsATX on Wednesday, April 6, 2011 10:05 AM

Another morning Pupdate! 

Bench time's been seriously impacted the past few days. I swear, my son turned three, and decided he's no longer able to fall asleep in his own room. Like a friggin' switch. Anyway, it's pretty much wrecked the family routine, so I've been going out to the garage an hour later than usual. 

Got a whole bunch of small stuff done last night. Painted the fastening brackets, the seatback, the details on the IP, etc. Tonight I'm hoping to rig up the control wires and maybe start gluing the cockpit together.

Also been playing with the engine. Love the detail - need to go darker for the cylinder/cooling fin detail, I think - but one thing that hacks me of is the way the pipes are molded right onto the crankcase cover. Makes busting out Alclad a huge masking pain, so I'm trying to get that burned metal look with pigments. I think I'm getting there.

On the Bench: 1/32 Trumpeter P-47 | 1/32 Hasegawa Bf 109G | 1/144 Eduard MiG-21MF x2

On Deck:  1/350 HMS Dreadnought

Blog/Completed Builds: doogsmodels.com


  • Member since
    April 2005
  • From: Piscataway, NJ!
Posted by wing_nut on Wednesday, April 6, 2011 10:09 AM

Great looking figure Jack.  I felt like I needed to step out of his way.

A "real" update this time with photos.  Sadly with an Albatros D.Va there is nothing as clever as "Pupdate" to do.  Ah well that's life.

Ejector marks filled, and interior gets the base colors

The seat was made a little wider on the sides since it looked a little more rounded at the top.  The inside was covered with Tamiya tape for a bit of texture.  The bottom has some tissue underneath for a padded look and then i made a slice with the back of a blade which pulled out some of the tissue to look like a tear in the leather.  Tough to see in the pic but in the face to face it really looks good.  Paint is Vallejo with artist oils

And the beginning of what will be a large pile of eyelets and turnbuckles ends

Marc  

  • Member since
    April 2005
  • From: Piscataway, NJ!
Posted by wing_nut on Wednesday, April 6, 2011 10:11 AM

Doogs you posted while i was typing.  That is some Sierra Hotel interior work.

Marc  

  • Member since
    June 2010
  • From: Austin, TX
Posted by DoogsATX on Wednesday, April 6, 2011 10:15 AM

wing_nut

Doogs you posted while i was typing.  That is some Sierra Hotel interior work.

Thanks!

You as well - LOVE that seat! Looks exactly, dead-on like leather! Would you mind going a bit more in-depth on how you got that look? I'm about to start "leatherizing" my seat soon, but not sure exactly how I want to proceed...

On the Bench: 1/32 Trumpeter P-47 | 1/32 Hasegawa Bf 109G | 1/144 Eduard MiG-21MF x2

On Deck:  1/350 HMS Dreadnought

Blog/Completed Builds: doogsmodels.com


  • Member since
    April 2005
  • From: Piscataway, NJ!
Posted by wing_nut on Wednesday, April 6, 2011 10:39 AM

Thanks doogs.

Did you see the posts about how I did the lower hull on the Stug III and the roads wheels on the Marder M?  Same thing.  Started with base coat of Vallejo red leather which a is a bit lighter in color.  Then I applied a thin all over coat of raw umber with a touch of burnt sienna artist oil.  Using the stiff clean brush wiped much of it away leaving it down in the recesses.  Then I went back and put more of the oils in the recesses only and let it dry a little bit... about 10 minutes.  Then again with a clean dry stiff brush to blend that out.  A few very fine random spots of the oil that I blended by rolled a Q-Tip on its side back and forth over the spot.

Marc  

  • Member since
    December 2002
  • From: NYC, USA
Posted by waikong on Wednesday, April 6, 2011 10:51 AM

You guys have all been doing a fantastic job in this GB, especially for one that hasn't officially started!

That figures looks great - love the dynamic tension in the pose.

All this great stuff about buckles and rigging, makes me afraid to start my plane as I feel I muse use buckles! On the otherhand I think it will solve the issue with fixing a finished rigging that comes loose.  Maybe I should do a Fokker DR I first, very little rigging.

My website: http://waihobbies.wkhc.net


  • Member since
    June 2010
  • From: Austin, TX
Posted by DoogsATX on Wednesday, April 6, 2011 11:02 AM

waikong

All this great stuff about buckles and rigging, makes me afraid to start my plane as I feel I muse use buckles! On the otherhand I think it will solve the issue with fixing a finished rigging that comes loose.  Maybe I should do a Fokker DR I first, very little rigging.

Ugh - I wrote out a nice little reply, and the internet ate it.

Suffice to say, I was terrified of rigging at first, but now that I've gotten a few lines under my belt, I actually kind of enjoy it. Still think all the wing rigging is going to be an exercise in eyestrain, but I'm not anywhere near as intimidated as I was. Honestly, all the eyebolts and turnbuckles and the double-loop method make the rigging relatively foolproof. Tedious, but foolproof.

On the Bench: 1/32 Trumpeter P-47 | 1/32 Hasegawa Bf 109G | 1/144 Eduard MiG-21MF x2

On Deck:  1/350 HMS Dreadnought

Blog/Completed Builds: doogsmodels.com


  • Member since
    April 2005
  • From: Piscataway, NJ!
Posted by wing_nut on Wednesday, April 6, 2011 6:04 PM

Today has been a good day.

I figured out how to wrap .003" wire around an eyelet at the end of a .007" without it breaking.

And I got my Aber Spandau upgrade set in the mail.  Oh baby is it nice.

AND the statement that came from Great Models Webstore with the Aber set from said I had a $40 credit.Surprise.  The down side of hthat is that I haven't ordered from them for like 3 years and they had my money all that time.  But this is lkike gettingthe Aber set for free and there is still more credit left

Marc  

  • Member since
    July 2006
  • From: San Francisco, CA
Posted by telsono on Wednesday, April 6, 2011 6:16 PM

Add me in, with Aeroclub's 1/48 R.E. 8

This will be in honor of the memory of my grandfather who was a mechanic on the old "Harry Tate" as he would call it.

Mike T.

Beware the hobby that eats.  - Ben Franklin

Do not fear mistakes. You will know failure. Continue to reach out. - Ben Franklin

The U.S. Constitution  doesn't guarantee happiness, only the pursuit of it. You have to catch up with it yourself. - Ben Franklin

  • Member since
    April 2005
  • From: Piscataway, NJ!
Posted by wing_nut on Wednesday, April 6, 2011 6:22 PM

Great.  Glad to have on board Mike.  Cool looking plane.  Looks like it's bent thoughWink

Marc  

  • Member since
    February 2006
  • From: Smithers, BC, Canada
Posted by ruddratt on Wednesday, April 6, 2011 7:29 PM

Mike, great to have you on board! Yes

Marc, that's some first-rate stuff! The interior walls looks great, and I am DEFINITELY stealing your method of replicating the leather - best replication of that stuff I've seen - EVER! It'll sure come in handy not only for the seat, but also for that padding around the 'pit opening.

Doogs, excellent progress on the 'pup - I'm really enjoying the "pupdates"  ....and I'm glad to hear you're having no real issues with the rigging - it really is not as scary as it appears.

I am going to do my best to get some pics up tonight - the engine for sure, and hopefully some 'pit pics tomorrow.

Mike

 "We have our own ammunition. It's filled with paint. When we fire it, it makes pretty pictures....scares the hell outta people."


  • Member since
    March 2006
Posted by TD4438 on Wednesday, April 6, 2011 7:32 PM

There is some seriously nice work being done around here!

  • Member since
    June 2010
  • From: Austin, TX
Posted by DoogsATX on Thursday, April 7, 2011 9:32 AM

Big steps last night! I assembled probably 3/4 of the cockpit...no pics, since I've trapped it in the fuselage halves to set up properly. Hopefully some tonight. 

Also followed Marc's steps on my leather seat. Well, almost. Before hitting the oils stage, I drybrushed it with MM Dunkelgrau. The oils calmed down the effect, so now it's nice and subtle. I'm thinking I may satin coat it next, then drybrush some gloss (anybody have a recommendation for a gloss clear I can drybrush?) to simulate that "shiny" look that patches of a leather chair get over time. Other option would be satin then slight polishing with fine grit on the high areas.

Also went back to the engine with thinned Metallic Black. Much happier.


On the Bench: 1/32 Trumpeter P-47 | 1/32 Hasegawa Bf 109G | 1/144 Eduard MiG-21MF x2

On Deck:  1/350 HMS Dreadnought

Blog/Completed Builds: doogsmodels.com


  • Member since
    April 2005
  • From: Piscataway, NJ!
Posted by wing_nut on Thursday, April 7, 2011 10:11 AM

The engine look great as does the seat.  For that 'butt slide" shine I would buff it a little with a coffee filter.

I have been looking at 2 wood grain technique to use on this build.  The 1st is the one I use on tool handles which is just oils applied to acrylics and wiped off.  The other actually paints on the darker bands of the plywood and looks truly awesome but will take a lot of practice.  So I set to practicing in the wide open area behind the seat that will not be seen. It looked like it was going to take a lot more practice so I tried the dry, stiff, clean bush stroke blending technique that is fast becoming my favorite weathering tool.  After a light coat that was wiped away with a piece of  packing foam, I made some dashed with a flat brush loaded with oil paint and flattened to a shard chisel edge.  A few blending stroke and the 2 technique combined into a look I that I am pretty happy with.

I got this tool at MosquitoCon over the weekend.  It is a very fine pointed reamer that the tip will fit inside the Lion Roar tubing.  Cleans the cutting burr and opens the end great.  And it was just a dollar.  I can find out who that vendor is if anyone has an interest.

Marc  

  • Member since
    February 2006
  • From: Smithers, BC, Canada
Posted by ruddratt on Thursday, April 7, 2011 11:57 AM

Doogs, she's lookin' great! I would go with the buffing method on the leather, using either the coffee filter as suggested by Marc or an old dryer sheet (that's what I use). Should look aces with that treatment!

Marc, that is some very impressive woodwork. I'll be using a similar technique on my SE.5. ....and yes, I am very interested in that tapered reamer you used - I'd love to have one of those in my arsenal.

....and finally, some progress pics (but I really need to work on my camera settings). This is the engine, pretty much OOB with the exception of the wiring and the collector tubes, done with styrene rod and small PE strips for the mounting brackets, along with small strips of bare metal foil for the hose clamps. Today I plan on going hot & heavy on the office, so I should have more pics up soon.

Mike

 "We have our own ammunition. It's filled with paint. When we fire it, it makes pretty pictures....scares the hell outta people."


JOIN OUR COMMUNITY!

Our community is FREE to join. To participate you must either login or register for an account.

SEARCH FORUMS
FREE NEWSLETTER
By signing up you may also receive reader surveys and occasional special offers. We do not sell, rent or trade our email lists. View our Privacy Policy.