SEARCH FINESCALE.COM

Enter keywords or a search phrase below:

The group build to end all group builds - THE GREAT WAR

156337 views
1091 replies
1 rating 2 rating 3 rating 4 rating 5 rating
  • Member since
    April 2005
  • From: Piscataway, NJ!
Posted by wing_nut on Thursday, April 14, 2011 1:21 PM

gnsnow, welcome to the group.  I iwll update the 1st page with you list.  Don't worry that you are a treadhead.  As you can see by my avatar I am a winged treaded  flying rolling streamlined muddy guy.  Very much out of my comfort zone here.  And certainly don't worry about not being up to par.  It's not about that.    Better that you are going out of your comfort zone.


This brings us to 31/42 molders/potential builds. I really didn't expect this to be so popular.  Wonder why no one did it before?


Marc  

  • Member since
    June 2010
  • From: Austin, TX
Posted by DoogsATX on Thursday, April 14, 2011 1:36 PM

In honor of Photobucket finally being back up, here's a peak at the cowl chipping. Apologies for the iPhone photos.

As I mentioned over in my Achilles WIP thread, I'm thinking I may try to throttle back a bit on this build. Got a lot on my mind at the moment, and as much as I'm enjoying pushing outside of my comfort zone, I'm also kind of craving a comfort zone build in the midst of all the insanity. But we'll see. I may change my mind tonight and keep the bench limited to the Achilles and the Pup.

On the Bench: 1/32 Trumpeter P-47 | 1/32 Hasegawa Bf 109G | 1/144 Eduard MiG-21MF x2

On Deck:  1/350 HMS Dreadnought

Blog/Completed Builds: doogsmodels.com


  • Member since
    April 2005
  • From: Piscataway, NJ!
Posted by wing_nut on Sunday, April 17, 2011 10:25 PM

Doogs, I know how stuff can get in the way of.. well... other stuff.  I would hate to see you give up on this though since you are doing such good work.  But you have to do what's best for you.  It's been a few days since your post so I am wondering what you thinking as at this point.

I need some opinions about these colors.  I've been practicing some plywood.  I've seen D.V's and D.Va's with the wood to the yellowish and with a bit of orange.
 
The 1st pic is the painted wood.  The base is Vallejo Iraqi Sand with the 2 left panels darkened twice =with medium brown and hate 2 right panels darkened twice with red leather. The 2nd has a 50/50 yellow/orange mix on top and straight yellow on the bottom.

Marc  

  • Member since
    April 2006
  • From: ON, Canada
Posted by jgeratic on Monday, April 18, 2011 1:23 AM

wing_nut

I think the yellow/orange mix is looking the best of the three.  The sand colour you chose might be a bit too dark (brown/gray) as a base when comparing to photos in museums.  Keep in mind too if you plan on using a gloss coat this will darken everything even more so.

These two pics I think were from a movie set, (German site).  You can really see how the setting sun gives the albatros an orange glow.


regards,

Jack


  • Member since
    June 2010
  • From: Austin, TX
Posted by DoogsATX on Monday, April 18, 2011 7:39 AM

Have to agree with Jack. I definitely think the yellow/orange is the closest tonally, just too dark. Maybe a really light base (deck tan or something)?

On the Bench: 1/32 Trumpeter P-47 | 1/32 Hasegawa Bf 109G | 1/144 Eduard MiG-21MF x2

On Deck:  1/350 HMS Dreadnought

Blog/Completed Builds: doogsmodels.com


  • Member since
    June 2010
  • From: Austin, TX
Posted by DoogsATX on Monday, April 18, 2011 7:46 AM

wing_nut

Doogs, I know how stuff can get in the way of.. well... other stuff.  I would hate to see you give up on this though since you are doing such good work.  But you have to do what's best for you.  It's been a few days since your post so I am wondering what you thinking as at this point.

Oh, I'm definitely not giving up, just slowing things down a bit so I can play in shallower water for a few days. Got the LaGG-3 interior primed up and I've been doing a lot of boring detail work on the Achilles most of the weekend.

I guess...basically...updates may be slower for the next week or so (though hopefully the whole job thing will be sorted by Tuesday evening).

On the Pup's side of things, I got the tiny wood framing inside the fuselage masked and sprayed (god what a PITA), got the outside shot with primer where I'm going to have to paint before assembly, painted the tires, and finished up the engine. First time playing with Alclad's transparent smoke. Love the look it's given the engine. And it's way less "oily" than Tamiya Smoke. 

On the Bench: 1/32 Trumpeter P-47 | 1/32 Hasegawa Bf 109G | 1/144 Eduard MiG-21MF x2

On Deck:  1/350 HMS Dreadnought

Blog/Completed Builds: doogsmodels.com


  • Member since
    April 2005
  • From: Piscataway, NJ!
Posted by wing_nut on Tuesday, April 19, 2011 6:41 PM

Alclad transparent smoke you say huh?  Didn't know about that one. Oh goody... something to BUY.

Work continues on the engine, slowly but surely. Needed to make the plates on top if the springs for the lifters.  They are not flat but have a curled under edge with a dimple in the middle.  I came up with this...

The 2nd to smallest punch on the Micro Mark set fits the top of the spring.  To figure out what size bit to use to make the little rings I doubled the size of the wire (0.02) and the thickness of the lead foil (0.1).  Take that off the size of the punch, .058 leaving .038.  I went down a tiny bit to a #65 bit at .035 for some wiggle room. 

In the standard ring making manner, wrap the wire around the bit shank and cut of the rings.  Press the lead foil over the ring.  Run a burnishing tool around the outside of the ring and make a dimple in the middle. The next step will explain why the calculations.  Turn the foil over and the shape of the rich should rest perfectly in the hole for the punch... ring side up.  Now gently punch it out and, Bob's your uncle, lifter spring covers.

The nuts, such as they were, by the lifter were chiseled off and replaced with Tichy plastic bolts heads.  I get these at a local model RR shop.  The engine mount bolts were replaced with machined brass from Scale Hardware.  The brass stuff is some of the most amazing stuff that add a great light bit of detail look.  The engine is just dry fit at the moment waiting for paint.

Marc  

  • Member since
    February 2006
  • From: Smithers, BC, Canada
Posted by ruddratt on Tuesday, April 19, 2011 11:28 PM

I think I'll just quit right now and start collecting swizzle sticks instead. Geez Marc, you've just placed the bar on the other side of the moon!

Outstanding work!!  Bow Down Bow Down

Mike

 "We have our own ammunition. It's filled with paint. When we fire it, it makes pretty pictures....scares the hell outta people."


  • Member since
    March 2010
  • From: Brisbane
Posted by Julez72 on Wednesday, April 20, 2011 2:06 AM

Dittooutstanding work guys....


  • Member since
    April 2005
  • From: Piscataway, NJ!
Posted by wing_nut on Wednesday, April 20, 2011 7:19 AM

Mike, Julez... thansk guys


ruddratt

you've just placed the bar on the other side of the moon!

Well that's not too smart... it's dark over there.


"I'll see you on the dark side of the moon. "Whistling

Marc  

  • Member since
    June 2010
  • From: Austin, TX
Posted by DoogsATX on Wednesday, April 20, 2011 7:26 AM

Mark - WOW. That's about all I can say. Can't wait to see that engine start its relationship with paint!

On the Bench: 1/32 Trumpeter P-47 | 1/32 Hasegawa Bf 109G | 1/144 Eduard MiG-21MF x2

On Deck:  1/350 HMS Dreadnought

Blog/Completed Builds: doogsmodels.com


  • Member since
    April 2006
  • From: ON, Canada
Posted by jgeratic on Wednesday, April 20, 2011 11:56 AM

wing_nut that is just freak'n nutz - awesome work!  I thought those WnW kits were the cat's meow, but I guess some of you guys are finding room for improvement. 

Apparently Roden has come out out with a 1914 version of the Rolls Royce armored car.  At a quick glance the only thing different from their original release is the new spoked wheels.   To my knowledge no AM products have been yet released for this type of car, can anyone else verify this?

I also came across a producer of  WW1 aircraft decals located in the UK, Pheon Models .   He has no website, but there are reviews on the net.  He has a list of available decal sets (in all 3 popular scales) and does his sales by personal email and paypal.  More info here: 

regards,

Jack

  • Member since
    August 2003
  • From: Connecticut, USA
Posted by Nachtflieger on Thursday, April 21, 2011 2:48 AM

Daaaaaaang Marc; that's looking awesome!

Nate


  • Member since
    February 2010
  • From: Berkeley CA/St. Paul MN
Posted by EBergerud on Thursday, April 21, 2011 3:46 AM

Wingnut and Doog: you're work is looking terrific. I'm working on a humble Academy Camel that a kind soul gave me on my last birthday. Unless catastrophe strikes while assembling and rigging the wings I guess it will get done. I'm not sure how to weather however. (Les at WWIaircraft does "arrival day" models - I would too if mine looked like his. So on this matter he is of no help.) When I weather a tank I try to make plastic look like metal. Not sure if the same techniques will work well to make plastic look like fabric. Any thoughts on how to proceed?

BTW Doog: thankee much for a sweet tip. I bought some Bob's buckles and sleeves for my kit and left them in California - they're safe but I'm in St. Paul. So I got some midge size fly tubing: width is perfect - .5 mm and the stuff is far easier to cut than messing with brass tubing.

Eric


A model boat is much cheaper than a real one and won't sink with you in it.

  • Member since
    April 2005
  • From: Piscataway, NJ!
Posted by wing_nut on Thursday, April 21, 2011 6:38 AM

Eric I saw a mention about fabric texture in the AeroScale forum but not about how to do it, or I just missed it.  I think thought hat even in 1/32 scale the texture of the fabric you be too small unless it was covered in burlap.  By no means an expert but I would guess, purely from an aerodynamic aspect, the linen would be a tight weave and once doped and painted the surface texture would be all but gone.

Marc  

  • Member since
    April 2006
  • From: ON, Canada
Posted by jgeratic on Thursday, April 21, 2011 2:18 PM

Regarding fabric texture and  aircraft weathering...
You will find much discussion on the topic of fabric rendering, on one site I found an entry that ended up being 75 pages in length! Confused

As wing_nut mentioned, at the scales we are working in you will definitely not see individual threads.  Even in real life after several coats of dope and paint you cannot tell it is fabric unless you tap it ( you hear a difference) or apply pressure to it - it gives.  If a fabric surface is next to another surface, say metal for example, and both are painted the same colour, then you might see a tonal difference.  Some say this is a result of the fabric surface weathering much faster , ie. the dope has yellowed and is cracking/flaking.  It could also be that the paint used on fabric would not adhere on metal so a different type paint was used there, but was not an exact match.

I have come across forums in which some agree that a fabric surface does have an overall impression of texture.   Here is an example from Stephen Lawson, although I believe his technique is intended just for lozenge surfaces, but you are free to interpret otherwise:

"... it is essentually a black wash that is dragged across the wing surface from fore to aft on the wings and horizontal tail surfaces. but on the fuselage applied vertically on the sides. Accross the top rear deck and the undersurface belly the were is applied to the surface to unite the texture directions of the sides.To be clear these are fabric surfaces that are not painted but have had their camouflage patterns printed on at the factory. The whole point of texuring is to represent the shadows that are inherited in the fabric on the finished aircraft"

Which takes us to the other end of the spectrum,  microsculpt.com  has created a decal to simulate linen fabric texture.  Apparently it looks great over lozenge decals, but can be used over monotone surfaces.  They do suggest on lighter backgrounds to overspray the decal afterwards to tone it down.   Atm only available in 1/48 but look "splendid" on 1/32 subjects.

For general aircraft weathering, you won't find dirt like you would on a afv.  I guess you can drybrush some finer details in lighter shades but don't overdo it.  Bleaching from sun exposure would be something to think about.   Hans von Hammer mentioned oil loss was a big thing, so check references for your specific craft for patterns and locations.  There is also exhaust stains, perhaps gun soot?   Prop splash would throw up dirt, and maybe the tires would throw up a bit on the undersides of the lower wing and landing struts, depending on the airfield condition.   Rust, maybe a bit on the engine - hopefully some of the 'stringbag' experts can qualify or add to this.

regards,

Jack

  • Member since
    February 2006
  • From: Smithers, BC, Canada
Posted by ruddratt on Thursday, April 21, 2011 4:41 PM

Jack, that's a great example of texturing. With the fabric being a fairly coarse surface, it would collect dirt, oil, and such in a very irregular pattern, and in some areas more than others. Thanks for finding that!

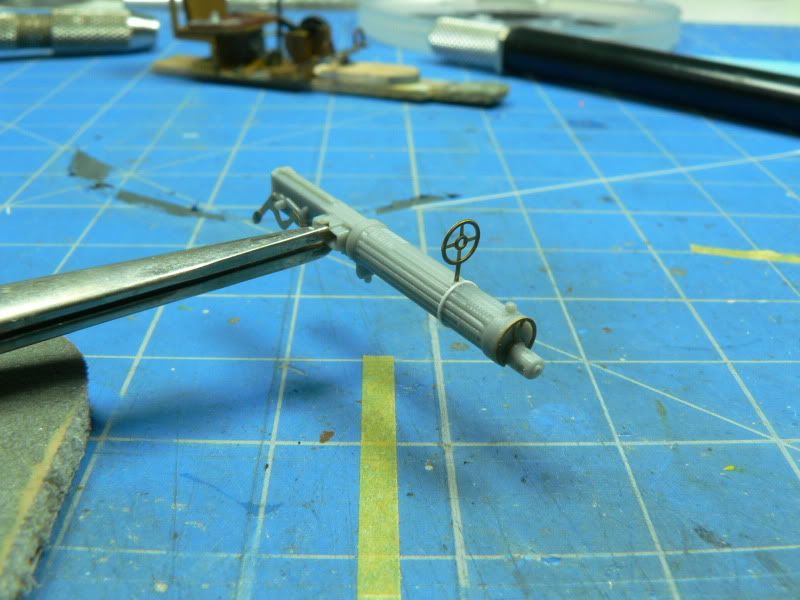
OK gents, been hot & heavy at the SE.5 for quite a while and finally have some worthwhile pics to share. First, the kit gun. They provide just enough PE to beef 'er up a bit.

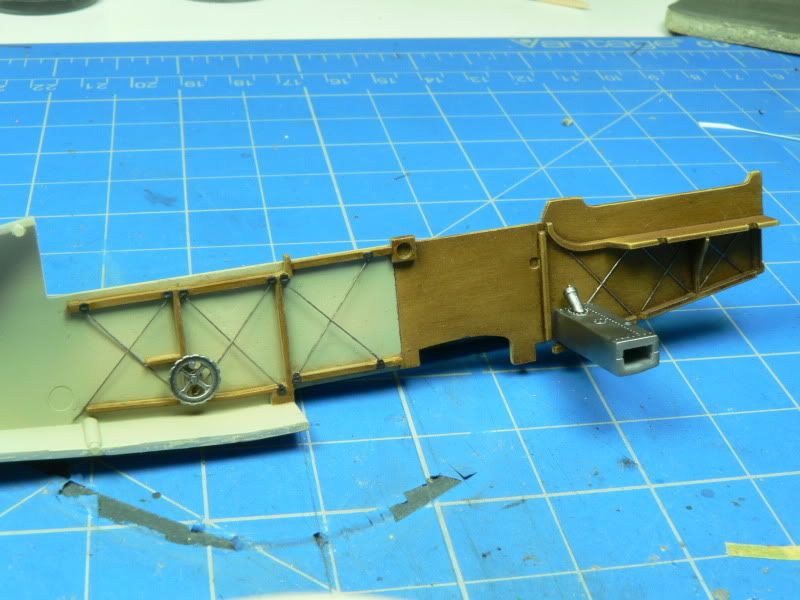
Inside the fuselage halves - the small Reheat PE bits worked out great as attachment points for the interior bracing, which was done with .003" EZline. The oil tank and trim wheel were painted with Alclad II dark aluminum and given a black enamel wash.

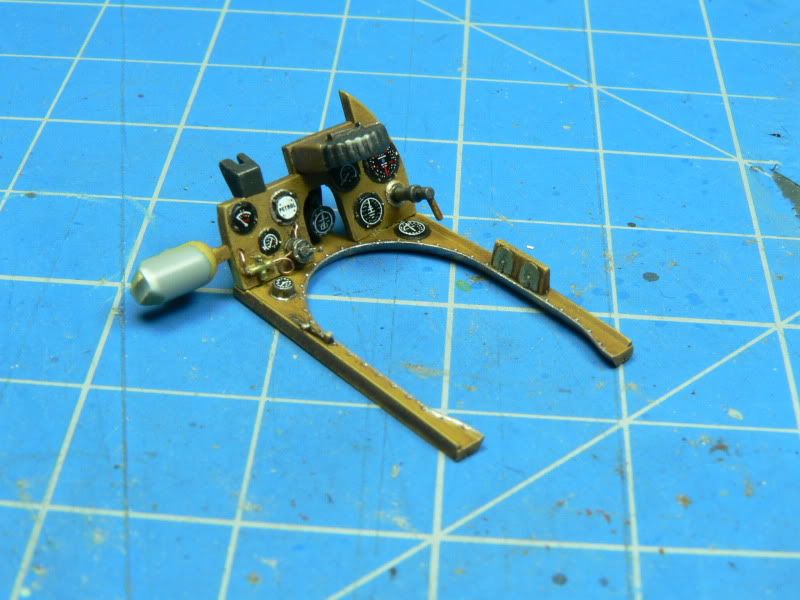
For the cockpit deck/IP panel, I scratchbuilt the detail on the lower left of the panel (the molded-on stuff wouldn't have cut it here). The ammo cannister was painted flat black and buffed with powdered graphite.

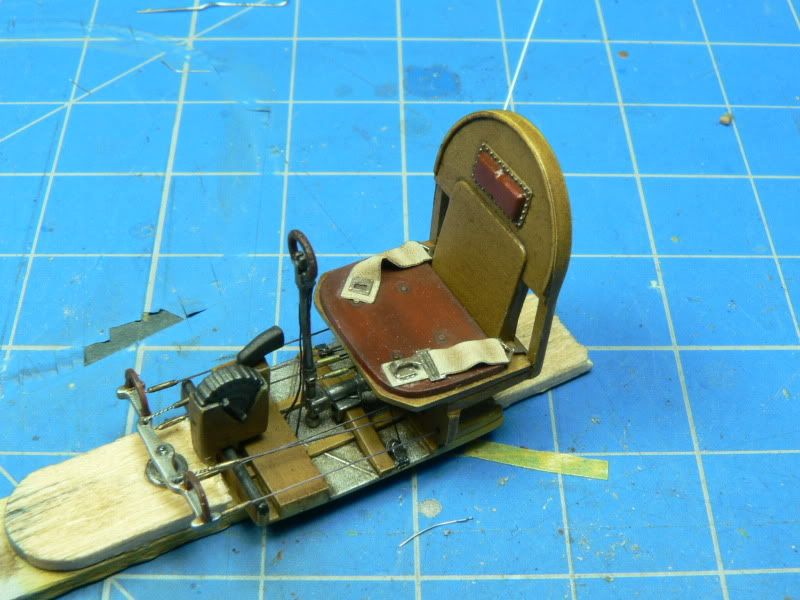
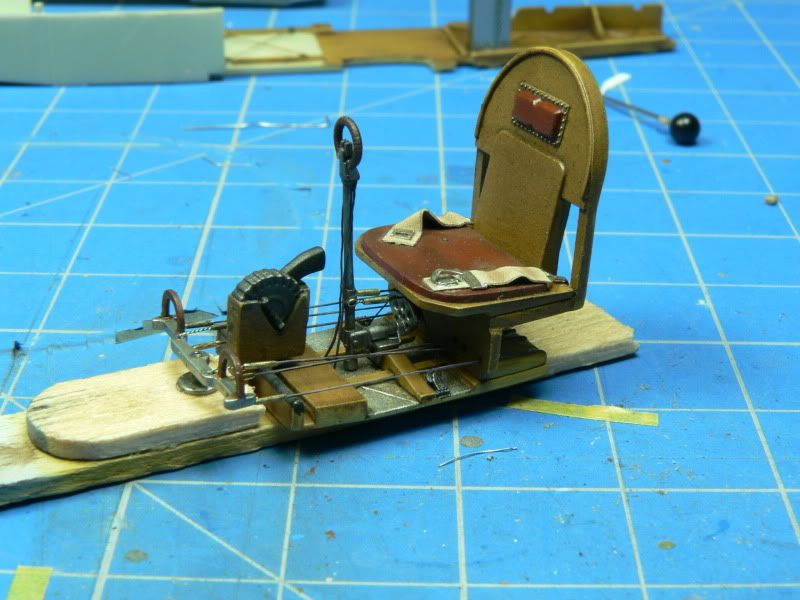
Whereas the 'pit for the Pfalz was completely modular and could be entirely assembled as one unit prior to installation, for the SE.5, I had to rig up a simple jig to "pre-rig" the rudder pedals. Their attachment point is located on the lower main wing piece, seperate from the rest of the 'pit floor, which mounts between the fuselage halves. The cabling is EZline with 0.5mm brass tubing for the buckles. For the belts, it was easier to replace the strap sections with lead foil, textured by pressing on them with a flat file. The kit's metal 'buckle' parts were retained however. I went with Marc's technique for replicating the leather on the seat & headrest, and while extremely happy with the results, I see I still need more practice to master it as he has (great tip, buddy! Yes ).

The fuselage halves should be buttoned up at some point today, with the 'pit and engine installed and lower wing attached. I also want to offer a huge "Thank you!" to my lovely wife for correcting my camera settings and providing me with much better pics to share with you guys. Love ya, sweetie!

Mike

 "We have our own ammunition. It's filled with paint. When we fire it, it makes pretty pictures....scares the hell outta people."


  • Member since
    February 2011
  • From: Launceston, Australia
Posted by the real red baron on Thursday, April 21, 2011 5:03 PM

how on earthSurprise

how did you do that it could quite possibly be the best ww1 plane cockpit ever!!!


  • Member since
    February 2010
  • From: Berkeley CA/St. Paul MN
Posted by EBergerud on Thursday, April 21, 2011 9:01 PM

I've decided to weather the Camel pretty seriously.  I've looked at dozens of photos and they show dirty birds, but are indistinct because of age. There are a few films in color of either original or rotary engined replicas: the owner of one said his camel burned 13 pints of castor oil per hour - indeed the oil loss was 100% if the plane exhausted its fuel. There's a constant plume coming out from underneath the plane. I'd guess the color is a kind of oily brown - not black. (That makes things more interesting because there certainly appears to be darker soot around the top of the cowl in addition. And of course there's dust and grass stains.) Right now I'm thinking of something like a light brown with some varnish in it sprayed thinly over the lower part of the aircraft directly behind the engine (this includes the lower parts of the sides). Maybe some green in it. But films lie like bandits. Anyone work with anything like this stuff. The oil would be fresh and then ejected immediately as it's used - presumably darkened in the process. Would this stuff maybe be a little green? Dark brown, maybe even a very dark grey? I could use any of these colors based on the films I've seen. I know this isn't science, but I'd like to get this as right as I can.

And yea, lovely cockpit.

Eric


A model boat is much cheaper than a real one and won't sink with you in it.

  • Member since
    December 2010
  • From: Memphis TN
Posted by Heavens Eagle on Thursday, April 21, 2011 10:46 PM

I suspect the green would not be the oil itself but caused by long term effects of oil and dirt on the surfaces.  I have seen numerous instances where after some oils, especially organic based oils will tend to cause corrosion to metals. Brass and copper type metals will especially start to develop a greenish tinge (called verdigris).

As to fabric staining I am not sure, but it could be due to other containments or just something else adding to the mix.

  • Member since
    April 2005
  • From: Piscataway, NJ!
Posted by wing_nut on Friday, April 22, 2011 6:52 AM

Jeez Mike.  That has to be a real cockpit sitting on large planks, not Popsicle sticks.  And people joke about my giant pennyWhistling  How long did it take you to paint the garage floor blue with the yellow grid?

Jack, thanks for that link.  Even with what I said about scale and fabric, I agree with what the say on that site about sometime you need to give the "impression" of things.  I really liked the look it had on the 9/24/08 model so I ordered a couple of the fabric sheets.  And nice discussion of lozenge application.

Marc  

  • Member since
    June 2010
  • From: Austin, TX
Posted by DoogsATX on Friday, April 22, 2011 8:58 AM

Mike. Dear god, man. The bar is now being raised toward the outer planets of the solar system. That looks fantastic!

Also jealous of the PE bits on the Vickers gun (I'm assuming it's a Vickers?). Mine looks the same, but, I don't have an PE for it. I has a sad. Still, I've got some ideas for drilling out the barrel.

Jack - that's some interesting stuff! One thing I would note about there not being dirt like on AFVs...maybe not caked mud, no, but the archival pic of Black Arrow in the WnW Pup manual (the one where it's on its back) shows a very dirty dog. The fuselage looks like it's been dealing with some sun fading, but also like it got caked in dust and then left in the rain. Strange thing is, the undersides of the wings are squeaky clean. Shiny, even.

Brief Pupdate. Issues with the new house have been sorted out. Issues with the job have been sorted out (gave my notice Tuesday!). Family is gone to see the in-laws for the weekend. I'm planning to spend a ridiculous amount of time at the bench this weekend...so hopefully some Pup work will come of it.

On the Bench: 1/32 Trumpeter P-47 | 1/32 Hasegawa Bf 109G | 1/144 Eduard MiG-21MF x2

On Deck:  1/350 HMS Dreadnought

Blog/Completed Builds: doogsmodels.com


  • Member since
    August 2003
  • From: Connecticut, USA
Posted by Nachtflieger on Friday, April 22, 2011 4:10 PM

Beautiful cockpit Mike! Can't wait to see the rest of the build.Big Smile

Nate


  • Member since
    April 2005
  • From: Piscataway, NJ!
Posted by wing_nut on Saturday, April 23, 2011 6:54 AM

I really get excited when parts become recognizably assemblies and get painted.

Here is a group of some of the sub-assemblies I am working on with a close up of the engine.  I am very pleased with the look of the spark plugs.

I used the buckles from the kit PE belts and made new straps from lead foil.  They are textured by rolled a round micro file back and forth.  The rest of the cockpit formers are dry so I can get the rest of that together soon.

Marc  

  • Member since
    June 2010
  • From: Austin, TX
Posted by DoogsATX on Saturday, April 23, 2011 9:14 AM

Marc - that seat looks fan-friggin-tastic! LOVE the texture on the leather, and I'm now like triple kicking myself about forgetting to install the belts until too late.

Keep up the simply awesome work!

In Pup land - I closed up the fuselage last night! Also inadvertently attached the decklid. I was just doing a test-fit, but the way it snuggles in between the two cabane struts, it just found its place and stuck! Good news is, perfect fit. Bad news...now I have to paint the leather padding on the plane, AND I'm going to have to mask the whole deal when it comes time to paint the fuselage and lower wing.

On the Bench: 1/32 Trumpeter P-47 | 1/32 Hasegawa Bf 109G | 1/144 Eduard MiG-21MF x2

On Deck:  1/350 HMS Dreadnought

Blog/Completed Builds: doogsmodels.com


  • Member since
    April 2006
  • From: ON, Canada
Posted by jgeratic on Saturday, April 23, 2011 1:12 PM

Hi everyone, I'm glad to be able to put forth some food for thought in our group build.  I have about a dozen or so unbuilt bipes in my stash so hope to get at least one done while we are together here.  What I wrote in my previous entry, as well as what others post, does not necessarily mean that this is how something should be done.  They are just suggestions and is up to the individual to decide what works for them.  Thx go out to Doogs for pointing out with his example of the Black Arrow - there is always an exception to some general rule of thumb.

Btw guys, Marc, Doogs, ruddratt - your cockpits and engines are lookn sweet, very inspirational work.

I have a question about rigging.  Is the same method used to attach structural cables and control lines, or is there a  difference?  For example, would the double loop method be characteristic just for bracing?

regards,
Jack

  • Member since
    February 2006
  • From: Smithers, BC, Canada
Posted by ruddratt on Saturday, April 23, 2011 8:36 PM

Gentlemen, thanks much for your comments. They're worth a ton o' gold coming from modelers (and people) of your caliber. Glad you're likin' 'er so far. Yes

Marc, that is seriously good work my friend. Ya gotta love that lead foil for the belts - IMO there's nothing better. Gotta go with Doogs about that seat - one of, if not the best one I've seen on these forums....and that engine, man, it's a killer all painted up!

Doogs, hope you're havin' at the 'pup this weekend. Man, it's been ages is seems since I've been able to put an entire weekend into a build. Definitely looking forward to seeing some MAJOR pupdates !

Jack, I've seen lots of photo references to the double loop method, both for structural cables and control cables. I can go dig up a few if you like.

Mike

 "We have our own ammunition. It's filled with paint. When we fire it, it makes pretty pictures....scares the hell outta people."


  • Member since
    April 2006
  • From: ON, Canada
Posted by jgeratic on Sunday, April 24, 2011 8:57 AM

Well the two kits I'm considering is either the Phonix D.I or Fokker B.II so maybe if you can direct me to a website I can search for pics, that would be great.

regards,

Jack

  • Member since
    June 2010
  • From: Austin, TX
Posted by DoogsATX on Sunday, April 24, 2011 10:05 AM

ruddratt

Doogs, hope you're havin' at the 'pup this weekend. Man, it's been ages is seems since I've been able to put an entire weekend into a build. Definitely looking forward to seeing some MAJOR pupdates !

Alas, I've mostly been plowing my time into the Achilles. Things been on my bench since February, and I'm kind of ready to get it done and snug in a display case. 

But...I did manage to pry the decklid off the Pup without breaking anything or scratching any of the wood grain away. Not easy! That thing had a grip on one of the cabane struts like nobody's business! Still, it let me paint up the leather padding.

Not quite done yet. That's the first pass and then the first pass with oils. Not sure what I want to hit it with next to give it that beat up leather texture. Maybe I need to go reread Marc's technique!

On the Bench: 1/32 Trumpeter P-47 | 1/32 Hasegawa Bf 109G | 1/144 Eduard MiG-21MF x2

On Deck:  1/350 HMS Dreadnought

Blog/Completed Builds: doogsmodels.com


  • Member since
    February 2006
  • From: Smithers, BC, Canada
Posted by ruddratt on Sunday, April 24, 2011 12:24 PM

Doogs, that's lookin' sweet! Definitely relieved that it came of without any damage to the build.


Jack, I found some nice pics of the D.III, but my knowledge of the differences between it and the D.I is not that great. Still, they may be of use to you. HTH.

http://www.wwi-models.org/Photos/AH/Pho_DIII/index.html


Mike

 "We have our own ammunition. It's filled with paint. When we fire it, it makes pretty pictures....scares the hell outta people."


JOIN OUR COMMUNITY!

Our community is FREE to join. To participate you must either login or register for an account.

SEARCH FORUMS
FREE NEWSLETTER
By signing up you may also receive reader surveys and occasional special offers. We do not sell, rent or trade our email lists. View our Privacy Policy.