SEARCH FINESCALE.COM

Enter keywords or a search phrase below:

Spitfire GB

150880 views
933 replies
1 rating 2 rating 3 rating 4 rating 5 rating
  • Member since
    July 2004
  • From: Sonora Desert
Posted by stikpusher on Friday, February 9, 2024 11:23 PM

GAF

She looks good, Carlos!  Maybe I should take a 12 year break from my models so I can finish them up to this standard!  Wink

Gary


Ya know, thats not a bad concept... but how many 12 year break do we have left? Wink


F is for FIRE, That burns down the whole town!

U is for URANIUM... BOMBS!

N is for NO SURVIVORS...

       - Plankton

LSM


GAF
  • Member since
    June 2012
  • From: Anniston, AL
Posted by GAF on Friday, February 9, 2024 9:32 PM

Double post.


GAF
  • Member since
    June 2012
  • From: Anniston, AL
Posted by GAF on Friday, February 9, 2024 9:31 PM

She looks good, Carlos!  Maybe I should take a 12 year break from my models so I can finish them up to this standard!  Wink

Gary

  • Member since
    July 2004
  • From: Sonora Desert
Posted by stikpusher on Friday, February 9, 2024 3:39 PM


F is for FIRE, That burns down the whole town!

U is for URANIUM... BOMBS!

N is for NO SURVIVORS...

       - Plankton

LSM


  • Member since
    July 2004
  • From: Sonora Desert
Posted by stikpusher on Thursday, February 8, 2024 9:47 PM

Still chugging along on this one between other builds...

Recently I applied a wash, cleaned it off and sealed it in with a flat coat


and not I have been doing all the last little bits before getting this one finished... I am aiming to have it completed tomorrow


Stay tuned...


F is for FIRE, That burns down the whole town!

U is for URANIUM... BOMBS!

N is for NO SURVIVORS...

       - Plankton

LSM


  • Member since
    July 2004
  • From: Sonora Desert
Posted by stikpusher on Tuesday, October 3, 2023 8:29 PM

Gary, this is the Mk.VII, a specialized high altitude variant. 
Yeah, I miss the old days on here as well. Lots of fun folks.


F is for FIRE, That burns down the whole town!

U is for URANIUM... BOMBS!

N is for NO SURVIVORS...

       - Plankton

LSM


GAF
  • Member since
    June 2012
  • From: Anniston, AL
Posted by GAF on Tuesday, October 3, 2023 12:35 PM

That's a nice looking Spit, Carlos!  Remind me what make of Spitfire it is?

I'll have to note, there's very few still around who signed up for this GB.  Looking at the sign-up makes me wish for the good old days.

Gary 

  • Member since
    July 2004
  • From: Sonora Desert
Posted by stikpusher on Saturday, September 30, 2023 8:56 PM


F is for FIRE, That burns down the whole town!

U is for URANIUM... BOMBS!

N is for NO SURVIVORS...

       - Plankton

LSM


  • Member since
    July 2004
  • From: Sonora Desert
Posted by stikpusher on Wednesday, September 27, 2023 7:46 PM

Very nice Spit John. Well, it is somewhat running... I wonder if anybody else here still hasn't finished what they signed up to build for this GB, and is still active here?

I got the topside color airbrushed on today. Humbrol Acrylic Medium Sea Grey


F is for FIRE, That burns down the whole town!

U is for URANIUM... BOMBS!

N is for NO SURVIVORS...

       - Plankton

LSM


  • Member since
    December 2002
  • From: Northern California
Posted by jeaton01 on Wednesday, September 27, 2023 3:31 PM

Maybe we should keep it running!  Looks like I beat your finish by 11 1/4 years, Carlos.

http://goldeneramodel.com/mymodels/spitfire/1tamiyamk1/0121tamiyamk1.jpg

John

To see build logs for my models:  http://goldeneramodel.com/mymodels/mymodels.html


  • Member since
    July 2004
  • From: Sonora Desert
Posted by stikpusher on Monday, September 25, 2023 7:08 PM

John, I thought that I'd posted this build somewhere on the forum, and lo and behold the forum search function worked to find it. Imagine my suprise to see that the GB rules said take as long as you like... LOL. 11 years! Wink

CB, yeah, hopefully WW2 is still among the living, even if not active on here... So close to the finish line now...


F is for FIRE, That burns down the whole town!

U is for URANIUM... BOMBS!

N is for NO SURVIVORS...

       - Plankton

LSM


  • Member since
    May 2004
  • From: Land of Lakes
Posted by cbaltrin on Monday, September 25, 2023 6:12 PM

stikpusher
According to the GB rules, technically this one is still running, and I have pulled my entry off the Shelf of Doom from the past decade and resumed work...

Well hopefully the ww2psycho has not gone to the great group build in the sky Stik!  Good luck on your Mk VIII!

On the Bench: Too Much

  • Member since
    April 2003
  • From: USA
Posted by keavdog on Monday, September 25, 2023 6:05 PM
Perseverance and a long memory Smile
 

Thanks,

John

  • Member since
    July 2004
  • From: Sonora Desert
Posted by stikpusher on Monday, September 25, 2023 5:37 PM

According to the GB rules, technically this one is still running, and I have pulled my entry off the Shelf of Doom from the past decade and resumed work...

as it looked upon being dusted off and returned to my work bench

and where its at now...

Rise from the dead!!!


F is for FIRE, That burns down the whole town!

U is for URANIUM... BOMBS!

N is for NO SURVIVORS...

       - Plankton

LSM


  • Member since
    April 2005
Posted by Thunderbolt379 on Friday, July 27, 2012 11:15 PM

Hi all,

After many months I'm getting ready to tackle the Academy Spit XIVc again. I just read a history of the Griffon Spits and it has me inspired to get my Spitfire collection into gear! My airbrush is in for service at the moment and I'm thinking this should be one of the first batch of models I do with it when it's back.

Here's the (finally completed) collection of aftermarket items:

  • Roundels (EagleStrike 48136)
  • Stencils (TechMod 48093)
  • RAF 18" codes/Sky (Fantasy Printshop FP884)
  • RAF 12" serials/Black (Fantasy Printshop FP880)
  • Masks (Eduard EX128)
  • Replacement prop (Quickboost 48 194)

With that lot I can completed avoid the Academy decals, accurise its beak and get a clean line job on the canopy. The model as I left it is waiting for the entry door and canopy to be added, and a few licks of filler, then its onto the masking and she's ready for preshading when the AB comes back.

Cheers, Mike/TB379 

http://worldinminiature.blogspot.com/

  • Member since
    January 2012
  • From: East Peoria, IL
Posted by stoutfella on Tuesday, July 24, 2012 7:49 PM

Checkmate and Thunderbolt: Thanks much. Kind words always appreciated. Good luck on your kits!

Cheers,

Stoutfella

On the bench: 1/48 Tamiya Bristol Beaufighter

On deck: 1/48 Tamiya P51-B

  • Member since
    April 2005
Posted by Thunderbolt379 on Tuesday, July 24, 2012 7:10 PM

Stoutfella, that is an exquisite piece of work! I have been longing to do a classic BoB Mk 1 and have the Tamiya kit, so have closely marked your warnings about the decals. I'll get Xtradedcals for the main markings, and the excellent stencil data sets produced by TechMod. Your work is an inspiration!

Yesterday I discovered Airfix's new Mk XII kit, read several reviews and ordered it at once -- earlier the same day I had been considering molding and casting the front end of a Mk XIV and the tail of a Mk VIII, and grafting them to a buitchered Mk V airframe, but there's no need. Airfix seem to have done a pretty decent job on this kit.

I'm hoping to get back to my beast before long, I have all the materials in hand, it's just a question of time.

Cheers, Mike/TB379

http://worldinminiature.blogspot.com/

  • Member since
    September 2003
  • From: AandF in the Badger State
Posted by checkmateking02 on Tuesday, July 24, 2012 11:58 AM

Wonderful looking Spitifre, Stoutfella.  Great paintwork and weathering.  

I have Tamiya's 1/72 version of this, and they left the flash suppressors on that one, too.  Haven't opened the box yet, but hope to build it this summer.


  • Member since
    January 2012
  • From: East Peoria, IL
Posted by stoutfella on Tuesday, July 24, 2012 11:56 AM

Jack: Yes, it's a BOB bird. Thanks for the info. I just followed the kit diagram on the walkway line. Had to piece 'em together anyway after they fell apart in a couple of spots. Tamiya decals, ugh!

Cheers,

Stoutfella

On the bench: 1/48 Tamiya Bristol Beaufighter

On deck: 1/48 Tamiya P51-B

  • Member since
    April 2006
  • From: ON, Canada
Posted by jgeratic on Tuesday, July 24, 2012 11:49 AM

That is a sweet build you have there.  Yes

 Looks to be a Spit from the Battle of Britain time frame.  Just a side note, might be considered a rivet counter thing, but the gun flash suppressors were removed from all aircraft shortly after war broke out.  Also the walkway line on the starboard wing should extend all the way to the fuselage.  

regards,

Jack

  • Member since
    January 2012
  • From: East Peoria, IL
Posted by stoutfella on Tuesday, July 24, 2012 11:07 AM

Greetings,

Here are a few shots of my completed Tamiya 1/48 Spitfire, with Ultracast prop and spinner, exhausts and seat.

The camo painting I described previously constituted the heavy lifting, so it went pretty smoothly after that. Put down a coat of MM acrylic gloss before decaling. I used an Xtradecal sheet with the markings for the Mk. I flown in Sept. 1940 out of Kenley/Gravesend by No. 66 Squadron Leader Rupert "Lucky" Leigh. Picked out panel lines with a pinwash of raw umber artist oil and hit a few areas lightly with some Bragdon weathering powder, though I decided not to beat it up too much.

The Xtradecals went down beautifully for the most part, but the sheet didn't include any stencils, so I used some of those from the Tamiya kit decals. I'm once again stunned at how awful Tamiya's decals are. Thick as cardboard and I got some silvering even on these small stencils with VERY liberal doses of Solvaset.

Cheers,

Stoutfella

On the bench: 1/48 Tamiya Bristol Beaufighter

On deck: 1/48 Tamiya P51-B

  • Member since
    February 2011
  • From: Bent River, IA
Posted by Reasoned on Wednesday, July 18, 2012 9:40 PM

She is looking great stoutYes, only thing missing is a few holes from 20mm rounds. Smile

Science is the pursiut of knowledge, faith is the pursuit of wisdom.  Peace be with you.

On the Tarmac: 1/48 Revell P-38

In the Hanger: A bunch of kits

  • Member since
    January 2012
  • From: East Peoria, IL
Posted by stoutfella on Wednesday, July 18, 2012 9:13 PM

Thanks, guys! I didn't do any preshading on this one, but I'll use a pinwash and weathering powder later to bring out the panel lines and beat it up a bit.

Cheers,

Stoutfella

On the bench: 1/48 Tamiya Bristol Beaufighter

On deck: 1/48 Tamiya P51-B

  • Member since
    April 2005
Posted by Thunderbolt379 on Wednesday, July 18, 2012 6:35 PM

I second the motion, Stoutfella, she's looking very nice. the thin, even coats really make the surface detail speak for itself.

M/TB379

http://worldinminiature.blogspot.com/

  • Member since
    September 2003
  • From: AandF in the Badger State
Posted by checkmateking02 on Wednesday, July 18, 2012 5:45 PM

Very nice looking camouflage.


  • Member since
    January 2012
  • From: East Peoria, IL
Posted by stoutfella on Wednesday, July 18, 2012 10:49 AM

Greetings,

After spraying the topside with MM acrylic dark earth, it was time to mask for the camouflage. A big shout-out here to jeaton01 for his wonderful templates. I printed them out and had intended to then use them as a guide to cut Frisket airbrush film for the actual masks. Fortunately, I tried a test with the Frisket on the undersides of the horizontal stabilizers before I dove in to the whole project. When I peeled off the film, it left a nasty, sticky residue on the paint. I was able to get just about all of it off by repeatedly pressing pieces of masking tape to it, lifting the residue little by little. But no way was I going to try this stuff on the whole plane now. So I went with Plan B. I cut out the paper template pieces and taped them in place, cutting a few of the smaller pieces directly out of masking tape:

I sprayed over the masks with Badger dark green acrylic, which went on very nicely. I think I'm also finally starting to get the right thickness in my paint mix. The answer was to thin it out a lot more than I had been and spray at a lower pressure -- 10 to 12 psi instead of 20. I'm getting thin, even coats now.

Next up, decals and fiddly bits (landing gear, prop, exhausts, etc.).

Cheers,

Stoutfella

On the bench: 1/48 Tamiya Bristol Beaufighter

On deck: 1/48 Tamiya P51-B

  • Member since
    January 2012
  • From: East Peoria, IL
Posted by stoutfella on Tuesday, July 17, 2012 8:58 AM

Greetings,

Much progress on my Spitfire over the weekend. This is my third Tamiya kit in a row and I'm getting spoiled. The fit's maybe not quite as spot-on perfect as the P-51D, but it's not far off. I used just a touch of filler on a couple of spots on the underside wing-fuselage joints, but otherwise it was just some sanding and smoothing.

Masking for the paint shop. This is the first time I've tried masking and attaching the canopies first, rather than stuffing tissue and masking tape into the cockpit.

I sprayed MM enamel RAF Sky for the bottom color. I sprayed the same paint as a primer coat on the topside, as well:

Then masked the bottom in preparation for the base color topside of

MM acrylic Dark Earth:

Next post will describe camo masking.

Cheers,

Stoutfella

On the bench: 1/48 Tamiya Bristol Beaufighter

On deck: 1/48 Tamiya P51-B

  • Member since
    September 2003
  • From: AandF in the Badger State
Posted by checkmateking02 on Wednesday, July 11, 2012 5:29 PM

Cats are the bane of modeling.  Outstanding cockpit!


  • Member since
    January 2012
  • From: East Peoria, IL
Posted by stoutfella on Wednesday, July 11, 2012 9:42 AM

Greetings,

ww2psycho has graciously allowed me to join the build, even though I'm a few months late to the party. I figured I was building the kit anyway, so I might as well share. I'm doing Tamiya's 1/48th Spitfire Mk I, done up in the markings and red spinner of No. 66 Squadron Leader Rupert "Lucky" Leigh. I picked up an Extradecal sheet for this kit after my first experience with cardboard-thick Tamiya decals on a previous build.

It'll also be my first experience with resin parts, having picked up a seat, prop/spinner and exhausts from Ultracast. I immediately found I wasn't prepared for how delicate these parts were, and my first act was to snap off the Sutton harness above the seat, never to be found again. I may try to fabricate a replacement if I get ambitious.

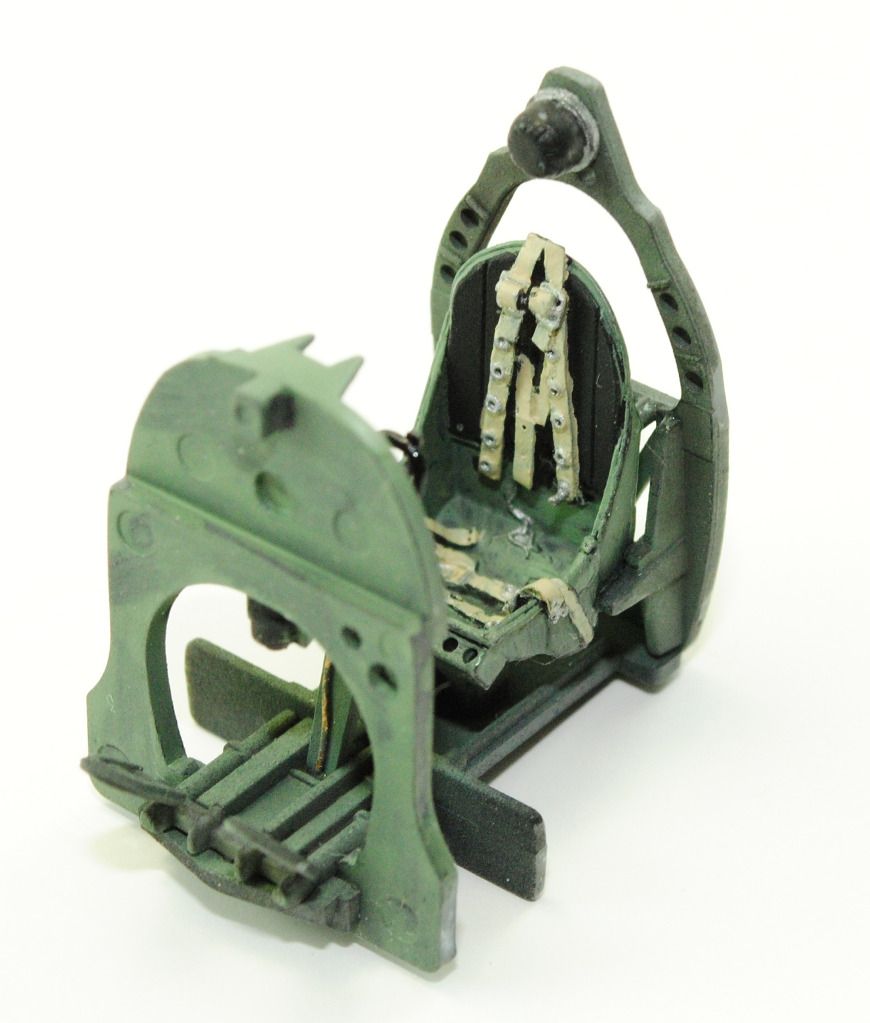
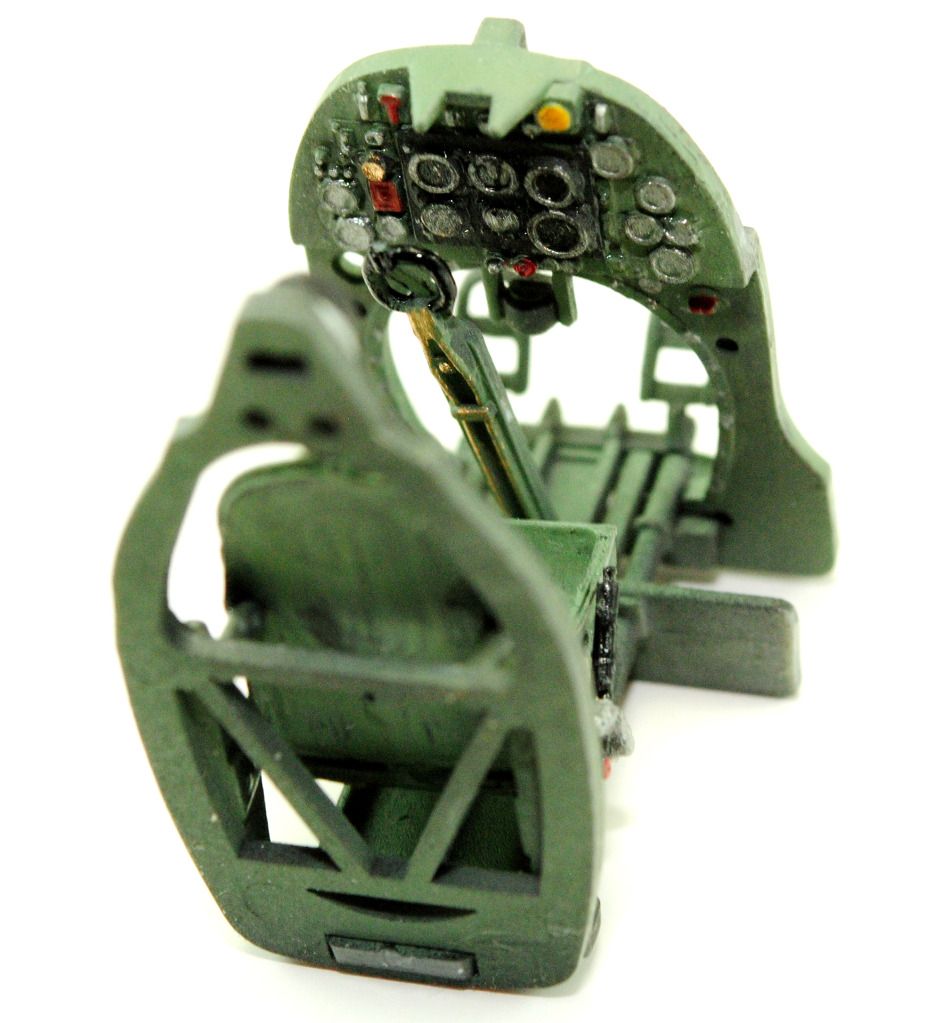
I'd thought about painting the seat in some sort of brown to simulate the Bakelite or whatever plastic was used for many Spitfire seats, but I determined that this plane first flew in January 1940, when the seats were still metal, so interior green it was.

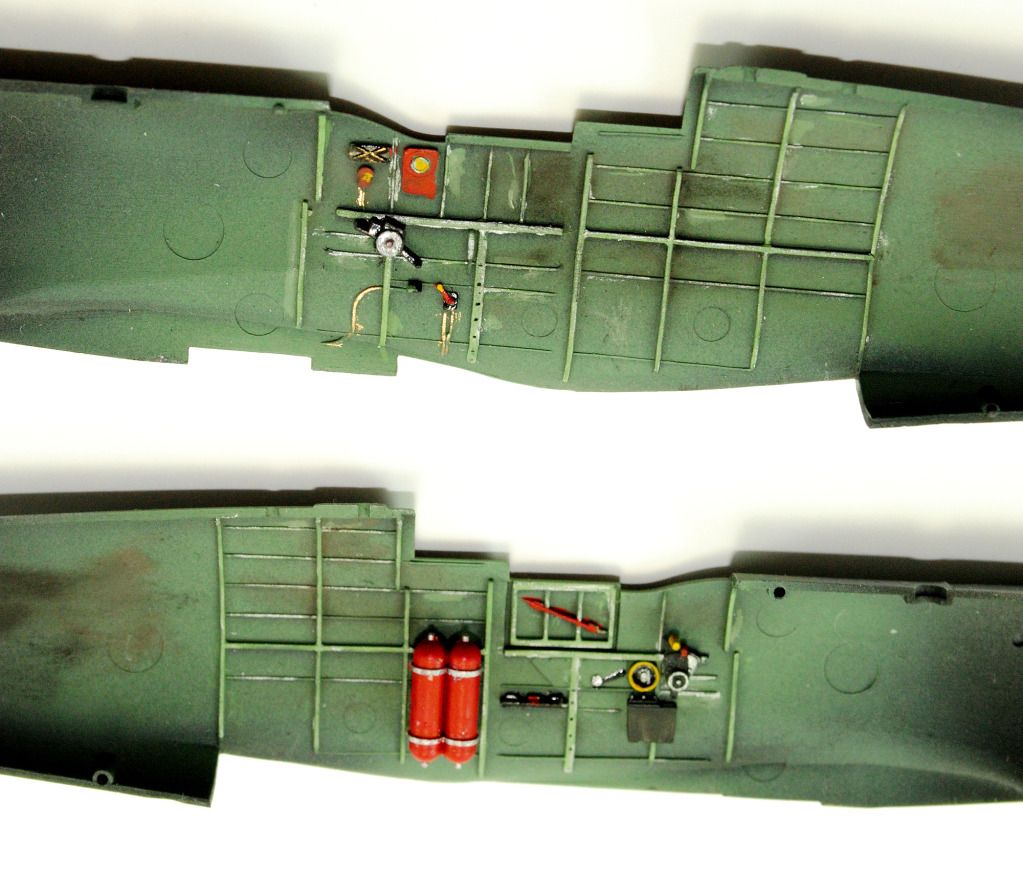
Here are a couple of more shots of progress so far. Just before taking these pictures, I went to retrieve the cockpit from the kitchen table where I'm forced to work at the moment, and discovered to my horror that it was gone.Surprise Apparently, the cats didn't pay attention to my stern warnings to not play with my toys. I eventually found it behind one of the litter boxes. In three pieces. Fortunately, nothing had snapped and I was able to make it right fairly easily.  But I really do need to find friendlier modeling quarters soon.

Cheers,

Stoutfella

On the bench: 1/48 Tamiya Bristol Beaufighter

On deck: 1/48 Tamiya P51-B

JOIN OUR COMMUNITY!

Our community is FREE to join. To participate you must either login or register for an account.

SEARCH FORUMS
FREE NEWSLETTER
By signing up you may also receive reader surveys and occasional special offers. We do not sell, rent or trade our email lists. View our Privacy Policy.