SEARCH FINESCALE.COM

Enter keywords or a search phrase below:

No More Excuses GB: Part Deux. Closed to New Entries But Finish What You Signed Up For

81882 views
690 replies
1 rating 2 rating 3 rating 4 rating 5 rating
  • Member since
    August 2005
  • From: Los Angeles, CA
Posted by corvettemike on Monday, September 24, 2012 6:33 AM

Still waiting.....

Every time i send CS an email "wait a little longer please be patient"

If I have to be patient through another month I will miss the deadline for this GB because we're moving around new years which means building anything isn't an option through Nov and Dec.

Rise my brothers we are blessed by steel in my sword I trust...

Arm yourselves the truth shall be revealed In my sword I trust...

Havoc Models

  • Member since
    October 2008
  • From: italy
Posted by bsyamato on Thursday, September 20, 2012 6:54 PM

Thanx for comments guys Toast 

LOL i have at least other two or three kits suspended in the same year Embarrassed

  • Member since
    March 2010
  • From: Buffalo, NY
Posted by macattack80 on Thursday, September 20, 2012 5:10 PM

Great job bsyamato!  15 years in the making.  I will update the front page.

Kevin

[


  • Member since
    July 2004
  • From: Sonora Desert
Posted by stikpusher on Thursday, September 20, 2012 12:54 PM

15 years BSY?:shocked: Wow! And I thought that my work on my SBD was slow (although it has been in the works about the same amount of time, possibly a year or two longer  :34:)

Well yours sure paid off! A beautiful finished build:love:


F is for FIRE, That burns down the whole town!

U is for URANIUM... BOMBS!

N is for NO SURVIVORS...

       - Plankton

LSM


  • Member since
    October 2008
  • From: italy
Posted by bsyamato on Thursday, September 20, 2012 10:05 AM

68GT

I like that wood work!

Ditto
More good updates Stik Yes
It's time to fix the badge Stick out tongue heres final EB-66E pictures:
on the final pictures you can see the last problems i had... some whiteness caused by 3rd layer of matt clear :( suddenly i removed it but something white point remains ..also dreak the nose probe and one of bottom antennas (scratchbuilded a new one) .Plus yesterday strong wind don't allow me to take outdoor pictures.. so ,after 15 years i can call this plane FINISHED!! Propeller
here complete gallery link
Comments and critiques are wellcomed Toast
At the next
  • Member since
    February 2010
  • From: New Jersey
Posted by 68GT on Thursday, September 20, 2012 5:39 AM

I like that wood work!

On Ed's bench, ???


  • Member since
    September 2009
  • From: Guam
Posted by sub revolution on Thursday, September 20, 2012 4:04 AM

Well, I set my ship aside for a while and consequently haven't been on this thread much! Great work all around by everyone!

Stik, that scratchbuilding is awesome!

Yamato- Love that plane! Great unusual subject and well done.

My build is assembled and initial paint is on. Will post photos soon.

Thanks, Budd

NEW SIG

  • Member since
    March 2010
  • From: Buffalo, NY
Posted by macattack80 on Wednesday, September 19, 2012 9:03 PM

68GT, the Raven looks nice so far!  I like effect of the pre-shading.  Keep up the good work.

bsyamato, that looks fantastic!  Can't wait to see the final pics!

Stik, nice work as usual sir.  Nice score with the floral screen!  Sometimes it helps to do a little dumpster diving.  Nice job updating/accurizing the M113.

Nice woodwork wayne!

Kevin

[


  • Member since
    April 2006
  • From: Denver, Colorado
Posted by waynec on Wednesday, September 19, 2012 8:57 PM

the coptic walnut alcohol pen works good for the wood. it's dark but streaks like wood grain. i used it over primer.

Никто не Забыт    (No one is Forgotten)
Ничто не Забыто  (Nothing is Forgotten)


  • Member since
    July 2004
  • From: Sonora Desert
Posted by stikpusher on Wednesday, September 19, 2012 8:40 PM

In this case for the vision blocks I tried something new and first painted on a sky blue, then did a couple coats of Tamiya clear green over that. Usually I just paint the clear green directly over the hull base color, whatever that is. For the vehicle pioneer tools if they are gonna be bare metal, I will use a dark metallic color with a dark wash and then some dry brushing for bare steel highlights. The bare wood I will weather with washes to match old garden tools. All paint companies "wood" colors are far too bright. I do like Tamiya's deck tan as that is very grayed out, but it is too light in shade. On US equipment I will usually paint the tools OD, or black & green, as I know that is SOP. But for non US equipment I tend to go with weathered bare wood & steel.


F is for FIRE, That burns down the whole town!

U is for URANIUM... BOMBS!

N is for NO SURVIVORS...

       - Plankton

LSM


  • Member since
    April 2006
  • From: Denver, Colorado
Posted by waynec on Wednesday, September 19, 2012 8:30 PM
what are you using for vision blocks? i usually paint the back silver followed by a couple coats of tamiya acrylic clear green but i'm thinking doing a darker back color so they don't look too green. we had some comments at the contest (i judged dioramas and helped with planes) about metal on tank tools. i know they were painted most of the time but i tend to do what you did, amy go-to metallic grey washed and toned down with coptic black pen and coptic walnut wood. i just like the contrast.

Никто не Забыт    (No one is Forgotten)
Ничто не Забыто  (Nothing is Forgotten)


  • Member since
    July 2004
  • From: Sonora Desert
Posted by stikpusher on Wednesday, September 19, 2012 8:09 PM

Thank you BSY Wink It almost looks full size at the Jerry cans (we always carried oil in those since a 113 drinks oil like there is no tomorrow) Where is that EB-66 of yours???

Well here is today's update on the FSV.

this morning I airbrushed on a coat of Future

Then after allowing the Future several hours to dry and cure (while I worked on a couple other projects) I applied the decals...

I took these photos a few minutes afterwards, so we shall see if the decals silver or dry properly. I gave them a good dose of Micro Set during application...Hmm


F is for FIRE, That burns down the whole town!

U is for URANIUM... BOMBS!

N is for NO SURVIVORS...

       - Plankton

LSM


  • Member since
    October 2008
  • From: italy
Posted by bsyamato on Tuesday, September 18, 2012 6:00 PM

Great detailing work on the 113 Stik and THESE ARE close ups!! Toast

Some da**** trouble on the eb-66 with last painting refines but finally finished Surprise tomorrow final pictures Pirate

  • Member since
    July 2004
  • From: Sonora Desert
Posted by stikpusher on Tuesday, September 18, 2012 5:33 PM

A few update pics as promised above... first off, a crappy cell phone cam pic of the exterior fire extinguisher pull handle box... obviously no macro setting that I could find on my phone- its the white blur behind the drivers hatch...Tongue Tied

and after painting and photographed with our good digital camera

The engine deck screening after a coat of OD

The scratch built antenna mount

and the Jerry cans and their racks, after the OD and then after a darker OD on the cans

I will go back and paint the tie down straps prior to weathering...

More tomorrow...


F is for FIRE, That burns down the whole town!

U is for URANIUM... BOMBS!

N is for NO SURVIVORS...

       - Plankton

LSM


  • Member since
    July 2004
  • From: Sonora Desert
Posted by stikpusher on Tuesday, September 18, 2012 12:06 PM

Well last night I could not leave well enough alone. So I added the external fire extinguisher pull handle box behind the drivers hatch on the top deck. A quick each scratch build. I will do some airbrushing in a few hours here and get more pics posted this evening.


F is for FIRE, That burns down the whole town!

U is for URANIUM... BOMBS!

N is for NO SURVIVORS...

       - Plankton

LSM


  • Member since
    July 2004
  • From: Sonora Desert
Posted by stikpusher on Monday, September 17, 2012 8:29 PM

BSY, your EB-66 is looking fabulous! I absolutely love it!Stick out tongue Beautiful work on the painting and the scratchbuilt landing gear... simply WOW stuff! Yes

68GT, your EF-111 is coming along very nicely. I look forward to seeing more progress.

Well, after being laid low by some bug on my days off last week, I was able to get back to the modeling bench for a few hours today, in between errands and dad duties and combinations of the two. So I decided to work on one of the sidelined AFV builds of mine that I have from quite awhile back that is closest to completion, Tamiya's M113 FSV.

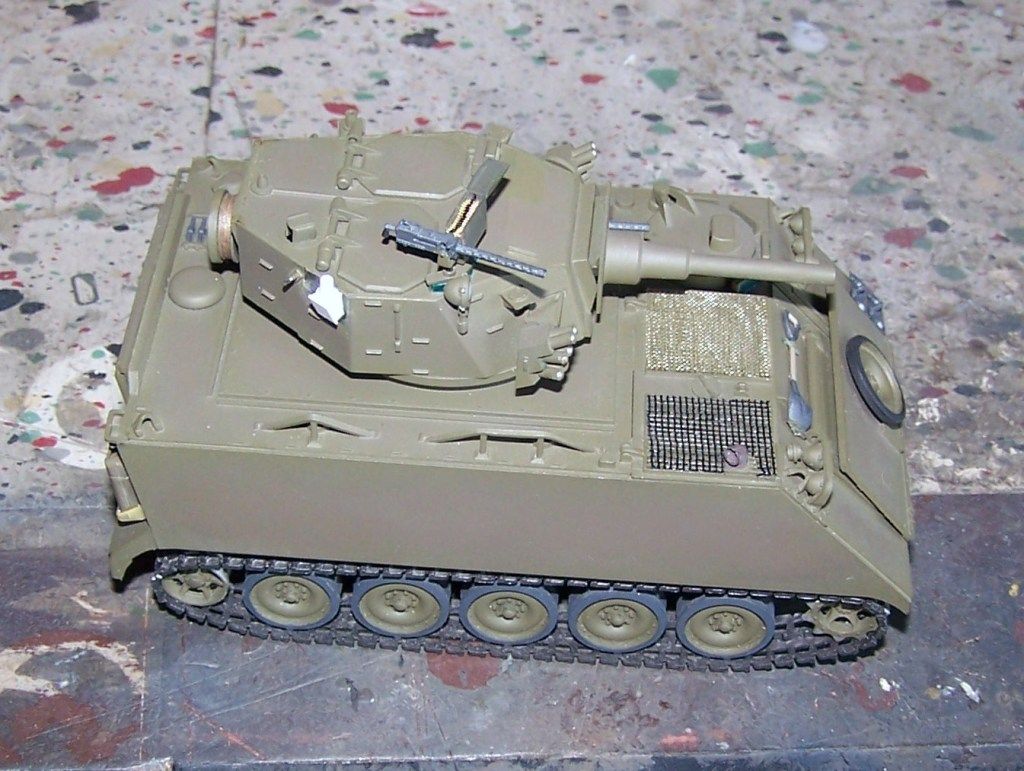
As you can see it is fairly close to completion. But a month or two back Phil H had to post some info over  on another thread telling of mods needing to be made to the kit to make it more accurate, so naturally I had to do a few of those plus add a couple of my own. I wont go into the reasons for the sidelining, but as of today the ball is rolling again for this build. I have no completed an AFV for awhile so I want to get a couple knocked out next. Enough random babbling anyways, on to today's work...

First up, my mods, I remembered the M113 vehicles that I had served on had wire mesh over the fan and radiator louvers so I dug through my old photo album and looked it up. A fairly fine mesh over the intake side and and larger grid mesh over the exhaust side. My mother in law who is staying with us on hospice care recently received a bouquet of flowers that came with some decorative fine mesh stuff that she threw away (and I dug out) that can do a battalion or two's worth of radiator/exhaust screens... and I had some left over mesh for the coarser exhaust stuff...

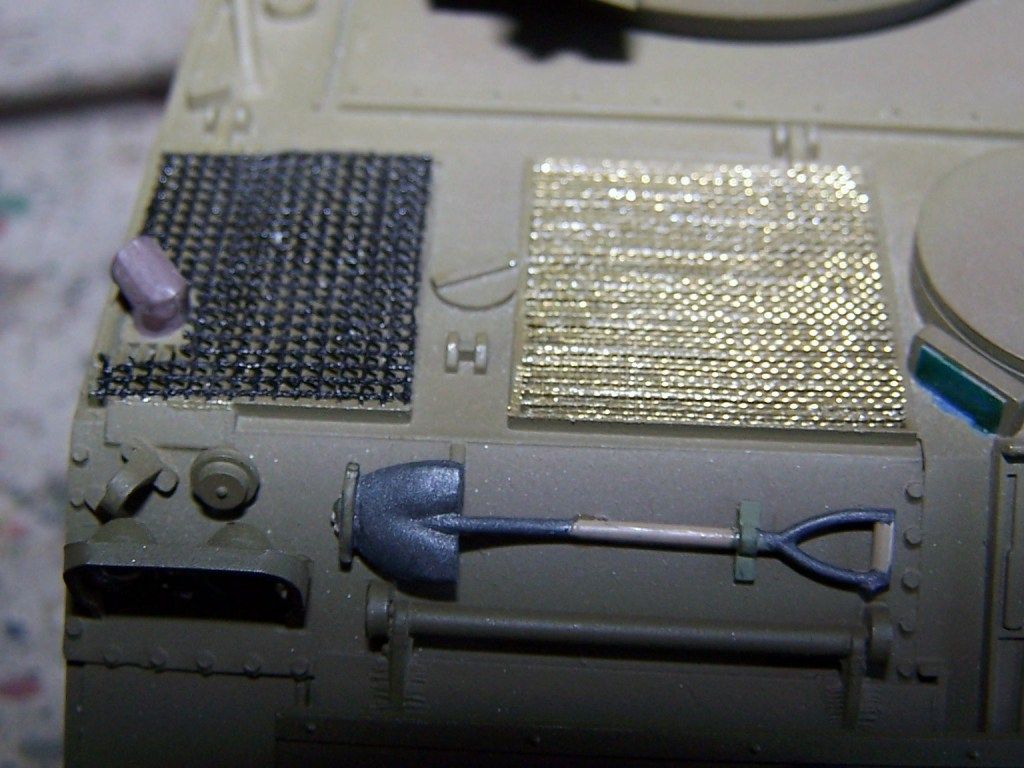
Big improvement I think. All my future 113 based kits will get this upgrade.

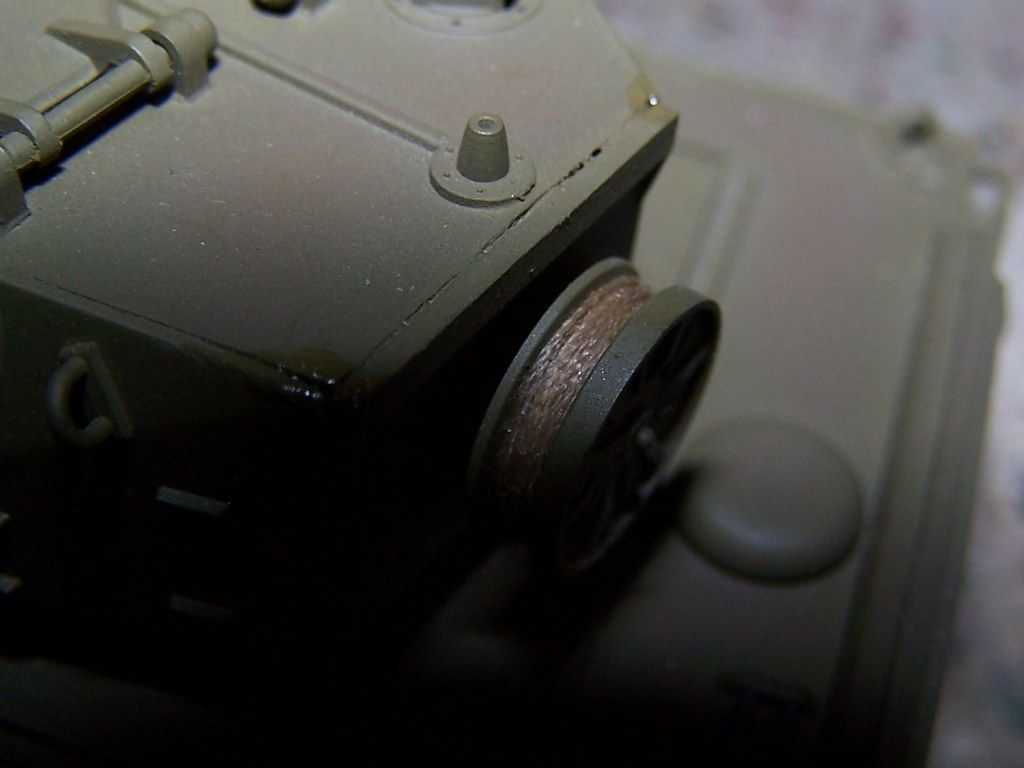
A spool on the rear of the turret just does not look right empty- I presume it is for commo wire, so I wound about 5 feet of thread around it and secured it all in place with thin super glue

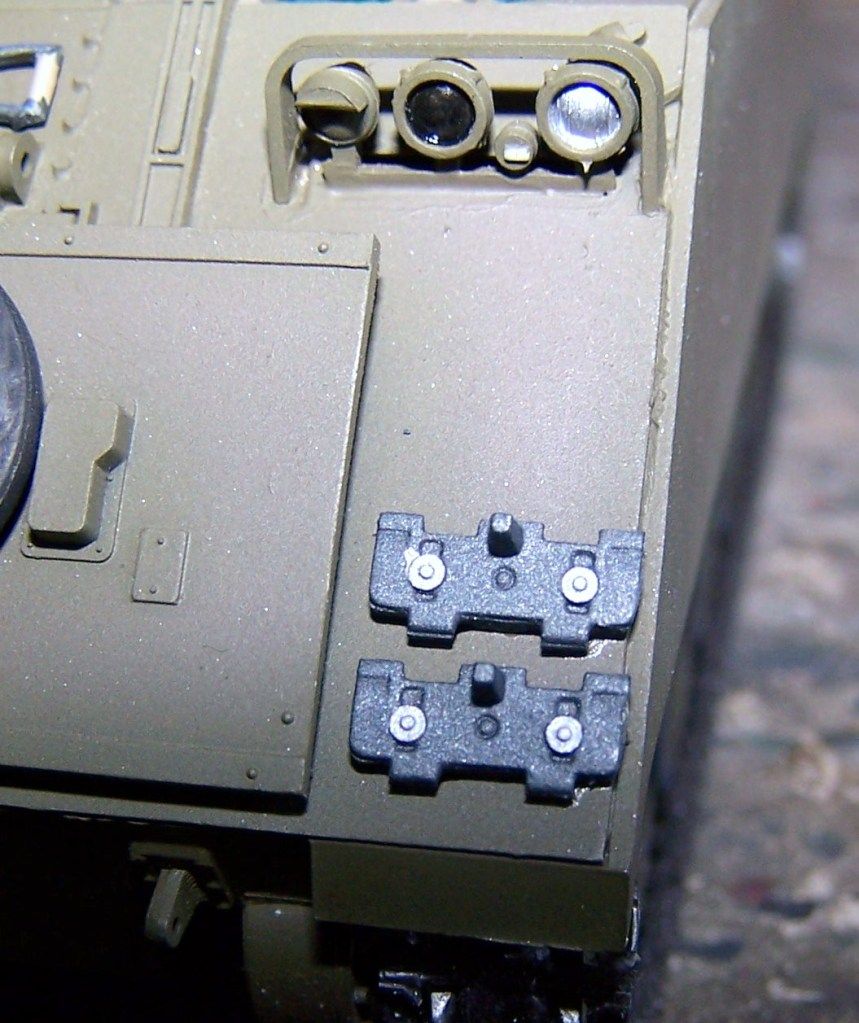
and then I glued the spare track shoes in place on the glacis after having painted them separately eons ago...

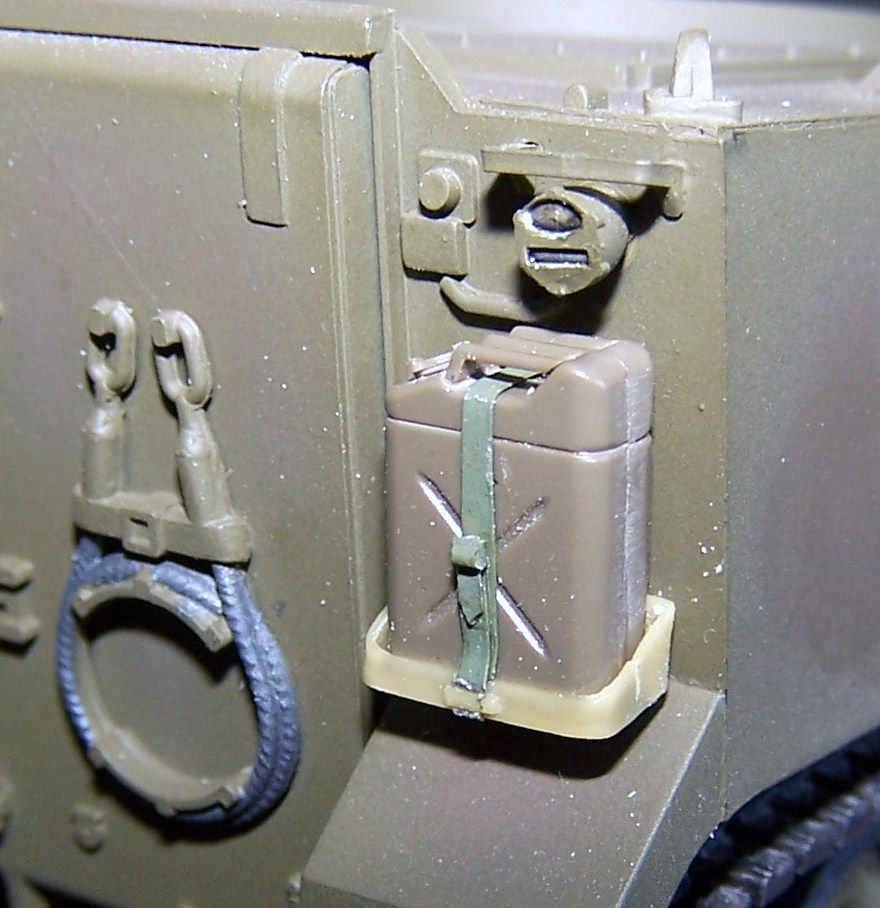
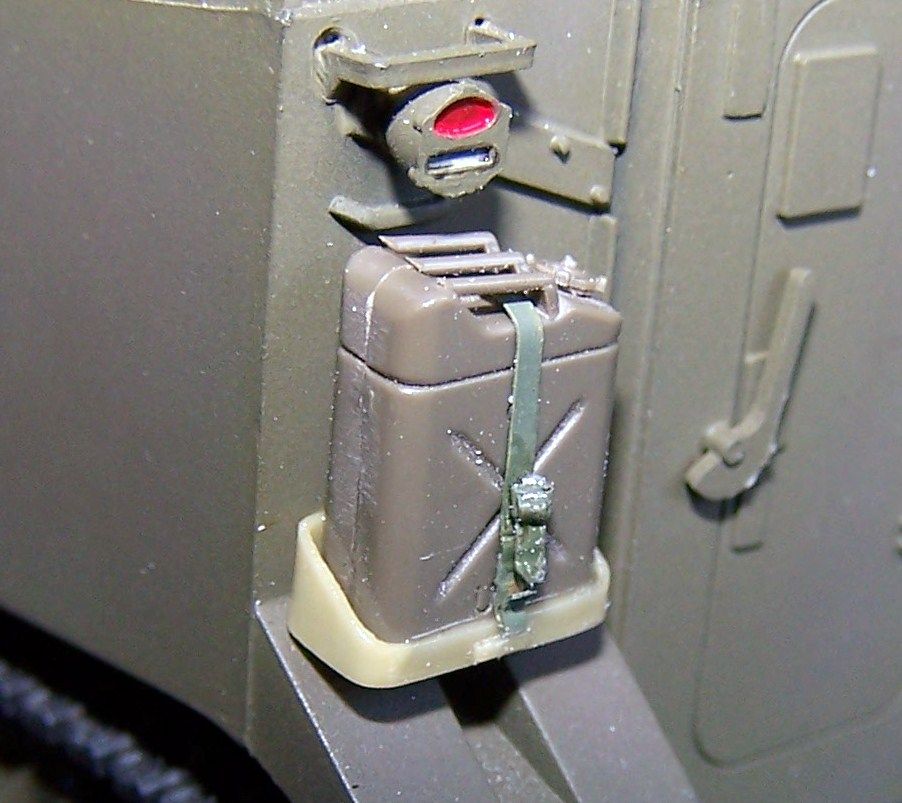
And now for the Phil H mentioned mods: first up the Aussies added racks for Jerry cans on to the back of the FSVs rather than the simple channel lip that was originally on 113s for that purpose. I scrounged a couple up from a Verlinden accessory set, some Jerry cans from a Tamiya set and added some lead foil tie down straps and Verlinden resin clamps.

and finally, Phil H advised that there was a second radio antenna mount, not included in the kit, on the right side of the turret. So I scratch built the mount from some sheet plastic, and then the antenna base from a bit of tube plastic and one of those round bits you clip off your model parts thinned appropriately...

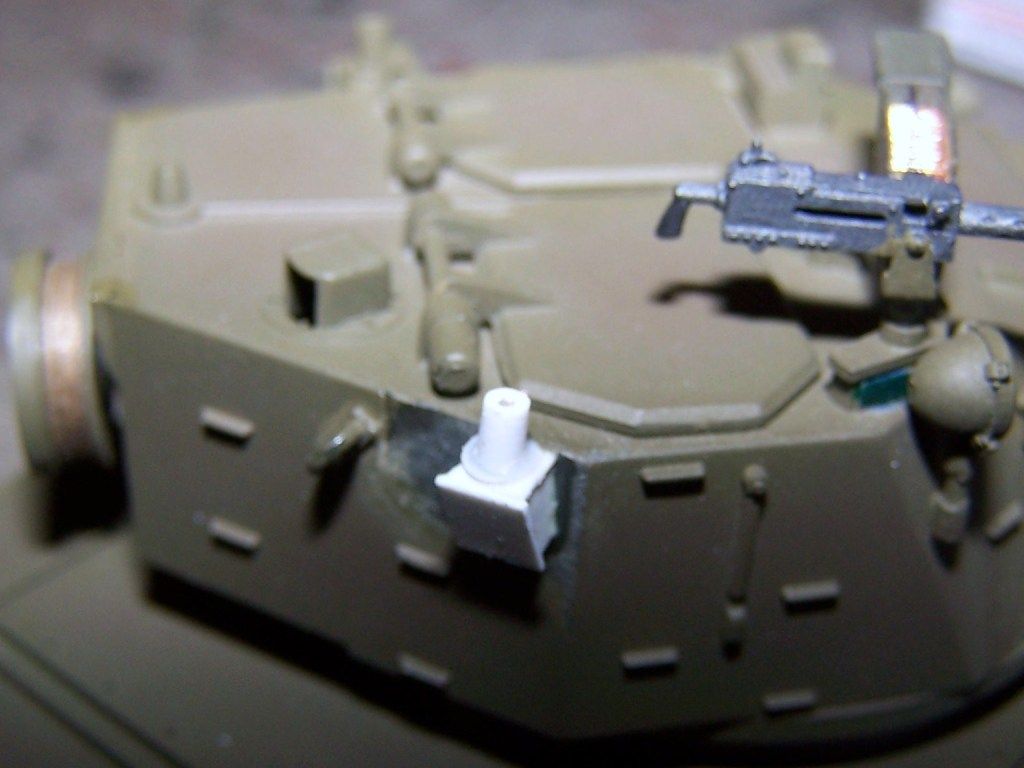
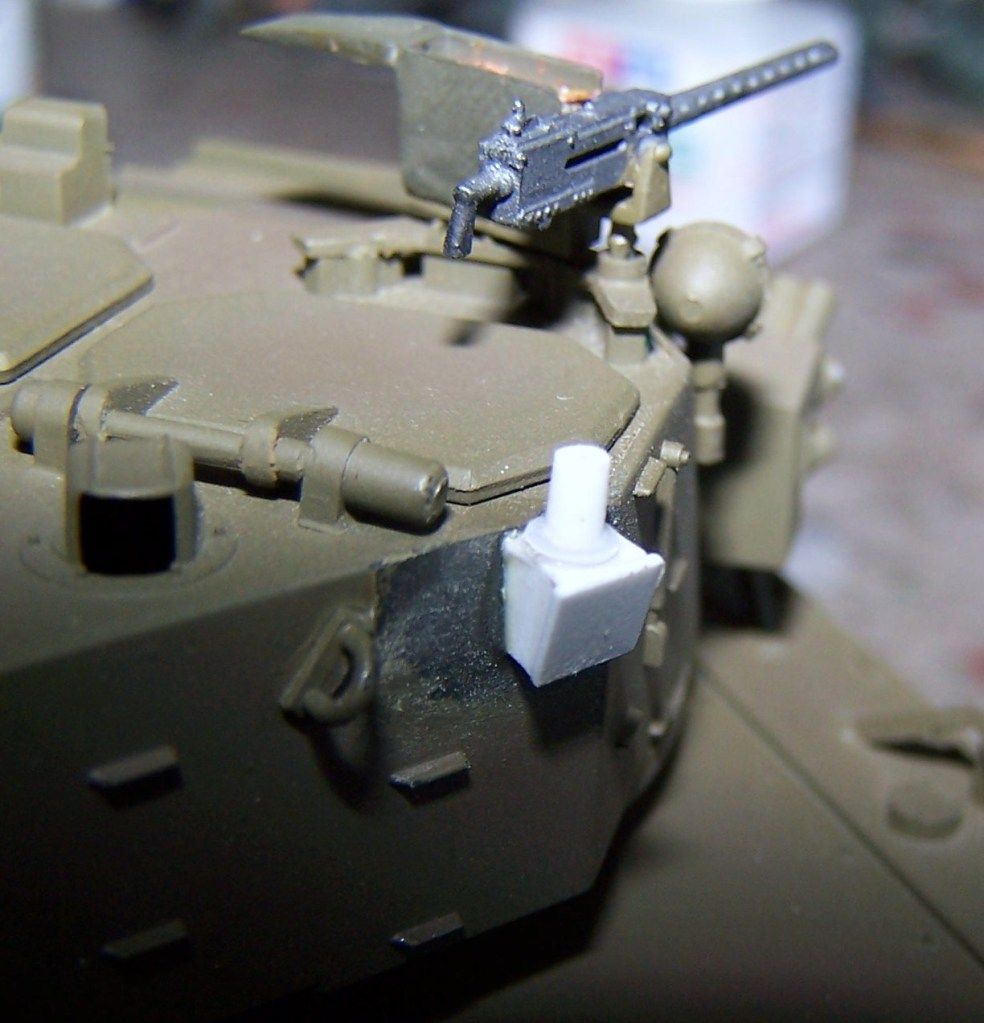
The one I scratch built pretty much matches the kit part and once painted should look the part... more to follow...


F is for FIRE, That burns down the whole town!

U is for URANIUM... BOMBS!

N is for NO SURVIVORS...

       - Plankton

LSM


  • Member since
    February 2010
  • From: New Jersey
Posted by 68GT on Monday, September 17, 2012 5:32 AM

The EF-111 kit isn't all that bad but the intake areas and the bomb bay doors need some work.  Otherwise it is the typical seam filling you would encounter on a Monogram kit.

On Ed's bench, ???


  • Member since
    April 2005
  • From: Australia
Posted by taxtp on Sunday, September 16, 2012 6:54 PM

Looking really good BSY, as expected. I won't say more  until you present the finished model.

That's a busy looking workbench.

Cheers

Tony

I'm just taking it one GB at a time.

  • Member since
    October 2008
  • From: italy
Posted by bsyamato on Sunday, September 16, 2012 6:19 PM

Last updates before final pictures:

The nose spear, intructions says to put on the other side.. wrong, and wrong diameter. On the real one this is not an antenna but refuelling probe Tongue Tied honestly i will leave the original piece, but on the correct side Embarrassed

Engine covers painted

wing lights reproduced with a drop of revell contacta clear

now resting for a night before last retouches

At the next

  • Member since
    October 2008
  • From: italy
Posted by bsyamato on Sunday, September 16, 2012 11:27 AM

I hear good things about this raven kit, nice to see one

  • Member since
    February 2010
  • From: New Jersey
Posted by 68GT on Sunday, September 16, 2012 11:03 AM

Lots of good work going on here and I'm glad to see a lot shelf queens getting dusted off.

I got back to work on my 1/72 Monogram EF-111A finally.  Masked the canopy and shot some paint over the last week.

Unfotunatly I knocked the pitot tube off and have to build a new one.

On Ed's bench, ???


  • Member since
    April 2006
  • From: Denver, Colorado
Posted by waynec on Sunday, September 16, 2012 10:25 AM

in a surprise, my CHALLENGER I (yes that one) took a first in post ww2 armor at local contest. (afv club M1126 STRYKER took second). there is hope for some of the polder ones still on the shelf.

Никто не Забыт    (No one is Forgotten)
Ничто не Забыто  (Nothing is Forgotten)


  • Member since
    October 2008
  • From: italy
Posted by bsyamato on Friday, September 14, 2012 6:07 PM

Thanx Kevin, hope to finish this wekeend

Here more updates

Engines intake covers

Also weathered wells , wheels and antennas and glued and "weighted"  wheels

rear engines covers

Just tonight filled front engine covers with milliput , tomorrow red and latest corrections.

At the next

  • Member since
    March 2010
  • From: Buffalo, NY
Posted by macattack80 on Thursday, September 13, 2012 10:17 PM

Looking great bsyamato!!!!  I still can't get over how nice that camo turned out.  Truly great work!

Kevin

[


  • Member since
    October 2008
  • From: italy
Posted by bsyamato on Thursday, September 13, 2012 5:11 PM

near to the end:

Well ddors on and wheels not yet glued

strted to glue antennas ..lots of them..

on topside all on

on the bottom too

left to scratcbuild covers for the engines intake/exhaust and minor adjusts Propeller

  • Member since
    October 2008
  • From: italy
Posted by bsyamato on Monday, September 10, 2012 4:25 AM

DJ these pictures are better Yes nice finished looking ! 

No pictures but yesterday finished to detail the main gear on the eb-66. Added retraction triangles , sanded and primed in grey. Painted also the black inside the vertical rudder decal lines.

Now just left to scratchbuild the main gear retraction actuators and the new compass on front gear. painting up last pieces and glue all toghether. Hope to finish all for this weekend Surprise

  • Member since
    July 2012
Posted by DJinFlorida on Sunday, September 9, 2012 10:20 PM

Thanks for all of the comments.

bsyamato, I put together an album on PhotoBucket with some larger pictures.

http://s1258.photobucket.com/albums/ii539/DJWeller72/Models%20By%20DJ/Corsair-Large/

-DJ

On the bench: 1/48 Avenger, 1/72 P40B
On daughter's bench: 1/72 ID4 Attacker
On wife's bench: 1/48 P40B
In the stash:  1/48 P-51D Mustang , 1/72 F4F-4 Wildcat, 1/48 Huey Hog

  • Member since
    April 2006
  • From: Denver, Colorado
Posted by waynec on Thursday, September 6, 2012 9:55 AM

i have an entire shelf unit with shelf queens. granted, they aren't stacked as tight as new boxed models. in the past i would hit a block, start something else, change interests and never get back to it. my modeling skills and confidence have improved greatly these past 18 months so i am working them in with new builds. currently on my shelf queen unit

1/72 uboat. 1/144 uboat, I-400, I-58, PZ-IIC, POTEMKIN, BORODINO, EMDEN, KONIG, M60A2 (from 1982), IDF M60 BLAZER (has length and link track but it's made of rubber band track material so it is very hard to keep together. it may hit a mine), ME-264 (hi bish), M4 MORTAR HALF TRACK, STG-III (from late '70s). most are at the paint stage and i may break out the badger patriot i got last year.

Никто не Забыт    (No one is Forgotten)
Ничто не Забыто  (Nothing is Forgotten)


  • Member since
    March 2010
  • From: Buffalo, NY
Posted by macattack80 on Thursday, September 6, 2012 7:48 AM

DJ, nice work on that Corsair!  I updated the front page with your completed model.

waynec, that challenger turned out great.  I really like the weathering.  It seems like you have more shelf queens than I have model kits.

bsyamato, Nice job building up the landing gear!  That panel wash turned out nice too. 

Kevin

[


  • Member since
    October 2008
  • From: italy
Posted by bsyamato on Wednesday, September 5, 2012 6:22 PM

Lots of details added but not yet finished Surprise

a weight test to try the strenght of main gear new elements

and starting to add details with aluminium stripes and plastic rods

the front gear was poor of details so i made some change

Pieces works correctly

and more details added

final test

and now going to test the bed.. at the next Sleep

JOIN OUR COMMUNITY!

Our community is FREE to join. To participate you must either login or register for an account.

SEARCH FORUMS
FREE NEWSLETTER
By signing up you may also receive reader surveys and occasional special offers. We do not sell, rent or trade our email lists. View our Privacy Policy.