SEARCH FINESCALE.COM

Enter keywords or a search phrase below:

Longest Day GB

264511 views
2863 replies
1 rating 2 rating 3 rating 4 rating 5 rating
  • Member since
    January 2013
Posted by BlackSheepTwoOneFour on Friday, April 25, 2014 9:06 AM

My eyes are too old to work on kits that small. LOL! Very nice build Stik!

  • Member since
    July 2004
  • From: Sonora Desert
Posted by stikpusher on Friday, April 25, 2014 11:42 AM

Thank you guys... it sounds like my little boat is a big hit ;-)


F is for FIRE, That burns down the whole town!

U is for URANIUM... BOMBS!

N is for NO SURVIVORS...

       - Plankton

LSM


  • Member since
    November 2009
  • From: SW Virginia
Posted by Gamera on Friday, April 25, 2014 1:06 PM

A big hit in a small package... Wink

"I dream in fire but work in clay." -Arthur Machen


  • Member since
    April 2003
Posted by shivinigh on Friday, April 25, 2014 1:48 PM

Great work Stik for such a small scale


  • Member since
    July 2004
  • From: Sonora Desert
Posted by stikpusher on Friday, April 25, 2014 3:24 PM

Well it's gonna put to big hits in EB's Destroyer some night if that thing ever shows up off of the beachhead ;)


F is for FIRE, That burns down the whole town!

U is for URANIUM... BOMBS!

N is for NO SURVIVORS...

       - Plankton

LSM


  • Member since
    February 2010
  • From: Berkeley CA/St. Paul MN
Posted by EBergerud on Friday, April 25, 2014 5:34 PM

Bish: Very nice dio. Foliage looks quite right. I know that it's a little irritating to paint and weather a tank to a good state and then throw branches on top and hide your work. Think history is on your side in this one. Just checked my "Closing with the Enemy", MIchael Doubler's justly famous book on how the US Army fought the NW European campaign from Normandy to almost Berlin. He emphasizes that the bocage and other forested terrain in Normandy (you would have found a lot of it near Caen also - a likely spot to look for a Panther) created a tactical nightmare because the Germans were almost invisible even up to a couple hundred yards. Any defending unit would have had a sector that would have included many good places to hide and to shoot from - the Normandy battlefield wasn't like Iwo Jima. So any tank near the front would very likely have been carrying foliage to attack advancing allied units and save itself from identification which meant air and artillery attack ASAP. Thus the biggest trouble facing the allies was finding the Germans - something that normally took getting shot at and even then you wouldn't be sure where the shots were from. A favored German tank tactic was to place a tank (very likely one or two - Normandy rarely saw concentrations unless counter attack was ordered) in a place where it could move a few yards and fire right down a road or large path - hence the desire to look like a bush.

I'd guess that it probably only took a few minutes for a crew to disguise a vehicle. So if a AFV was behind the line they might have parked it under trees or netting. After looking at a few zillion German tank photos in Normandy I was struck on how much more often German films show heavy foliage on tanks as opposed to photos. (I get this from my DVD collection on German weapons based on Geobbles' propaganda films. (The fact that the editors were able to cobble together volumes on every major German weapon gives you an idea of the thousands of miles of films that were made and captured by the allies.) The narrators continually contrast a AFV in the East to one in the West because the former wasn't covered with foliage as often. Goebbels' cameramen weren't shy about getting close to the front either. Still photos might be a different story - they were taken by the megaton but would have survived or gotten into print because of clarity etc - and I'm sure the bulk were taken in some place where a cameraman could take a shot without taking a shot.    

Eric


A model boat is much cheaper than a real one and won't sink with you in it.

  • Member since
    July 2004
  • From: Sonora Desert
Posted by stikpusher on Friday, April 25, 2014 5:50 PM

EB, it only takes about 10-15 minutes with an axe for a couple crew members to completely cover an AFV with branches. I have done it many times myself. And you update it every day or two with fresh branches to better blend in, replacing to older dying stuff. There are a few other tricks to the trade as well.

BTW, have you looked in the Bundesarchiv online photo section for reference photos? They have an incredible database full of official military photos in there. Just type in your search keywords and timeframe... In German... And boom, you get some great stuff.


F is for FIRE, That burns down the whole town!

U is for URANIUM... BOMBS!

N is for NO SURVIVORS...

       - Plankton

LSM


  • Member since
    February 2014
  • From: Michigan
Posted by silentbob33 on Friday, April 25, 2014 8:37 PM

I'm going to call the LCVP finished for this build.  I don't think I'll be able to get the figures and diorama finished by June, so I'll save that for the 1944 GB since I'll have more time.  Unfortunately, I still could not get the gunners to fit, so I'm leaving them out and will have to settle for the coxswain and Motor Mac.  This is the first sea-going kit I've made since I was in middle school, and I'm mostly pleased with the results.  I also didn't weather the bottom since it will eventually be covered by water effects and won't be seen.

On my bench: Academy 1/35 UH-60L Black Hawk

  • Member since
    July 2004
  • From: Sonora Desert
Posted by stikpusher on Friday, April 25, 2014 9:18 PM

Looks good to me from here ;-) If you're not gonna use the gunners, I might suggest taking one of their steel pots and swapping it out for the motor macs Dixie cup cover.


F is for FIRE, That burns down the whole town!

U is for URANIUM... BOMBS!

N is for NO SURVIVORS...

       - Plankton

LSM


  • Member since
    February 2014
  • From: Michigan
Posted by silentbob33 on Friday, April 25, 2014 9:21 PM

Thanks SP!  I tried getting one of the helmets to fit, but his head is a little too big for them.  I didn't think about raiding a box of spares my dad gave me though...might be something that'll fit in there...

On my bench: Academy 1/35 UH-60L Black Hawk

  • Member since
    July 2004
  • From: Sonora Desert
Posted by stikpusher on Friday, April 25, 2014 9:28 PM

Try filing the edges of the top of his head down a bit ;-)


F is for FIRE, That burns down the whole town!

U is for URANIUM... BOMBS!

N is for NO SURVIVORS...

       - Plankton

LSM


  • Member since
    February 2014
  • From: Michigan
Posted by silentbob33 on Friday, April 25, 2014 9:36 PM

I found one that I think will fit, I'll get it put on tomorrow when I have a chance.  Thanks for the advice!

On my bench: Academy 1/35 UH-60L Black Hawk

  • Member since
    May 2005
Posted by pyrman64 on Saturday, April 26, 2014 7:30 AM

Bob: Excellent job on the landing craft......which one of those sailors is Lt. Eddie Heimberger? Huh?

Greg H

"There is many a boy here today who looks on war as all glory, but, boys, it is all hell." Gen. Wm T. Sherman (11 April 1880, Columbus, Ohio)

  • Member since
    December 2002
  • From: Bury St Edmunds, Suffolk, England
Posted by Bish on Saturday, April 26, 2014 8:51 AM

Bob, excellent work on this, a really nice looking build. And look forward to seeing the finished dio in the 44 GB.

Am I right in thinking this is your first completed GB build.

I am a Norfolk man and i glory in being so


On the bench: Airfix 1/72nd Harrier GR.3/Fujimi 1/72nd Ju 87D-3

  • Member since
    February 2014
  • From: Michigan
Posted by silentbob33 on Saturday, April 26, 2014 8:52 AM

Thanks Pyrman and Bish!  And this is my first completed Group Build.  I'm glad I signed up, I can't believe how much I learned from this.  I accidentally pulled the Motor Mac's head off when I was trying to get the dixie cup hat, so I just replaced it.  I'm not sure why I didn't think of doing that with one of the extras in the box the first time...

On my bench: Academy 1/35 UH-60L Black Hawk

  • Member since
    February 2010
  • From: Berkeley CA/St. Paul MN
Posted by EBergerud on Saturday, April 26, 2014 1:06 PM

Good tip on the Bundesarchiv. My German isn't as good as it was, but I still dream in it sometimes. Curse Oxford University Press for selling the official German histories "auf English" for nearly $300 a volume. Crime against military history junkies.

Eric


A model boat is much cheaper than a real one and won't sink with you in it.

  • Member since
    April 2006
  • From: ON, Canada
Posted by jgeratic on Monday, April 28, 2014 12:11 AM

silentbob33

Thanks Pyrman and Bish!  And this is my first completed Group Build.  I'm glad I signed up, I can't believe how much I learned from this.  I accidentally pulled the Motor Mac's head off when I was trying to get the dixie cup hat, so I just replaced it.  I'm not sure why I didn't think of doing that with one of the extras in the box the first time...

That turned out really good, the figures definitely add to it.  Yes

Looking forward to what you do with it in a diorama setting for the '44 GB.

regards,

Jack

  • Member since
    November 2009
  • From: SW Virginia
Posted by Gamera on Monday, April 28, 2014 11:28 AM

Thanks awesome Bob! I think I can hear the water sloshing around her hull!

"I dream in fire but work in clay." -Arthur Machen


  • Member since
    February 2014
  • From: Michigan
Posted by silentbob33 on Monday, April 28, 2014 11:30 AM

Thanks guys!

On my bench: Academy 1/35 UH-60L Black Hawk

  • Member since
    March 2014
Posted by BarrettDuke on Monday, April 28, 2014 12:33 PM

OK, Time for some more pics. I'm about ready to assemble everything. Here are some pics of the components. There are still some things to do. Taking pictures always reveals new things that aren't right, too. So, no doubt, I've got some stuff still do here and there. Generally, the fit on this model has been pretty good. The lower level, driver's compartment and engine compartment aren't worth displaying, though. The engine is essentially two pieces with a manifold that glues on. No hoses to the radiator or connection to the exhaust. Seems really weird to me. I have one small piece to add to the muffler on the outside that is supposed to lead to the engine exhaust, but there's nothing on the inside that would connect it.

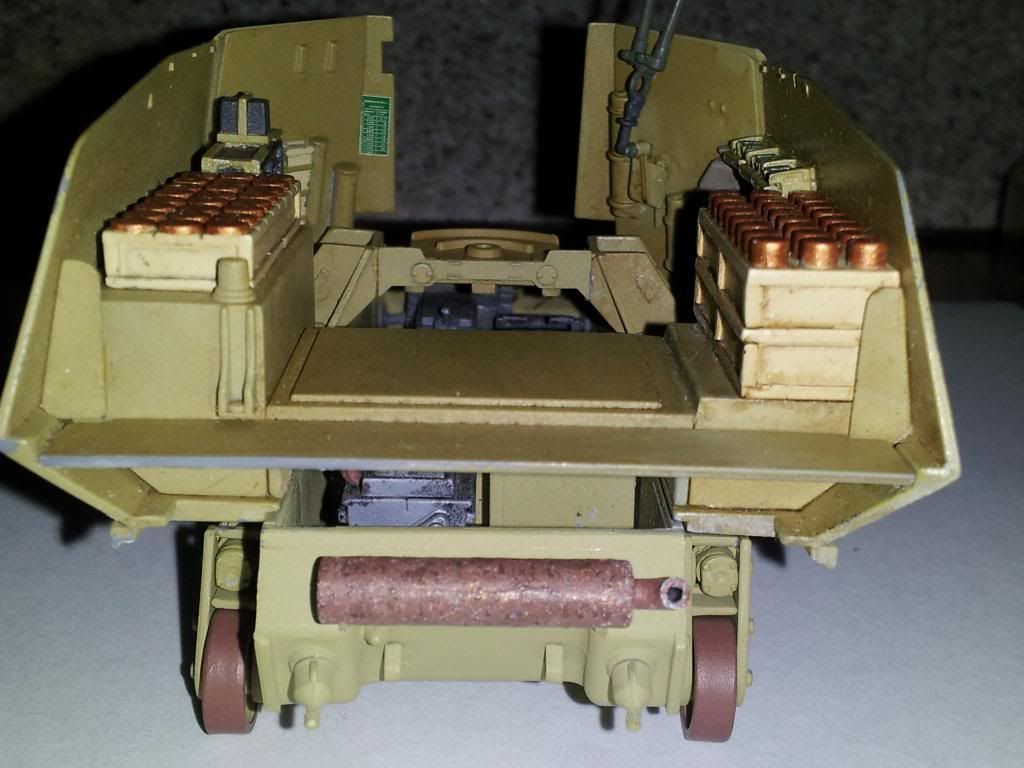
Here's looking down into the fighting compartment. You can see the lower compartment a little as well:

This is looking in from the back. I didn't put the rear panel on yet so I could get a good pic of the inside from this angle. I see the back floor panel is warped a little. I don't know if I can fix that now:

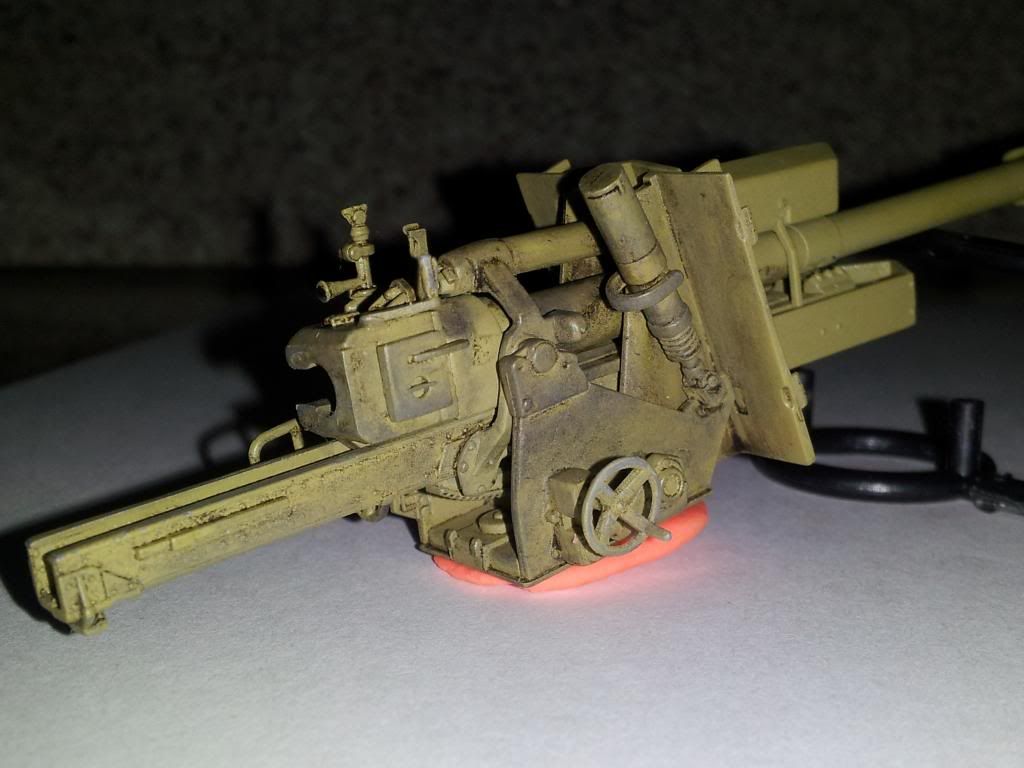
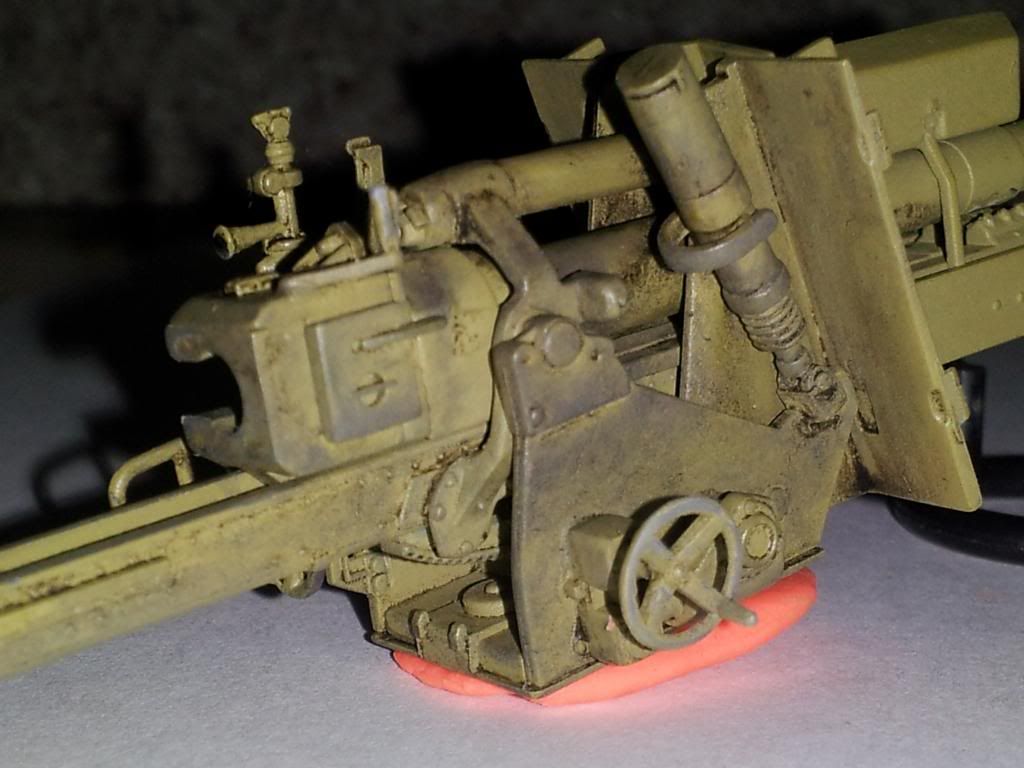
Here are some pics of the gun before I mount it. The weathering, etc is just done on the part that's inside the compartment. I figure what's outside will be different. I did two filters, one with dark yellow and one with dark grey, then I did a wash with Vandyke Brown oil paint and mineral spirits. It came out pretty much like I wanted it to.

And here's the other side:

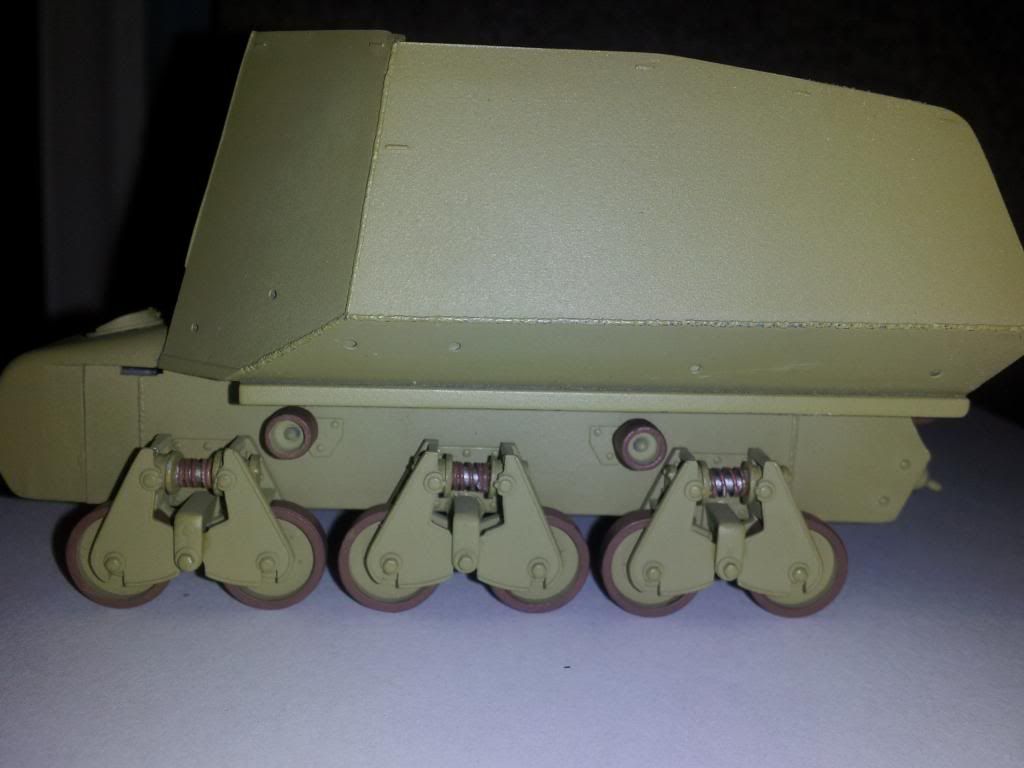
FInally, here is the side view as I get ready to do the camo, weather it, and put on the tracks. I still have a few things to attach on the front and the rear, too.


  • Member since
    April 2003
Posted by shivinigh on Monday, April 28, 2014 12:43 PM

nice work there Bob. The figures really add nicely to whole thing.

Barretduke. Looking really good there. I like the weathering on the intior and can't wait to see the how the outside looks


  • Member since
    December 2002
  • From: Bury St Edmunds, Suffolk, England
Posted by Bish on Monday, April 28, 2014 12:47 PM

Nice work there Barrett. That back piece doesn't look to warped, will the rear cover that.

I am a Norfolk man and i glory in being so


On the bench: Airfix 1/72nd Harrier GR.3/Fujimi 1/72nd Ju 87D-3

  • Member since
    March 2014
Posted by BarrettDuke on Monday, April 28, 2014 12:56 PM

Thanks, Bish. Yes, the rear piece covers it just fine. So, I don't think it will even matter. The rear panel leans in over that space anyway. It wouldn't be noticeable if it were warped twice as bad. :-)

  • Member since
    March 2014
Posted by BarrettDuke on Monday, April 28, 2014 12:59 PM

Thanks, Shivinigh. I am learning as I go with this stuff. I never did anything like this before. When I was a kid, I glued the stuff together, maybe slathered on a little paint, and that was pretty much it. These new techniques are fun but time consuming and exacting.

  • Member since
    December 2002
  • From: Bury St Edmunds, Suffolk, England
Posted by Bish on Monday, April 28, 2014 1:13 PM

That's ok then. To be honest, it doesn't look bad at all, I don't think I would have noticed if you hadn't mentioned it. What external scheme are you going to do.

I am a Norfolk man and i glory in being so


On the bench: Airfix 1/72nd Harrier GR.3/Fujimi 1/72nd Ju 87D-3

  • Member since
    March 2014
Posted by BarrettDuke on Monday, April 28, 2014 1:39 PM

External scheme....that's a good one. I don't have a clue, yet. :-) I'm pretty sure I don't want to do hard edged camo, though. And I don't want to do winter,especially since this is for a June 1944 time frame, as I recall. So likely some kind of typical disruptive pattern with dark green and red brown stripes.

  • Member since
    December 2002
  • From: Bury St Edmunds, Suffolk, England
Posted by Bish on Monday, April 28, 2014 1:50 PM

Yes, not sure if its the same kit, but I have seen a couple of reviews showing the instructions and the scheme for a vehicle of the 21st Pz Div which looks really nice.

I am a Norfolk man and i glory in being so


On the bench: Airfix 1/72nd Harrier GR.3/Fujimi 1/72nd Ju 87D-3

  • Member since
    March 2014
Posted by BarrettDuke on Monday, April 28, 2014 1:59 PM

The instructions for this Bronco Models kit has color pics for all four sides, so that would make it pretty easy to do something along those lines. I get nervous when I think about trying to replicate a specific vehicle, though. It's too hard to get everything exact.

  • Member since
    July 2004
  • From: Sonora Desert
Posted by stikpusher on Monday, April 28, 2014 2:06 PM

BD, that is looking real sharp! Nice weathering work on the gun.


F is for FIRE, That burns down the whole town!

U is for URANIUM... BOMBS!

N is for NO SURVIVORS...

       - Plankton

LSM


  • Member since
    December 2002
  • From: Bury St Edmunds, Suffolk, England
Posted by Bish on Monday, April 28, 2014 2:18 PM

BarrettDuke

The instructions for this Bronco Models kit has color pics for all four sides, so that would make it pretty easy to do something along those lines. I get nervous when I think about trying to replicate a specific vehicle, though. It's too hard to get everything exact.

I wouldn't worry about getting 100% exact, especially when it comes to German camo. I simply try and get as close as I can. My Panther instructions only came with the scheme on front back and one side. I had a couple of images of a tank in the same scheme from the same unit, but as with mine, there were no turret numbers, so I can't be sure if that scheme is based on that vehicle. So for the top and other side, I had to wing it and take a best guess.

I am a Norfolk man and i glory in being so


On the bench: Airfix 1/72nd Harrier GR.3/Fujimi 1/72nd Ju 87D-3

JOIN OUR COMMUNITY!

Our community is FREE to join. To participate you must either login or register for an account.

SEARCH FORUMS
FREE NEWSLETTER
By signing up you may also receive reader surveys and occasional special offers. We do not sell, rent or trade our email lists. View our Privacy Policy.