SEARCH FINESCALE.COM

Enter keywords or a search phrase below:

Abrams II Group Build

18983 views
117 replies
1 rating 2 rating 3 rating 4 rating 5 rating
  • Member since
    March 2009
  • From: Middletown, OH
Posted by Buffirn on Tuesday, July 29, 2014 9:04 PM

I did get one Abrams done, the 1/72 AMT M-1.  I have two more that won't make the deadline for various lousy reasons.  In any case, it was fun and I still need to finish those two models and about a dozen others!

Jim Williams


  • Member since
    April 2005
Posted by Thunderbolt379 on Saturday, May 31, 2014 7:23 PM

Phil -- thanks for the feedback. You might not believe it, but those washes are actually there. I used black and umber oils suspended in white spirit, but they sooo don't stand out. The white spirit is not really enthusiastic about the capillary action thing, not compared to the Testor enamel thinner I used to use, but can't seem to find locally any more. If I can find some, I agree those details need a much clearer accenting. Also, thanks for the reference pic, I thought I could remember that being an optical glass, but couldn't get a clear look in my reference collection and ended up holding off until I forgot all about it...

What do you think of the dust work -- okay?

Cheers, and thanks,

M/TB379

http://worldinminiature.blogspot.com/

  • Member since
    August 2005
  • From: Sydney, Australia
Posted by Phil_H on Saturday, May 31, 2014 6:43 AM

Looking good Mike.

If I can offer a few suggestions, perhaps some pin washes to give definition to the access panels on the engine deck, the bores of the smoke grenade launchers and between the skirt panels.

Also, if you have a fine enough brush and a steady hand, paint in the lens of the commander's MG sight. (The commander's MG can be fired remotely from inside when buttoned up.)

It looks like this:

http://data4.primeportal.net/tanks/jeff_derosa/m1a1_details/images/m1a1_details_014_of_435.jpg

PS: I may have mentioned it before, but the raised corners on the front CIPs represent the Velcro strips that hold them on when reversed and are often seen as black.

  • Member since
    April 2005
Posted by Thunderbolt379 on Saturday, May 31, 2014 3:02 AM

Thanks Rob, Bugsy and Phil -- I did some more online searching and compared shots, and finally settled on mixing a slightly lightened shade of NATO green to approximate what I'm seeing in many photos -- hopefully I got close!

I'm calling her done as of today. The radio masts are up, tow cables on, and she's dusted -- I'm not sure if the dust really came out well, I can always wash off the pigments and go again if I feel it's overdone or not realistic. I can say that this old Trumpy fought me to the very last, but she's finally done and dusted (yes, pun, I know...) and in the display case alongside her less troublesome Tamiya siblings. Without further ado, here's the evidence, and loads of things will probably jump out of the photos when they don't to the naked eye!

Comments welcome, guys! I did some dust work on the forward CIPs but it seems invisible in the shots. The decals were thin and behaved pretty well, though they were a bit sticky and fairly shiny. I might add some stowage at a later date.

Cheers, hope it passes muster,

Mike/TB379

http://worldinminiature.blogspot.com/

  • Member since
    August 2005
  • From: Sydney, Australia
Posted by Phil_H on Wednesday, May 28, 2014 1:00 AM

Thunderbolt379
I tried searching on the M1's IFF system but got no matches, and with regard to 'panels' the search results seemed mainly concerned with the turret roof blow-out panels.

You may get better results searching for "M1A1 CIP" (Combat Identification Panel) Smile

Note that the louvered panels typically mounted on the turret sides slip into a frame. There is a louvered side and a "plain" side. When not required, they simply slide them up out of the frame, flip it so the plain side is facing outwards and drop it back in the frame.

  • Member since
    March 2013
Posted by MikeyBugs95 on Tuesday, May 27, 2014 10:19 PM

I've finally made "progress" on the Abrams I'm building which mean I'm back into this build. Actually since I had stopped here I had added some stowage that I had including some MRE's (both Tamiya and the DML paper), ruck sags and day bags, and I'll be adding some crew weapons after all the bags are on. I also applied a few decals before I had gotten Pledge and now that I have Pledge and have applied it, I can add more decals and they'll stay. Now to apply some Pledge to all the kits that will be getting decals soon.

Thunderbolt: I did a quick search and came up with a few things: First is Echelon decals' sheet on the Abrams. It includes a few tanks in NATO colors:

Next was this:

As well as this:

And this too:

Unfortunately all I can give is what I find off of Google...

 In progress:

CAD:

1/35 SINCGARS ICOM/ASIP; 1/35 Flat screen TVs; 1/35 tactical light that I shall reveal later Devil

Models:

1/35 DML M4A1 DV; AFV Club M18 Hellcat; DML StuG IV; DML Armored Jeep w/ .50 cal; Panda Cougar 4x4 MRAP; Academy M3A1 Stuart; 1/700 Midship Models USS Miami; 1/700 Skywave Rudderow Destroyer Escort

  • Member since
    April 2005
Posted by Thunderbolt379 on Tuesday, May 27, 2014 9:30 PM

In addition -- I took a careful look at the box art and the panel toward the viewer is nested completely within a green area of the camo but is certainly a different shade -- it looks like Forest Green. Would the panels be the same colour each side, or the color closest to the nearest major camo area, respectively? I tried searching on the M1's IFF system but got no matches, and with regard to 'panels' the search results seemed mainly concerned with the turret roof blow-out panels.

M/TB379

http://worldinminiature.blogspot.com/

  • Member since
    April 2005
Posted by Thunderbolt379 on Tuesday, May 27, 2014 6:32 PM

Hi Rob -- thanks for the info! The skate ring has since been painted into dark metal, but I wasn't sure about the IFF panels. The kit instructions and box art show the camo lapped over them, and I also found photos of built up models with them in a distinct shade, but photos of the real thing I've found so far are unclear -- either light conditions or dust/dirt obscuring them. Do you remember which exact shades they were supplied in? Were they NATO colors or US Federal Standard shades? I would love to get this detail correct (I should have replaced them with thin stock sheet to get the depth right too -- c'est l'vie! or should I say, c'est l'guerre!

Cheers, Mike

http://worldinminiature.blogspot.com/

  • Member since
    December 2002
  • From: Fort Knox
Posted by Rob Gronovius on Tuesday, May 27, 2014 9:34 AM

Mike, nice job on the Abrams. I noticed you painted a couple of things that you shouldn't have. First the two square panels on the turret face are IFF panels and come either in green or tan. They aren't painted because it would defeat the purpose of the thermal signature. The other thing is the loader's skate ring. That flat semi-circle should be a bare dark metal.

  • Member since
    April 2005
Posted by Thunderbolt379 on Tuesday, May 27, 2014 9:19 AM

Hi guys, it's been a while since there was action on this thread but there's still a month to go before the scheduled end of the second Abrams build and I hope there's some interest in making a dive at finishing some projects. I've made a run on mine, with the decals completed today and most final fittings added. I have two detail parts left to add, plus the radio masts, and a round of pigment work for dust and carbon on the rear grills, then I'll be ready to call this one done.

PhilH -- I was sure I responded to you way back, but that must have been the period when I couldn't log on, and I didn't get the chance to comment before it went out of my head. That would have been a great addition and I had just the right angle rod to do it with, but ... as it's after painting, I think I'll let it be -- and remember that trick for next time, as there'll always be another Abrams coming along.

Cheers, Mike/TB379

http://worldinminiature.blogspot.com/

  • Member since
    August 2005
  • From: Sydney, Australia
Posted by Phil_H on Monday, April 28, 2014 11:13 AM

Perhaps it's a little late, but you might consider adding a short length of L shaped styrene to represent the wiring conduit that runs between the APU adaptor and the connector block at the front of the left blow-out panel on the top of the turret.

It looks like this: http://data3.primeportal.net/tanks/marc_peters/m1a1/images/m1a1_25_of_71.jpg

  • Member since
    April 2005
Posted by Thunderbolt379 on Monday, April 28, 2014 3:16 AM

Wash and drybrush stage underway today, and I unmasked the turret ring. The drybrush seems a bit heavy by my own standards (but this is my first time using oils), and the wash is not as distinct as it usually is (possibly because it's going over a dark scheme, plus I'm using white spirit instead of Testor enamel thinner as the carrying medium, which seems to behave a little differently).

Here's the evidence:

If the drybrushing still looks too heavy tomorrow, I'll use thinner to remove some, oils should still respond to the chemistry by then. I can go heavier on the dirt as well, it looks like she should have a spotty effect of dirt overall. Then on to detail painting, lights, barrels, that sort of thing, mounting the stowage cans and tact board, decals and antennas, a final working with pigments for dust, and she's done...

M/TB379


http://worldinminiature.blogspot.com/

  • Member since
    April 2005
Posted by Thunderbolt379 on Sunday, April 27, 2014 12:27 AM

Okay, with the IT problems sorted, here's the update I was trying to do a couple of days ago, brought up to date with the current session:

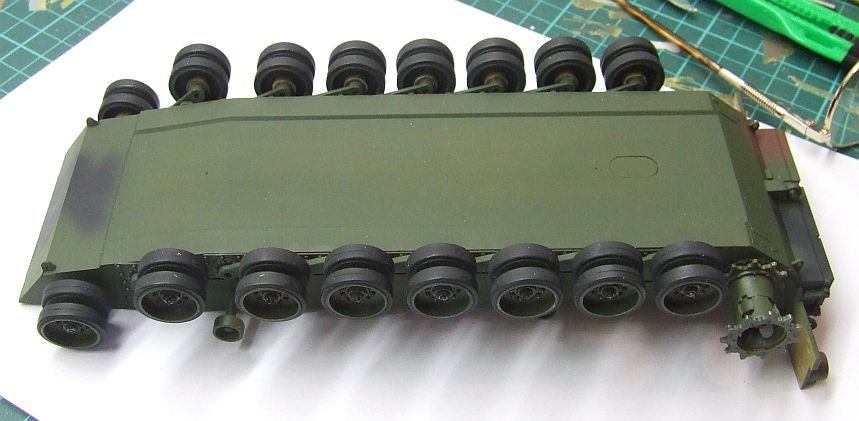
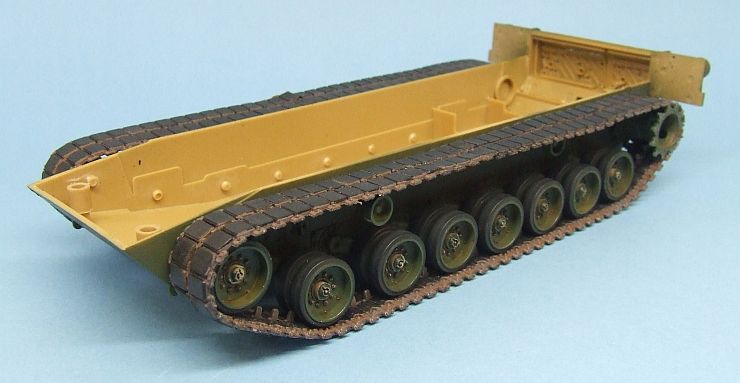
Right, I had a chance to make some progress. The wheels went on, a slow and unsatisfactory process -- if the retaining caps had a) fitted the axles width-wise, and b) fitted the hubs depth-wise, it would have been a snap, but as it is the axles had to be filed and nothing would get the retainers to recess properly into the wheels. In the end, I've just ignored the problem. Here's the running gear mounted:

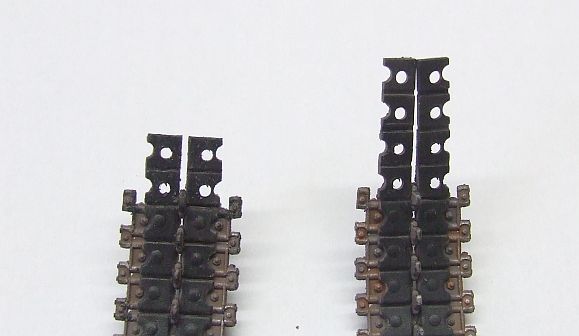
Next, the tracks had to be shortened, and as they were set up with a  four-plate mating area, I basically trimmed the ends by two plates. Here's each end in comparison:

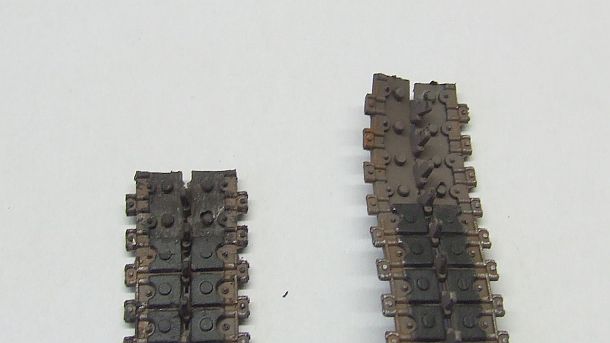
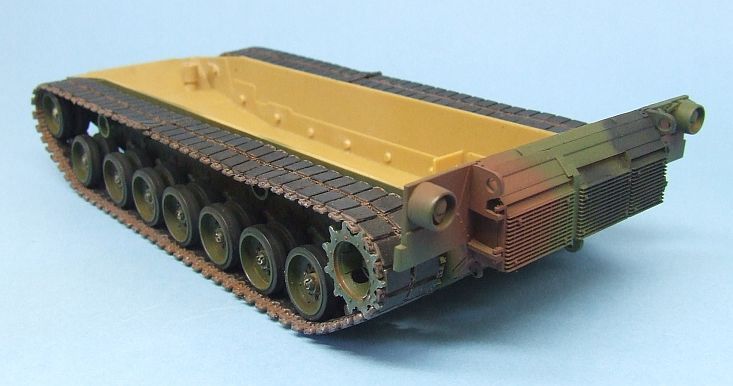
It worked pretty well, although I have read that the right hand side needs only one plate removed, I had removed two before I thought to double check -- no matter, the length was right. Here is the finished lower hull set up with tracks installed:

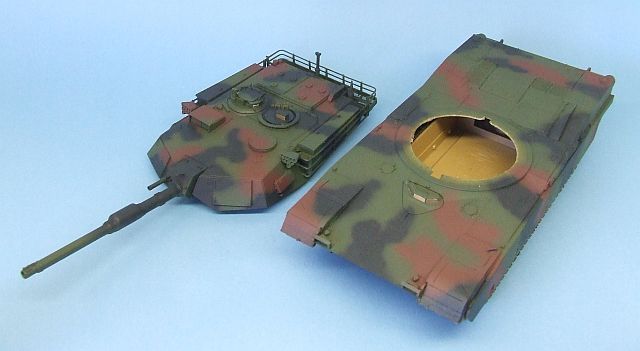
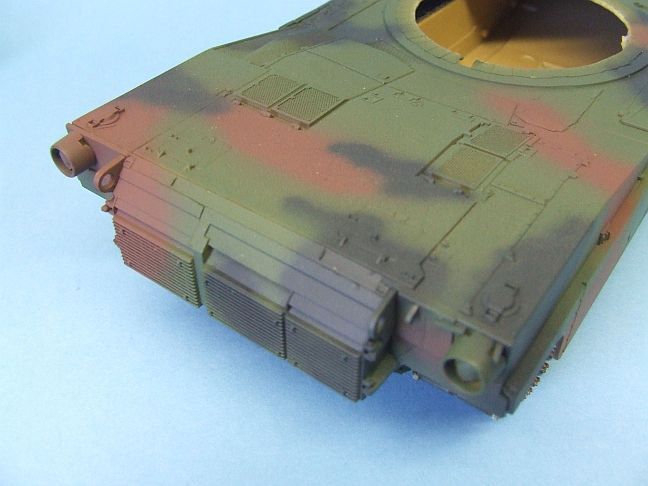
Today I joined the hulls halves, snugging the top down onto the bottom with superglue. The fit is close enough to get by, though the rear juncture needed a bit of squeezing and fiddling. Next, I loaded up the three NATO shades and spotted the camo over the joints, which is where the project rests at the moment:

While the black and green were in the airbrush, I finished/tidies up the camo on the AS-90 for have Gun Will Travel III, another project on a mid-year finish date.

I think I'll forego the fade coat. It would be probably buff at 5% paint to thinner ratio, misted on from a  distance, but I need to service my AB, it's not quite up to speed for a job like that, and I'm low on thinners anyway, so I might let it be and cruise to the finish on the assumption that this animal is not long out of the paint shop. So, on to wash and drybrush phases...

M/TB379

http://worldinminiature.blogspot.com/

  • Member since
    April 2005
Posted by Thunderbolt379 on Saturday, April 26, 2014 11:48 PM

Done -- and it worked! PHEW!!!! Thanks for the tip, Phil!

M/TB379

http://worldinminiature.blogspot.com/

  • Member since
    August 2005
  • From: Sydney, Australia
Posted by Phil_H on Saturday, April 26, 2014 11:42 PM

Thunderbolt379
No luck yet -- I found a security thing where you could enter trusted sites, did so and restarted, but no rich format tools yet... M/TB379

Under "tools" in your browser menu above (or if you hit the "settings" gearwheel icon at the top right below the red "X") you will find a selection "Compatibility view settings" If you click on this, you will have an open entry box captioned "Add this website". Enter "finescale.com" (less quotes) and hit the "add" button beside.


  • Member since
    April 2005
Posted by Thunderbolt379 on Saturday, April 26, 2014 9:21 PM
No luck yet -- I found a security thing where you could enter trusted sites, did so and restarted, but no rich format tools yet... M/TB379

http://worldinminiature.blogspot.com/

  • Member since
    April 2005
Posted by Thunderbolt379 on Saturday, April 26, 2014 5:41 PM

Thanks, man! I'm on a PC type machine -- whereabouts did you find that routine? Control Panel, View Settings, something along those lines? It's disturbing to have improper access to FSM after all these years! You're right, too, the machine did a round of updates just before the routines vanished...

M/TB379

http://worldinminiature.blogspot.com/

  • Member since
    October 2005
  • From: New Port Richey
Posted by deattilio on Saturday, April 26, 2014 9:09 AM

Thunderbolt379

Okay, back from a restart, let's see if I can get to rich format:

Nope, nothing there. I'll have to try a different terminal, there's nothing visible to reconfigure... M/TB379

 
I had the same problem after the computers did auto updates.  You have to add finescale.com to Compatibly View Settings and the rich text formatting returns; I came to this after quite some time of aggravation.


WIP:
Trying to get my hobby stuff sorted - just moved and still unpacking.


"Gator, Green Catskill....Charlie On Time"


  • Member since
    April 2005
Posted by Thunderbolt379 on Saturday, April 26, 2014 8:21 AM

Okay, back from a restart, let's see if I can get to rich format:

Nope, nothing there. I'll have to try a different terminal, there's nothing visible to reconfigure... M/TB379

http://worldinminiature.blogspot.com/

  • Member since
    April 2005
Posted by Thunderbolt379 on Saturday, April 26, 2014 8:08 AM
It's not making any difference at this end... GRRR, problem here! Maybe I'm not seeing the subroutine, I'll try a fresh reboot... Pity, I had updates ready to post, I've got the tracks on this beast today. M/TB379

http://worldinminiature.blogspot.com/

  • Member since
    December 2002
  • From: Fort Knox
Posted by Rob Gronovius on Saturday, April 26, 2014 8:07 AM

Thunderbolt379

The more I think about it, the more I think Tamiya got it right forty years ago with their traditional polycap mounting system. If this kit was a Tamiya it would have been finished last year, but Trumpeter's idea of engineering back in these days (2007, I think) leaves so much to be desired that it will drag on to the bitter end.

M/TB379

Tamiya's Abrams dates back to the 1980s. Trumpeter's is from 2002. Trumpeter copied a combined kit taking elements of Tamiya's motorized M1A1 with those of Dragon's more up-to-date M1A1HA to create a more accurate, but poorer model.

  • Member since
    May 2005
Posted by pyrman64 on Saturday, April 26, 2014 7:31 AM

They are there....you might want to either hit "refresh" (F5) or clear your cache.

Greg H

"There is many a boy here today who looks on war as all glory, but, boys, it is all hell." Gen. Wm T. Sherman (11 April 1880, Columbus, Ohio)

  • Member since
    April 2005
Posted by Thunderbolt379 on Saturday, April 26, 2014 2:14 AM
WHAT is wrong with the FSM forums??? The rich text and image importation tools have all vanished, as has the WYSIWYG editing environment... I don't think uploads beyond quick comments are going to be possible until it's working! M/TB379

http://worldinminiature.blogspot.com/

  • Member since
    April 2005
Posted by Thunderbolt379 on Friday, April 25, 2014 7:51 AM

Oh, and the tracks are too long. They'll need to be shortened by a link or two to develop a suitable tightness. Compare this to Trumpeter's three kits based on the common chassis of the 122mm MBRL, Type 83 SPG and Type 89 Tank Destroyer -- the tracks were at least three links too short and nothing would make them stretch and fit. No wonder they did an individual link set for those, there must have been lots of unfinished kits out there as builders tried to cadge spare track from the company to cannibalise for lengthening...

M/TB379

http://worldinminiature.blogspot.com/

  • Member since
    April 2005
Posted by Thunderbolt379 on Friday, April 25, 2014 2:32 AM

Well, after a quick trip to the UK and back, and finishing all teaching related paperwork this afternoon (for the moment) I was at last able to get to grips with the HA. I sprayed the wheel retaining hubs into NATO green and began work mounting the running gear. I have to say, cheap as this kit was, it wasn't worth it. A better engineered kit would go together when you want I to, this one -- despite having the highest detail level of any Abrams out there -- is the most obstructing, uncooperative build I've braved in many years.

The wheels are held in place by the central hubs, which are a softer vinyl-like plastic, inserted from the outside as retainers, except they don't fit. They neither fit over the axles, requiring drilling of the retainers and filing of the axles, nor sit snuggly into the wheels, where a moulding lip compels them to sit visibly too far out. I have two of the 16 done so far. Oh, and the drive sprockets required the mounting stubs to be filed down and the axle holes drilled out, because the peg and the hole were simply two different sizes.

The more I think about it, the more I think Tamiya got it right forty years ago with their traditional polycap mounting system. If this kit was a Tamiya it would have been finished last year, but Trumpeter's idea of engineering back in these days (2007, I think) leaves so much to be desired that it will drag on to the bitter end.

I had to stop work and have a rant for a few. Now I'll do another hub...

M/TB379

http://worldinminiature.blogspot.com/

  • Member since
    May 2005
Posted by pyrman64 on Monday, April 14, 2014 10:51 AM

It's looking good, Mike.

Greg H

"There is many a boy here today who looks on war as all glory, but, boys, it is all hell." Gen. Wm T. Sherman (11 April 1880, Columbus, Ohio)

  • Member since
    April 2005
Posted by Thunderbolt379 on Monday, April 14, 2014 3:08 AM

A little progress on the -HA. I replaced the flimsy clear acetate supplied in the kit with solid styrene inserts, prepainted gold to simulate the anti-laser coating of the optics. Here's a snap of the driver's hatch (the dusty, spotty look of the paint is due to the model being very close to a light source):

Next, the running gear (including the lower hull) was given the wash and drybrush treatment with brown and black oils, then red-brown and metallic enamels, all suspended in white spirit. The tracks were also given the enamel treatment, over an acrylic paintjob. I mixed a grey-brown shade for the metal areas, then painted the track pads and blocks by brush. I tried enamel flat black but it dried glossy and I used XF-1 instead, then used the new Tamiya clear flat acrylic to unify the finish before the wash and drybrush process:

I'm finally ready to mount the running gear in preparation for snugging the upper hull, with its moulded-on side skirts, down over the lower. Then it's downhill to the finish...

M/TB379

http://worldinminiature.blogspot.com/

  • Member since
    April 2005
Posted by Thunderbolt379 on Sunday, March 23, 2014 2:18 AM

Jayjay82 -- a thousand apologies, I got caught up in other projects (not to mention teaching six classes a week and doing some heavy grading) and I completely forgot to update p1 with your finished build. It's there now!

I made some progress on my Trumpeter -HA this weekend, I did the basic oil wash of the running gear and suspension fittings, and have just got the periscope of the loader's hatch sorted out. I'll press on by the same technique and get the rest done, and I need to pick up some enamels for drybrushing and washes, my old Humbrol tins have officially died. I'm hoping to spray the tracks in the next few days, then get the running gear finished and mounted, by which time the periscopes will be done from inside/underneath, and I can close up the hull.

There's just a few months to go on this GB -- could we have a roundup of who's building at this time?

Cheers, Mike/TB379

http://worldinminiature.blogspot.com/

  • Member since
    February 2014
  • From: Dryden, NY
Posted by jayjay82 on Friday, March 7, 2014 10:09 AM

Yeah.  I Had some issues with the Launchers and the one Hatch so i had to do it this way.  In the end i i gave up on trying to make it one way or the other, decided to make it my way.  :)

"Military intelligence is a contradiction of terms."                                          

JOIN OUR COMMUNITY!

Our community is FREE to join. To participate you must either login or register for an account.

SEARCH FORUMS
FREE NEWSLETTER
By signing up you may also receive reader surveys and occasional special offers. We do not sell, rent or trade our email lists. View our Privacy Policy.