SEARCH FINESCALE.COM

Enter keywords or a search phrase below:

Keepers of the Peace GB 2013-14

22671 views
173 replies
1 rating 2 rating 3 rating 4 rating 5 rating
  • Member since
    May 2005
Posted by pyrman64 on Sunday, June 1, 2014 6:05 PM

Guys, the Peacekeeper GB bage has been added to the front page. Toast

Greg H

"There is many a boy here today who looks on war as all glory, but, boys, it is all hell." Gen. Wm T. Sherman (11 April 1880, Columbus, Ohio)

  • Member since
    April 2006
  • From: Denver, Colorado
Posted by waynec on Sunday, June 1, 2014 11:31 AM

stikpusher

I have tried blue for vision blocks and persicopes on AFVs a couple times. I always end up repainting them with clear green to better replicate that coke bottle glass look that I remember on all the tracks that I rode on. But this year has been a year of modeling firsts for me. My first UN, my first "what if?", and I am now bitten by both bugs to do more of the same genres in the future.

firsts for me too. started first 1/24 truck, sci-fi, artist oil washes and filters, some 1/72 vehicles, and hosting my first (2) group builds. and it's only 5 months into the year.

Никто не Забыт    (No one is Forgotten)
Ничто не Забыто  (Nothing is Forgotten)


  • Member since
    July 2004
  • From: Sonora Desert
Posted by stikpusher on Sunday, June 1, 2014 11:09 AM

I have tried blue for vision blocks and persicopes on AFVs a couple times. I always end up repainting them with clear green to better replicate that coke bottle glass look that I remember on all the tracks that I rode on. But this year has been a year of modeling firsts for me. My first UN, my first "what if?", and I am now bitten by both bugs to do more of the same genres in the future.


F is for FIRE, That burns down the whole town!

U is for URANIUM... BOMBS!

N is for NO SURVIVORS...

       - Plankton

LSM


  • Member since
    April 2006
  • From: Denver, Colorado
Posted by waynec on Sunday, June 1, 2014 10:41 AM

stikpusher

The build subjects sure do look different in white rater thn green or tan. Not quite so "warlike". And yes, I did do a final topcoat of clear green on the periscop lenses.

my first UN vehicle was the TRUMPETER CANADIAN LAV-III which got me hooked on canadian warwheels, and i did the vision blocks in blue. just didn't like it as well as the green. and ,whhoo, got the missing parts from revell for my 1/24 UNIMOG THW 4x4.

Никто не Забыт    (No one is Forgotten)
Ничто не Забыто  (Nothing is Forgotten)


  • Member since
    July 2004
  • From: Sonora Desert
Posted by stikpusher on Sunday, June 1, 2014 9:42 AM

The build subjects sure do look different in white rater thn green or tan. Not quite so "warlike". And yes, I did do a final topcoat of clear green on the periscop lenses.


F is for FIRE, That burns down the whole town!

U is for URANIUM... BOMBS!

N is for NO SURVIVORS...

       - Plankton

LSM


  • Member since
    April 2006
  • From: Denver, Colorado
Posted by waynec on Sunday, June 1, 2014 9:06 AM

That turned out really nice. These un GBs are fun as equipment looks different in weathered white. Did you repaint the vision blocks green?

Никто не Забыт    (No one is Forgotten)
Ничто не Забыто  (Nothing is Forgotten)


  • Member since
    July 2004
  • From: Sonora Desert
Posted by stikpusher on Sunday, June 1, 2014 1:17 AM

Thank you sir. I thought that you might like the patch with the vehicle shot. I have an idea for a vignette of this somewhere down the line incorporating the patch. I am very glad to have partaken in this GB. It was kind of surreal for me at times as at some points I was using my music play (a Sony mini disc player) that I had there during my time in country, listening to the same music that I did there...


F is for FIRE, That burns down the whole town!

U is for URANIUM... BOMBS!

N is for NO SURVIVORS...

       - Plankton

LSM


  • Member since
    May 2005
Posted by pyrman64 on Saturday, May 31, 2014 8:57 PM

Stik: An excellent build!  The last pic with the patch seems fitting, so I've added it to the front page. So glad you got it finished.

I'm calling this one finished....I failed to notice that I'm out of MV lenses, so I have to order more. I also have to find a replacement shovel - it fell off the desk and got stepped on! Surprise

and here's one of the reference pics I've been using for the build  The unit is 3 Trp, B Sqd, 3-4 Cavalry Regt when it was in Rwanda.


Thank you to all for participating!

Greg H

"There is many a boy here today who looks on war as all glory, but, boys, it is all hell." Gen. Wm T. Sherman (11 April 1880, Columbus, Ohio)

  • Member since
    July 2004
  • From: Sonora Desert
Posted by stikpusher on Saturday, May 31, 2014 8:15 PM

After the Matt Coat dried and I made the antenna I did the final detail painting: Tamiya Clear Green on the periscopes, Tamiya Clear Red on the stop lamp lens, Humbrol Flat Black on the Cargo Hatch pull chain cover, .50 cal. ammo links, & Drivers Hatch seal ring, Humbrol Dark Green 34079 on the upper deck hatch rims, and Testors Steel dry brushing in a few appropriate high wear spots. Then a bit of Testors Clear Parts glue for lenses on the headlights & taillights. Finally I mixed up a batch of Humbrol Hemp & Matt Clear for a dusting on the suspension and airbrushed that on. Afterwards some Tamiya weathering soot in the exhast pipe, and then the antenna was glued in place and finito! I present my completed K-200 in Malay Army/UN service in Bosnia

Thanks for looking. Comments and critiques are welcome.


F is for FIRE, That burns down the whole town!

U is for URANIUM... BOMBS!

N is for NO SURVIVORS...

       - Plankton

LSM


  • Member since
    July 2004
  • From: Sonora Desert
Posted by stikpusher on Saturday, May 31, 2014 7:52 PM

The stuff is easily missed at HL if youre not looking for it. I stumbled across it last visit accidentally. The local HL carries in in a two tier rack on the bottom shelf down the aisle from the Testors paint rack.

My next couple of updates will be in stages here.
Yesterday on my trip to Hobby Lobby I also picked up this wire for use in making the antenna


Now modern real FM vehicle antennas are tapered from a thick botten that screws on to the antenna base to a narrow tip. The long whips are also sectional, in two pieces. (yeah the commo sergeant in me is coming out here) To replicate that I stretched some tube styrene, and cut a couple lengths to fit over the wire core. Then I added some super glue which I would later sand flush once it was dry to give the appropriate taper. Here it is while the superglue is drying.

Not perfect, but it looks the part.

Before I started the antenna I applied a final coat of Humbrol Matt Clear. I love that stuff!!! Dead flat finish every time!

After that it was final detail painting and weathering...


F is for FIRE, That burns down the whole town!

U is for URANIUM... BOMBS!

N is for NO SURVIVORS...

       - Plankton

LSM


  • Member since
    May 2005
Posted by pyrman64 on Saturday, May 31, 2014 6:43 AM

Looks interesting, Stik.  I was at HL yesterday morning, but did not see this.....I did see Tamiya's weathering powders and Vallejo's weathering stuff.  However, I did pick up a can of Purple-Licious.

Greg H

"There is many a boy here today who looks on war as all glory, but, boys, it is all hell." Gen. Wm T. Sherman (11 April 1880, Columbus, Ohio)

  • Member since
    July 2004
  • From: Sonora Desert
Posted by stikpusher on Friday, May 30, 2014 6:47 PM

This is the stuff I used for the wash. The local Hobby Lobby started stocking them recently and this is my second use of the product. A pre make wash by Testors (or stain as it is labled), in this case, Gray, but it is really really dark in the bottle. They make both enamel and acrylic versions of the stuff, but since I prefer to work with enamels for my washes I am going with that here. Especially over my Acrylic base colors.

So here is the K-200 with the wash applied, but not yet cleaned up

and with the wash cleaned up, hatches popped open, and machine guns installed...

I will get it completd tomorrow. We have company coming over this evening and I still need to do the flat coat, final touch up painting and final weathering...


F is for FIRE, That burns down the whole town!

U is for URANIUM... BOMBS!

N is for NO SURVIVORS...

       - Plankton

LSM


  • Member since
    July 2004
  • From: Sonora Desert
Posted by stikpusher on Friday, May 30, 2014 12:17 AM

Thanks Pyr, I am looking forward to seeing it done as well! I am looking forward to your finished 113

Wayne, this is an outwardly different build for me as well. I am used to vehicles in warpaint. But this white stuff is growing on me. I would like to get a Scorpion one day for my Brit AFV collection, and build it up in Falklands War colors & markings. I am trying something new on the periscopes, as I usually just paint the clear green over the vehicle base color. But on the white here that would be too light. This blue still may be too light as well... we shall see. For the weapons I started off by base coating them in airbrushed Tamiya Flat Black. On the .50 I then gave a heavy drybrushed coat of Humbrol Gun Metal followed by a very light dry brushing of Testors Flat Steel in the high wear areas. On the 60s I dry brushed Testors Gun Metal (a darker and bluer shade compared to the Humbrol shade) on the barrel & receiver, followed by drybrushed Humbrol Gun Metal on the bipod legs and handguard vent. Next I drybrushed Humbrol Matt Aluminum on the high wear areas of the feed tray cover, and finally I hit all the rubber portions of the handguard, butt, and feed tray cover with Humbrol Satin Black. The photo does not really show it to good effect. I will see if I can take some better ones tomorrow.


F is for FIRE, That burns down the whole town!

U is for URANIUM... BOMBS!

N is for NO SURVIVORS...

       - Plankton

LSM


  • Member since
    April 2006
  • From: Denver, Colorado
Posted by waynec on Thursday, May 29, 2014 9:31 PM

cool. this looks really different.

i have a scorpion in my stash.

i still have not gotten my vision block colors the way i want them. usually i paint them silver and then clear green and then smoke to tone down the green. what did you paint the weapons. i have given up on gun metal. i now do metallic gray with medium black oil wash.

Никто не Забыт    (No one is Forgotten)
Ничто не Забыто  (Nothing is Forgotten)


  • Member since
    May 2005
Posted by pyrman64 on Thursday, May 29, 2014 8:45 PM

Stik: excellent work.....looking forward to seeing it completed.

Greg H

"There is many a boy here today who looks on war as all glory, but, boys, it is all hell." Gen. Wm T. Sherman (11 April 1880, Columbus, Ohio)

  • Member since
    July 2004
  • From: Sonora Desert
Posted by stikpusher on Thursday, May 29, 2014 7:55 PM

I am done with today's work now. The finish line is just ahead.
Today's detail painting, based upon some photos that I came across:
Tow hooks in Dark Green 34079

headlights & driver's persicopes base painted. After the final top flat coat, I will add a coat of Tamiya Clear Green on the persicopes

right side troop compartment periscopes- same thing for them on the Clear Green top coat

left side troop compartment periscopes and spare track shoe attachment bolts

TC & drivers hatch periscopes

troop compartment rear periscopes

right side tail lights. After the flat coat, I will paint the lenses with Smoke/Neutral

left side tail light assembly- lower light will get Smoke lens, top will get Clear Red.

and then it was time for the decals... the nice "low vis" UN markings (yes I am being facetious). Academy did not provide the "UN" decals for the ramp or the cargo hatch, so I took those from an AFV Club Scimitar in my stash. They also did not provide decals for the Malay Army vehicle serial number, only the UNPROFOR bumper number. So I created those using some extra British Army AFV decals from my spares bin by cutting apart several to make the two, since the Brit ones are of the same style. The number itself is fictitious, but the letter prefix is correct.

and the parts that I have left to add tomorrow...

and that's all my updates of work for today/tonite....


F is for FIRE, That burns down the whole town!

U is for URANIUM... BOMBS!

N is for NO SURVIVORS...

       - Plankton

LSM


  • Member since
    July 2004
  • From: Sonora Desert
Posted by stikpusher on Thursday, May 29, 2014 12:40 PM

Well, on Sunday I began the final painting. An overall coat of Tamiya Flat White, followed by a coat of Gloss White. The Gloss White did not turn out quite as well as I had hoped on the vertical surfaces, so I will need to use some Future there before the decals are applied. But here is how she looked overall Sunday midday before it was time for me to go to work.

on Monday I begain detail painting with enamels- I came across a few nice shots of Malay K-200s in Bosnia, and they did indeed show the ramp inner face was still green, and the surrounding area, when the ramp is closed stayed that color too. I used Dark Green 34079. I also used flat black on the rubber portion of the cover for the commo wire hook up box the the right of the ramp

then it was time for top deck details. Humbrol Gun Metal for the tripod & tankers bar, Humbrol Dark Green 34079 on the pioneer tools, Testors Gun metal on the antenna base spring, and Humbrol Flat Black on the rubber stops for the TC, Gunner, and Cargo hatches.

I also painted the rubber bore covers for the smoke grenade launchers in Humbrol Flat Black

Then it was time for me to go to work and no more time to get to my work bench until I had a few minutes before work on Wednesday. On that session I painted the spare track shoes in Humbrol Satin Black, which is how they look when new when the protective coating is still on those things

and I painted the tow cable Humbrol Gun Metal with the end portions in Dark Green 34079, again based off of the photos that I found

and that is where it stands now as I am about to go aout and do the final bits of detail painting in a bit here...


F is for FIRE, That burns down the whole town!

U is for URANIUM... BOMBS!

N is for NO SURVIVORS...

       - Plankton

LSM


  • Member since
    July 2004
  • From: Sonora Desert
Posted by stikpusher on Sunday, May 25, 2014 12:25 AM

After I got all the parts on this one, I took it to my shelves and compared it side by side to my Dutch YPR. There are some noticeable differences between the two types.... this UN stuff is kinda cool...


F is for FIRE, That burns down the whole town!

U is for URANIUM... BOMBS!

N is for NO SURVIVORS...

       - Plankton

LSM


  • Member since
    April 2006
  • From: Denver, Colorado
Posted by waynec on Saturday, May 24, 2014 2:28 PM

i think i will get one of these too, maybe not the korean one but one of the dutch ones. i like adding the mounting brackets. i will do that too usually using angle iron styrene and my chopper. sometimes i have this vision of a tanker truck filled with cya pulling up next to a tank so the crew can attach all the spare gear. i may have to do another UN build, maybe 1 of 3 versions of PLA ZSL-92 6x6.

Никто не Забыт    (No one is Forgotten)
Ничто не Забыто  (Nothing is Forgotten)


  • Member since
    January 2013
Posted by jibber on Saturday, May 24, 2014 12:38 PM

Thats funny, I have a shelf full of projects, want some?

  • Member since
    July 2004
  • From: Sonora Desert
Posted by stikpusher on Saturday, May 24, 2014 11:09 AM

Hey jibber, I presume that you meant the complement regarding the sharpie work was for Pyr and not me. No sharpies were harmed in the making of this build... so far... ;-)

And thank you to you and PM for the kind words on my project. I have an idea for a display base forming in my head, but that is outside the scope of this GB for now. And I have to do some research to see what area of the country it was where the Malays operated.


F is for FIRE, That burns down the whole town!

U is for URANIUM... BOMBS!

N is for NO SURVIVORS...

       - Plankton

LSM


  • Member since
    January 2013
Posted by jibber on Saturday, May 24, 2014 8:24 AM

It's looking very cool Stik, I've never built this one but I'm sure it'll be on my shelf soon after seeing yours. I think with the ramp down showing that awesome interior and all the outside detail, this KIFV will show real nice. Almost there. BTW nice sharpie work, I thought you custom printed off some decals or picked something from another kit…Can't have a shaky hand there.

Thanks for the compliment on the AUF1, it's a very detailed and complex piece of AFV/Artillery and my intentions was to do it in the original French 3 color camo, but I couldn't pass up the chance to get it in here. Thanks again for letting me in at such a late date I hope I did it proud.

Terry

  • Member since
    July 2004
  • From: Sonora Desert
Posted by stikpusher on Saturday, May 24, 2014 12:09 AM

Greg, your 113 is coming along real good there! All ready for tracks now. I did a coouple final bits of work today: Machine guns primed with Flat Black; engine deck grill screens primed with Tamiya White Liquid Surface Primer; and the seams where the laminate side armor meets the rear were puttied and sanded smooth once dry. Tomorrow, White paint, Tamiya Flat White base coat followed by a Tamiya Gloss White top coat.


F is for FIRE, That burns down the whole town!

U is for URANIUM... BOMBS!

N is for NO SURVIVORS...

       - Plankton

LSM


  • Member since
    May 2005
Posted by pyrman64 on Friday, May 23, 2014 10:34 PM

Terry: My fellow adopted countrymen would be proud of your build - it's magnifique!

I've added it to the 1st page.

Stik: the KIFV looks great and closer to finish....can't wait to see it completed.

I've managed to finish the squadron markings using a template & Sharpie (ultra-fine) and need to finish the tracks, followed by the final weathering.

Greg H

"There is many a boy here today who looks on war as all glory, but, boys, it is all hell." Gen. Wm T. Sherman (11 April 1880, Columbus, Ohio)

  • Member since
    July 2004
  • From: Sonora Desert
Posted by stikpusher on Friday, May 23, 2014 3:04 PM

And today's build update... last night after family business and before bed I finished painting up the tracks. Dry brushed Testors Flat Steel on the grouser road contact surfaces and then Floquil Weathered Black on the Track Pads

Then this morning the final stages of construction began. I glued on the idler and sprocket wheels and placed the tracks on as well. As you can see they were a bit a springy and loose fitting

then I added some brass wire pins into holed that I had pre drilled to tamp down the upper track runs

then I added the side laminate armor plates. Once those had set I began to add the final detail parts as well

exhaust pipe

right side grab handle/step

left side grab handle/step

smoke grenade launchers

pioneer tool shovel and spare track shoe mounting bolts

pioeer tool pick mattock head and handle

pioneer tool axe, tankers bar, and maching gun tripod.. I also added a bit of strip styrene to teh shovel mount to make a proper bracket instead of having it free floating on the upper side

and a couple of overall views

I have puttied up where the side laminate armor joins the rear plate and am waiting for that to dry to sand it later and then I can begin final painting...


F is for FIRE, That burns down the whole town!

U is for URANIUM... BOMBS!

N is for NO SURVIVORS...

       - Plankton

LSM


  • Member since
    January 2013
Posted by jibber on Thursday, May 22, 2014 11:49 PM

Thought so, should work out nice.

  • Member since
    July 2004
  • From: Sonora Desert
Posted by stikpusher on Thursday, May 22, 2014 8:39 PM

Nope, just we merry few here... Lol! The Tamiya tracks are a bit loose in fit. I am gonna add sag by using metal rods inserted into holes that I drilled the other day over the first and last road wheels with the track test fitted. The side armor that I still need to add will come down to the top of the road wheels, so not too much will be visible there.


F is for FIRE, That burns down the whole town!

U is for URANIUM... BOMBS!

N is for NO SURVIVORS...

       - Plankton

LSM


  • Member since
    January 2013
Posted by jibber on Thursday, May 22, 2014 8:20 PM

You have got a lot done, nice work  on the spare track and the Testors wash looks really interesting, I'll have to pickup some. Your extra tracks, how close are they to fitting and are you adding the styrene to create a sag or to tighten them up? It's coming along nicely, not many of us left here.

  • Member since
    July 2004
  • From: Sonora Desert
Posted by stikpusher on Thursday, May 22, 2014 7:06 PM

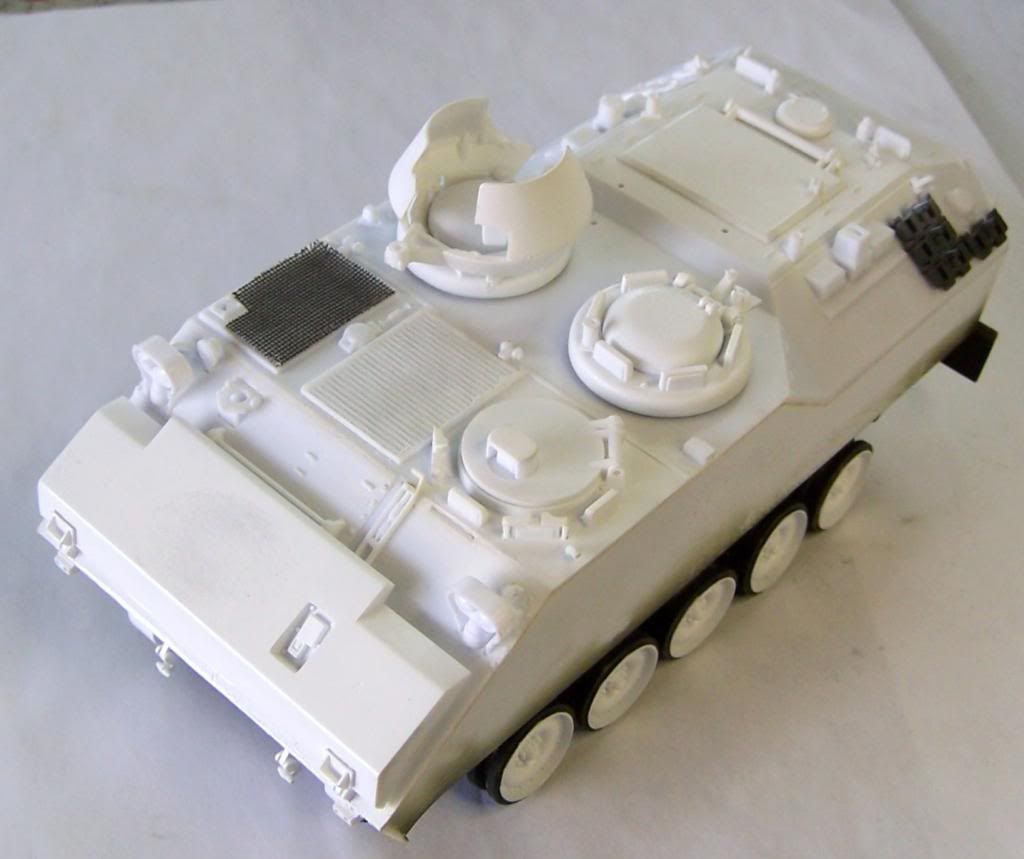
Ok my latest progress photos after a very busy morning and midday, I got a couple of hours of work in at the bench afterwards. Mostly detail painting. But first up this update of where I was when I started today:
Road wheels painted and installed:

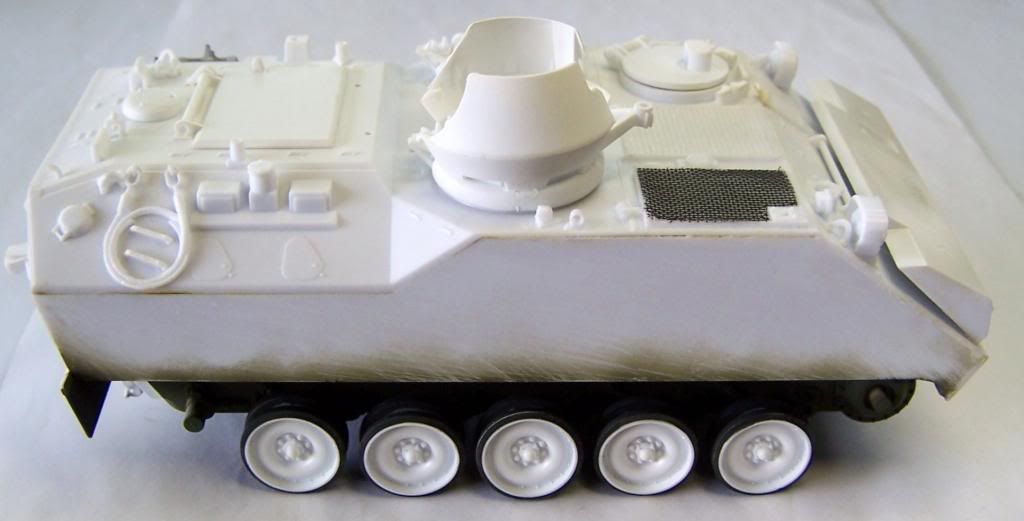
front glacis plate seams cleaned up and the lower one painted. You may notice a rough area on the trim vane- I accidently touched that area when the paint was still wet and left a fingerprint. I had to sand that off after the paint dried

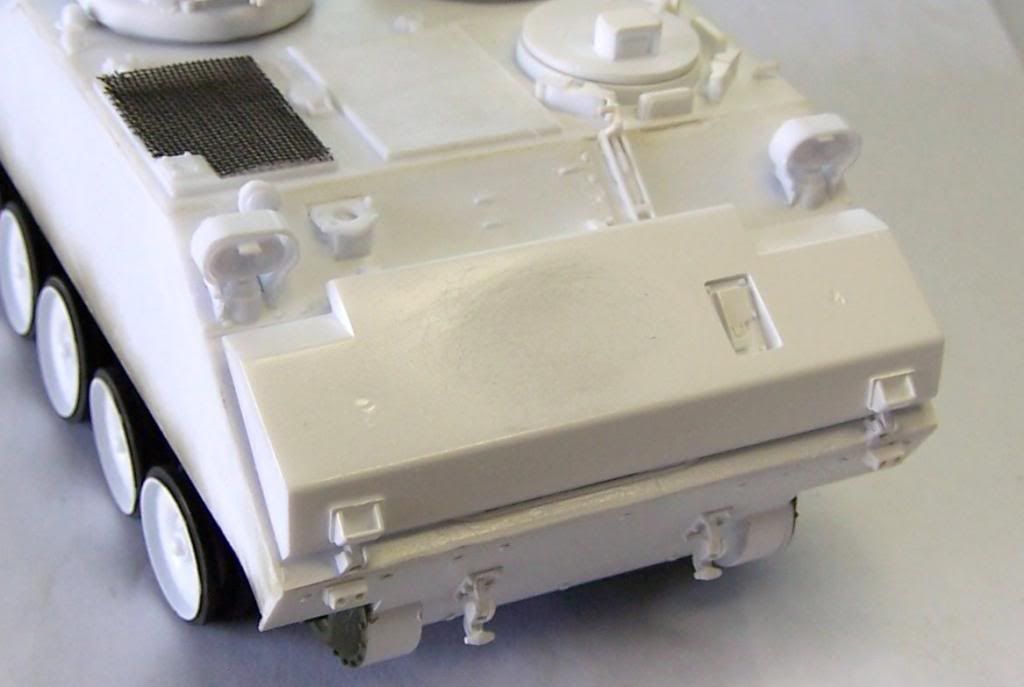
rear mud flaps painted

hatches all tacked down "buttoned up" for painting

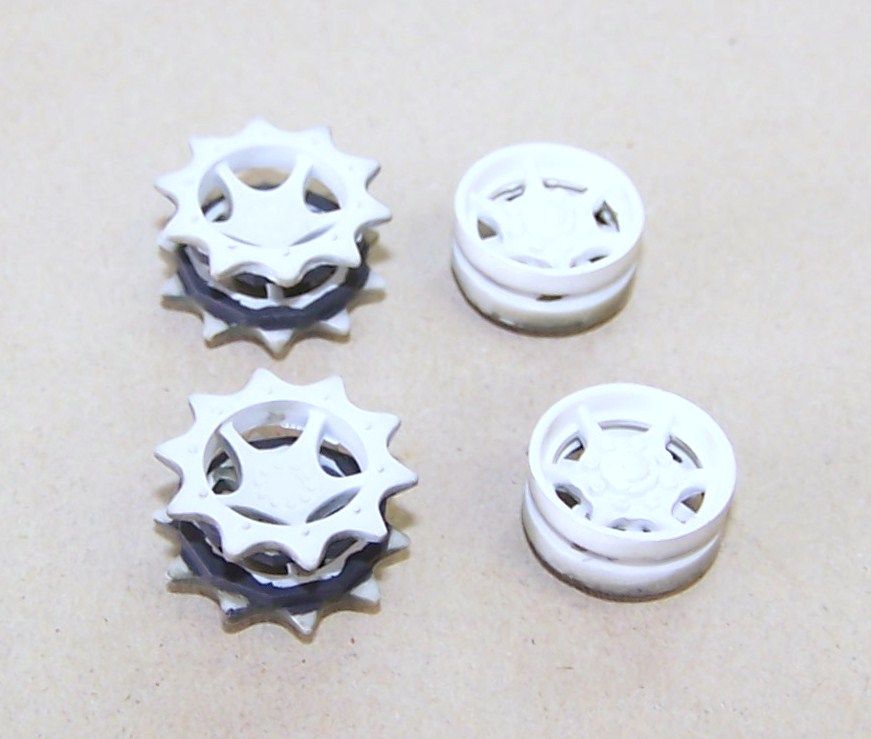
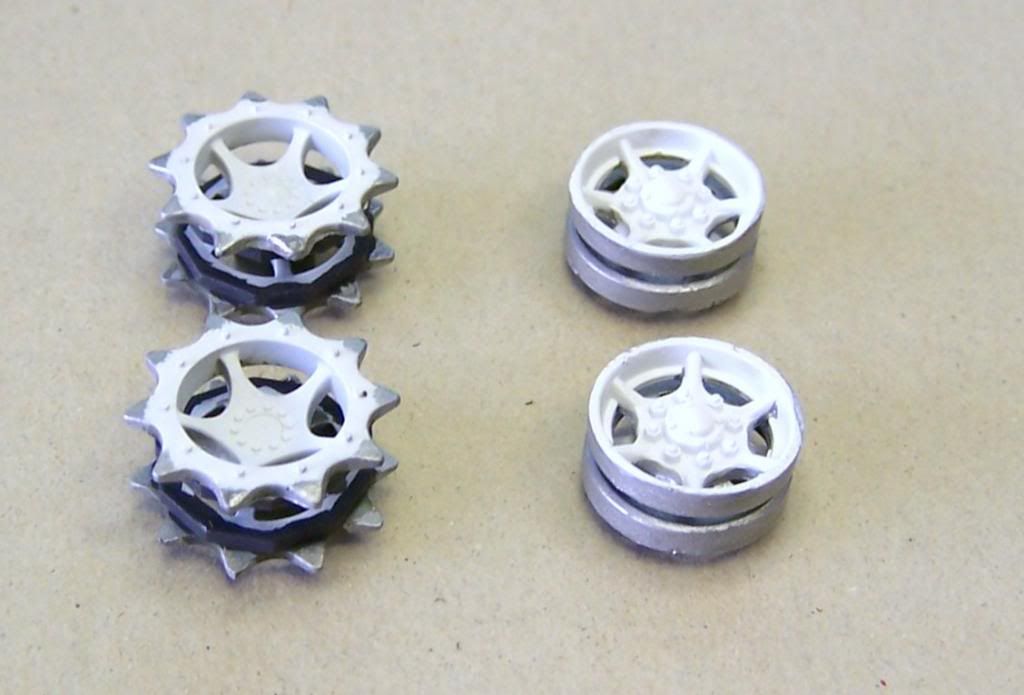
outer faces of sprocket and idler wheels painted white, and sprocket cushion in black (the back sides of these parts are forest green)

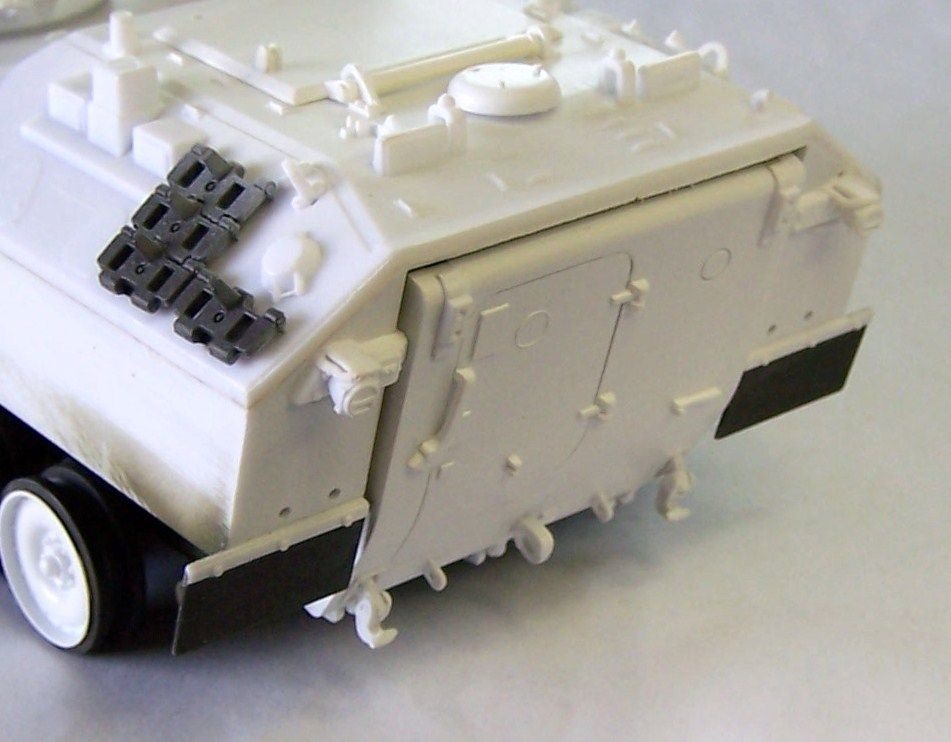
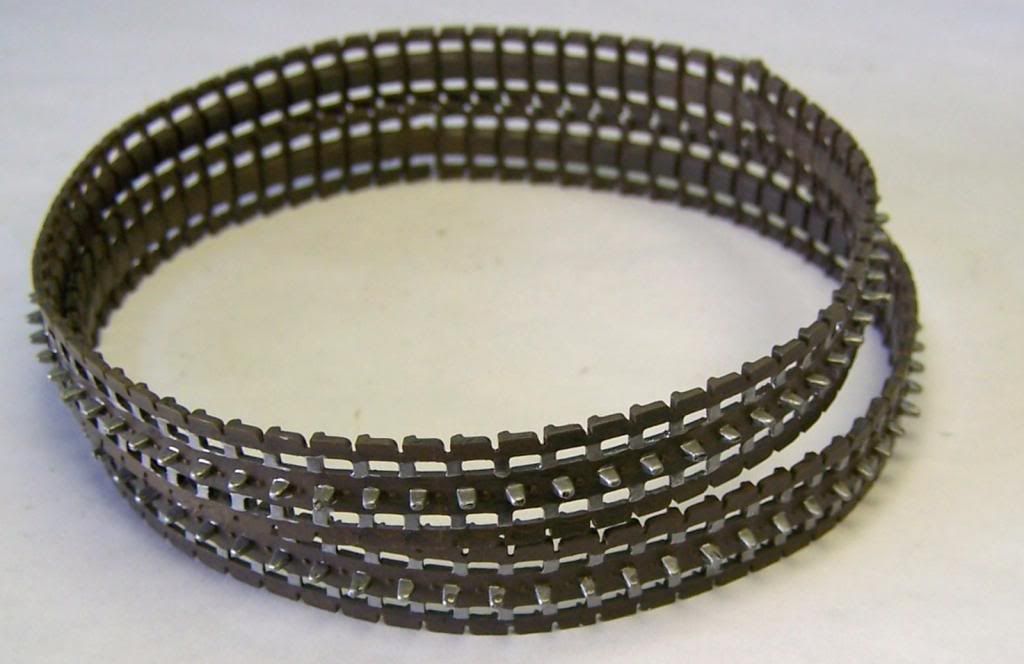
I swapped out the kit indy link tracks for some single length Tamiya ones from another 113 based kit in my stash as a time saving measure. After the hot screwdriver method of joining the end, I applied this new Testors enamel tint wash that I picked up at Hobby Lobby last week. Great stuff, and it gave the tracks just the right shade.

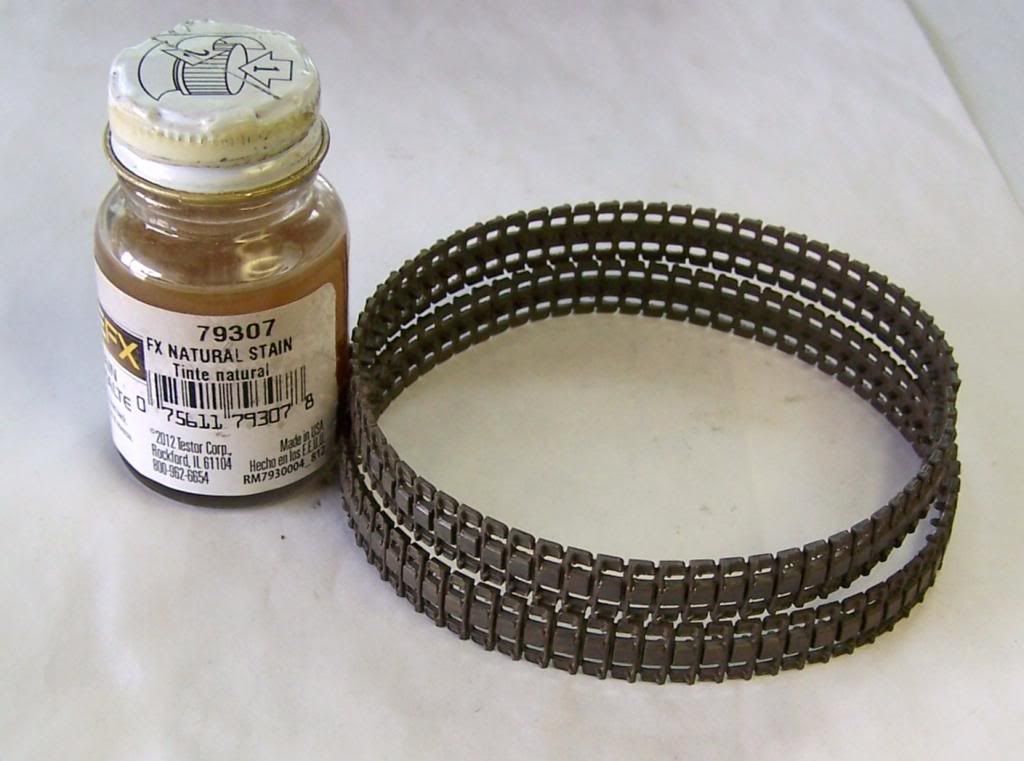
I also pre drilled out some holes for some thin rod to keep the tracks down in place once installed. So that is where things stood when I started today's work session.

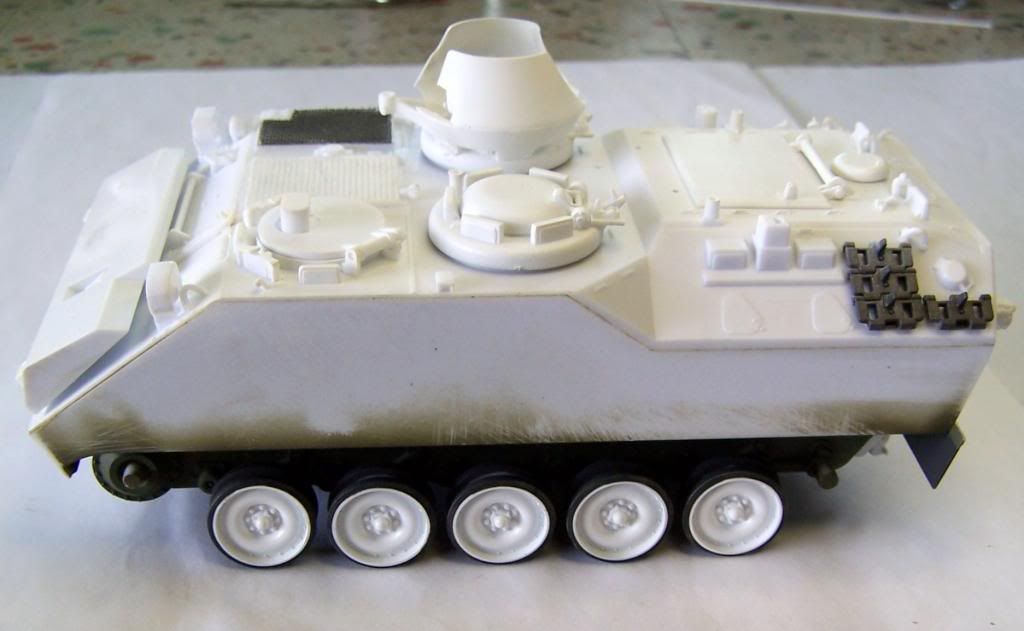
first up I added eight 2mm long pieces of strip styrene for the spare track brackets

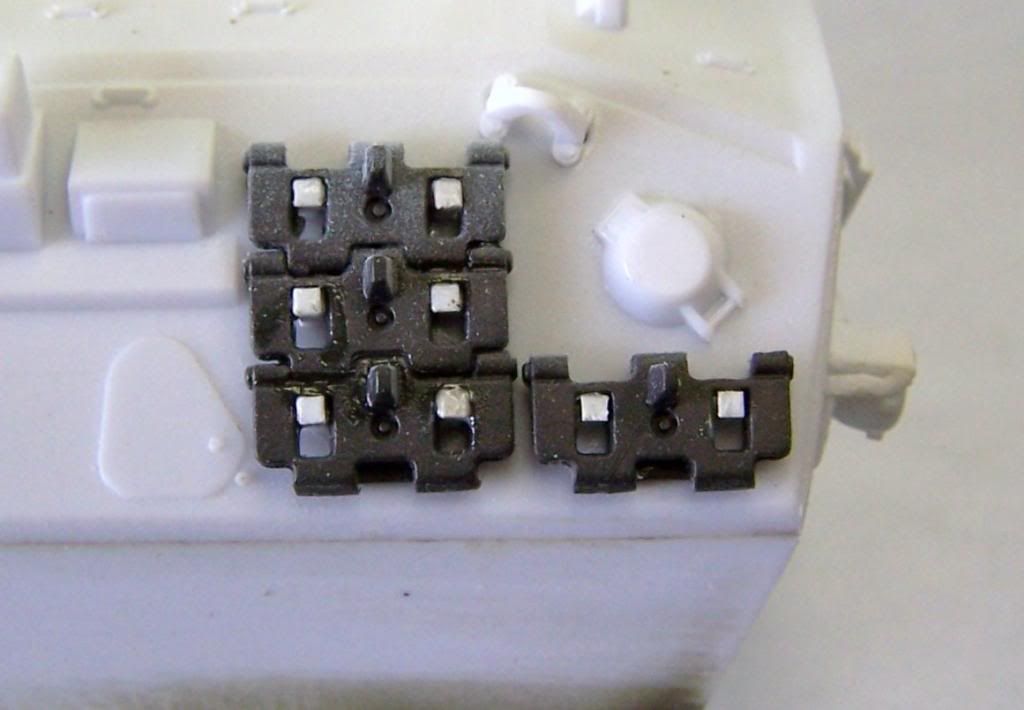
once those had time to dry I sliced up some thin pieces off styrene rod to replicate the washers used to secure the spare track shoes in place on the brackets with 3/4" bolts on the real deal, and glued those in place.

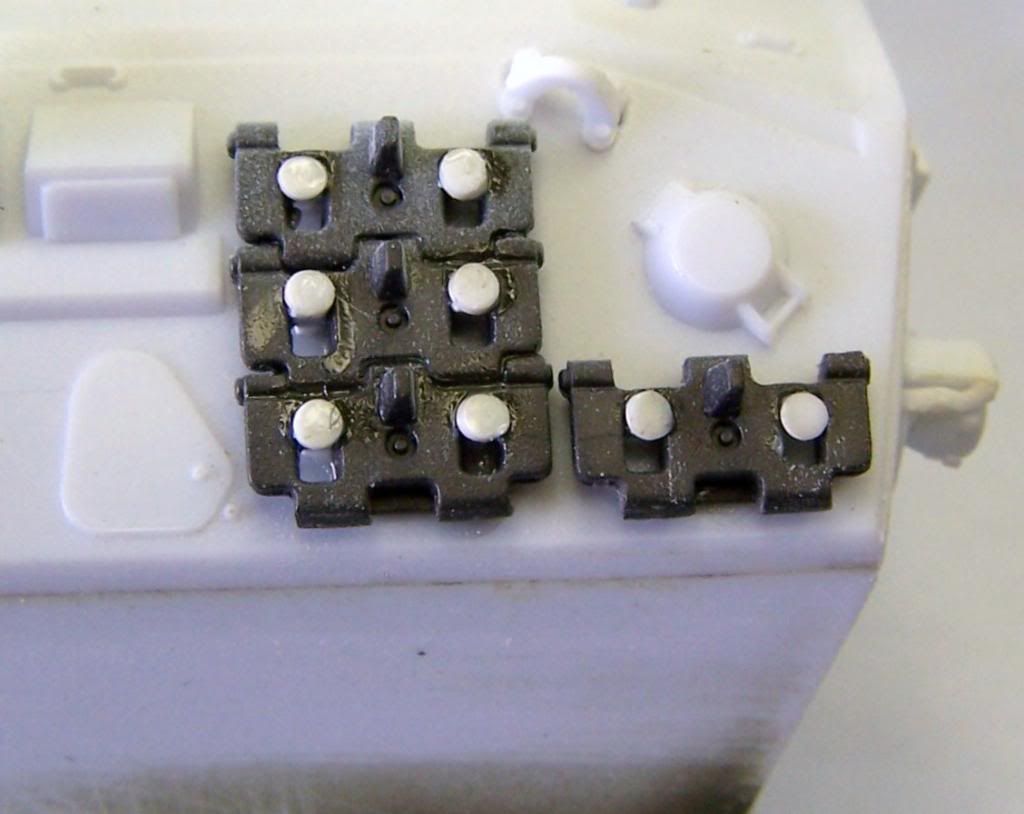
now Academy thoughtfully included some bolts on the sprues that I will add after shaving them off of the sprues. I love how they include these things on some of their kits. A huge but of little detail items that make all the difference in the world for spicing things up in miniature

I mixed up a shade of bare steel using 2 parts Testors Chrome Silver to 1 part Testors Flat Steel that I am using on the tracks, sprocket, and idler wheel surfaces that have metal to metal contact in real life and get polished up from that in use.

So that is where it stands now. After some family business this evening I will dry brush steel on the grouser portion of the track shoes that contact the ground on hardball roads and after that paint the track pads black. Then let it all dry overnight before the next phase of installation tomorrow.


F is for FIRE, That burns down the whole town!

U is for URANIUM... BOMBS!

N is for NO SURVIVORS...

       - Plankton

LSM


JOIN OUR COMMUNITY!

Our community is FREE to join. To participate you must either login or register for an account.

SEARCH FORUMS
FREE NEWSLETTER
By signing up you may also receive reader surveys and occasional special offers. We do not sell, rent or trade our email lists. View our Privacy Policy.