SEARCH FINESCALE.COM

Enter keywords or a search phrase below:

1944 Group Build

131983 views
1959 replies
1 rating 2 rating 3 rating 4 rating 5 rating
  • Member since
    April 2013
Posted by SchattenSpartan on Saturday, January 25, 2014 6:23 PM

I'm a bit hesitant because of the deadline as well. I don't want to rush this build, but it's soo tempting...

  • Member since
    August 2009
  • From: MOAB, UTAH
Posted by JOE RIX on Saturday, January 25, 2014 6:25 PM

I can fully understand Clemens. Then how about starting with the Hellcat?

"Not only do I not know what's going on, I wouldn't know what to do about it if I did". George Carlin

  • Member since
    December 2002
  • From: Bury St Edmunds, Suffolk, England
Posted by Bish on Saturday, January 25, 2014 6:33 PM

Great work there Blue. I have been giving some thought to those HGW belts, I have one set in 32nd, unfortunately they don't seem to do them in 72nd, PE belts can be a pain.

G-J, I do the same as Blue when it comes to leaving part on the sprue. Its especially handy if you need to paint both sides, you can use the piece of sprue to clamp something to and stand it up, so you can do both sides at once. I try and remove as many of the attachments as possible, especially if the side also needs painting. And those wooden cloths pegs are really handy as well, especially for canopies.

Jsmyth, welcome aboard. Just post progress pics when ever you can and enjoy the ride.

Clemen's, can you put me down for the AFV Club 35th 251/3 Ausf D.

I am a Norfolk man and i glory in being so


On the bench: Airfix 1/72nd Harrier GR.3/Fujimi 1/72nd Ju 87D-3

  • Member since
    April 2013
Posted by SchattenSpartan on Saturday, January 25, 2014 6:36 PM

Yeah, I think I'll start working on my B-25 nonetheless, but in a WIP thread jsut for her. That allows me to take my time with the big bird...

I should be able to start work on my Hellcat in a week or two.

  • Member since
    April 2013
Posted by SchattenSpartan on Saturday, January 25, 2014 6:37 PM

Sure, buddy! I see you got kinda inspired by scanning in those instructions for me Big Smile

  • Member since
    December 2002
  • From: Bury St Edmunds, Suffolk, England
Posted by Bish on Saturday, January 25, 2014 6:40 PM

LOL, well, I don't need much of an excuse to build a 251. And as I have nearly 30 in the stash, I think its time I got a couple built. I was going to do my Tamiya /9, but that's a bit of a complicated and time consuming dio, so went for an easier option.

I am a Norfolk man and i glory in being so


On the bench: Airfix 1/72nd Harrier GR.3/Fujimi 1/72nd Ju 87D-3

  • Member since
    August 2009
  • From: MOAB, UTAH
Posted by JOE RIX on Saturday, January 25, 2014 7:23 PM

Nearly 30 251's! Holy Lord Bish, your as bad as Clemens and his FW 190's. Are they all 1/72?

"Not only do I not know what's going on, I wouldn't know what to do about it if I did". George Carlin

  • Member since
    December 2002
  • From: Bury St Edmunds, Suffolk, England
Posted by Bish on Sunday, January 26, 2014 3:14 AM

JOE RIX

Nearly 30 251's! Holy Lord Bish, your as bad as Clemens and his FW 190's. Are they all 1/72?

72nd, o no. All my armour is 1/35th. One of my long term projects is to build one of every variant and version of the 251. this is one I may never leave to do, but its fun to have a goal.

I have calculated that there are 63 in all, so I am not even half way.

I am a Norfolk man and i glory in being so


On the bench: Airfix 1/72nd Harrier GR.3/Fujimi 1/72nd Ju 87D-3

  • Member since
    April 2006
  • From: ON, Canada
Posted by jgeratic on Sunday, January 26, 2014 10:36 AM

Clemens, that is stunning nose art on the B-25, just hope you don't get hit with the time out stick for posting it.

---------------------------------------------

I'm thinking of a subject with some Russian flavour for this GB.  Looking through the stash, dug out a 1/72 kit of the KV-85.  Though it was designed in the previous year of this GB's theme, it does have a decal option for 1944.  If it is acceptable, sign me up.

regards,

Jack

  • Member since
    April 2013
Posted by SchattenSpartan on Sunday, January 26, 2014 1:18 PM

Jack: Oops, I didn't think of that...

  • Member since
    October 2008
  • From: Georgia
Posted by Rigidrider on Sunday, January 26, 2014 3:24 PM

Well I should hope not... Its part of the history of the birdies we build and not ment to be any thing but. My build for this GB will also have "Nose Art" and sorry, but again, its part of the era and history. Still waiting on some parts to arrive and I cant start till then. Keep up the great work all!

Take care...

Doug

When Life Hands You A Bucket Of Lemons...

Make Lemonade!

Then Sell It Back At $2 Bucks A Glass...

  • Member since
    August 2009
  • From: MOAB, UTAH
Posted by JOE RIX on Sunday, January 26, 2014 3:41 PM

You should be just fine Clemens. Heck, When I was building my P-47 "Eight Nifties" for the Jugs GB I posted the nose art for that which was every bit as risque if not more than your B-25 and never met with any concern. Like Doug pointed out, we are modeling history and "Candy" nose art is as much a part of that than anything. I believe our administrators understand that and are open to the fact that that is simply a part of modeling military equipment.

"Not only do I not know what's going on, I wouldn't know what to do about it if I did". George Carlin

  • Member since
    April 2013
Posted by SchattenSpartan on Sunday, January 26, 2014 3:42 PM

I couldn't agree more, my friend!

  • Member since
    October 2013
Posted by Big Blue on Sunday, January 26, 2014 4:16 PM

Lots of entertaining discussion here!

More show & tell from me.  Not a ton of steps checked off of the Tamiya instruction sheet, but I have spent a bit of time finishing up the instrument panel, and building and detailing the big Pratt & Whitney.

First up the IP:

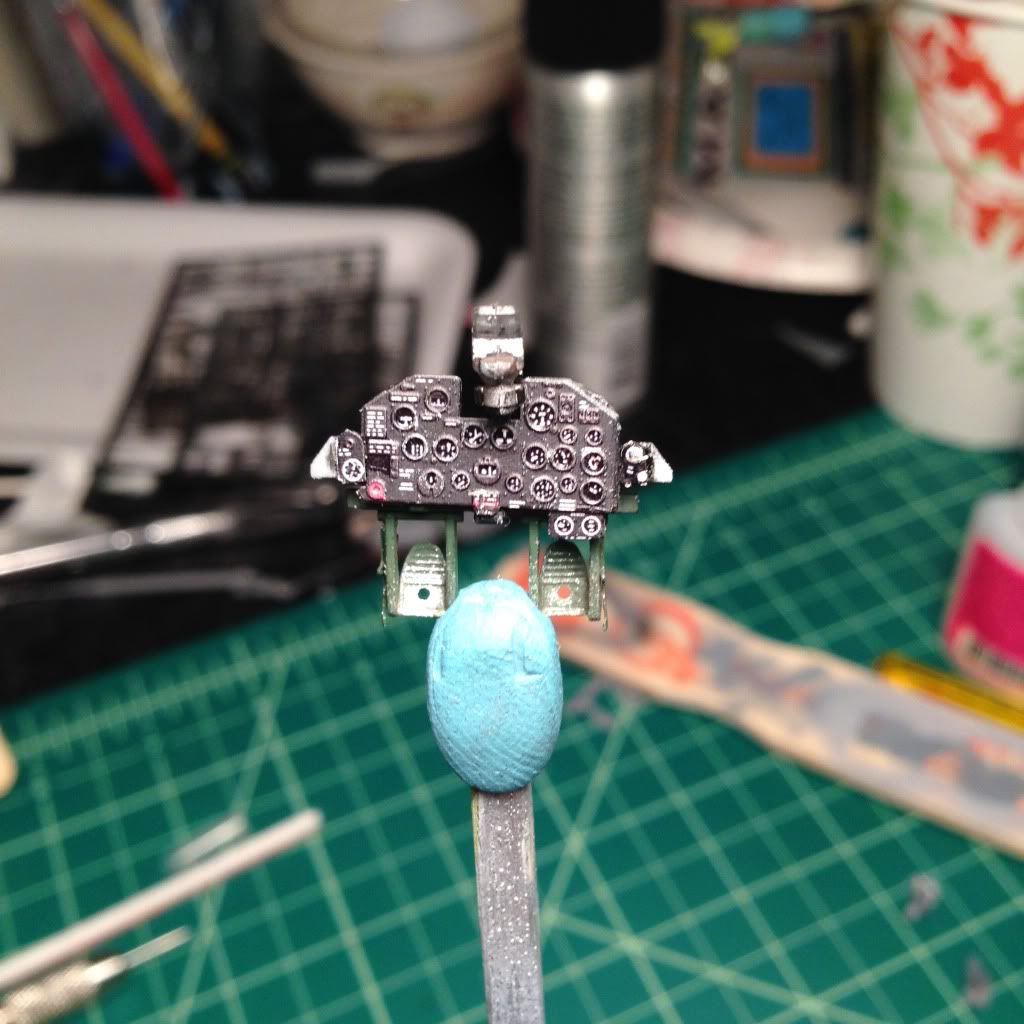
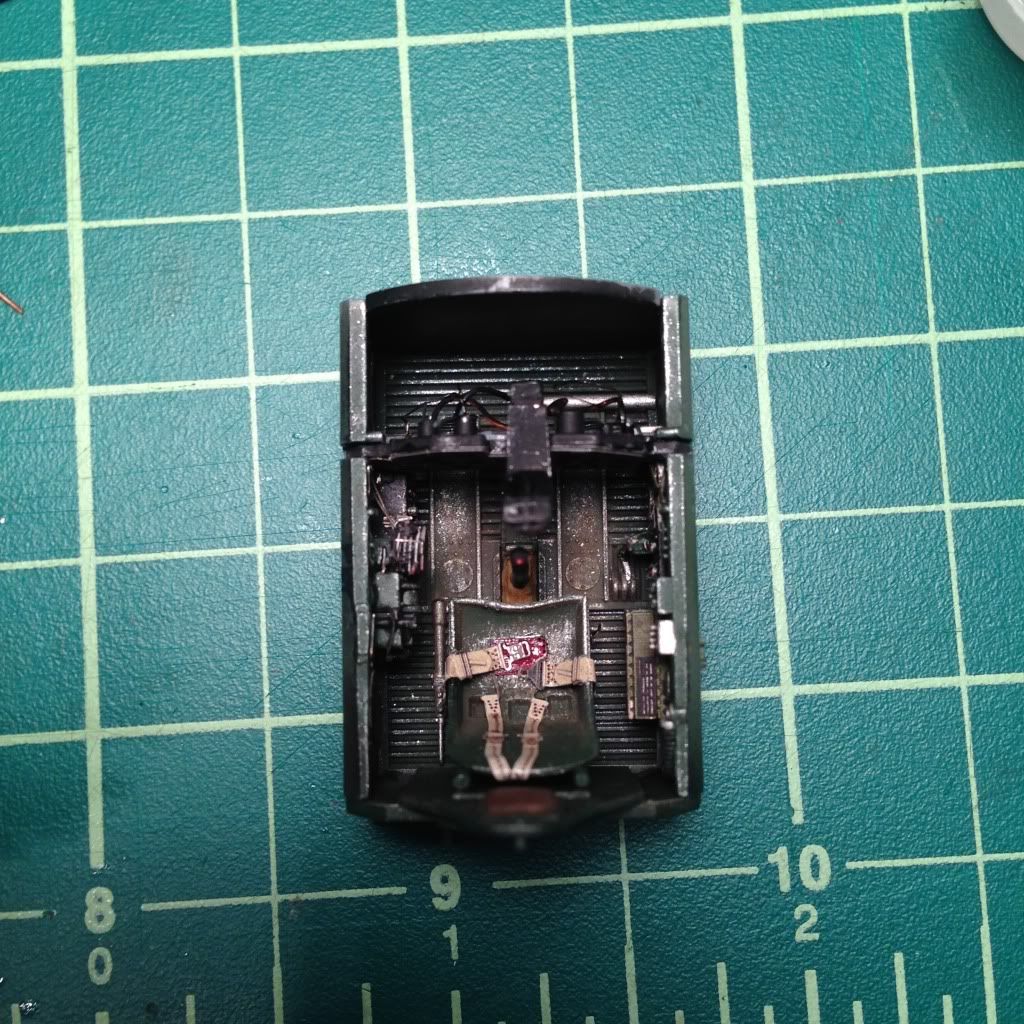
Nothing too dramatic here; since my last update, I painted and attached the gun sight, and added some wiring to the back of the panel using bit of various size wire.  (Sorry for the dark picture).  You can't see it in either picture, but I drilled out the holes in the sight's mounting arm, and added a small piece of aluminum which I cut from a soda can to give the arm the I-beam shape I see in photos.  The bottom of the arm has a bit of photo-etch from the Eduard set.

Most of my modeling time these last few days has been devoted to the engine:

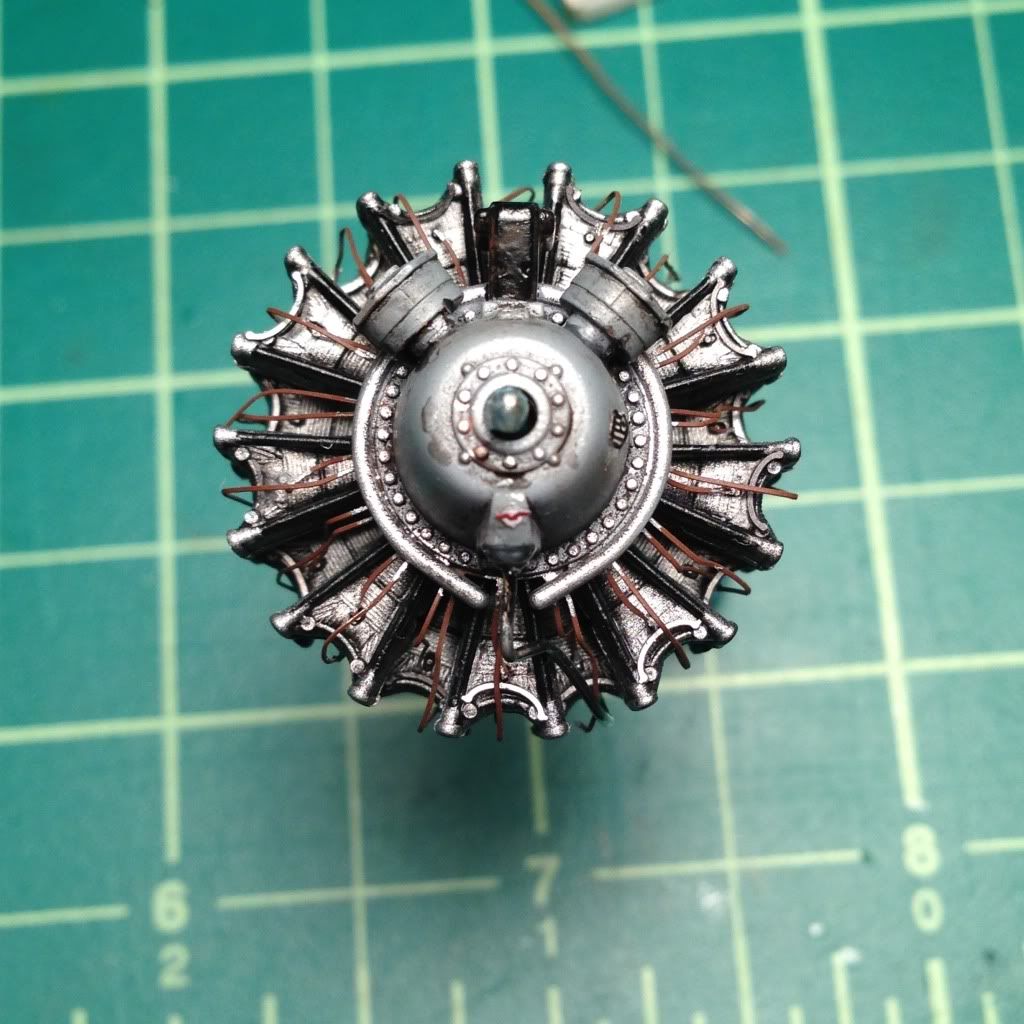
Alclad Aluminum, oil wash for the cooling fins.  Tamiya flat back for the rods, neutral gray for the case (with flat aluminum details.  I weathered everything with more oil washes, MIG pigments, and Tamiya Smoke for the oil leaks.  Photo-etch includes the P&W emblem, the placard and details not the case, and the ignition harness.  I painted the harness with red-brown and a thin coat of MM aryl Rust, and used the flat aluminum to detail it.  I looks a bit flat in this close-up side view, but it looks fine looking from the front (especially when looking through the cowl opening).  I added an oil drain pipe from a piece of fine solder.

Thanks for looking, and comments or suggestions are welcome.

Blue

  • Member since
    October 2008
  • From: Georgia
Posted by Rigidrider on Sunday, January 26, 2014 4:29 PM

Just flat out good lookin work! Engine looks killer!

Doug

When Life Hands You A Bucket Of Lemons...

Make Lemonade!

Then Sell It Back At $2 Bucks A Glass...

  • Member since
    April 2013
Posted by SchattenSpartan on Sunday, January 26, 2014 4:39 PM

She's going to be a beauty! I love the way that big R-2800 looks! I replaced mine with a Quickboost resin part, but I'll stick to Tamiya's plastic parts in the future. The Quickboost engine looks way better IMO, but you have to add the pushrods and the wiring harness yourself which isn't too dramatic, but I don't think it's really worth the effort with what little is visible after the cowling is on... I'll finish up my QB engine tomorrow and post some pics if you are interested in how it looks...

  • Member since
    October 2013
Posted by Big Blue on Sunday, January 26, 2014 4:56 PM

Thanks guys.

Clemens, I'll look forward to seeing the resin version.  I am sure its a step up over the kit parts, but I have figured that so little of it is actually visible once it is behind a prop and under the cowling, that the extra detail is lost.  Sometime I will have to do a Jug with the panels removed, and then I'd be very interested in the Quickboost model.

I definitely enjoy the detail part of the build, slow as it is.  Much more satisfying to me than filling and sanding seams!  That said, I am ready to move ahead with some bigger stuff soon!

  • Member since
    April 2013
Posted by SchattenSpartan on Sunday, January 26, 2014 5:01 PM

If you want to build her opened up, go big! Grab one of the big Hasegawa kits (Hobbylink Japan has them listed at 40 bucks) and get you one of Aires' Engine sets. They are really expensive but soo worth it (Hannants has them at 1/3rd off ATM) I have some pics of my set and I can PM them to you if you don't believe me Wink.

  • Member since
    June 2013
  • From: Jax, FL
Posted by Viejo on Sunday, January 26, 2014 8:48 PM

Thanks for the votes of confidence.


SS, the first run I made at the seams I used Testors filler putty (grey tube) and thinned it with lighter fluid.  I smelled the putty and it kinda smelled like the LF would work, and it kinda did.  It just didn't work all the way into all the seams.


Not sure what I'm supposed to used to thin that putt.  I do have super glue, but it's kind of like slow honey.  The BIGGEST problem I have is with the paint.  I masked multiple curve/recurves and it didn't get tight enough.  I could have copped out and just painted one of the halves white and the other black, but I'm trying to make sure I put the correct tab A into the proper slot B.

  • Member since
    July 2004
  • From: Sonora Desert
Posted by stikpusher on Monday, January 27, 2014 10:54 AM

Try liquid cement on the putty as a thinner. I used that on Squadron White putty and it thins that stuff great!


F is for FIRE, That burns down the whole town!

U is for URANIUM... BOMBS!

N is for NO SURVIVORS...

       - Plankton

LSM


  • Member since
    December 2002
  • From: Bury St Edmunds, Suffolk, England
Posted by Bish on Monday, January 27, 2014 12:38 PM

Blue, more really nice work. Lovely detail on the engine.

I am a Norfolk man and i glory in being so


On the bench: Airfix 1/72nd Harrier GR.3/Fujimi 1/72nd Ju 87D-3

  • Member since
    December 2002
  • From: Bury St Edmunds, Suffolk, England
Posted by Bish on Monday, January 27, 2014 12:39 PM

Viejo, you could also try acetone, I use that with Squadron putty. But just test it on a piece of unused plastic as it can melt some. But I have not had that problem yet.

I am a Norfolk man and i glory in being so


On the bench: Airfix 1/72nd Harrier GR.3/Fujimi 1/72nd Ju 87D-3

  • Member since
    October 2008
  • From: Georgia
Posted by Rigidrider on Monday, January 27, 2014 3:19 PM

I use finger nail polish remover (Acetone)and it works very well, Cheap too, about a 1.39 at WallyMart for a bottle. Mix with putty, apply, and dip a Qtip in it after application and you can smooth, cutting WAY down on the sanding, also, if you notice an error after drying, just dip another Qtip and it will re soften the putty as you work it. Just watch the surrounding styrene, if worked too much it can and will melt plastic if not carefull.

Doug

When Life Hands You A Bucket Of Lemons...

Make Lemonade!

Then Sell It Back At $2 Bucks A Glass...

  • Member since
    October 2009
  • From: Oil City, PA
Posted by greentracker98 on Sunday, February 2, 2014 11:22 PM

Here is the begining pics of my V-1!

A.K.A. Ken                Making Modeling Great Again

  • Member since
    April 2013
Posted by SchattenSpartan on Monday, February 3, 2014 6:25 AM

Looking nice, Ken!

  • Member since
    October 2009
  • From: Oil City, PA
Posted by greentracker98 on Monday, February 3, 2014 6:54 PM


SchattenSpartan

Looking nice, Ken!

Thanks SS

A.K.A. Ken                Making Modeling Great Again

  • Member since
    August 2009
  • From: MOAB, UTAH
Posted by JOE RIX on Monday, February 3, 2014 10:45 PM

Hey Ken, That's looking great. Keep it coming.

"Not only do I not know what's going on, I wouldn't know what to do about it if I did". George Carlin

  • Member since
    October 2009
  • From: Oil City, PA
Posted by greentracker98 on Tuesday, February 4, 2014 9:27 PM

Okay here is an update on the Buzz Bomb. It was a strugle to get it this far. LOL All I have to do now is touch up some of the paint and the decals and it's finished


A.K.A. Ken                Making Modeling Great Again

  • Member since
    April 2013
Posted by SchattenSpartan on Wednesday, February 5, 2014 6:37 AM

Looking good so far, although the pic is really blurred...

  • Member since
    October 2009
  • From: Oil City, PA
Posted by greentracker98 on Wednesday, February 5, 2014 11:47 AM

SchattenSpartan

Looking good so far, although the pic is really blurred...

I'll take some other pics tonight. I messed them up royally

Thanks everyone

A.K.A. Ken                Making Modeling Great Again

JOIN OUR COMMUNITY!

Our community is FREE to join. To participate you must either login or register for an account.

SEARCH FORUMS
FREE NEWSLETTER
By signing up you may also receive reader surveys and occasional special offers. We do not sell, rent or trade our email lists. View our Privacy Policy.