SEARCH FINESCALE.COM

Enter keywords or a search phrase below:

100th Anniversary of WWI GB

75541 views
879 replies
1 rating 2 rating 3 rating 4 rating 5 rating
  • Member since
    April 2005
  • From: Piscataway, NJ!
Posted by wing_nut on Friday, September 19, 2014 6:50 PM

Rocker the Nieuport I looking greatly.

PJ that too is looking pretty special.  If I ever had the thought of hand painting the lozenge on an 80" wing... I would have moved too.  Even if I wasn't planning to.Whistling. But that would have been a sight to behold.

Marc  

  • Member since
    June 2010
  • From: Rochester, New York USA
Posted by rocker286 on Friday, September 19, 2014 1:20 PM
Hey everybody, I managed to do a bit more work on my Nieuport before I had to get ready for work: DSCF1586

4badges

  • Member since
    December 2002
  • From: Bury St Edmunds, Suffolk, England
Posted by Bish on Friday, September 19, 2014 12:34 PM

John, thanks for the clarification. Given there is two tubes, I would guess the one at the front takes up the hot water and the one at the back takes the cooled water back to the tank, that would make sense.

PJ, my step dad used to build RC aircraft and he did a German one with the lozenge scheme, I think it was a Bip but now idea what, and I am sure he painted the pattern on the wings.

I am a Norfolk man and i glory in being so


On the bench: Airfix 1/72nd Harrier GR.3/Fujimi 1/72nd Ju 87D-3

  • Member since
    September 2011
  • From: Milaca, Minnesota
Posted by falconmod on Friday, September 19, 2014 6:57 AM

Bish

John, what are you using for that tube. I was looking at the kit before and made a point of checking out that area. Am I right in thinking it take hot water up to the wing where its cooled and then brings it back down to the engine.

Yes that is what it is used for.  there is also another one the is mostly vertical further back like in the center of the middle of the wing that goes from the radiator to somewhere on the back of the engine, but that one is impossible to add now, not to mention you could hardly see it at all. I'm using some Plasticstruct .080 rod for that tube.

John

On the Bench: 1/72 Ki-67, 1/48 T-38

1/144 AC-130, 1/72 AV-8A Harrier

  • Member since
    November 2008
  • From: Central Florida
Posted by plasticjunkie on Friday, September 19, 2014 6:38 AM

LOL Bish. That would be quite a task even tough I had to mix my own paints to touch up one wingtip area that the decal came up short.

Years ago I was building a radio controlled Fokker E.V with an 80" wingspan and was planning on doing the lozenze with Humbrol enamels and a med. sized flat brush. That would have been one heck of a hair pulling experience. We moved out of state so I sold some of my things to de clutter so the plan never materialized.

 GIFMaker.org_jy_Ayj_O


Too many models to build, not enough time in a lifetime!!

  • Member since
    December 2002
  • From: Bury St Edmunds, Suffolk, England
Posted by Bish on Thursday, September 18, 2014 2:55 PM

Looking nice there PJ. I bet you guys are glad you don't have to paint those wings.

I am a Norfolk man and i glory in being so


On the bench: Airfix 1/72nd Harrier GR.3/Fujimi 1/72nd Ju 87D-3

  • Member since
    December 2002
  • From: Bury St Edmunds, Suffolk, England
Posted by Bish on Thursday, September 18, 2014 2:54 PM

John, what are you using for that tube. I was looking at the kit before and made a point of checking out that area. Am I right in thinking it take hot water up to the wing where its cooled and then brings it back down to the engine.

I am a Norfolk man and i glory in being so


On the bench: Airfix 1/72nd Harrier GR.3/Fujimi 1/72nd Ju 87D-3

  • Member since
    September 2011
  • From: Milaca, Minnesota
Posted by falconmod on Thursday, September 18, 2014 2:46 PM

Bish,

  Yes I really like how the dragon is turning out.   I think you will enjoy it as well, the decals went on real easy.    I have to add the radiator tube from the engine to the wing radiator as Eduard doesn't supply one.  Can't wait to put it in the done column. Toast

John

On the Bench: 1/72 Ki-67, 1/48 T-38

1/144 AC-130, 1/72 AV-8A Harrier

  • Member since
    November 2008
  • From: Central Florida
Posted by plasticjunkie on Thursday, September 18, 2014 2:33 PM

Blue, Rider, Wnut, Rob, falcon....The quality of work here is just incredible. I slacked off a bit and you guys are doing a KILLER job.

Here's my small contribution so far:

Got some sanding done and getting the fuselage ready for that funky bright green this scheme takes. The nose is yellow and is taped up.

A good match is Testors Beret Green in the small bottle so need to get me that one to shoot the fuselage then will be able to apply the lozenge on the top of the lower wing and the rest of the under wing lozenge decals.

 GIFMaker.org_jy_Ayj_O


Too many models to build, not enough time in a lifetime!!

  • Member since
    December 2002
  • From: Bury St Edmunds, Suffolk, England
Posted by Bish on Thursday, September 18, 2014 2:05 PM

John, I am really liking that. I am glad I picked that one as well, that scheme with the markings is really nice.

Guys, I have been following along, but the work is of such a high standard, I think I have run out of things to say without repeating what's been said. Especially the woodwork.

Just amazing.

I am a Norfolk man and i glory in being so


On the bench: Airfix 1/72nd Harrier GR.3/Fujimi 1/72nd Ju 87D-3

  • Member since
    January 2014
  • From: Toronto
Posted by Rob S. on Thursday, September 18, 2014 6:36 AM

Mike..thanks! Yes, the array of possibilities makes me want to do more Rolands too, LOL!! 'They' really did make interesting paint schemes compared to the British for sure. Option D, Koch's mount paint scheme black and white is going to be a stunner!!

______________________________________________________________________________


On the Bench: Nothing on the go ATM

  • Member since
    February 2006
  • From: Smithers, BC, Canada
Posted by ruddratt on Wednesday, September 17, 2014 8:37 PM

Blue, sorry I didn't get that info to you earlier.  When I saw how thin those edges were,  figured they could use a bit of reinforcing. Those WnW guys are awesome. Hoping they come through with the markings for ya! Yes

Rob, just loving that Roland, so much in fact that it was the deciding factor in my temporarily putting the Tripe aside and having a go at it instead.  The color schemes available for it are stunning, more colorful than plain ole'  PC10.  Those black & white horizontal stripes look killer - just have to do that one and hope I can produce one half as nice as yours is looking.

Mike

 "We have our own ammunition. It's filled with paint. When we fire it, it makes pretty pictures....scares the hell outta people."


  • Member since
    April 2013
Posted by SchattenSpartan on Wednesday, September 17, 2014 4:21 PM

Oh believe me, I'm working on that everytime I sit down at the bench. I'm still missing a couple of goodies though and I want to wait for some tools to arrive before doing all the major PE and resin work (and I can't do a whole lot of stuff before I get that done)

  • Member since
    October 2008
  • From: Georgia
Posted by Rigidrider on Wednesday, September 17, 2014 4:08 PM

John... Great finish! Looks just like the picture...

Blue... I LOVE the Eindecker! coming along nicely! Very cool aircraft.

Rob... I for one am absolutely in awe of your progress! Stunning job...

Clemens my friend... Good to here from you! You are too kind sir! Eagerly watching your progress on the Butcher Birds! Bring them home now...

When Life Hands You A Bucket Of Lemons...

Make Lemonade!

Then Sell It Back At $2 Bucks A Glass...

  • Member since
    April 2013
Posted by SchattenSpartan on Wednesday, September 17, 2014 2:58 PM

Rob: Thanks for all the tips on those decals! This is going to be my first biplane model, so there's plenty of new stuff to learn... Your Roland looks magnificent! The perfect finish and your attention to detail makes it truly inspiring! I'm by far not brave enough to paint mine with the natural wood finish on fuselage, but the "Edelweiß" color scheme cought my eye right when I first looked at the box, so I'll probably go with that one...

Doug: I love that fancy black'n'white striped scheme! Overall some really great work on the Spad!

Blue: Your Eindecker is looking awesome as well! I especially like the metal finish you achieved on the cowling!

John: She's coming along very nicely! That colorful scheme sure looks bad-a!

  • Member since
    October 2013
Posted by Big Blue on Wednesday, September 17, 2014 9:15 AM

Marc, thanks and no worries.  It is hard to keep track of all the updates here... a good "problem" to have in an active group build!

Rob, your Roland just keep looking better and better!  I'm afraid I will miss something between when I start typing this and when I post it!  Really great work.

John, your Albie really came together beautifully!  Lovely work in a tiny scale; congratulations.

Mike, it sounds like you made a good call when reinforcing your Eindecker's seams.  My progress on this build has basically stopped while I wrestle with the decision to strip the top down to attempt to repair.  I know that trying to match the required new painting, weathering, etc. to the rest of the fuselage is risky, and I'd hate to go through all that if it is just going to re-appear.  I've sent an inquiry to WnW to see if they'll sent me the top decals since I know it would be close to impossible to match the color of the blue fuselage band.  If they come back with a "no", I'll probably just have to live with the seam.  

Blue

  • Member since
    January 2014
  • From: Toronto
Posted by Rob S. on Wednesday, September 17, 2014 7:43 AM

Fantastic John, looking forward to your big finish!! Cheers!

______________________________________________________________________________


On the Bench: Nothing on the go ATM

  • Member since
    April 2005
  • From: Piscataway, NJ!
Posted by wing_nut on Wednesday, September 17, 2014 7:33 AM

Nice John.  Looks like a 3D picture on top of the boxYes

Marc  

  • Member since
    September 2011
  • From: Milaca, Minnesota
Posted by falconmod on Wednesday, September 17, 2014 7:06 AM

Almost done,  got the prop done last night and the tail dragger on.  now some flat coat a little weathering.Propeller

Oh yea and the exhaust still needs to be attached.

John

On the Bench: 1/72 Ki-67, 1/48 T-38

1/144 AC-130, 1/72 AV-8A Harrier

  • Member since
    January 2014
  • From: Toronto
Posted by Rob S. on Wednesday, September 17, 2014 6:37 AM

Top of upper wing, almost done. Need to apply decals on the ailerons AND a spot repair on the right side as you'll see in a bit:

AND, here's that line. I trimmed every piece on Marc's advice, BUT, for this tiny 5mm wide final piece, I neglected to trim the long edge.....AND....there it is, VERY obvious (also, minor chip on top, but, easy to fix):

______________________________________________________________________________


On the Bench: Nothing on the go ATM

  • Member since
    April 2005
  • From: Piscataway, NJ!
Posted by wing_nut on Tuesday, September 16, 2014 8:36 PM

Rob my friend I am happy to help.  That is just beautiful.

Marc  

  • Member since
    January 2014
  • From: Toronto
Posted by Rob S. on Tuesday, September 16, 2014 7:51 PM

Ok, another evening of intense decalling done for now (will cover that next time). Got a bunch more stuff done before that though:

Exhaust. Also, the bit of weathering/paint damage was done with the hairspray method.

Upper wing supports/struts:

One of my favourite additions: GasPatch turnbuckles. WHERE have these things been my whole life?!. Installed them early to avoid having to work around the upper wing:

And the tailplane rib taped and the thin black line added flush to the lozenges:

Also, got the 'purple' upper wing lozenges completed in strips, thanks to Marc, again....Big Smile. Yup, Marc, I did definitely see that dark 'line'. It was quite pronounced. I trimmed it away. This was a tough decal job. More to follow on that next time. Thanks for lookin'.

______________________________________________________________________________


On the Bench: Nothing on the go ATM

  • Member since
    January 2014
  • From: Toronto
Posted by Rob S. on Tuesday, September 16, 2014 2:56 PM

Hey Marc...for sure...gonna trust you!! I'll trim em up beforehand.

______________________________________________________________________________


On the Bench: Nothing on the go ATM

  • Member since
    April 2005
  • From: Piscataway, NJ!
Posted by wing_nut on Tuesday, September 16, 2014 11:52 AM

Oh, I really can't see that dark line on the long edge of the decals you mention?

Trust me... it's there.  Take a couple of scrap pieces and try putting them together along the edge. You'll see it.


BTW Blue... so sorry but I didn't mean to by pass you.  The Endecker looks really sweet.  And I feel your pain about that seem.  It's happened all to often.

Marc  

  • Member since
    January 2014
  • From: Toronto
Posted by Rob S. on Tuesday, September 16, 2014 11:16 AM

Marc...OK, NOW I get what the 'arrows' in the instructions are. I have to say, WNW did not do a good job with describing what they meant for that part. Yes, it makes total sense now...cut in strips, then apply in the direction of the arrows..sheesh..

Yes, I will keep on with the decal rib tapes. I can see a ton of total wing decalling coming to a dead halt by destroying the surface with masking material!! Gonna try the hair dryer on the tapes to see if I can get 'em to conform better.

I really like the red stipe..kinda wish I'd have done that version now.\

Oh, I really can't see that dark line on the long edge of the decals you mention?

______________________________________________________________________________


On the Bench: Nothing on the go ATM

  • Member since
    February 2006
  • From: Smithers, BC, Canada
Posted by ruddratt on Tuesday, September 16, 2014 9:17 AM

I remember when I built my Eindecker for the FSM GB, those fuselage joints looked real thin, so I glued two long runs of evergreen .015 x .06 plastic strip inside from front to back, one along the top seam and one along the bottom seam to reinforce them. 

Mike

 "We have our own ammunition. It's filled with paint. When we fire it, it makes pretty pictures....scares the hell outta people."


  • Member since
    April 2005
  • From: Piscataway, NJ!
Posted by wing_nut on Tuesday, September 16, 2014 7:05 AM

Rigid... That's some cool striping.

Falcon... looking really nice.

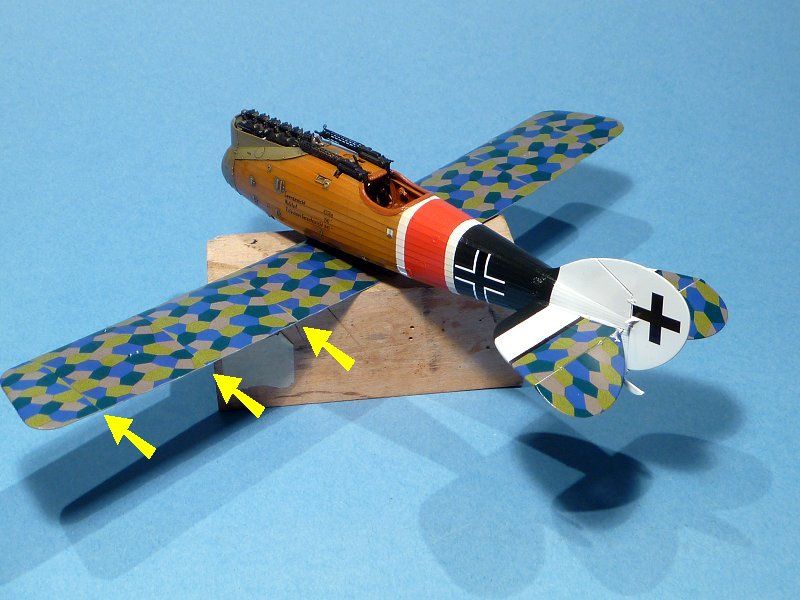
Rob... The fuselage is just awesome.   I just read the part about the large size of the wing decals giving you fits.  Sorry that I am too late with this to do any good now but you'll have it for the next one.  

The WNW lozenge decals are printed the same way the real fabric was in a long continuous bolt of cloth.  The cloth was cut in lengths equal to the chord of the wing.  The chord is the distance from the leading edge to the trailing edge. These panels were turned 90 degrees and sewn together.  So there would be a seam every few feet along the wing. And there would be a mismatch of the pattern at these seems.  The same needs to be done with the WNW decals.  This not only gives you the correct orientation of the pattern, you are dealing with smaller squares of the decals instead of 1 huge, long decals. 

Here's the lower wing of the Roland I built a few years ago. Same aircraft but I opted for the red band. Note the mismatch at the seams. Click the pic for a larger view.

1 thing has to be done to the strip before you cut it into smaller panels. There is a barely perceptible dark line at the long edges of each strip.  A thin silver needs to be trimmed from both edge before cut into the smaller panels.  If you don't, that line is double in size when the panels are rotated and butted together making an obvious dark line between each panels. 

I had a few spots that didn't want to snuggle down over some small details.  Poking with the point of a sharp blade and applying some Solva-Set and when just about dry light pressure with a q-tip pushed it all down tight.  If you never used Solva-Set this stuff is really aggressive.  This stuff compared to Micro-Sol is like comparing a nuke to a hand grenade.  Do not touch it at all until near dry or your decals will smear like wet paint.

Lastly, a tip for getting the decal around the control horns without any need for patching.  Trim the decal to the rough shape you need as usual.  Before you dip it in the water position it on the elevator, for example, correct from side to side and slide it forward so it buts up to the controls horn.  Mark the spot and make a tiny still in the decal.  When soaked and moved into position the control horn slips right into the slot and a little decal solution gets the side the settle down around it without leaving a mark or gap

Sorry for the long winded post but now this is REALLY the last thing.  Stick with the rib tape decals.  Tedious?  Yes indeed.  But the thought of tape pulling up the lozenge decals is sending shivers down my spine.  I also think it will be less tedious than taping all that and getting them all the exact same width.

Marc  

  • Member since
    October 2013
Posted by Big Blue on Monday, September 15, 2014 9:41 PM

Rob Sherman

Funny, on my Eindekker last year, the exact think happened to me!!

Hmm... maybe I should think twice before ripping things up and trying to fix it.  If it happened again after all that.... Angry

  • Member since
    January 2014
  • From: Toronto
Posted by Rob S. on Monday, September 15, 2014 8:48 PM

Thanks Blue, gonna try that method. Funny, on my Eindekker last year, the exact thing happened to me!!

______________________________________________________________________________


On the Bench: Nothing on the go ATM

  • Member since
    October 2013
Posted by Big Blue on Monday, September 15, 2014 8:31 PM

Rob,

Have you tried using a hairdryer for the decals?  I'd go slow and steady until you see how they respond, but I know that a number of people have been using this method with success on other decals.  Just a thought.

Thanks for the kind comments.  I'm really bumming about that damn seam line appearing...

JOIN OUR COMMUNITY!

Our community is FREE to join. To participate you must either login or register for an account.

SEARCH FORUMS
FREE NEWSLETTER
By signing up you may also receive reader surveys and occasional special offers. We do not sell, rent or trade our email lists. View our Privacy Policy.