SEARCH FINESCALE.COM

Enter keywords or a search phrase below:

Ju 87 Stuka GB

173299 views
2599 replies
1 rating 2 rating 3 rating 4 rating 5 rating
  • Member since
    November 2008
  • From: Central Florida
Posted by plasticjunkie on Friday, January 9, 2015 7:07 AM

Do you have the other part? If not then stretched sprue and Tenax or Plasti I Weld to make a permanent join. Very easy fix.

 GIFMaker.org_jy_Ayj_O


Too many models to build, not enough time in a lifetime!!

  • Member since
    May 2013
  • From: Indiana, USA
Posted by Greg on Friday, January 9, 2015 11:19 AM

I second PJ's advice. Important to use a thin aggressive cement as he mentioned on this repair.

Raven, I managed to break mine in the exact same place. Luckily I found the snapped off part of the bracket. I spot welded it with Tamiya Extra Thin cement (pretty aggressive stuff too), let it cure a while then reinforced it with some medium thickness CA. All while still on the sprue.

If you want I can take a shot of what the repair looks like later.

Removing the part from the sprue will be a delicate operation I suspect. I hope you have the missing bit.

I somehow managed to break one of the engine mounting brackets, and repaired that using the same method btw.

  • Member since
    September 2013
Posted by Raven728 on Friday, January 9, 2015 1:27 PM

Ah, I forgot to add that the missing part is nowhere to be found, so it'll have to be made from scratch (if at all...muhaha Devil).

- Steve

  • Member since
    May 2013
  • From: Indiana, USA
Posted by Greg on Friday, January 9, 2015 2:01 PM

I hate it when that happens.

When I broke my mount the other day, had no idea when it happened let alone where it went. Wrote it off as lost then saw it on the floor. My lucky day.

Reminder to self, clean the bench. This is why this stuff keeps happening.

  • Member since
    December 2002
  • From: Bury St Edmunds, Suffolk, England
Posted by Bish on Saturday, January 10, 2015 5:52 AM

That's a bummer Steve. I would go for some plastic rob myself, but stretched sprue would work just as well.

I am a Norfolk man and i glory in being so


On the bench: Airfix 1/72nd Harrier GR.3/Fujimi 1/72nd Ju 87D-3

  • Member since
    September 2013
Posted by Raven728 on Saturday, January 10, 2015 11:49 AM

Bish

That's a bummer Steve. I would go for some plastic rob myself, but stretched sprue would work just as well.

That would be the ideal solution for me, if I can find some styrene the same size (or close to it). Planning a trip to the LHS, so wish me luck. I should be posting update pics this weekend, I did the splinter camo last weekend and it turned out pretty well I think.

- Steve

  • Member since
    December 2002
  • From: Bury St Edmunds, Suffolk, England
Posted by Bish on Saturday, January 10, 2015 11:59 AM

I am not sure what size you would need. I've gathered a selection of sizes as that stuff always comes in handy.

I am a Norfolk man and i glory in being so


On the bench: Airfix 1/72nd Harrier GR.3/Fujimi 1/72nd Ju 87D-3

  • Member since
    April 2013
Posted by SchattenSpartan on Saturday, January 10, 2015 5:39 PM

Raven: Ouch, I hate it when that happens. I'm sore you'll get it sorted though.

Bad news on my Stuka cockpit: I just noticed the entire rear bulkhead is missing in my resin set. I already sent an email to Aires' customer support and I'm pretty sure they are going to send me a replacement (they are really great regarding that stuff). That delay basically means I'll have to ditch the idea of further enhancing it with the Eduard cockpit PE though.

  • Member since
    December 2002
  • From: Bury St Edmunds, Suffolk, England
Posted by Bish on Sunday, January 11, 2015 2:53 AM

Thats a bummer. I am sure Aires will come through, I have a good experience with their service.

I am a Norfolk man and i glory in being so


On the bench: Airfix 1/72nd Harrier GR.3/Fujimi 1/72nd Ju 87D-3

  • Member since
    November 2008
  • From: Central Florida
Posted by plasticjunkie on Monday, January 12, 2015 7:51 AM

That sucks Clemens. I have made it a practice as of late to go thru the parts as soon as my orders come in just to make sure all parts are accounted for. Hope you get your part soon.

Squadron had a sale just before Christmas and I took advantage of the lower prices of the 1/48 Kitty Hawk Cougar and Starfire.  As soon as they came in I checked the contents and discovered the F-94's pe fret missing. I contacted Squadron and they sent a replacement a few days later.  

 GIFMaker.org_jy_Ayj_O


Too many models to build, not enough time in a lifetime!!

  • Member since
    December 2004
  • From: Houston, Texas
Posted by panzerpilot on Monday, January 12, 2015 11:01 AM

SS. I was missing a few parts from my Aires set. They sent me two pf the parts, via airmail. I had them within a week.

I'll be continuing my stuka soon. Dry fitting of the cockpit parts on my Aires set, and a tip from someone here, shows the cockpit floor a bit narrow. I'll probably have to add some sprue to the sides to get it to stay in correctly. So, be on the lookout for that.

-Tom

  • Member since
    December 2002
  • From: Bury St Edmunds, Suffolk, England
Posted by Bish on Monday, January 12, 2015 11:19 AM

I'll be making note of these issues and will have to make a point of checking my Aires set. I know Aires has good service, they sent me a PE fret for my 72nd Stuka pit when I lost one part, the IP, from my original one. It was my fault but they still sent it free of charge.

In general, I am finding the service from eastern European companies to not just be first class but above and beyond.

I am a Norfolk man and i glory in being so


On the bench: Airfix 1/72nd Harrier GR.3/Fujimi 1/72nd Ju 87D-3

  • Member since
    November 2003
  • From: Naples, FL
Posted by tempestjohnny on Monday, January 12, 2015 11:40 AM

Well...it doesn't look like work will be bringing me in for overtime tomorrow.   So that means I can stay up late tonight at the bench.   Should get some build time.....;)


  • Member since
    December 2002
  • From: Bury St Edmunds, Suffolk, England
Posted by Bish on Monday, January 12, 2015 11:46 AM

Well, that good new for us Johnny, even if not for your bank account.

I am a Norfolk man and i glory in being so


On the bench: Airfix 1/72nd Harrier GR.3/Fujimi 1/72nd Ju 87D-3

  • Member since
    January 2013
  • From: Athens, Greece
Posted by Zvezda1980 on Tuesday, January 13, 2015 9:09 AM

Hello fellow Sturzkampfgeschwaderer's.

I see we all have our collection of modelling accidents. My most awkward was a heavy drop of CA glue splashed right into the eye. For a few days it was as if I was winking to everybody Wink

After some idle period, the Stuka received all decals and a second heavy coat of gloss clear.

Decals were excellent and went down perfectly with some Gunze's solution.

Within the next few days I hope to have finished all assembly, weathering, etc  downstream the engine firewall.Then the engine compartment and engine itself.

I also half-assembled and half-painted an Opel Blitz truck (no pics worth showing yet) and if I like the result, I will try to put the bird inside a simple diorama (an 'engine parts delivery to the airfield', scene) but that's dependent of my Super Angry working hours.

  • Member since
    April 2013
Posted by SchattenSpartan on Tuesday, January 13, 2015 1:26 PM

She's looking really pretty, Zvezda! That CA accident sounds painful...

I already got a reply from Aires. They are going to get my replacement part posted in the next couple of days. Their customer service really is something else!

  • Member since
    December 2002
  • From: Bury St Edmunds, Suffolk, England
Posted by Bish on Tuesday, January 13, 2015 3:08 PM

That looks really nice Zvezda, and nice to hear your going to try a dio. have you done one before.

That's good news SS.

I am a Norfolk man and i glory in being so


On the bench: Airfix 1/72nd Harrier GR.3/Fujimi 1/72nd Ju 87D-3

  • Member since
    November 2008
  • From: Central Florida
Posted by plasticjunkie on Tuesday, January 13, 2015 7:40 PM

Ouch Zvezda! Glad you are ok. My buddy's daughter superglued one of her eye lids a  few years back. They spent several hours in the ER unsticking things! Your Stuka looks great.

Got a little done on my Stuka. Did some preshading to the bottom only. Then sprayed some RLM65.

Then sprayed some RLM65.

 GIFMaker.org_jy_Ayj_O


Too many models to build, not enough time in a lifetime!!

  • Member since
    October 2006
  • From: Tucson, AZ
Posted by Archangel Shooter on Tuesday, January 13, 2015 9:37 PM

Like how that pre-shading came out! I have tried that a couple of times and can never seem to get it right, I wind up just covering it with the base color.

Note to fellow group members here, I just posted a yard sale over at the ARC site if interested.

Tomorrow I hope to lay down some more paint on my bird, unexpected interruptions are killing me here.

Scott  

 Your image is loading...

 On the bench: So many hanger queens.


  • Member since
    November 2008
  • From: Central Florida
Posted by plasticjunkie on Wednesday, January 14, 2015 6:35 AM

Thanks Scott

The single colors are a breeze. I just spray very lightly to cover most of the area then hit the center of the panels fading to the edges till there's a hint of the black. Multi colored schemes are  more complex. for that reason I'm not doing the preshading on top cause it will be lost to the multi colored North Arica scheme coming.

 GIFMaker.org_jy_Ayj_O


Too many models to build, not enough time in a lifetime!!

  • Member since
    December 2002
  • From: Bury St Edmunds, Suffolk, England
Posted by Bish on Wednesday, January 14, 2015 1:56 PM

PJ, that looks nice. I have not tried pre shading for the reason Shooter mentioned, but I might have to give it a try some day.

I am a Norfolk man and i glory in being so


On the bench: Airfix 1/72nd Harrier GR.3/Fujimi 1/72nd Ju 87D-3

  • Member since
    April 2013
Posted by SchattenSpartan on Wednesday, January 14, 2015 11:44 PM

That preshading looks spot on indeed! Definitely one of the many things I still have to improve on...

  • Member since
    November 2008
  • From: Central Florida
Posted by plasticjunkie on Thursday, January 15, 2015 7:09 AM

Thanks gents. I think it gives it that grimy weathered look underneath more visible on lighter colors.

 GIFMaker.org_jy_Ayj_O


Too many models to build, not enough time in a lifetime!!

  • Member since
    May 2013
  • From: Indiana, USA
Posted by Greg on Friday, January 16, 2015 11:34 AM

Zvesda, your Stuka is looking great.

The CA in the eye scares me. Ouch.

PJ, looking good. I'm not even close with my pre-shading attempts. Your Stuka's underside looks great.

  • Member since
    January 2013
  • From: Athens, Greece
Posted by Zvezda1980 on Sunday, January 18, 2015 5:55 AM

Thanks for the comments fellows.

Bish that would be my first serious dio attempt

Unfortunatelly things did not go as anticipated.

Yesterday I started working on setting up the engine area to make it look right.

In brief:

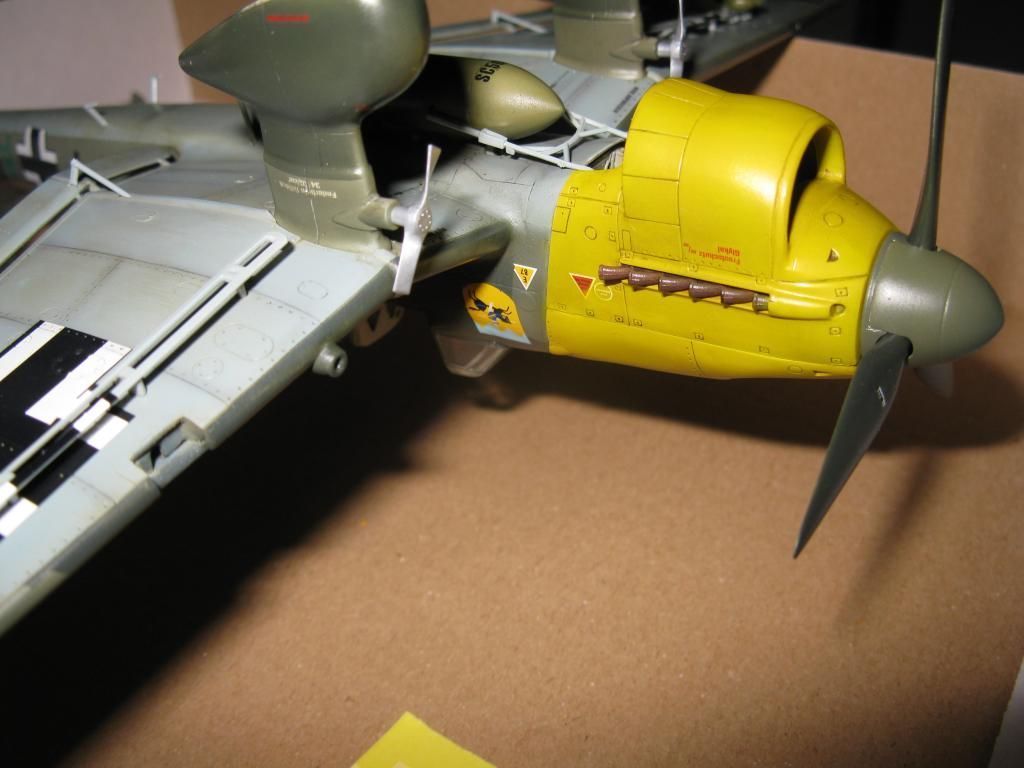
Plan-A (Initial): Fully displayed engine: The engine, when placed on the plane looks disgusting. Nothing aligns properly, engine mounts are bent/distorted heavily when fit in place. Also from various photos I have seen, some engine parts are oversized, some undersized, some are missing, etc, etc. I attempted a series of cutting, trimming, squizing and similar operations, but the result was still unacceptable for a realistic fully displayed engine. So I proceeded to ...

Plan-B: Display with lower covers in place: Attempting to install the lower covers and excibit only the top of the engine, initiated the 'head banging on wall' period Bang Head. Cover and engine are just not made for each other. Covers have a lousy fit on the plane. Engine has a lousy fit on the firewall and inside the covers. Combine the two and a monster is born. Having exhausted my arsenal of foul language (in the style of 'Italeri go DevilAngrySuper Angry'), I headed torwards ...

Plan-C: Engine covers fully installed - no engine display: It took about 3 hours to install and glue the fully assembled engine covers. They do not fit properly by any means. There are no locating pins/tabs, etc and whatever one may try, there are gaps and misalignments. I did not want to ruin the finished paintwork and after carefully attempting about 30 times, I ended up with the less ugly configuration .I left the model aside, got up and had a bottle of beer and a couple of smokes.

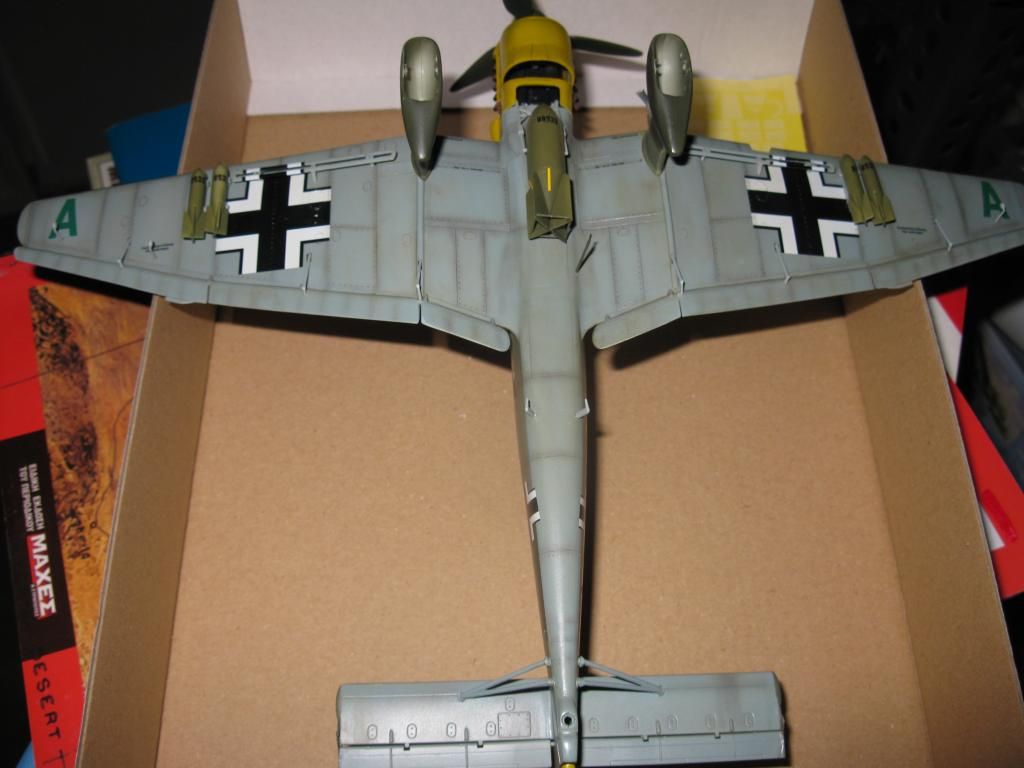
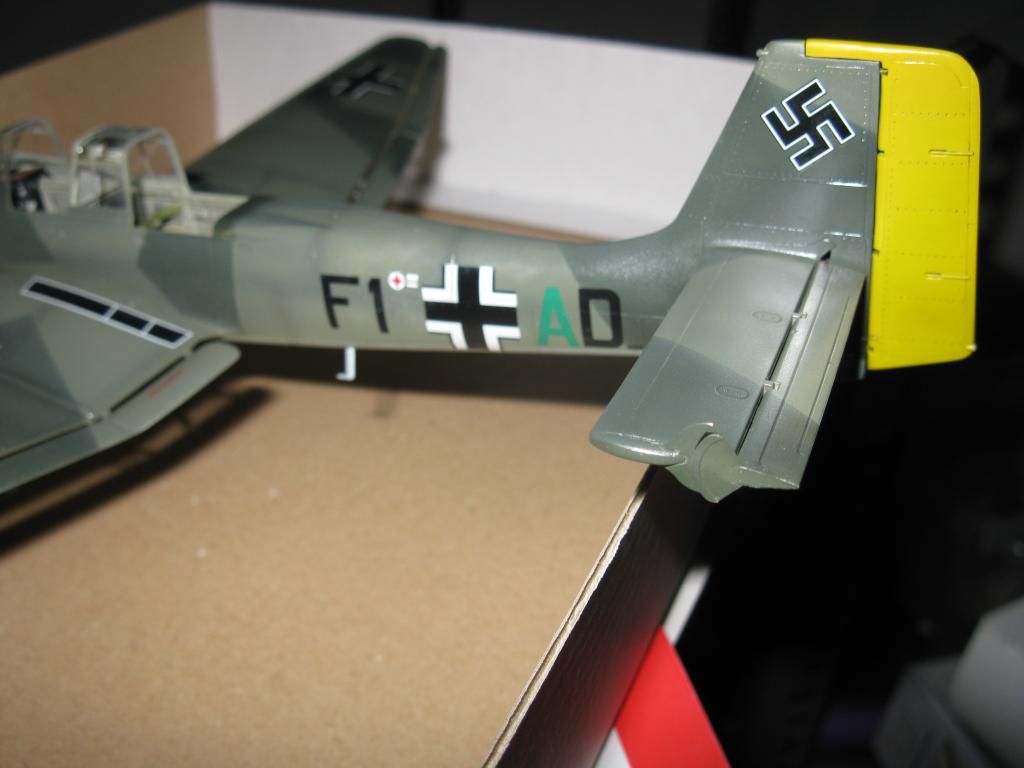
Another string of problems appear on the lower surfaces positioning of markings and airbrakes & bomb racks. I followed Italeri instructions and something is not right with the Blk/cross position (see photos).

Result: I do not like the result. I also do not wish (my broken nerves don't allow me) to start the heavy sanding, filling, etc required and do the painting all over again. This model is not worth a place in a diorama so it will just be completed and put on a corner for punishment.

I will transfer and apply the idea to another GB

I apologize for talking too much in this post, I tried to be as brief as possible.

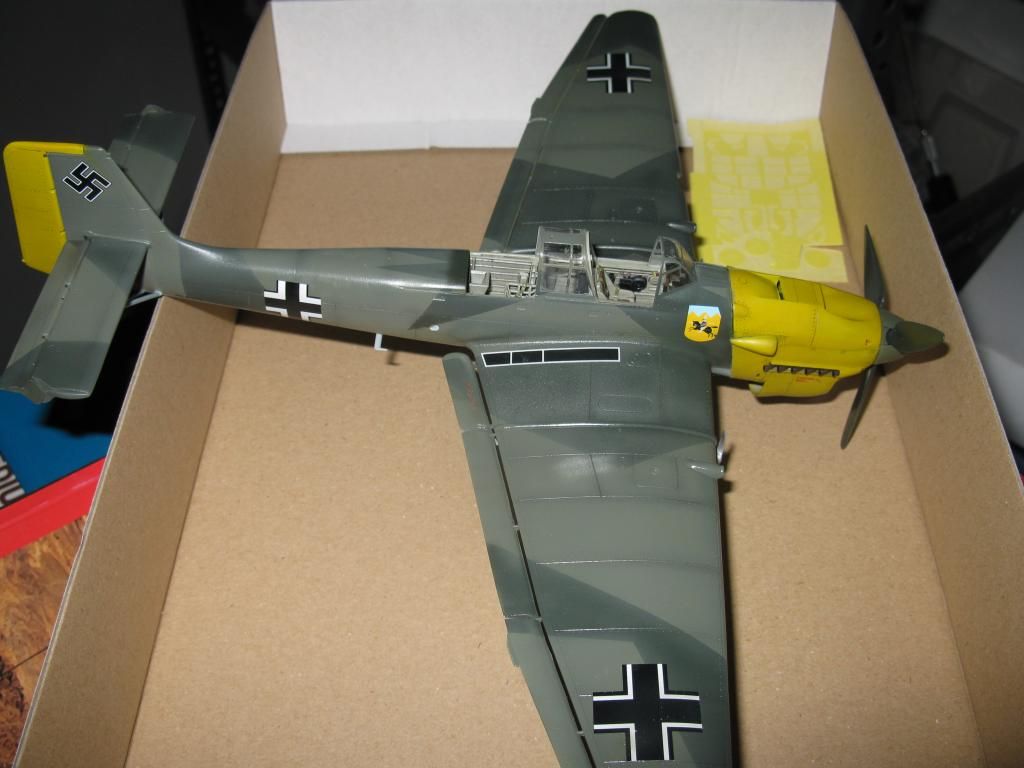
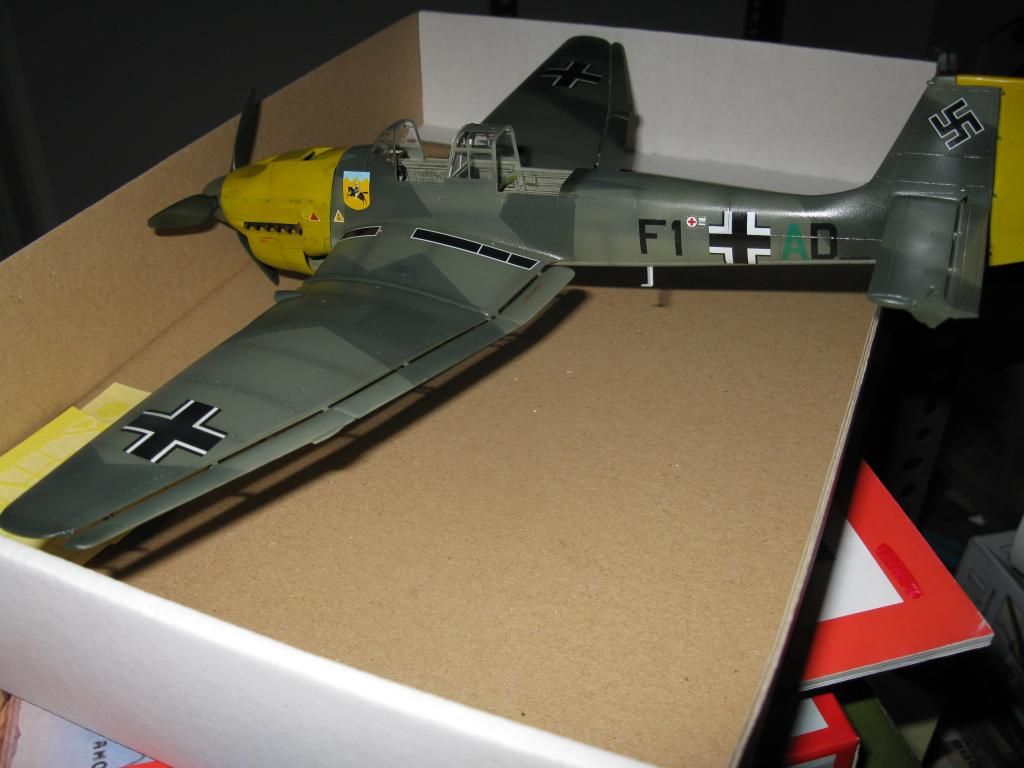
Below some pics of the almost finished kit. An oil wash was applied and some panel post shading, rivets were highlighted with a soft pencil's tip. Also a crooked cross decal was placed from the spares box, Italeri provides none. Some small bits and the wheels are to be installed and some exhaust stains, leaks,some more dust,  etc to be recreated.

Cheers to all

  • Member since
    April 2005
Posted by Thunderbolt379 on Sunday, January 18, 2015 6:05 AM

Zvezda -- you've achieved a fantastic result from a dog of a kit! The fit of the cowling to fuselage you've finally arrived at is at least as good, if not better, than Hasegawa's, and the overall effect is notably good. Please don't short-change yourself over that darn engine -- okay, your plans didn't work out for a more ambitious display, but it's a very fine model indeed. I'd have been proud of it, and I rate it superior to the one I knocked out!

Cheers, M/TB379

http://worldinminiature.blogspot.com/

  • Member since
    December 2002
  • From: Bury St Edmunds, Suffolk, England
Posted by Bish on Sunday, January 18, 2015 6:35 AM

Zvezda, sorry to hear you have had to struggle with this. I do agree with Mike in that the fit of the cowl to fuselage does look good from here. As for the underside crosses, I have been checking some pics. Its hard to tell for sure as pics of the underside are all from an angle, but your actually look about right. I know it seems there should be more space between the bombs and the cross, but from what I could tell, there wasn't.

It is a pity about the engine, but its still a really nice looking build. Given that its bombed up, how about a dio of the crew climbing aboard.

I am a Norfolk man and i glory in being so


On the bench: Airfix 1/72nd Harrier GR.3/Fujimi 1/72nd Ju 87D-3

  • Member since
    November 2003
  • From: Naples, FL
Posted by tempestjohnny on Sunday, January 18, 2015 9:43 AM

Little more painting done this morning.  Canopy is just tacked in place


  • Member since
    February 2010
  • From: New Jersey
Posted by 68GT on Sunday, January 18, 2015 10:34 AM

That's some nice work there Zvezda.

On Ed's bench, ???


  • Member since
    November 2008
  • From: Central Florida
Posted by plasticjunkie on Sunday, January 18, 2015 12:01 PM

Zvezda.

Take it from one picky modeler, your build looks great from here. All parts appear to be in alignment and unless you mention the shortcomings, no one would be the wiser. You have succeeded in rescuing an otherwise unfinished shelved model. You should be happy how it came out.  

 GIFMaker.org_jy_Ayj_O


Too many models to build, not enough time in a lifetime!!

JOIN OUR COMMUNITY!

Our community is FREE to join. To participate you must either login or register for an account.

SEARCH FORUMS
FREE NEWSLETTER
By signing up you may also receive reader surveys and occasional special offers. We do not sell, rent or trade our email lists. View our Privacy Policy.