SEARCH FINESCALE.COM

Enter keywords or a search phrase below:

Armour in the West GB (Defence of the Reich)

44512 views
658 replies
1 rating 2 rating 3 rating 4 rating 5 rating
  • Member since
    August 2013
Posted by Jsmyth on Friday, August 22, 2014 3:56 PM

Hello everyone

I was just researching about the Panther kit I picked up and there is a lot of negative reviews. They say it's old and inaccurate so now I'm not looking forward to this build if I have to do a lot of scratch building. This was the only kit my LHS had that would fit this build. Any pointers of this kit from anyone would be great.

  • Member since
    December 2002
  • From: Bury St Edmunds, Suffolk, England
Posted by Bish on Friday, August 22, 2014 4:12 PM

I have not built this kit. But older kits of most companies don't tend to be all that accurate, though saying that, the Su 85 I am doing looks ok though I have not gone into great detail in research. I have read that this Tamiya kit is not accurate. You have several choices. You could simply build it, knowing its not accurate, and use it as a chance to practice. I know you have built a couple of armour kits so not completely new to armour, but the chance to practice on a kit like this might be worth while. You could try and correct it, probably more hassle than its worth. Or you could get another kit and put this one away.

I think this will build up easy enough, if you want to go with the first idea.

I am a Norfolk man and i glory in being so


On the bench: Airfix 1/72nd Harrier GR.3/Fujimi 1/72nd Ju 87D-3

  • Member since
    August 2013
Posted by Jsmyth on Friday, August 22, 2014 6:28 PM

Here is my attempt to try and install Zimmerit. I wanted to try it on a piece of cardboard before to see how it would come out. Seeing how I have never performed it before I think it looks ok. Let me know what you all think.

thanks Jamie

  • Member since
    May 2013
  • From: From the Mit, but live in Mason, O high ho
Posted by hogfanfs on Friday, August 22, 2014 6:44 PM

Looks very realistic to me. How did you perform the lines?

 Bruce


 On the bench:  1/48 Eduard MiG-21MF

                        1/35 Takom Merkava Mk.I


  • Member since
    February 2014
  • From: Michigan
Posted by silentbob33 on Friday, August 22, 2014 7:18 PM

That looks pretty good!  I'll second Bruce's question, how'd you do it?

On my bench: Academy 1/35 UH-60L Black Hawk

  • Member since
    May 2013
  • From: From the Mit, but live in Mason, O high ho
Posted by hogfanfs on Friday, August 22, 2014 7:30 PM

Jamie,

Here is a picture of a real King Tiger I pulled from the internet.  It shows the Zimmerit nicely.

Hopefully, this can give you scale ideas about how the zimmerit is laid on the tank. 

What you have is very similar!

Hope this helps!

 Bruce


 On the bench:  1/48 Eduard MiG-21MF

                        1/35 Takom Merkava Mk.I


  • Member since
    August 2013
Posted by Jsmyth on Friday, August 22, 2014 7:37 PM

I read that the Germans used trowel's to put it on so I used a piece of plastic to spread out the contour putty then just let it set for a very short time. I then used an old square tip x-acto blade. When I pressed it in I went in at a 45deg angle down one row then spun the cardboard 180deg and went the other way. I just hope it will come out nice on the Panther.

  • Member since
    January 2013
Posted by jibber on Saturday, August 23, 2014 12:13 PM

Jamie I think it needs to be a little bit more unformed. Even though it was put on randomly, there is a method to it and as you can see in this pic of a King Tiger, it's a "little" more straight with ridges. You can also deliberately remove small sections as some areas were knocked off but I think you're real close. Making your own is fun and you can fit it in small areas that most pre-formed zimmerit misses. What material did you use? A lot of guys use Miliput and roll it out thin in small sections that makes it easier to handle. Also there are other tools that roll out an entire row at a time that goes quick and looks great too.  

  • Member since
    December 2002
  • From: Bury St Edmunds, Suffolk, England
Posted by Bish on Saturday, August 23, 2014 12:21 PM

You have done a pretty good job with that Jamie. jbber makes a good point, but its certainly better than my first time. I use Miliput white for Zimm, but what ever works works.

I am a Norfolk man and i glory in being so


On the bench: Airfix 1/72nd Harrier GR.3/Fujimi 1/72nd Ju 87D-3

  • Member since
    November 2009
  • From: SW Virginia
Posted by Gamera on Saturday, August 23, 2014 3:35 PM

Looks fine to me Jamie. I usually use Squadron green or white putty and rake it with a small hack saw.

"I dream in fire but work in clay." -Arthur Machen


  • Member since
    July 2004
  • From: Sonora Desert
Posted by stikpusher on Tuesday, August 26, 2014 12:06 AM

Panthers often had zimmerit applied in manners different than many other panzers. Often the ridges were vertical rather than horizontal.

Sometimes there was a grid or cross hatch pattern added to the ridges

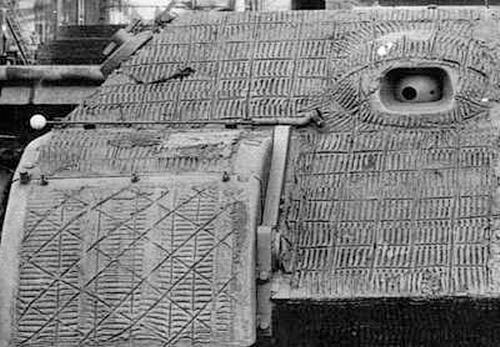
also, sometimes it was just a simple grid pattern rather than the ridges

Anyways, I made mor progress on my Panther G in the past couple of days. Yesterday I added the lower glacis plate to the die cast hull using Gator Glue and held it in place with rubber bands until the glue dried. Today I super glued on the side plated and final drive housings...

Then I built up the running gear

and glued them into place

Then I built up the remaining fiddly bits

and glued most of them in place on the hull sides

and I got the exhausts and fiddly bits glued to the rear hull plate

and I glued the main gun barrel in place after I sanded the seam smooth. So after maybe 4-5 hours work, all I need to do is add the tracks, screw the upper hull to the lower and glue the last bits on, and then it will be all ready for painting...


F is for FIRE, That burns down the whole town!

U is for URANIUM... BOMBS!

N is for NO SURVIVORS...

       - Plankton

LSM


  • Member since
    December 2002
  • From: Bury St Edmunds, Suffolk, England
Posted by Bish on Tuesday, August 26, 2014 4:39 AM

Nice work there SP. And some nice pics of the Panther Zimm.

I am a Norfolk man and i glory in being so


On the bench: Airfix 1/72nd Harrier GR.3/Fujimi 1/72nd Ju 87D-3

  • Member since
    November 2009
  • From: SW Virginia
Posted by Gamera on Tuesday, August 26, 2014 8:36 AM

Yes, nice work there SP. And good reference photos, if you're going with that sorta of zimmerit I suppose you either need to buy one of the pre-made sets or the special dies to press it into the model.

"I dream in fire but work in clay." -Arthur Machen


  • Member since
    July 2004
  • From: Sonora Desert
Posted by stikpusher on Tuesday, August 26, 2014 11:30 AM

I did the "grid" pattern for a test on an old Panther kit using green putty, and that was the easiest zimm that I have ever done. The other patterns require you to do whateer your basic method is, then scribe in the grid or cross hatch on top of that. A bit more challenging.


F is for FIRE, That burns down the whole town!

U is for URANIUM... BOMBS!

N is for NO SURVIVORS...

       - Plankton

LSM


  • Member since
    July 2004
  • From: Sonora Desert
Posted by stikpusher on Wednesday, August 27, 2014 12:14 AM

Another hour or so spent at the bench on this putting on the tracks

left side

right side

then a test fit of the upper hull

I gotta check my references to see if the tank that I am modeling has side skirts or not. But this kit is pretty much done now.


F is for FIRE, That burns down the whole town!

U is for URANIUM... BOMBS!

N is for NO SURVIVORS...

       - Plankton

LSM


  • Member since
    December 2002
  • From: Bury St Edmunds, Suffolk, England
Posted by Bish on Wednesday, August 27, 2014 3:04 AM

Looking good there SP, be nice to see some colour on it.

I am a Norfolk man and i glory in being so


On the bench: Airfix 1/72nd Harrier GR.3/Fujimi 1/72nd Ju 87D-3

  • Member since
    November 2009
  • From: SW Virginia
Posted by Gamera on Wednesday, August 27, 2014 8:51 AM

Looks great SP! I built one of these when they first came out and yup it's one of those shake the box and it falls together Tamiya kits. I made some skirts for mine out of old 'For Sale' sign plastic.

"I dream in fire but work in clay." -Arthur Machen


  • Member since
    July 2004
  • From: Sonora Desert
Posted by stikpusher on Wednesday, August 27, 2014 10:58 AM

This kit has skirts. It really did fall together. Just what I needed to do after all the fiddling and fussing with my last few projects. it's really too bad that Tamiya did not start their 1/48 series in the 80s and expand it to modern armor as well. These kits are the bomb.


F is for FIRE, That burns down the whole town!

U is for URANIUM... BOMBS!

N is for NO SURVIVORS...

       - Plankton

LSM


  • Member since
    May 2013
  • From: From the Mit, but live in Mason, O high ho
Posted by hogfanfs on Wednesday, August 27, 2014 11:16 AM

stikpusher

This kit has skirts. It really did fall together. Just what I needed to do after all the fiddling and fussing with my last few projects. it's really too bad that Tamiya did not start their 1/48 series in the 80s and expand it to modern armor as well. These kits are the bomb.


Pun intended?!? LOL!

Stik, the Panther looks very great, looking forward to seeing it with paint!

 Bruce


 On the bench:  1/48 Eduard MiG-21MF

                        1/35 Takom Merkava Mk.I


  • Member since
    November 2009
  • From: SW Virginia
Posted by Gamera on Wednesday, August 27, 2014 1:42 PM

Did the kit come with skirts? Maybe I'm thinking of something else where I made my own- no idea. I can barely remember where I was yesterday much less ten years or so ago when I built my kit.

"I dream in fire but work in clay." -Arthur Machen


  • Member since
    July 2004
  • From: Sonora Desert
Posted by stikpusher on Wednesday, August 27, 2014 2:05 PM

Yes it did. And I have found some photos of a few in the Bulge that had skirts or at least partial skirts so I am leaning towards those right now. Research is taking more time than the build here...


F is for FIRE, That burns down the whole town!

U is for URANIUM... BOMBS!

N is for NO SURVIVORS...

       - Plankton

LSM


  • Member since
    May 2013
  • From: From the Mit, but live in Mason, O high ho
Posted by hogfanfs on Thursday, August 28, 2014 11:22 AM

Question, which Milliput putty did any of you use for simulating zimmerit on a German tank? The standard grain, or the superfine?

Thanks,

 Bruce


 On the bench:  1/48 Eduard MiG-21MF

                        1/35 Takom Merkava Mk.I


  • Member since
    December 2002
  • From: Bury St Edmunds, Suffolk, England
Posted by Bish on Thursday, August 28, 2014 11:27 AM

I use the superfine, Miliput white.

I am a Norfolk man and i glory in being so


On the bench: Airfix 1/72nd Harrier GR.3/Fujimi 1/72nd Ju 87D-3

  • Member since
    May 2013
  • From: From the Mit, but live in Mason, O high ho
Posted by hogfanfs on Thursday, August 28, 2014 11:29 AM

Bish

I use the superfine, Miliput white.

Thank you sir,  for the fast response!

 Bruce


 On the bench:  1/48 Eduard MiG-21MF

                        1/35 Takom Merkava Mk.I


  • Member since
    December 2002
  • From: Bury St Edmunds, Suffolk, England
Posted by Bish on Thursday, August 28, 2014 11:36 AM

lol, right time right place. I think when I first tried it I used the standard, but its to grainy. With the white I have had no problems.

I am a Norfolk man and i glory in being so


On the bench: Airfix 1/72nd Harrier GR.3/Fujimi 1/72nd Ju 87D-3

  • Member since
    November 2009
  • From: SW Virginia
Posted by Gamera on Thursday, August 28, 2014 12:50 PM

I've used Squadron green and white putty but the Milliput should work better.

"I dream in fire but work in clay." -Arthur Machen


  • Member since
    July 2004
  • From: Sonora Desert
Posted by stikpusher on Saturday, August 30, 2014 2:38 PM

Well after looking at plenty of photos of Panther Gs in the Bulge I found one that has the same features as my build (chin mantlet, crewherater, late style exhausts) and will be painting mine up at this one.

I wanted to do an Ardennes Heer Panther G and this one from Fuehrer Grenadier Brigade fits the bill perfectly. Plus the Tamiya kit just happens to have the markings on the decal sheet, although the paint instructions show it in a "ambush" scheme.

This morning I screwed down the upper hull onto the lower hull and glued the engine hatch and ball MG mount in place over those openings, so now I am all ready to start slinging paint on my days off this week starting tomorrow.  I will be doing it in the late 1944 scheme of Olive Green and Dark Yellow over Red Oxide Primer that  was used on most German armor built at that time period and seen in the Bulge fighting.


F is for FIRE, That burns down the whole town!

U is for URANIUM... BOMBS!

N is for NO SURVIVORS...

       - Plankton

LSM


  • Member since
    December 2002
  • From: Bury St Edmunds, Suffolk, England
Posted by Bish on Saturday, August 30, 2014 2:50 PM

If you had sia di would have given you the printout of the instructions to the Tamiya 35th Ausf G. Though the markings might not have been easy to do. Look forward to the pics.

I am a Norfolk man and i glory in being so


On the bench: Airfix 1/72nd Harrier GR.3/Fujimi 1/72nd Ju 87D-3

  • Member since
    July 2004
  • From: Sonora Desert
Posted by stikpusher on Saturday, August 30, 2014 3:10 PM

I have the Tamiya 35th scale early Panther G in my stash. I have not compared the marking options to the 48th scale kit. I had hard time pinning down markings that would work for a Bulge Panther with the late style exhausts. most seemed to be with the earlier style exhausts without the flame arrestors, but with the crew heater and chin mantlet. jeez I obesess over silly things sometimes... I cant wait to get some paint on this thing and get her all wrapped up.


F is for FIRE, That burns down the whole town!

U is for URANIUM... BOMBS!

N is for NO SURVIVORS...

       - Plankton

LSM


  • Member since
    December 2002
  • From: Bury St Edmunds, Suffolk, England
Posted by Bish on Saturday, August 30, 2014 3:56 PM

Sorry Stik, I should have been clearer. I meant their late G. It has markings for 301 of the 9th Pz Div in the Ardennes in jan 45. You can't see the number here, but I have a pic of it in one of the Pz Tracts books which is clearer. This is the same vehicle.

I am a Norfolk man and i glory in being so


On the bench: Airfix 1/72nd Harrier GR.3/Fujimi 1/72nd Ju 87D-3

JOIN OUR COMMUNITY!

Our community is FREE to join. To participate you must either login or register for an account.

SEARCH FORUMS
FREE NEWSLETTER
By signing up you may also receive reader surveys and occasional special offers. We do not sell, rent or trade our email lists. View our Privacy Policy.