SEARCH FINESCALE.COM

Enter keywords or a search phrase below:

USMC GB : Now until Sept 2015

39505 views
499 replies
1 rating 2 rating 3 rating 4 rating 5 rating
  • Member since
    October 2008
  • From: Georgia
Posted by Rigidrider on Saturday, December 27, 2014 8:55 PM

Rob, Yes sir they are... This one has a made in china 1977 mold on the tail plane. POG, but I'm not going to let it whip me.

PJ, You bet! , I've cut off the pilots side but left the other, The pictures I have to go by is showing the one, as for the nose gun, absolutely I will not put it on! LOL...The belt ammo in some pictures goes over the top, and in some, underneath the guns, think I'll go over top. Also, I cant bring myself to put on those hideous white MARINE decals... I will replace with black dry transfers... The only white markings I ever saw were either the very early conflict birds or the ones that were stateside. I never saw any with white lettering when I was overseas. Again, my reference book shows black lettering in country and white lettering on the early stateside birds.

Thanks for the tips...

Doug

When Life Hands You A Bucket Of Lemons...

Make Lemonade!

Then Sell It Back At $2 Bucks A Glass...

  • Member since
    October 2008
  • From: Georgia
Posted by Rigidrider on Saturday, December 27, 2014 9:03 PM

PJ... By the way... Did you see that Photo bucket is wanting 39.00 A YEAR for extra storage now??? I will check out Imageshack too but have been using Flickr as of now... a bit to try to figure out the workings, but 1 TB of storage which they claim is about 1/2 million photos... for free???

Doug

When Life Hands You A Bucket Of Lemons...

Make Lemonade!

Then Sell It Back At $2 Bucks A Glass...

MAC
  • Member since
    July 2009
  • From: Keyport, New Jersey
Posted by MAC on Saturday, December 27, 2014 10:25 PM

I made another diorama for this build. It depicts a Marine squad coming across a tunnel

Thanks for looking

Mac


  • Member since
    October 2004
  • From: Northern Virginia
Posted by ygmodeler4 on Sunday, December 28, 2014 2:58 AM

Sorry for being away, been pretty busy (in a good way). I'm glad to see some have finished and many more have started. I will try my very best to get things updated over the next few days though y'all seem to have been getting along fine without me, I do like seeing that in group builds. I hope all of you had a very good Christmas (for those who celebrate it) (or a good whatever you may celebrate if it is not Christmas). I hope all of you stay safe and enjoy the new year, though I will try to chime in before then. ToastToastToast

-Josiah

  • Member since
    January 2014
  • From: Toronto
Posted by Rob S. on Sunday, December 28, 2014 10:45 AM

Thanks Josiah...we'll see 'ya soon, Cheers!!

______________________________________________________________________________


On the Bench: Nothing on the go ATM

  • Member since
    November 2008
  • From: Central Florida
Posted by plasticjunkie on Sunday, December 28, 2014 2:20 PM

Mac

Great display idea showing the tunnel levels. Great work.

 GIFMaker.org_jy_Ayj_O


Too many models to build, not enough time in a lifetime!!

  • Member since
    June 2014
Posted by BrandonK on Monday, December 29, 2014 2:58 PM

Alrighty boys, we are off and running. All the other kits are done and shelved. Time to jump on this one. It is a 1/48 Tamiya F4U-1D Corsair, February 1945, Deck of the USS Franklin. It will include a prop blur that I have never used, so this should be telling. I am building this kit for a friend of mine for the Marine Corp birthday and this GB fit perfectly. I will post pics and updates as I go.

On the bench:

A lot !! And I mean A LOT!!

2024 Kits on deck / in process / completed   

                         14 / 5 / 2  

                              Tongue Tied

  • Member since
    January 2014
  • From: Toronto
Posted by Rob S. on Monday, December 29, 2014 3:24 PM

right on Brandon, looks like it's going to be an excellent kit.

______________________________________________________________________________


On the Bench: Nothing on the go ATM

  • Member since
    October 2008
  • From: Georgia
Posted by Rigidrider on Tuesday, December 30, 2014 5:19 PM

OK all... I got some more done this weekend and have several days off this week so may be able to get a lot more done... But heres what we have so far...

As was said earlier... slowly close and glue each section, little at a time to try to get proper alignment and minimal seam issues...

And... Voila!!! so far so good... No real issues with seams or alignment, even though I did go through and remove all locating pins before joining fuse halves.

  Well this is about all I have at the moment, and next the top and the nose piece goes on...Take care all and wishing all my fellow builders here a very Happy New Year! Semper Fi!!!

Doug

When Life Hands You A Bucket Of Lemons...

Make Lemonade!

Then Sell It Back At $2 Bucks A Glass...

  • Member since
    January 2014
  • From: Toronto
Posted by Rob S. on Tuesday, December 30, 2014 5:39 PM

Huey's looking great Doug..looking forward to this one coming together..gunship?

______________________________________________________________________________


On the Bench: Nothing on the go ATM

  • Member since
    October 2008
  • From: Georgia
Posted by Rigidrider on Wednesday, December 31, 2014 4:42 AM

That's my thoughts , yes sir.   Also kit ( of coarse) doesn't come with the antenna set up, No problem, and easily remedied, but can any one explain why the Marine units use UHF radios over VHF ?

When Life Hands You A Bucket Of Lemons...

Make Lemonade!

Then Sell It Back At $2 Bucks A Glass...

  • Member since
    November 2008
  • From: Central Florida
Posted by plasticjunkie on Wednesday, December 31, 2014 4:45 PM

Great job Doug!

 GIFMaker.org_jy_Ayj_O


Too many models to build, not enough time in a lifetime!!

  • Member since
    December 2003
  • From: Charleston, SC
Posted by sanderson_91 on Wednesday, December 31, 2014 10:53 PM

Nice looking work guys!

I hope to get started on my Harrier soon.  

Happy New Year!!!

Steve


  • Member since
    April 2010
Posted by Theuns on Thursday, January 1, 2015 9:22 AM

After chucking a model in the trash today because of stupidity I will get back on the horse and do some work on the F-18.

The cockpit is done, I need to still add straps to the seat and install that in the tub.

In my view this kit is way over complex with the way it is put together, loads of room for messing stuff up!

The detail is however very nice.

Theuns

  • Member since
    January 2014
  • From: Toronto
Posted by Rob S. on Thursday, January 1, 2015 9:58 AM

I did an Academy F-14 last year, so, I imagine this one is of similar quality. I'm looking for a USMC F-18, so, I'll keep an eye on this build closely. Thanks Theuns.

______________________________________________________________________________


On the Bench: Nothing on the go ATM

  • Member since
    October 2008
  • From: Georgia
Posted by Rigidrider on Thursday, January 1, 2015 3:19 PM

Happy New Year all! Got a bit more done, I'm also starting another GB as of this morning on the ME109 GB, so am doing 2 now and when this one is done will start on Bish's Star Wars GB... Not too good at doing 2 at a time but I guess its all in the planning! LOL...

Any way, These pics will be trying to get the top lined up and glued down... Will have to do one side at a time, then trying to get the nose piece on, and oh boy is that a lousy fit. Lots of trimming and dry fitting. It will go eventually! LOL

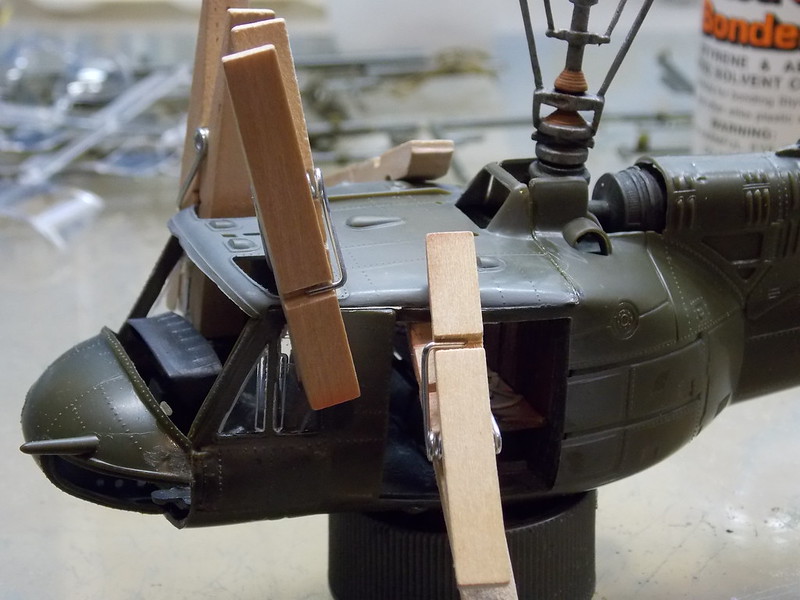
The white area up near the rotor is a large gap that wouldn't close, so I had to put some plastistruct pieces in there kinda like shims then glue tight. pretty well closed now, but still needs a touch oh smoothing, not enough for putty so I use Bic, white out correction fluid. It works great for small gaps and smooths well with Acetone (nail polish remover) Not too much though, its very aggressive and will melt the plastic. 

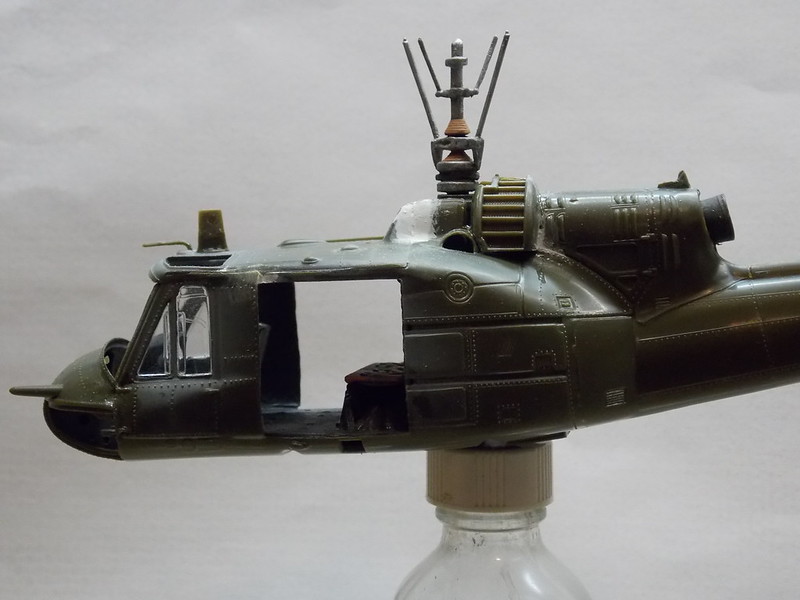
Same on this side, and finally got the nose to fit fairly well.

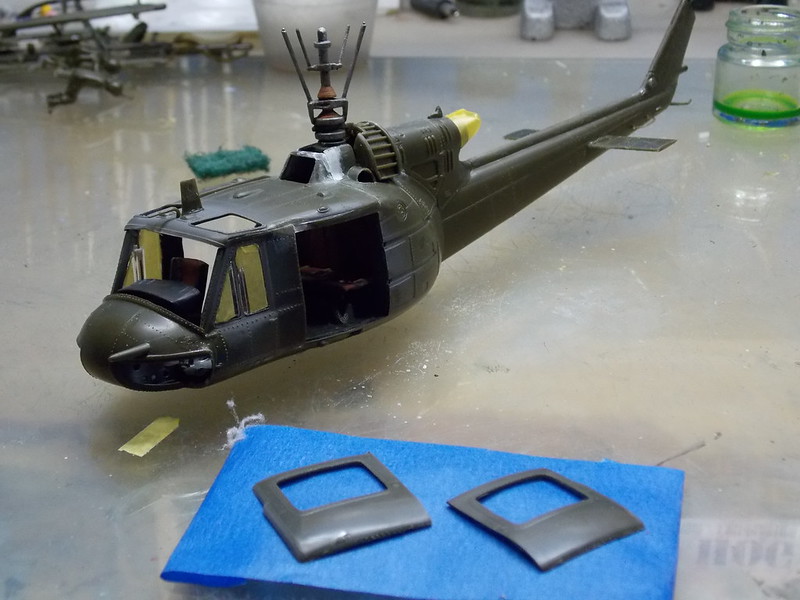
Well, That's where we are at this time, I will start prep. to paint maybe tomorrow. Take care all!

Doug 

When Life Hands You A Bucket Of Lemons...

Make Lemonade!

Then Sell It Back At $2 Bucks A Glass...

  • Member since
    November 2008
  • From: Central Florida
Posted by plasticjunkie on Friday, January 2, 2015 8:05 AM

Doug

The only place I wound up with a small gap was at the bottom near the glass nose sections and the center. It was more of a warp or dip in the plastic.

[View:]

Mine was tail heavy so I took a small lead sinker and flattened it and slipped it into the nose between the IP and windshield frame then added a drop of Aleene's to secure it.

 GIFMaker.org_jy_Ayj_O


Too many models to build, not enough time in a lifetime!!

  • Member since
    October 2008
  • From: Georgia
Posted by Rigidrider on Friday, January 2, 2015 4:03 PM

Hey PJ... Yeah, your a bit ahead of me yet. Man, I knew when I opened this one that I was in for it, LOADS of flash, and when I started dry fitting parts virtually nothing fit, I'm having to force everything into place and clamp securely while the glue is setting. Well... its coming along , slowly, begrudgingly, but it is coming. By the By, the nose piece was really a challenge to get it fit without removing the detail. But it finally fit too. Oh well, Yours is looking GOOD! Looks like into the paint shop soon for you!. Take care...

Doug

When Life Hands You A Bucket Of Lemons...

Make Lemonade!

Then Sell It Back At $2 Bucks A Glass...

  • Member since
    January 2014
  • From: Toronto
Posted by Rob S. on Friday, January 2, 2015 5:21 PM

Hey Josiah..I was traveling today and picked up my "Sharpshooter" entry for this GB..1/72 Hasegawa AV-8A Harrier. This one will be from VMA-542 Tigers. Keeping with my last USMC entry..this one will be 'well' loaded with underwing stores. Now to Find a kit for the "Expert" badge!!

______________________________________________________________________________


On the Bench: Nothing on the go ATM

  • Member since
    January 2014
  • From: Toronto
Posted by Rob S. on Friday, January 2, 2015 5:24 PM

It's a fairly dreadful kit upon close inspection...we'll see about this one Angry

______________________________________________________________________________


On the Bench: Nothing on the go ATM

  • Member since
    May 2008
  • From: Ypsilanti, MI
Posted by MIflyer on Saturday, January 3, 2015 11:58 AM

Hi all,

Room for one more? I just started a 1/48 Tamiya -1D Corsair that I'd love to enter in the build.

Kevin Johnson    Ypsilanti, Michigan USA

On the bench: 1/72 Fujimi Ki-36 J-BAAR

  • Member since
    June 2009
  • From: Florida
Posted by STFD637 on Saturday, January 3, 2015 2:01 PM

Alright, been gettting some good work done on the M-60 the last week. Now if I can buy batteries that will last longer than 3 shots in camera we might get somewhere!!!!Angry So far it has been a pretty easy build, except for some of the track issues. The kit is about 1 link short to complete both treds, it would also have been nice to have  a couple extra to place on the tank as spares. Luckily the Black Dog Resin will add to the look. Here are some pics.

More to come once I change the batteries!! Other buids are looking great BTW! Cant wait to see more!

"If a lie is told often, and long enough, it becomes reality!"

Travis/STFD637

make an avatar

  • Member since
    June 2009
  • From: Florida
Posted by STFD637 on Saturday, January 3, 2015 2:03 PM

Theuns, I have heard only "good" things about the Academy Kit. Good to hear honest cominatry. i have several Hasegawa and Italeri 1 72 F-18 in the stash, never broke down and got the Academy though. Can't wait to see more from you!

"If a lie is told often, and long enough, it becomes reality!"

Travis/STFD637

make an avatar

  • Member since
    January 2014
  • From: Toronto
Posted by Rob S. on Saturday, January 3, 2015 3:27 PM

Looks great Travis...great stores load on the turret.

______________________________________________________________________________


On the Bench: Nothing on the go ATM

  • Member since
    October 2008
  • From: Georgia
Posted by Rigidrider on Saturday, January 3, 2015 4:52 PM

Travis... Man I love a well modeled piece of armor, I just have never been able to do it justice. Maybe I'll try again sometime, Any way, I have a bit more done on my build, now starts the part I enjoy, the paint and decal phase.

This will be the base coat, I rarely primer unless absolutely necessary.

Also started some of the shading and lightly touched on the start of the weathering, Clear coat applied, That will dry over night and then I'll start the decals. Take care all...

Doug 

When Life Hands You A Bucket Of Lemons...

Make Lemonade!

Then Sell It Back At $2 Bucks A Glass...

  • Member since
    January 2014
  • From: Toronto
Posted by Rob S. on Saturday, January 3, 2015 6:45 PM

Right on Doug...lookin great!

______________________________________________________________________________


On the Bench: Nothing on the go ATM

  • Member since
    November 2008
  • From: Central Florida
Posted by plasticjunkie on Sunday, January 4, 2015 8:00 AM

Travis

Great work on your M60.

Doug

The little feller looks really good. Did you use FS34097 as the basecoat? I see you have several extra hand thingies. Aren't those great? I have several that I got from Harbor Freight on sale for like $3 a piece. Man they come in very handy sometimes.

This is where I'm at now and looks like the airbrush stage will be next.

 GIFMaker.org_jy_Ayj_O


Too many models to build, not enough time in a lifetime!!

  • Member since
    October 2008
  • From: Georgia
Posted by Rigidrider on Sunday, January 4, 2015 3:47 PM

LOLOL... Yeah Buddy... Gotta love Harbor Freight! What I used was the Tamiya olive green, and I intend to use some other greens to do some of the fading and weathering. I'm experimenting with some different blends now, maybe tomorrow I can begin the decals and paint. I'm also going to use a silver artist pencil to produce some chipping and scuffs. I usually do a dry brush method to do this, but on this one dry brush may be a bit heavy for the desired effect.

Doug

When Life Hands You A Bucket Of Lemons...

Make Lemonade!

Then Sell It Back At $2 Bucks A Glass...

  • Member since
    November 2008
  • From: Central Florida
Posted by plasticjunkie on Sunday, January 4, 2015 8:39 PM

That's great Doug, XF58 is the color you used and I just happen to have a bottle in my paint drawer. Almost went out and got a bottle of the Marine Corps Green but this Tamiya looks like a very close color match. And yes, a sharpened silver Prismacolor pencil does wonders in the chipping dept.

 GIFMaker.org_jy_Ayj_O


Too many models to build, not enough time in a lifetime!!

  • Member since
    June 2014
Posted by BrandonK on Monday, January 5, 2015 1:00 PM

I appreciate all the interest and kind words, guys. Thanks.!

I am done with the pit so here is what I did. I followed Lawdog's pit detailing as best I could. I painted the pit in MM interior green and the console in XF-1. I used a cockpit from an un-restored survivor F4 as my paint reference. So the pit walls are black as is the back and instrument panel with interior green everywhere else. I painted knobs and switches as best I could to match the real deal. I also added a few PE details like the knobs on the left console and the control levers on the forward right and a map pocket forward right. The instrument panel is Eduard PE which came unpainted but came out great. The plastic gauges gives the look of glass once it's in place, love it! 

I washed the pit in Flory Black and weathered it a bit with Tamiya's master weathering kit using silver to show some paint and panel wear. I added some small PE pieces to the side panels but they really don't add much in my opinion.  I finished the pit off with MM flat clear to seal it all in. It is hard to see the detail in the photos but I am very happy with how this pit turned out. Now to finish up on the engine wiring and that will be done also. Thanks for looking.

On the bench:

A lot !! And I mean A LOT!!

2024 Kits on deck / in process / completed   

                         14 / 5 / 2  

                              Tongue Tied

JOIN OUR COMMUNITY!

Our community is FREE to join. To participate you must either login or register for an account.

SEARCH FORUMS
FREE NEWSLETTER
By signing up you may also receive reader surveys and occasional special offers. We do not sell, rent or trade our email lists. View our Privacy Policy.