SEARCH FINESCALE.COM

Enter keywords or a search phrase below:

World at War 1939-1940 Group Build

65587 views
1023 replies
1 rating 2 rating 3 rating 4 rating 5 rating
  • Member since
    September 2003
  • From: AandF in the Badger State
Posted by checkmateking02 on Saturday, March 14, 2015 4:22 PM

Yup, the canopy has been irksome, and I don't know why.  I build a Douglas Devastator last year, and it had maybe more glass than the Stuka.  

Maybe the astral plane has been out of alignment--or the moon really isn't in the seventh house.


  • Member since
    November 2008
  • From: Central Florida
Posted by plasticjunkie on Sunday, March 15, 2015 9:51 AM

Lots of fine builds going on so I will start with my entry.

The kit

Shot the required parts aotake blue/green as per the instructions

 GIFMaker.org_jy_Ayj_O


Too many models to build, not enough time in a lifetime!!

  • Member since
    December 2002
  • From: Bury St Edmunds, Suffolk, England
Posted by Bish on Sunday, March 15, 2015 9:56 AM

Nice to see another one started PJ, don't think I have seen one of those.

I am a Norfolk man and i glory in being so


On the bench: Airfix 1/72nd Harrier GR.3/Fujimi 1/72nd Ju 87D-3

  • Member since
    September 2003
  • From: AandF in the Badger State
Posted by checkmateking02 on Sunday, March 15, 2015 2:28 PM

Striking color for the interior, pj.  Looks sort of metallic.  What brand of paint is it?


  • Member since
    November 2008
  • From: Central Florida
Posted by plasticjunkie on Sunday, March 15, 2015 4:48 PM

Thanks Bish.  The Nate was actually rated very early in the conflict as an excellent fighter.

Check

The color is actually a blue with a little green. In the picture it came out more green probably from the light and mat reflection? My buddy who builds Japanese WWII planes suggested mixing Tamiya clear blue wit a drop or two of clear green, then sprayed over the grey plastic  gives a metallic look to it. Since I have the Tamiya paints I mixed the two and got what you see in the picture.

 GIFMaker.org_jy_Ayj_O


Too many models to build, not enough time in a lifetime!!

  • Member since
    December 2002
  • From: Bury St Edmunds, Suffolk, England
Posted by Bish on Sunday, March 15, 2015 6:04 PM

I did some reading up on it PJ. You don't often hear about Japanese Air force planes, its usually the navy that takes all the limelight with the Zero. Look forward to seeing your build. Will you be doing the scheme on the box.

I am a Norfolk man and i glory in being so


On the bench: Airfix 1/72nd Harrier GR.3/Fujimi 1/72nd Ju 87D-3

  • Member since
    September 2003
  • From: AandF in the Badger State
Posted by checkmateking02 on Sunday, March 15, 2015 7:28 PM

You did a good job mixing it, pj.  It's very effective.


  • Member since
    November 2008
  • From: Central Florida
Posted by plasticjunkie on Sunday, March 15, 2015 9:07 PM

Thanks check.

Bish

Yes the Zero seems to be popular. I will be doing the scheme on the box art which looks very cool and colorful. The markings are from the 84th Flight Co. Sqn. stationed at Guangdong, China in 1939. Even though for being such an old kit from1988, it has very nice recessed details.

 GIFMaker.org_jy_Ayj_O


Too many models to build, not enough time in a lifetime!!

  • Member since
    September 2003
  • From: AandF in the Badger State
Posted by checkmateking02 on Monday, March 16, 2015 5:32 PM

Some of the old kits are still pretty charming!


  • Member since
    November 2008
  • From: Central Florida
Posted by plasticjunkie on Monday, March 16, 2015 7:21 PM

I Tenaxed the fuselage from the inside using a Touch N Flow applicator. This method cuts down on the exterior sanding which will take away a ton od recessed rivet detail.

I also assembled the wings and they fit really good. Unfortunately the pit detail will be very hard to see. The Hasegawa canopy is one piece and restricts the view.

[View:]

 GIFMaker.org_jy_Ayj_O


Too many models to build, not enough time in a lifetime!!

  • Member since
    September 2003
  • From: AandF in the Badger State
Posted by checkmateking02 on Tuesday, March 17, 2015 10:48 PM

Looking good.  That interior paint is still intriguing.  It's very eye-catching.


  • Member since
    December 2002
  • From: Bury St Edmunds, Suffolk, England
Posted by Bish on Wednesday, March 18, 2015 3:07 AM

Ye, that colour is a bit different. Nice to see it coming together.

I am a Norfolk man and i glory in being so


On the bench: Airfix 1/72nd Harrier GR.3/Fujimi 1/72nd Ju 87D-3

  • Member since
    November 2008
  • From: Central Florida
Posted by plasticjunkie on Wednesday, March 18, 2015 6:29 AM

Thanks. I was reading a fairly current article on the Nate and now they say that the interior color was also found either NMF or an interior green. I read somewhere to spray silver first, then spray clear blue with a drop or two of clear green mixed to get the Aotake color. White Ensign and Xtracolor make this shade.


 GIFMaker.org_jy_Ayj_O


Too many models to build, not enough time in a lifetime!!

  • Member since
    November 2008
  • From: Central Florida
Posted by plasticjunkie on Wednesday, March 18, 2015 10:28 AM

Worked on the IP last night. Dry brushed it, added some colors  and used some Future for the lenses.

Worked on the seat by adding some details like rivets and lightening holes.

The pit is done. I added some Eduard Nakajima IJA seat belts.

Once in the fuselage most of the details are almost impossible to see. The wing fit is tight with no gaps along the wing root.

The kit came with extra Squadron vac canopies which are a pain to cut and shape but are a lot clearer and have a more scale thickness. By having the canopy open, a better view of the pit is possible than thru the thick kit  part. The top is the Hasegawa one piece canopy and the bottom is the Squadron vac canopy. I still have to carefully sand some of the edges.

 GIFMaker.org_jy_Ayj_O


Too many models to build, not enough time in a lifetime!!

  • Member since
    September 2003
  • From: AandF in the Badger State
Posted by checkmateking02 on Wednesday, March 18, 2015 4:11 PM

Nice work!


  • Member since
    September 2003
  • From: AandF in the Badger State
Posted by checkmateking02 on Thursday, March 26, 2015 7:49 PM

Finished up with the Stuka for Bish's Ju-87 GB, so I plan on concentrating here until I finish up the 109E-1.

Put the wings together and re-drilled the gun ports.  One of the low points on the kit is that the panel lines don't line up between the top and bottom wing halves.  I'm just going to leave them, since it would take extensive re-scribing to correct this.  Possibly the paint demarcation line will minimize this.

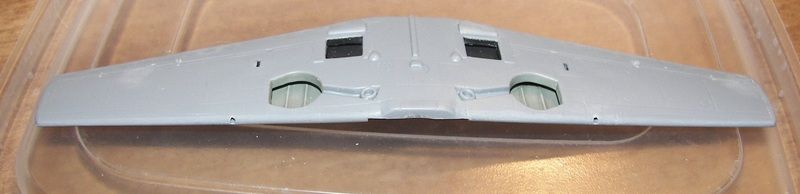
Because the landing gear bays are so shallow, I plan to mask just the wheel well, then paint the rest of the bays after I put on the RLM 65 undersurface paint.

Installed the cockpit,

and then ran out of superglue.  I like Zap's gap filling type, but no one in the area stocks it, so had to order it by mail, and it may arrive any time between tomorrow and Monday.  I'll occupy the weekend with painting the smaller parts and masking the canopy.


  • Member since
    November 2008
  • From: Central Florida
Posted by plasticjunkie on Thursday, March 26, 2015 7:54 PM

Looking good check.

I made a little progress on my Nate. The engine was assembled, painted and secured inside to the inside of the cowl ring. I cut a circle paper mask to protect it from the red paint. I also shot Tamiya IJA grey on the fuselage and wings then shot some Future to gloss up the finish to prepare it for decals and washes.

[View:]

 GIFMaker.org_jy_Ayj_O


Too many models to build, not enough time in a lifetime!!

  • Member since
    September 2003
  • From: AandF in the Badger State
Posted by checkmateking02 on Thursday, March 26, 2015 7:56 PM

More progress!  Nice work, pj!


  • Member since
    September 2003
  • From: AandF in the Badger State
Posted by checkmateking02 on Saturday, March 28, 2015 6:59 PM

Back plate for the spinner attached.  It is undersize for the fuselage, and the nose is moulded a little whopper-jawed besides.

Re-scribed panels lines across the fuselage top with a razor saw.

My Zap-a-Gap arrived earlier, so I attached the wings.  A sizeable gap; this is not the best-fitting 109 in the world--but I think it may be the only 1/72 E-1.


I have it rough-sanded now with 320 grit paper; hopefully some smaller grit will smooth everything out.


  • Member since
    December 2002
  • From: Bury St Edmunds, Suffolk, England
Posted by Bish on Sunday, March 29, 2015 1:31 AM

Nice progress guys. Good to see some paint on PJ.

Check, that is a nasty gap. I think you might be right about that being the only 72nd E-1. I am keen to get some of the less common 109 versions myself, they all seem to be from the smaller company's, like Avis and AML. I guess these shortcomings are something we have to deal with for these less seen versions.

I am a Norfolk man and i glory in being so


On the bench: Airfix 1/72nd Harrier GR.3/Fujimi 1/72nd Ju 87D-3

  • Member since
    September 2003
  • From: AandF in the Badger State
Posted by checkmateking02 on Sunday, March 29, 2015 10:50 PM

There are gaps all over this thing, Bish.

How long were E-1's kept in service?  Seems I read that they were upgraded to E-3 standards at some point, with cannon in the wings.  Otherwise, they'd be pretty lightly armed for the battles over France and Britain in 1940.

I've got Xtra Decals' BoB sheet, and it includes an E-1, but from the profile, it looks like it has the cannon bulges under the wing.

The kit decals only include options for September, 1939 and the Polish campaign.


  • Member since
    April 2006
  • From: ON, Canada
Posted by jgeratic on Sunday, March 29, 2015 11:49 PM

Hi guys, good looking stuff on your respective aircraft builds.

Check - great question on how long the E-1 version kept flying.   My guess would be it continued to fly as is, as long as it could.  When time permitted (during an overhaul?), the armament and other items would be upgraded.

There is an interesting figure here http://www.historyofwar.org/articles/weapons_bf_109E.html  giving E-1 losses totaling 249 aircraft in the latter half of 1940.  The author though, doesn't clarify if it is in reference to the original aircraft type regardless of upgrades?

The British did keep detailed reports of crashes on their soil, and some referenced E-1s can be found here:

http://forum.12oclockhigh.net/showthread.php?t=436

... and a couple quick photos found of the type crashed during BoB from here:

http://histomil.com/viewtopic.php?f=95&t=3918&start=3020

regards,

Jack


  • Member since
    September 2003
  • From: AandF in the Badger State
Posted by checkmateking02 on Monday, March 30, 2015 5:50 PM

Thanks, Jack.  Very helpful.  It's obvious the two E-1's in the photos weren't upgraded.  The wing gun ports are clearly visible.  Frankly it surprises me since the Spitfires and Hurricanes were already carrying eight MG's.


  • Member since
    September 2007
  • From: Finland funland
Posted by Trabi on Friday, April 3, 2015 3:58 PM

Hi guys!

I haven´t had much time to spend with Fokker, but starts to take shape. Some little fixing still. Atleast one intake still missing.

Raised panel lines got destroeyd by sanding, so I scribed new ones. Also I carved aerilons to look made from fabric.

There´s some fishy with the fuselage. Looks like that wings are located different hight so tail is tilted bit right when wings are lined together Super Angry


"Space may be the final frontier, but it´s made in Hollywood basement." RHCP, Californication

  • Member since
    September 2003
  • From: AandF in the Badger State
Posted by checkmateking02 on Saturday, April 4, 2015 11:21 AM

That's looking great, Trabi!

As for the wings, it seems a lot of kits have that issue.  I've encountered it too.  It's not too evident most times, unless you look at it from certain angles.  From your photos, I don't think it's very noticeable.

Nice work!


  • Member since
    December 2002
  • From: Bury St Edmunds, Suffolk, England
Posted by Bish on Saturday, April 4, 2015 2:16 PM

Nice work Trabi, it looks god to me from those angles.

I am a Norfolk man and i glory in being so


On the bench: Airfix 1/72nd Harrier GR.3/Fujimi 1/72nd Ju 87D-3

  • Member since
    September 2003
  • From: AandF in the Badger State
Posted by checkmateking02 on Monday, April 6, 2015 11:30 PM

Masked and installed canopy.

Drilled out wing gun ports.

The tabs on the wings were somewhat indistinct; I made new ones from plastic sheet, glued them in place and filed them to shape.


  • Member since
    September 2003
  • From: AandF in the Badger State
Posted by checkmateking02 on Saturday, April 11, 2015 1:13 PM

Painted the undersides with MM's RLM 65, then set about masking the landing gear wells.  It looked liked they were moulded too shallow to accept tissue paper stuffed inside, so I masked around them, with thin strips of masking tape.  I gradually added thicker pieces around them.

Followed this up with wide strips of tape to protect the blue paint, then painted the wells with MM's RLM 02.

It worked.

I wrapped the previously-installed prop backing plate with tape and ticky-tacky.  Filled in the box-like contraptions with tissue.

Now it's ready for it upper camouflage.


  • Member since
    September 2003
  • From: AandF in the Badger State
Posted by checkmateking02 on Saturday, April 11, 2015 1:22 PM

Added the lighter top surface colour, MM's RLM 71, a couple of days ago and let it dry.

Then got busy with the complicated masking pattern for the RLM 70.  I found a masking pattern on the web, but it didn't fit too well, especially around the engine exhausts, so I mostly did this with masking tape strips.  Then I filled in with more strips and used some ticky-tacky to cover the exhaust ports.


  • Member since
    September 2003
  • From: AandF in the Badger State
Posted by checkmateking02 on Saturday, April 11, 2015 1:28 PM

One of our fellow-modelers here on the forums posted this link to Luftwaffe color schemes.

http://www.warhistoryonline.com/war-articles/luftwaffe-camouflage-colors-and-patterns.html


I wish I could remember who he was, since the site is very helpful, and he gets a lot of gratitude from me.

 I used this diagram to achieve the pattern for the E-1.


JOIN OUR COMMUNITY!

Our community is FREE to join. To participate you must either login or register for an account.

SEARCH FORUMS
FREE NEWSLETTER
By signing up you may also receive reader surveys and occasional special offers. We do not sell, rent or trade our email lists. View our Privacy Policy.