SEARCH FINESCALE.COM

Enter keywords or a search phrase below:

Battle of the Coral Sea Group Build 4 May, 2017 - 8 May, 2018

24134 views
533 replies
1 rating 2 rating 3 rating 4 rating 5 rating
  • Member since
    April 2005
  • From: Australia
Posted by taxtp on Wednesday, June 13, 2018 7:11 PM

Thanks very much Scott, appreciate the comment.

Cheers

Tony

I'm just taking it one GB at a time.

  • Member since
    December 2003
  • From: 37deg 40.13' N 95deg 29.10'W
Posted by scottrc on Wednesday, June 13, 2018 10:30 AM

Tony,

Your SBD turned out fabulous.

  • Member since
    September 2003
  • From: AandF in the Badger State
Posted by checkmateking02 on Thursday, May 31, 2018 9:16 PM

Good choice, Tony.  Front page updated.  Thanks again for participating and finishing! Yes


  • Member since
    April 2005
  • From: Australia
Posted by taxtp on Thursday, May 31, 2018 7:49 PM

Thanks CMK. I think the 2nd photo is probably the best.

Cheers

Tony

I'm just taking it one GB at a time.

  • Member since
    September 2003
  • From: AandF in the Badger State
Posted by checkmateking02 on Wednesday, May 30, 2018 8:32 PM

Very sharp-looking SBD, Tony.  Nice work!  I particularly like what you accomplished with the dive brakes.  

Do you have a preference for the front page?

And thank you for sticking with things and getting the project done!  It's always good to see your work.


  • Member since
    April 2005
  • From: Australia
Posted by taxtp on Wednesday, May 30, 2018 12:43 AM

Once again CMK, a big thank you for keeping this open to me. Here it is, Hasegawa 1/72 SBD-3 Dauntless, with Aeromaster decals, Aires resin wheels, an Eduard zoom P/E set for cockpit, as well as some scratchbuilt airframe details,  and Airwaves PE dive brakes. Paints are enamel for the upper surface and acrylic for the lower surfaces. 

The decals are from Aeromaster sheet 72-101, of VS-2 'Scouting 2' off the USS Lexington, which sank on May 8th, 1942.

Cheers

Tony

I'm just taking it one GB at a time.

  • Member since
    September 2003
  • From: AandF in the Badger State
Posted by checkmateking02 on Saturday, May 26, 2018 3:54 PM

Good to hear, Tony!


  • Member since
    April 2005
  • From: Australia
Posted by taxtp on Friday, May 25, 2018 6:00 PM

I got the flat coat down yesterday CMK, I'm on the home straight now.

Cheers

Tony

I'm just taking it one GB at a time.

  • Member since
    September 2003
  • From: AandF in the Badger State
Posted by checkmateking02 on Wednesday, May 23, 2018 8:23 AM

Something I've never achieved, even once!  


  • Member since
    April 2005
  • From: Australia
Posted by taxtp on Tuesday, May 22, 2018 9:35 PM

I like Starfighter decals. I've built a couple of aircraft from their Pearl Harbour Defenders sheet, a P-40B and F4F. I'm stil ltrying to get a couple of P-36s and a Catalina so that I can build the whole sheet. That's something I've only ever achieved once !

Cheers

Tony

I'm just taking it one GB at a time.

  • Member since
    September 2003
  • From: AandF in the Badger State
Posted by checkmateking02 on Tuesday, May 22, 2018 7:10 PM

The decals held together for such an elderly thing.

I have a sheet from Starfighter decals for Midway, and it includes the same markings.


  • Member since
    April 2005
  • From: Australia
Posted by taxtp on Tuesday, May 22, 2018 6:37 PM

Thanks CMK. The decals are from an old Aeromaster sheet 72-101 produced back in 1995. At least they hold together OK.

Cheers

Tony

I'm just taking it one GB at a time.

  • Member since
    September 2003
  • From: AandF in the Badger State
Posted by checkmateking02 on Tuesday, May 22, 2018 8:06 AM

Excellent, Tony.  That looks great.

Are you using the kit decals?


  • Member since
    April 2005
  • From: Australia
Posted by taxtp on Monday, May 21, 2018 11:44 PM

Thanks again guys. Here's the next photo, this time a bit glossy but with decals applied. 

Cheers

Tony

I'm just taking it one GB at a time.

  • Member since
    September 2003
  • From: AandF in the Badger State
Posted by checkmateking02 on Monday, May 21, 2018 3:38 PM

Take your time, Tony.  Your work is looking really good.  The weathering is very subtle and convincing.  Very nice!


  • Member since
    December 2003
  • From: 37deg 40.13' N 95deg 29.10'W
Posted by scottrc on Monday, May 21, 2018 8:12 AM

That SBD is looking sharp!

  • Member since
    April 2005
  • From: Australia
Posted by taxtp on Sunday, May 20, 2018 10:34 PM

Cheers CMK, it's good stuff. I use it in the way that you described too.

I decalled it last night, along with another model. I don't think I've ever decalled two models in one evening before.

However, the photos pre-date the decalling, I'll post some of it it later.

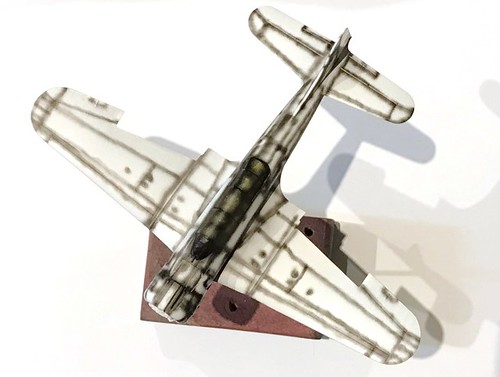
Here it is with preshading.

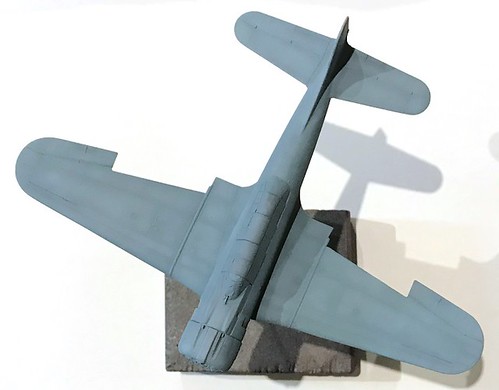
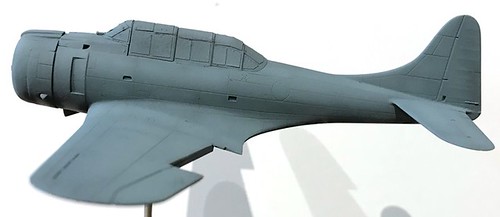
and with the upper surface Blue Grey, this is MM enamel, just thinned and sprayed.

I must say, thanks very much for your patience CMK, I'll try to get this thing done ASAP.

Cheers

Tony

I'm just taking it one GB at a time.

  • Member since
    September 2003
  • From: AandF in the Badger State
Posted by checkmateking02 on Saturday, May 19, 2018 10:20 AM

Thanks, Tony.  I bought some Mr. Surfacer to use as a brush-on-wipe-off filler, but haven't even opened it yet. 

Looking forward to seeing your photo tomorrow.  


  • Member since
    April 2005
  • From: Australia
Posted by taxtp on Saturday, May 19, 2018 4:38 AM

Sometimes Tamiya Fine White Primer, sometimes Mr Surfacer. Both do a pretty good job. This one was Tamiya, for no particular reason. The good news is I got the uppersurface colour down last night. Since it's enamel, I've giving it a bit of extra drying time until tomorrow before I proceed with the acrylic undersurface colour. I don't have time to do a photo today, but I should be able to tomorrow.

Cheers

Tony

I'm just taking it one GB at a time.

  • Member since
    September 2003
  • From: AandF in the Badger State
Posted by checkmateking02 on Friday, May 18, 2018 10:58 AM

That's looking good, Tony.  I like the lines on this aircraft; pretty sleek.

What do you use for primer?


  • Member since
    April 2005
  • From: Australia
Posted by taxtp on Thursday, May 17, 2018 6:53 PM

I've got the flaws fixed and primed again. I'd rather have a slightly patchy priming coat than lay down too much paint and obscure the detail. It's still better than raw plastic.

As you can see I've started masking the canopy. So far the Eduard set has fitted pretty well, not always the case.

For paint, it's going to be MM Enamel for the upper surfaces and Gunze acrylic for the lower surfaces. I'll do the enamel first, but tread carefully. The reason is simply that I have these paints in stock already.

Cheers

Tony


I'm just taking it one GB at a time.

  • Member since
    September 2003
  • From: AandF in the Badger State
Posted by checkmateking02 on Monday, May 14, 2018 9:00 PM

Looking forward to seeing it!


  • Member since
    April 2005
  • From: Australia
Posted by taxtp on Monday, May 14, 2018 7:21 PM

Thanks CMK. It's been primed, came out pretty good, just a couple of minor things to perfect. I forgot to take a photo though :)

Cheers

Tony

I'm just taking it one GB at a time.

  • Member since
    September 2003
  • From: AandF in the Badger State
Posted by checkmateking02 on Sunday, May 13, 2018 11:39 AM

Looking good, Tony.  It's good Hasegawa included the spinner for the prop; Airfix didn't with its SBD.


  • Member since
    April 2005
  • From: Australia
Posted by taxtp on Friday, May 11, 2018 4:53 PM

Thanks CMK.

With a little bit of masking, we'll be all ready for a priming coat....at last.

Cheers

Tony

I'm just taking it one GB at a time.

  • Member since
    September 2003
  • From: AandF in the Badger State
Posted by checkmateking02 on Friday, May 11, 2018 2:01 PM

Shaken, not stirred, Tony.

Glad you got it out.  Makes you wonder why it's so easy to have things fall in, in the first place.  

Anyway--the SDB is shaping up nicely.  


  • Member since
    April 2005
  • From: Australia
Posted by taxtp on Friday, May 11, 2018 6:39 AM

I typed that after about 15 minutes of trying everything, of course, one minute later, it's out ! Stick out tongue


I'm just taking it one GB at a time.

  • Member since
    April 2005
  • From: Australia
Posted by taxtp on Friday, May 11, 2018 6:36 AM

I have an interesting dilemma with this kit.  Whilst I was dry fitting the clear parts, the windscreen fell inside the cockpit and has disappeared inside the fuselage somewhere. I can hear it rattle if I shake it, but I can't see it. I've tried turning it upside down and shaking, but I still can't shake it into view. There are no other access points.

I guess you've gotta laugh....

I'm just taking it one GB at a time.

  • Member since
    April 2005
  • From: Australia
Posted by taxtp on Thursday, May 10, 2018 9:29 PM

Here's some progress. The engine is painted and in, and the cowling has been mounted to the fuselage. The prop is done apart from the centre being painted natural metal, the spinner is only placed there for the photo. Tyres are black too. I'm just finishing off the rear cockpit before I attach the canopy parts. I'm hoping to get a coat of primer on it today. I'm pretty worried about the dive brakes, but we'll see how we go.

Cheers

Tony

I'm just taking it one GB at a time.

JOIN OUR COMMUNITY!

Our community is FREE to join. To participate you must either login or register for an account.

SEARCH FORUMS
FREE NEWSLETTER
By signing up you may also receive reader surveys and occasional special offers. We do not sell, rent or trade our email lists. View our Privacy Policy.