SEARCH FINESCALE.COM

Enter keywords or a search phrase below:

Battle of Midway Group Build, 3 June, 2017 - 7 June, 2018

32770 views
777 replies
1 rating 2 rating 3 rating 4 rating 5 rating
  • Member since
    September 2003
  • From: AandF in the Badger State
Posted by checkmateking02 on Wednesday, February 14, 2018 9:04 PM

Cute kitties, Dwayne.  And they look so innocent of any evil-doing!  

I know what you mean about races through the house.  Sometimes I think we have horses instead of cats.


  • Member since
    December 2002
  • From: Bury St Edmunds, Suffolk, England
Posted by Bish on Thursday, February 15, 2018 2:13 AM

Dwayne, thats looking nice. Be good to see some paint on it.

I am a Norfolk man and i glory in being so


On the bench: Airfix 1/72nd Harrier GR.3/Fujimi 1/72nd Ju 87D-3

  • Member since
    September 2016
  • From: Albany, New York
Posted by ManCityFan on Friday, February 16, 2018 8:10 AM

Bish

Dwayne, thats looking nice. Be good to see some paint on it.


Thanks.  Looking forward to painting this myself.  But...I wouldn't hold your breath based on my current pace.  LOL.

Check, yes they are cute, and they know it.  That's why we keep them, even after chewing the charge cord for my iphone (yes, the orange tiger again).

Dwayne or Dman or just D.  All comments are welcome on my builds. 

  • Member since
    September 2003
  • From: AandF in the Badger State
Posted by checkmateking02 on Friday, February 16, 2018 4:57 PM

Our cats are particularly fond of ear buds.


  • Member since
    September 2016
  • From: Albany, New York
Posted by ManCityFan on Monday, February 19, 2018 9:19 PM

Had the day off, so got some bench time.

Wings are on:

 IMG_0727 by Dwayne Munk, on Flickr

But most of last night and today was wiring the engine.  Here it is before paint:

 IMG_0724 by Dwayne Munk, on Flickr

Here it is with paint.  Photos of the engine show black wires and what appear to be glossy black on the push rods.  Not as visually appealing, but more accurate.

 IMG_0731 by Dwayne Munk, on Flickr

Still plenty of work to do, but nearing primer stage.  There is a bit of a step where the lower wing fuselage joins the rest of the fuselage.  Not sure what to do there.  Any sanding will take away the bolt detail.  I suppose I will primer and see how bad it looks before deciding how to deal with it.   Here is the trouble area:

 IMG_0733 by Dwayne Munk, on Flickr

and a little closer:

 IMG_0732 by Dwayne Munk, on Flickr


Dwayne or Dman or just D.  All comments are welcome on my builds. 

  • Member since
    September 2003
  • From: AandF in the Badger State
Posted by checkmateking02 on Monday, February 19, 2018 10:22 PM

Nice work, Dwayne.  Good looking engine.

As far as the step goes, when cleaning up something like that interferes with detail, I usually opt to preserve the detail.  But--that's just me.

By the look of it, the step is on the underside, and might not show up much when the Wildcat rests on its landing gear.

It's a tough call, I know.  Hope it goes well for you.


  • Member since
    December 2003
  • From: 37deg 40.13' N 95deg 29.10'W
Posted by scottrc on Tuesday, February 20, 2018 8:39 AM

Looking good Dwayne, for that step, I've built up the low area of the step with some putty and then blended it with a small file or sanding stick.  I even blended by carefully cutting the step down with a very sharp exacto and using a magnifyer, then polishing it up with some thinned putty and small sanding stick.  I get into these problems a lot with 1/700 scale.  

It is along a panel line, and I think I left it alone when I built my F4F.  If you look at an actual aricraft, the panels are wavy and not in perfect alignment.  Especially if the airframes have high time on them.  

  • Member since
    September 2016
  • From: Albany, New York
Posted by ManCityFan on Tuesday, February 20, 2018 9:20 AM

scottrc

Looking good Dwayne, for that step, I've built up the low area of the step with some putty and then blended it with a small file or sanding stick.  I even blended by carefully cutting the step down with a very sharp exacto and using a magnifyer, then polishing it up with some thinned putty and small sanding stick.  I get into these problems a lot with 1/700 scale.  

It is along a panel line, and I think I left it alone when I built my F4F.  If you look at an actual aricraft, the panels are wavy and not in perfect alignment.  Especially if the airframes have high time on them.  


Actually, I was thinking along those lines myself.  PPP and using a wet Q-tip should help blend the step so it is not so nearly noticeable.  The problem is along the sides, not the whole panel line.  Dry fitting showed a huge gap at that join, but once glued, I only had a small gap where you see putty.  I didn't see the step at all while gluing, although I don't think there was much I could do about it, as I applied as much pressure as I could.

I also really appreciate the comment about panels not always being perfect anyway.  This kit is not going to an IPMS show, so this helps me move on without obsessing over it (if you knew me well, you would consider this a minor miracle Big Smile)

This is my third plane ever, so still learning even the basics.

Thanks for the feedback!

Dwayne or Dman or just D.  All comments are welcome on my builds. 

  • Member since
    September 2016
  • From: Albany, New York
Posted by ManCityFan on Tuesday, February 27, 2018 3:31 PM

So I caught another freaking cold, and was home today.  Feeling lousy, but not lousy enough to keep me off the bench.  Spent a good chunk of the day masking.

 IMG_0734 by Dwayne Munk, on Flickr

I get why folks buy pre-cut masks.  Takes me way longer than I think it should.

So the Wildcat is built enough for a primer coat.  Hope to do that later tonight.

 IMG_0735 by Dwayne Munk, on Flickr

Had a minor modeling miracle.  Lost a small piece...the little bump you see just behind the cowl.

 IMG_0737 by Dwayne Munk, on Flickr

My bench setup includes a "lap desk" which raises the desk a little, and angles my work.  This helps with the back issues.  I use some vinyl shelf liner to keep things from sliding, and while fidlling with something or other, some movement catches my eye.  Yup, you guessed it, the little part falls out of the shelving liner.

 IMG_0736 by Dwayne Munk, on Flickr

I do my happy dance.

Dwayne or Dman or just D.  All comments are welcome on my builds. 

  • Member since
    September 2003
  • From: AandF in the Badger State
Posted by checkmateking02 on Tuesday, February 27, 2018 4:23 PM

Sorry to hear about your cold, Dwayne.  Hope you feel better soon.

Nice progress.  Very good that you found the errant piece.  Most times, anything I lose disappears into another dimension of reality.


  • Member since
    July 2006
  • From: San Francisco Bay Area
Posted by bufflehead on Wednesday, February 28, 2018 10:51 PM

Hello all!  Stepping over from the Dark Side (Russian Armor GB) at the invitation of Dwayne to check out hisTamiya Wildcat. Reviewed the completed builds on pg 1 and they're all fantastic!   I wish I had more experience and skills with aircraft and ships to join this GB because the Battle of Midway has always fascinated me!  

Dwayne, the F4F is coming along nicely, looking forward to coming back to see your progress.  I've always loved the look and color schemes of that stubby fighter and how the pilots held their own against the superior Japanese Zeros.

On a side note:  before I read Dwayne's invite I was at a hobby store this afternoon to buy some supplies and actually picked up a 1/48 Tamiya F4F Wildcat kit thinking, Hmmm.....Indifferent

Ernest

Last Armor Build - 1/35 Dragon M-26A1, 1/35 Emhar Mk.IV Female


Last Aircraft Builds - Hobby Boss 1/72 F4F Wildcat & FW-190A8


  • Member since
    September 2003
  • From: AandF in the Badger State
Posted by checkmateking02 on Thursday, March 1, 2018 1:07 PM

Greetings, bufflehead.

Thanks for looking in.  Glad Dwayne pointed you this way.

When you're ready to commit, let us know--and I'll add your Wildcat to the build roster.


  • Member since
    September 2016
  • From: Albany, New York
Posted by ManCityFan on Thursday, March 1, 2018 9:30 PM

Got the F4F primed last night:

 IMG_0738 by Dwayne Munk, on Flickr

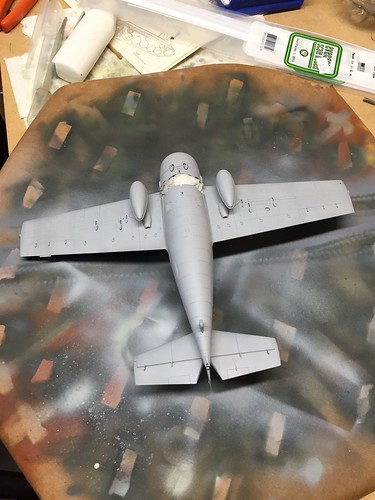
 IMG_0739 by Dwayne Munk, on Flickr

Was hoping to put on the bottom coat, but nothing shows the errors like a coat of primer.  They pop out like a poke in the eye.  Going to have to do some minor filling, seam work, and re-scribing before the paint goes on.

The step on on the bottom is still there, but you have to know to look for it.  This is not going to a show, and I can live with it.  Still have some more canopy masking.  Doing inside and out, as I may (have not decided yet) have the canopy open.  Depends on whether or not I think I can get it glued in place without ending up with a glue bomb.

Lessons learned so far:  1) get PE seat belts.  Masking tape is kind of OK, but PE would be a huge improvement, and is not that costly. 

2) Slow down when gluing, and be absolutely sure the parts match properly to avoid steps.  This is a fantastic kit, and I tried my best to ruin it by not being patient.  Mate the parts properly, and let the Tamiya Extra Thin do it's job.  (I know this is basic construction, but sometimes I am a slow learner)

Thanks for looking.  Still have the landing gear to work on, but the parts sprues are getting bare, so I must be nearing the end. 

Yeah, not really, the painting will take a long time before I am happy.  Going for light weathering as the F4F-4 was a fairly new introduction to the carriers prior to Midway.


Dwayne or Dman or just D.  All comments are welcome on my builds. 

  • Member since
    September 2003
  • From: AandF in the Badger State
Posted by checkmateking02 on Thursday, March 1, 2018 9:33 PM

Good looking work, Dwayne.  Despite the frustrations, you're making it go.


  • Member since
    January 2017
Posted by damouav on Friday, March 2, 2018 3:17 AM

Great Dwayne, almost over the line.

Keep up the great work.

In Progress
1/48 Tamiya P47-D Bubbletop
1/48 Hobby Boss TBF-1C Avenger (on hold)
Pending
1/48 Roden S.E.5a
1/48 Airfix Walrus
  • Member since
    September 2016
  • From: Albany, New York
Posted by ManCityFan on Friday, March 2, 2018 2:54 PM

Thanks for the encouragement.  All frustration is self-inflicted, and certainly not due to the kit.  This is my third plane, and I am learning with each build.  As one of my IPMS local chapter mates said, "you learn from each build, and you get better like everything else, experience and practice".

And despite my whining, I am having fun.  Big Smile

Dwayne or Dman or just D.  All comments are welcome on my builds. 

  • Member since
    December 2002
  • From: Northern California
Posted by jeaton01 on Thursday, March 22, 2018 10:59 PM

I have a very little more to show on the B-26.  I have been working on the fuselage.  The lower aft windows were different on the early models so I have been filling the kit windows in that area in preparation for putting in two more in a little different location.  I have also replaced the other fuselage side windows with oversized clear cut from a DVD case, and am sanding them smooth to conform to the fuselage curves.  Some are sanded out in these photos and others are just inserted.  I don't like the look of the windows on the Monogram bomber kits, they don't fit well, also true of most other maker's bombers.  Since the clear parts are oversize I can mask them down to proper size and have well faired windows.  I sure hope this plan comes together!


John

To see build logs for my models:  http://goldeneramodel.com/mymodels/mymodels.html


  • Member since
    July 2004
  • From: Sonora Desert
Posted by stikpusher on Friday, March 23, 2018 1:13 AM

The Monogram B-26 kit is a nice build. But not an ideal choice for a GB with a time deadline if you’re doing mods... been there, done that. 


F is for FIRE, That burns down the whole town!

U is for URANIUM... BOMBS!

N is for NO SURVIVORS...

       - Plankton

LSM


  • Member since
    September 2003
  • From: AandF in the Badger State
Posted by checkmateking02 on Friday, March 23, 2018 8:25 AM

Nice work, John.  Precise and well done!


  • Member since
    December 2002
  • From: Northern California
Posted by jeaton01 on Friday, March 23, 2018 10:59 PM

Point taken, Stik.  I do feel like I will get close if I can stay focused.  Hey, it's not like I am trying to turn the kit into an F or a G, now that would be a job.

Today I cut out the aft lower windows.   I do not agree with where Mike placed those windows, I think his template shows them more forward than they should be, so I reworked the template he supplied to move them back to where I think photos show them.  I still need to refine the shape a little, stupid camera never lies.  Those openings will not be filled as I doubt they were at Midway. 

I filed and sanded the remaining fuselage windows to shape and polished them.  The nose gear doors were different on the early B-26, missing a bulge that continued on to the fuselage in front.  The fuselage area had already been filled with Aves Epoxysculpt and it was sanded to contour.  Lone Star supplied new resin nose gear doors.  Still to do is the resin tail stinger but I think I will have to join the fuselage and install the tail surfaces before I can fit that part.

Photos of the above work.


John

To see build logs for my models:  http://goldeneramodel.com/mymodels/mymodels.html


  • Member since
    September 2003
  • From: AandF in the Badger State
Posted by checkmateking02 on Saturday, March 24, 2018 10:01 AM

Excellent work with the modifications, John.  It's fascinating watching how you do these.


  • Member since
    September 2016
  • From: Albany, New York
Posted by ManCityFan on Sunday, April 1, 2018 9:02 PM

Hey John, watching your build closely.  I have this exact kit in my stash.  Wasn't sure I was even going to keep it, but your build will likely make me want to.  Big Smile  Well, at some point.  I don't have your patience or skill yet.

So I finally reached the paint stage with the Wildcat.  I decided on the closed canopy simply because I did such a poor job on the seatbelts.  Will be buying PE belts for any future builds.  Lesson learned.

Anyhow, Mission Models paints were used.  I really like these paints.  They are very forgiving.  I think they absolutely nailed the colors for this plane.

 IMG_0744 by Dwayne Munk, on Flickr

 IMG_0745 by Dwayne Munk, on Flickr

 IMG_0746 by Dwayne Munk, on Flickr

I have a little touch up work to do.  I used silly putty as a mask for the first time, and one side isn't quite the way I want it.  This is Jimmy Thach's plane, and has a distinctive pattern on the side of the plane.  Hope to have the clear coat on this week so I can do decals over the weekend. 

Then "just" the landing gear, prop, and some light weathering.

Dwayne or Dman or just D.  All comments are welcome on my builds. 

  • Member since
    December 2002
  • From: Northern California
Posted by jeaton01 on Sunday, April 1, 2018 9:20 PM

The Wildcat looks nice, I like the color same as you.

John

To see build logs for my models:  http://goldeneramodel.com/mymodels/mymodels.html


  • Member since
    September 2003
  • From: AandF in the Badger State
Posted by checkmateking02 on Sunday, April 1, 2018 9:38 PM

Nice paintwork, Dwayne.  Really looks sharp.

I haven't heard of Mission Model paints.  Are they acrylic or enamel?


  • Member since
    September 2016
  • From: Albany, New York
Posted by ManCityFan on Monday, April 2, 2018 9:12 AM

checkmateking02

Nice paintwork, Dwayne.  Really looks sharp.

I haven't heard of Mission Model paints.  Are they acrylic or enamel?


Thanks Check.  Mission Models paints are acrylic.  I have used several different brands of acrylic paints, and have had the best results with this brand.  Not sure if you prefer enamel or acrylic, but if you use acrylics, this brand is worth a look.

https://www.missionmodelsus.com/ 

Dwayne or Dman or just D.  All comments are welcome on my builds. 

  • Member since
    September 2003
  • From: AandF in the Badger State
Posted by checkmateking02 on Monday, April 2, 2018 12:37 PM

Thanks for the link, Dwayne.  I've never used acrylics before, but I like to keep up with developments in paint.  I use enamels, since they seem to have better adhesion qualities than acrylics--at least, so I have read.


  • Member since
    December 2002
  • From: Bury St Edmunds, Suffolk, England
Posted by Bish on Monday, April 2, 2018 1:24 PM

Check, i have been useing enamels for years partly for the same reason. But these new acrylics seem to be a vast improvment over the older types.

I am a Norfolk man and i glory in being so


On the bench: Airfix 1/72nd Harrier GR.3/Fujimi 1/72nd Ju 87D-3

  • Member since
    September 2003
  • From: AandF in the Badger State
Posted by checkmateking02 on Monday, April 2, 2018 8:58 PM

Hadn't heard that, Bish.  May have to give 'em a go.  Every now and then, some paint I'd like is only available in acrylics.


  • Member since
    December 2002
  • From: Bury St Edmunds, Suffolk, England
Posted by Bish on Tuesday, April 3, 2018 2:28 AM

checkmateking02

Hadn't heard that, Bish.  May have to give 'em a go.  Every now and then, some paint I'd like is only available in acrylics.


I'm planning on switching over to Mr Paint for the majority of my subjects. main reason is because i like adding oil washes and am haveing problems with it efefcting the enamels. Alos, the amount of paint i lose from tins going funny i think it will save me money in the long run.

I am a Norfolk man and i glory in being so


On the bench: Airfix 1/72nd Harrier GR.3/Fujimi 1/72nd Ju 87D-3

  • Member since
    December 2002
  • From: Bury St Edmunds, Suffolk, England
Posted by Bish on Tuesday, April 3, 2018 2:30 AM

Dwayne, thats looking great, the results of the masking looks well done in those pics.

I am a Norfolk man and i glory in being so


On the bench: Airfix 1/72nd Harrier GR.3/Fujimi 1/72nd Ju 87D-3

JOIN OUR COMMUNITY!

Our community is FREE to join. To participate you must either login or register for an account.

SEARCH FORUMS
FREE NEWSLETTER
By signing up you may also receive reader surveys and occasional special offers. We do not sell, rent or trade our email lists. View our Privacy Policy.