AUTOS - Racing Car Group Build (ends 12/1/04)
 33404 views
 399 replies
- Member since
December 2002
- From: -
|
Posted by luke
on Friday, December 10, 2004 3:13 AM
Hello Everyone
seeing someone quoted the first post which I haven't updated in a while, I'll do it near the end of December (20th). I've been away and will add all the new names with updated glory then.
l8r
|
- Member since
November 2005
|
Posted by Anonymous
on Wednesday, December 8, 2004 8:10 AM
|
- Member since
September 2003
- From: New Zealand
|
Posted by nicholma
on Saturday, December 4, 2004 3:17 AM
Ok here they are. Unfortunately the rear shot didn't come
Firstly the side. You can see where I subsituted baremetalfoil for the missing p/e along the side windows and it doesn't look so good.
From the front. The p/e grill was missing so I used a bit of mesh from a Tamiya or Haseqawa kit. Fortunately the weave is meant to be quite large so it fits. The headlight lense and the spot lights are on order.

Tron provided some very nice wire wheels in the kit which set it off nicely but the bumpers look a bit heavy. I've just realised it hasn't had a dark wash in the panel lines, amazing what you miss!
Kia ora,
Mark
"Time flies like the wind, fruit flies like bananas"
|
- Member since
September 2003
- From: New Zealand
|
Posted by nicholma
on Saturday, December 4, 2004 1:55 AM
QUOTE: Originally posted by U-96
....The way the decal was printed seemed to bear no connection to the shape of the car. I used a few discrete cuts and a fair bit of Micro Set, but the decals are pretty thick and have little adhesion on complex curves, so think that Micro Sol might have been better if I had any.....
|
|
Yes definately The 2 solutions should be used at different times. The Mircoset should be first and applied to the area where the decal is to go. This acts as a water repellant. Lay down the decal and then Microsol should then be applied as it softens the decal to make it conform.
Kia ora,
Mark
"Time flies like the wind, fruit flies like bananas"
|
- Member since
April 2003
- From: South Carolina
|
Posted by jlwilliams
on Thursday, December 2, 2004 8:13 AM
I ummmmm...... got a case of the lazies and made absolutely no progress on this one.
J. Lee Williams
2007 New Year's Resolution: Complete a group build
2008 New Year's Resolution: Complete a group build on time
You load 16 tons and what do you get?
Another day older and deeper in debt!
In my stash gallery: http://pics.jamesjweg.com/gallery/3989211

|
- Member since
February 2003
- From: United Kingdom
|
Posted by U-96
on Thursday, December 2, 2004 3:21 AM
I'm glad you say they're difficult, because they were. Admittedly, it's only my second car kit, so it was quite ambitious even before I bunged in some photoetch stuff and engine detail ![Big Smile [:D]](/FSM/CS/emoticons/icon_smile_big.gif) .
The way the decal was printed seemed to bear no connection to the shape of the car. I used a few discrete cuts and a fair bit of Micro Set, but the decals are pretty thick and have little adhesion on complex curves, so think that Micro Sol might have been better if I had any.
For some reason the driver's side stripe ended up a little short. No idea why!
The hair drier tip is one I'll definitely try next time - quite fancy adding a Stratos or Integrale to the collection.
|
- Member since
September 2003
- From: New Zealand
|
Posted by nicholma
on Thursday, December 2, 2004 2:30 AM
Yes you're right it shouldn't be hurried but the next weekend is nigh so maybe? Its looking nice so far. The Martini strips are always difficult, especially around the nose. I presume you used a softening solution, have you ever applied heat from a hair drier to help?
Kia ora,
Mark
"Time flies like the wind, fruit flies like bananas"
|
- Member since
February 2003
- From: United Kingdom
|
Close, but no cigar!
Posted by U-96
on Wednesday, December 1, 2004 3:22 PM
![Blush [:I]](/FSM/CS/emoticons/icon_smile_blush.gif)
So close! I now have a nice colour in the bathroom and laid a cork floor at the weekend, but the Lancia 037 suffered, so I'm declaring for the scutineers
Save the decals on the rear body section, the clear parts and a few details like mirrors and mudflaps, and the odd paint detail, I almost got in by the deadline. Better to finish it properly than rush and bork it.
For those that are interested, I used Halfords acrylic car paint - Fiat White 233 was about the closest I could get to 1980s Lancia (they don't sell the marque in the UK anymore). No reaction with the kit plastic and polished happily with T-Cut.
Here's a couple of pics:


|
- Member since
November 2005
|
Posted by Anonymous
on Monday, November 29, 2004 11:34 PM
|
- Member since
September 2003
- From: New Zealand
|
Posted by nicholma
on Sunday, November 28, 2004 2:13 AM
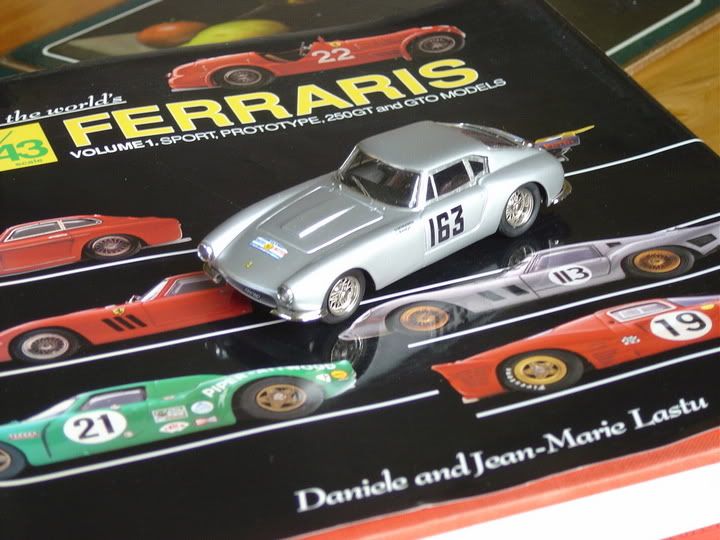
OK its finished (Ferrari 250 GT LWB that won the 1959 Tour de France (Tour Auto)). Photos next weekend. As this kit was produced around 1987 it hasn't come out too badly, the decals (Cartograph) were still excellent but the lack of the p/e parts and the lights has hamstrung it a bit. Baremetal foil wasn't a totally adequate replacement for the side window frames. My spares box(es) were missing the right sized headlight lenses but I did find suitable replacements for the rear brake and indicator lights and p/e windscreen wipers. The wire wheels look very nice but until I get some photos this description won't adequately describe the car.
Kia ora,
Mark
"Time flies like the wind, fruit flies like bananas"
|
- Member since
February 2003
- From: United Kingdom
|
Only a few days left!
Posted by U-96
on Friday, November 26, 2004 11:42 AM
Well looks like this endurance race is in the final laps! ![Tongue [:P]](/FSM/CS/emoticons/icon_smile_tongue.gif)
I've just got the weekend left to finish before the deadline (for pride's sake as much as anything!) and my wife says "let's decorate the bathroom this weekend". gnnnnnnnn ![Disapprove [V]](/FSM/CS/emoticons/icon_smile_disapprove.gif)
We'll see. Pics soon!
|
- Member since
November 2005
|
Posted by Anonymous
on Wednesday, November 24, 2004 2:52 PM
Thanks Glenn,
Can't claim that one as my own cuz I definitely learned it from someone else on the net. My memory is weak, but it was likely from someone here at FSM. You can make a pattern for almost any part this way. Stuff that's got a spherical or convex or concave shape is pretty tough to do without wrinkles though...
Murray
|
- Member since
November 2003
- From: State of Mississippi. State motto: Virtute et armis (By valor and arms)
|
Hi Murray,
The masking tape pattern you made for your CF decals is a great idea. I would've been through two sheets of decals before I'd have thought of it.
Glenn
|
- Member since
November 2003
- From: State of Mississippi. State motto: Virtute et armis (By valor and arms)
|
Hi Bob,
Raised letters on both sides? There's no justice in the world.
Glenn ![Wink [;)]](/FSM/CS/emoticons/icon_smile_wink.gif)
|
- Member since
November 2003
- From: Nashville, TN area
|
Posted by bobbaily
on Sunday, November 21, 2004 6:20 PM
QUOTE: Originally posted by mississippivol
Hey Bob,
I second the sanding tip. I tend to gouge the tire when I try to shave them off. I run a 400 grit, followed by a 600 grit. Then shoot the tire with Glosscote Lacquer (not the enamel, it won't dry on vinyl), decal it, then go back over it with Dullcote Lacquer. Works great on my stockcars. You could start with a 320 grit to get the letters off quickly, but you'll want to still follow up with finer grits to smooth the tire back out.
If, however the tire is reversible, you could skip the sanding and decal it with the clearcoats mentioned and put the tire on with the raised lettering on the inside. That'd save a lot of time.
Glenn
|
|
Glenn-thx for the sanding tips. Probably what I will end up doing. Unfortunatly, the letters are raised on both sides.
|
- Member since
November 2005
|
Posted by Anonymous
on Sunday, November 21, 2004 1:32 AM
QUOTE: Originally posted by nicholma
|
|
PS Where abouts in NZ are you?
|
Wellington. He was a great driver sorely missed. I stopped rallying in about 1978 before he really got going - competed against Jim Richards a couple of times though in his rally days!
Cool.
As a longtime motor racing fan your name did ring a small bell but I couldn't remember from where or how long ago. Those were the real days of NZ motor racing.
- Member since
September 2003
- From: New Zealand
|
Posted by nicholma
on Saturday, November 20, 2004 11:07 PM
|
PS Where abouts in NZ are you?
Wellington. He was a great driver sorely missed. I stopped rallying in about 1978 before he really got going - competed against Jim Richards a couple of times though in his rally days!
Kia ora,
Mark
"Time flies like the wind, fruit flies like bananas"
- Member since
November 2005
|
Posted by Anonymous
on Saturday, November 20, 2004 10:40 PM
Thanks for the comments guys.
Glenn, the CF decals are from Scale Motor Sport (SMS). I cut out the 'Corvette' logo from the kit decals and put it on overtop. Not sure if you can tell in the pic or not, but I made a big goof because the 'weave' of the CF under the logo goes the opposite direction as the 'weave' of the rest of the air box. I made a pattern for the box using masking tape, and then used PollyScale decal solvent to get it to conform around the edges. The engine's not quite done yet. A few more items to add...
Murray
|
- Member since
November 2003
- From: State of Mississippi. State motto: Virtute et armis (By valor and arms)
|
I forgot about the Rally Build; I'll check it out.
Thanks
Glenn
|
- Member since
November 2005
|
Posted by Anonymous
on Saturday, November 20, 2004 2:15 AM
QUOTE: Originally posted by nicholma
Tony why the interest in Possum??
|
|
I grew up in Pukekohe, knew Possum through the local car club as well as last years of school. A few of my old school mates were his original crew. Richard "Snow" Mooney, Noel Robinson, and Mike Eggleton. I last spoke to Peter in 2001 at the Caloundra Rally. He is a great loss both as a friend and as a New Zealander.
My long term aim is to build his 94, 99(both done) 2000, 2001, 2002 and 2003 cars. I am on the look out for a 1/24th scale slot car body of a Mk1 Cortina so I can build his first rally car.
If I can find a Leone, Legacy RS and a Mazda RX3 I will build them as well.
I will then put them all into a glass coffee table on a diorama type base as a permanent memorial to Possum.
Cheers
Tony
PS Where abouts in NZ are you?
|
- Member since
September 2003
- From: New Zealand
|
Posted by nicholma
on Friday, November 19, 2004 1:51 PM
QUOTE: Originally posted by mississippivol
... I need to start my Focus, and see how it looks compared with all of those stockcars I have.
|
|
Glen, You could start it as part of the Rally Car group build that has just started
Kia ora,
Mark
"Time flies like the wind, fruit flies like bananas"
|
- Member since
November 2003
- From: State of Mississippi. State motto: Virtute et armis (By valor and arms)
|
Hi Murray,
That engine is sweet. Where did the carbon fiber come from and how did you get it to cover that well?
That Subaru is also very nice, Tony. I need to start my Focus, and see how it looks compared with all of those stockcars I have.
Glenn
|
- Member since
November 2003
- From: State of Mississippi. State motto: Virtute et armis (By valor and arms)
|
Hey Bob,
I second the sanding tip. I tend to gouge the tire when I try to shave them off. I run a 400 grit, followed by a 600 grit. Then shoot the tire with Glosscote Lacquer (not the enamel, it won't dry on vinyl), decal it, then go back over it with Dullcote Lacquer. Works great on my stockcars. You could start with a 320 grit to get the letters off quickly, but you'll want to still follow up with finer grits to smooth the tire back out.
If, however the tire is reversible, you could skip the sanding and decal it with the clearcoats mentioned and put the tire on with the raised lettering on the inside. That'd save a lot of time.
Glenn
|
- Member since
November 2003
- From: Nashville, TN area
|
Posted by bobbaily
on Thursday, November 18, 2004 6:50 AM
Niclas,
Thanks for the tip. Now I just have to convince the wife that I need a Dremmel tool for "household chores"....
|
- Member since
September 2003
- From: New Zealand
|
Posted by nicholma
on Thursday, November 18, 2004 2:08 AM
Tony why the interest in Possum??
Kia ora,
Mark
"Time flies like the wind, fruit flies like bananas"
|
- Member since
December 2002
- From: Falun, Sweden
|
Posted by proosen
on Wednesday, November 17, 2004 3:57 PM
QUOTE: Originally posted by proosen
QUOTE: Originally posted by bobbaily
Nice work on the Subaru Tony.
My 'cuda funny car is complete-just waiting to get access to a better digital camera to submit photos.
Question for the group-I have purchased the Revell Spy vs. Spy funny car-nice kit, massive decals. However, the slicks have raised letters. How would you remove the raised letters? Decals for the Goodyear label are provided. My first thought is to shave them off and place the decal over the area that the letters resided.
Any suggestions? Thanks
|
|
I saw a guy that hooked up the tire on the power drill and sanded the sidewalls smooth. I have used a grinding stone and tape to sand my tires, but only the threads.
Niclas
|
|
Edit:
That didn't make very much sense did it? What I meant was that I use a grinding stone for the powerdrill and the tape to adjust the width of it to suit the inner diameter of the tire.
Niclas
|
- Member since
December 2002
- From: Falun, Sweden
|
Posted by proosen
on Wednesday, November 17, 2004 3:54 PM
QUOTE: Originally posted by bobbaily
Nice work on the Subaru Tony.
My 'cuda funny car is complete-just waiting to get access to a better digital camera to submit photos.
Question for the group-I have purchased the Revell Spy vs. Spy funny car-nice kit, massive decals. However, the slicks have raised letters. How would you remove the raised letters? Decals for the Goodyear label are provided. My first thought is to shave them off and place the decal over the area that the letters resided.
Any suggestions? Thanks
|
|
I saw a guy that hooked up the tire on the power drill and sanded the sidewalls smooth. I have used a grinding stone and tape to sand my tires, but only the threads.
Niclas
|
- Member since
January 2004
- From: Westland. MI USA
|
Posted by mkhoot
on Wednesday, November 17, 2004 2:46 PM
Great job on the Subaru Tony I really like the interior.

When in doubt just build it. Mark
http://www.ipmslivonia.org/ipms/
|
- Member since
November 2003
- From: Nashville, TN area
|
Posted by bobbaily
on Wednesday, November 17, 2004 12:26 PM
Nice work on the Subaru Tony.
My 'cuda funny car is complete-just waiting to get access to a better digital camera to submit photos.
Question for the group-I have purchased the Revell Spy vs. Spy funny car-nice kit, massive decals. However, the slicks have raised letters. How would you remove the raised letters? Decals for the Goodyear label are provided. My first thought is to shave them off and place the decal over the area that the letters resided.
Any suggestions? Thanks
|