SEARCH FINESCALE.COM

Enter keywords or a search phrase below:

P-47 Thunderbolt GB

54332 views
603 replies
1 rating 2 rating 3 rating 4 rating 5 rating
  • Member since
    April 2005
  • From: Piscataway, NJ!
Posted by wing_nut on Tuesday, January 24, 2006 7:44 AM

Darren - The one I have has the PE stuff and the real nice pit.  The clear panes inthe canopy have a rough texture, like frosting gone wrong, that looks like orange peel.  Look at the glass under the windscreen cross piece.  The whole canopy looks like that to soem extent.   Except ofr the cross piece near to top, the windscreen is devoid for framing or detail.  But there is a slight "bump" where the framing was meant to be molded. I have never tried to get replacement parts for any kit.  Will theysend a new one if it is simply junk and not damaged?  Because I have a variety of methods that can inflict damageEvil [}:)]

Marc  

  • Member since
    April 2005
  • From: Piscataway, NJ!
Posted by wing_nut on Tuesday, January 24, 2006 8:08 AM

Enough Helldiver stuff…now some official P-47 Thunderbolt GB business.


 While I wait for my graphic artist cousin to get some free time to help my reproduce marking for my Fw 190 I had some time to do some work on my P-47.  The trouble with working on a 1/24 Fw 190 is that you don’t realize how BIG the thing is until you go back to 1/48.  I feel like one of the people that paint portraits on grains of rice. 


Got some work done on the pit… going nuts bending all the really tiny PE stuff… and there is plenty of it for this kit.  The Eduard set has 3 frets of parts.  Interesting how they give you 5 little levers when you only use 3.  They are good enough to predict the 2 will go “TWANG” off the tweezers and into oblivion.  (They were right too)


Here is the gun sight with PE and new "glass" next to the sight form the 1/24 190.  You can see the Revi sight in the BoG GB with a dime for reference.  There are only 2 words that can describe the Jug gun sight… tie…knee.


Marc  

  • Member since
    October 2003
  • From: Everett, WA
Posted by gwaihir on Tuesday, January 24, 2006 9:02 AM

Marc, The gun sight looks great! What is the "new glass?" and is it curved? if so, how in the heck did you do that? It looks great, and so does the 190 sight!

Darren, your paint job looks good. Good luck with the invasion stripes - let me know if you develop any good practices while doing it - I had tons of troubles while doing them on my 'practice' build, and may never try them again Black Eye [B)]

Hope all is well.

Leon

Click the banner to see my builds.
  • Member since
    April 2005
  • From: Piscataway, NJ!
Posted by wing_nut on Tuesday, January 24, 2006 9:32 AM
Thanks Leon.  It is clear sheet styrene...Evergreen... flat with the top rounded off and Future applied with a small brush.

Marc  

  • Member since
    December 2002
  • From: Reno, NV
Posted by espins1 on Tuesday, January 24, 2006 6:27 PM
I'd like to join this one please.  Put me down for the Tamiya 1/48 P47D Bubbletop.  Thanks!

Scott Espin - IPMS Reno High Rollers  Geeked My Reviews 

  • Member since
    December 2002
  • From: Reno, NV
Posted by espins1 on Tuesday, January 24, 2006 6:49 PM

 Jabbe wrote:
Sign - Welcome [#welcome] 

I put it next to my Academy razorback last night, and noticed a huge height difference between the two kits. Any idea which one is correct?


Joshua

I came across a bit of research that may explain the height difference you're seeing.  Here is a link to the entire article http://www.swannysmodels.com/TamiyaP47D.html, but I clipped the paragraph that might be helpful.

"The conventional three-bladed propeller could not efficiently utilize the power of the new engine and a four-bladed propeller was adopted. Incidentally, the P-47 served as the first test stand for this propeller. Although this propeller was an admirable solution to the power gearing of the engine, there remained the problem of providing sufficient ground clearance for its 12-foot diameter. Republic had to design a telescopic landing gear, which was nine inches shorter when retracted than when extended."

So possibly when they designed the kits, one did it with the gear extended, and the other non-extended.

Scott Espin - IPMS Reno High Rollers  Geeked My Reviews 

  • Member since
    February 2005
  • From: Raleigh (NCSU)
Posted by Jabbe on Tuesday, January 24, 2006 7:36 PM

hey thanks espins1! I knew the Tbolt had telescoping gear, but I never knew that it didn't have telescoping gear. It's too late anyhow, I already shortened the gear legs on the Academy to the same length as the RM model. Welcome to the GB too!

Joshua

  • Member since
    December 2002
  • From: A secret workshop somewhere in England
Posted by TANGO 1 on Wednesday, January 25, 2006 7:44 PM
Hi gang,

thanks for the kind words about the paint job I did, I have'nt managed to start the invasion stripes yet due to noticing my mistakes here and there on the airframe. In short, I found some gaps along the wing seams, so I have had to fix them and re-spray. I hope to start the stripes tomorrow if all goes well.

Marc, I took another look at the helldiver canopy and it looks OK to me. Here is a pic of the one from my kit.


By the way, your gun sight looks fantastic! I have the same Eduard PE set as you, and I am losing small parts all over the place!

When I make some more progress, I'll post pics. See you later,

Darren.

Regards, Darren. C.A.G. FAA/USNFAW GB
  • Member since
    April 2005
  • From: Piscataway, NJ!
Posted by wing_nut on Wednesday, January 25, 2006 8:29 PM

 TANGO 1 wrote:

By the way, your gun sight looks fantastic! I have the same Eduard PE set as you, and I am losing small parts all over the place!


Let's see which one of us goes blind or crazy first.Wink [;)]


I am going to contact AM to see if they can send a new one.

Marc  

  • Member since
    October 2003
  • From: Everett, WA
Posted by gwaihir on Wednesday, January 25, 2006 11:01 PM
It is so good to know that I am not the only one who gets a pe set and actually (due to user error, launching pieces, or just frustration) only end up using a portion of it. Thank you for sharing that it happens to others.

I finally made a start on my 1/48 razorback (tamiya). However, it is probably a weird place to start - the intercooler ducting (I think that is what it is called) - the opening on the side of the fuselage. In the osprey book, they mention a resin set that helps blank this area off, so I decided to try scratch building a piece to do it. Here are the pieces pre and post painted. They do the job - close off the empty insides of the fuselage, but when they are installed they will be all but invisible - oh well, I had fun trying to build them.

Leon

The pictures...


Click the banner to see my builds.
  • Member since
    December 2002
  • From: A secret workshop somewhere in England
Posted by TANGO 1 on Thursday, January 26, 2006 9:12 AM
Guys, maybe we should re-name this the Blind & Crazy GB!

Leon, those ducts look good, I too put the cooling ducts inside my airframe (crazy!) and now I cannot see them(blind!) The things we do to get the details right....

I was wondering just how many of us have a Helldiver in the stash? A future GB maybe.....?

Darren.
Regards, Darren. C.A.G. FAA/USNFAW GB
  • Member since
    December 2002
  • From: Reno, NV
Posted by espins1 on Thursday, January 26, 2006 11:08 AM

 TANGO 1 wrote:
I was wondering just how many of us have a Helldiver in the stash? A future GB maybe.....? Darren.

I'd be very interested in a Helldiver group build, maybe we can get one going this summer. 

Anyway, I've washed the parts in my Tamiya 1/48 P-47D Bubbletop and will begin cockpit and engine work tonight.... if only this day would move along a little faster. 

I really like the look of the bare metal and invasion stripes, along with the black and white checkerboard cowling of Lt. Col Benjamin Mayo's aircraft with the 84th FS, 78th FG, Duxford Air Base, 1944.

Scott Espin - IPMS Reno High Rollers  Geeked My Reviews 

  • Member since
    September 2003
  • From: N.E. Ohio
Posted by dragonfly on Thursday, January 26, 2006 4:23 PM

Hey Marc...nice gunsight...could you build one for me? LOL

Leon...great scratch work. Looks like you're going to super detail this one. Can't wait to see more.

Looks like I'm going to have to score a Helldiver.

Jerry

  • Member since
    October 2003
  • From: Everett, WA
Posted by gwaihir on Thursday, January 26, 2006 6:03 PM

 TANGO 1 wrote:
Leon, those ducts look good, I too put the cooling ducts inside my airframe (crazy!) and now I cannot see them(blind!) The things we do to get the details right.... Darren.

Sweet. What did you use for the cooling ducts?

 dragonfly wrote:

Leon...great scratch work. Looks like you're going to super detail this one. Can't wait to see more.

Jerry

Thanks for the comment. Funny that you say this, because my build is actually for two GBs (ok with both leaders) this and the super detail GB. Smile [:)]

Leon

Click the banner to see my builds.
  • Member since
    December 2002
  • From: A secret workshop somewhere in England
Posted by TANGO 1 on Thursday, January 26, 2006 7:48 PM
Hi Leon,

I'm using the 3 sheet PE set from Eduard, the ducts are simply folded brass. They are not as well detailed as yours, but they do the job! Mind you, I wish I never bothered now as they cannot be seen from the outside.......here's what they look like.


Today, I spent lots of time swearing and eventually got some straight edges with my masking tape! I have put two thin coats of white on for the invasion stripes. I think it'll need another coat before I put the black paint down. spent rest of the evening on the landing gear and weapons load, pics to follow when the paint dries.


See you later,

Darren.

Regards, Darren. C.A.G. FAA/USNFAW GB
  • Member since
    April 2005
  • From: Piscataway, NJ!
Posted by wing_nut on Thursday, January 26, 2006 8:24 PM

Jerry - Thanks for the compliment.  But I've seen your stuff... you don't need me to do thatWink [;)]Big Smile [:D]

Leon - nice ducts… very nice.

Darren - I was wondering what those pieces on the fret were for.  I am going to put them in. I am old hand at unseen detail.  The Jumo engine in my 1/24 Fw has all new pipes and spark plugs wires... the whole nine yards.  Can't see any of it. Well a tiny bit of the back in the wheel well.


Marc  

  • Member since
    September 2003
  • From: N.E. Ohio
Posted by dragonfly on Thursday, January 26, 2006 9:26 PM

Darren...I have'nt attempted painting invasion stripes before and can't imagine the patience it would take. How did you accomplish masking the irregular surface under the fuselage? Can't wait to see more.

Jerry

  • Member since
    November 2005
Posted by Anonymous on Friday, January 27, 2006 4:44 AM
    I love the 'Jug'. Just recently picked up the Squadron/Signal book on them, and was thinking of building a P-47G 'Doublebolt' trainer version in either 1/72 or 1/48 scale. It will probably be in 1/48 since I already have a 'Bubbletop' in 1/72 to park next to the BF-109G.

Big Smile [:D]

Kent White

"It vas a dinosaur...but a dinosaur vit goot proportions!" -Alexander Kartveli, designer of the P-47.
  • Member since
    December 2002
  • From: A secret workshop somewhere in England
Posted by TANGO 1 on Friday, January 27, 2006 7:44 AM
Marc,
I take my hat off to you and the other guys who go that extra mile for the detail, its a thankless task!

Jerry,

Like I said, with plenty of swearing! In short, I streched the tape around the curves very slowly. It took many attempts and its quite fustrating, I hope it looks OK when its done. I had to mask the rest of the model to protect my nice OD green finish. I need to put another light coat of white down today, when that dries I can get the black stripes down.

See you later,

Darren.
Regards, Darren. C.A.G. FAA/USNFAW GB
  • Member since
    February 2003
  • From: phoenix
Posted by grandadjohn on Friday, January 27, 2006 7:55 AM
You guy's are doing great, haven't touched mine since Tues, still sanding seams, not bad but still some slow work
  • Member since
    May 2004
  • From: Dallas
Posted by KINGTHAD on Friday, January 27, 2006 11:58 AM

Darren just finished laying down the primer, Im just waiting for you to come over and mask my stripes Tongue [:P]. Looks like you are a couple of steps ahead of me, I hope my stripes come out strieght to.


Thad

  • Member since
    February 2005
  • From: Raleigh (NCSU)
Badge Ready!
Posted by Jabbe on Friday, January 27, 2006 2:11 PM

Hi guys!

I'm happy to see lots of discussion and pictures. I was hoping that I wouldn't be the only one posting in this thread, and I can see that you guys have (thankfully) kept the ball rolling. The progress that I've seen so far looks top notch. Good job guys.

The badge is ready, and it can be used as soon as you finish a P-47. Please be sure to download it or host it on your own webpage, and not just link to mine.

From my front, I've got grey and olive drab on the Academy Razorback. I'm going to spray the grey spots "light" olive drab, to make them look used. Sadly, I broke off the right wing while pulling the masking tape off. Oh well, it's easy to repair. The rudder and cowl are going to get red trim. Primer for Alclad II will be applied to the bubbletop P-47 this weekend. If it wern't for the career fair at school this week (I really need an internship), I'd be able to finish painting both T-bolts, but I don't see that happening.


purpleplex650d: are you going to join the GB? if so, what kit are you going to build?

  • Member since
    November 2005
Posted by Anonymous on Friday, January 27, 2006 8:53 PM
    Let me study on it while I catch my breath this weekend. I've been in training all week, as a newly hired corrections officer.

Needless to say, I can't even go get a kit to start with until I get my first paycheck Hopefully that will come true on Monday. I'll report back when I decide on it. Was doing some research, may elect to do the XP-47B prototype, or maybe the XP-72 if I can find enough info on them.

Kent White

:-(

The wife found out...no more Ebay for me...
  • Member since
    October 2003
  • From: Everett, WA
Posted by gwaihir on Saturday, January 28, 2006 6:50 PM

Woops, missed a couple days here. Darren and Jabbe, your work looks great. I'm curious to see how the next steps (dreaded black invasion stripes and lighter OD respectively) go - I hope great.

purplexs650d, I love the ebay comment - cracked me up!

Hope all is well.
Leon

Click the banner to see my builds.
  • Member since
    December 2002
  • From: A secret workshop somewhere in England
Posted by TANGO 1 on Sunday, January 29, 2006 6:49 AM
Hi gang,

Firstly, welcome Purplexs65od! I hope you join our formation soon. Thanks to everyone for sharing their progress, this is a really good group build with lots going on. Now about me...I've not made any progress at all since my last post due to going round to other folks houses and painting their invasion stripes! :D

OK....the truth is I'm having too much fun playing with my son this weekend to be in the workshop. Normal service will resume soon. Black stripes should be done by late Sunday night.

Bye for now,

Darren.

Regards, Darren. C.A.G. FAA/USNFAW GB
  • Member since
    October 2003
  • From: Everett, WA
Posted by gwaihir on Sunday, January 29, 2006 10:39 AM
Sounds like time well spent Darren. Enjoy :)
Leon
Click the banner to see my builds.
  • Member since
    September 2003
  • From: N.E. Ohio
Posted by dragonfly on Tuesday, January 31, 2006 2:19 PM

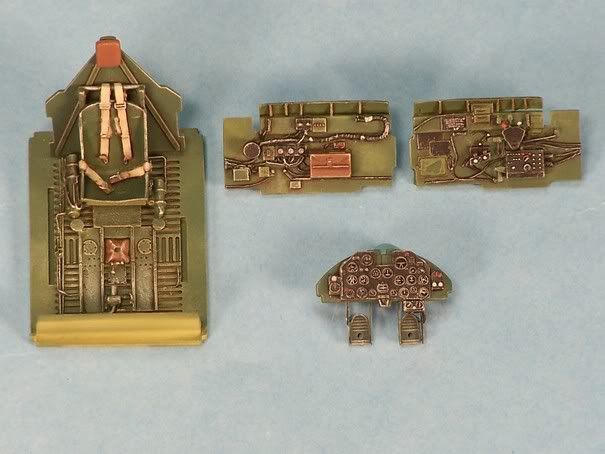
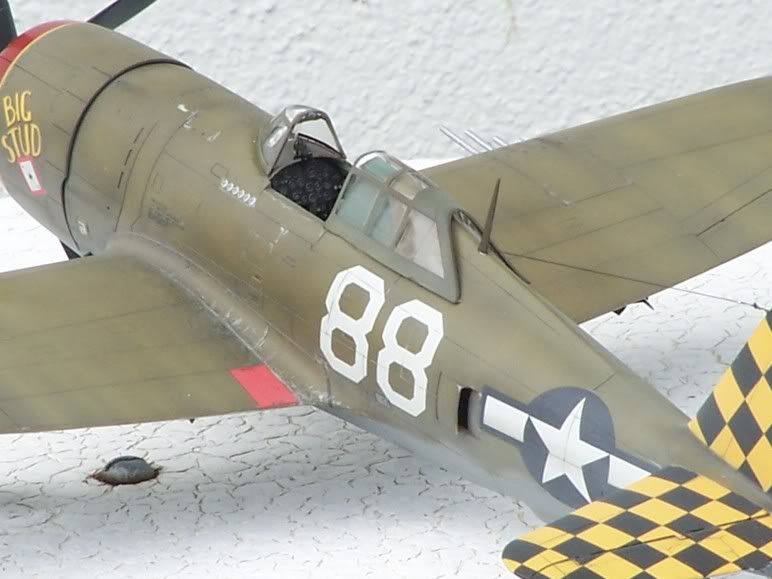
Well guys, I made it back from Fla. in one piece, and I must say, I'm not happy about leaving 75 degree temps. to the reality of Ohio winter. As promised, I'm posting some more finished pics. I thought it would be interesting to compare the True Details resin CP set to a Tamiya kit CP that I biult last year.

First, the resin set,
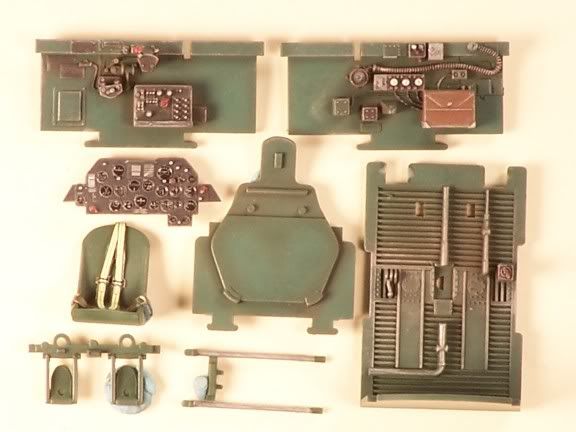
Now, the Tamiya,

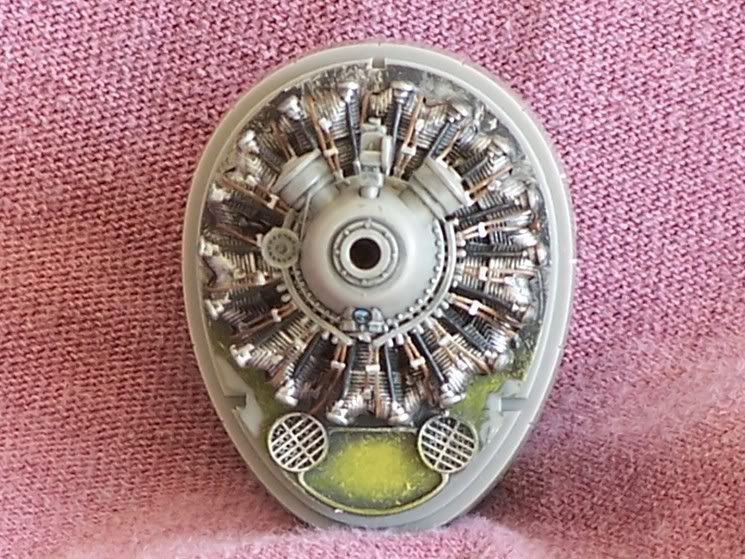
Here's the Hase. kit engine with some PE added,

Now a couple of overall finished pics

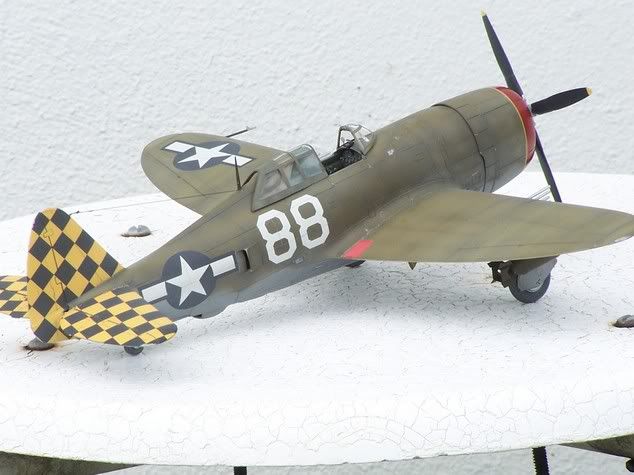
After building both the Tamiya kits, there's no doubt they're clearly better then the older Hasaegawa offering, but since I aquired this one in an auction for five bucks I had to buy it, and I think it came out allright. Except, being the sucker I am, I spent another thirty-five on AM goodies. OUCH!!

Can't wait to see more from everyone,

Jerry

  • Member since
    December 2002
  • From: Reno, NV
Posted by espins1 on Tuesday, January 31, 2006 2:37 PM
    Dragonfly, kick ****** job on your P-47, looks absolutely fantastic!  Very nice!

Scott Espin - IPMS Reno High Rollers  Geeked My Reviews 

  • Member since
    February 2005
  • From: Raleigh (NCSU)
Posted by Jabbe on Tuesday, January 31, 2006 5:02 PM

Dragonfly: Holy cow man, that's an amazing looking bolt. I hope mine comes out half that good. Again, looks excellent.

I masked off the remaining grey spots on the razorback planning to airbrush it, but ended up brush painting the last few pannels. I'm still not sure if I like it or not. I think I *might* have gone a little too light. I was aiming for a slightly weathered or used look. The worst part is that I mistakenly covered up one of the pannels with masking tape, so I still have to paint another half pannel. What do you guys think? Strip it off and apply a slightly darker color, or does it look ok?

Joshua

  • Member since
    September 2003
  • From: N.E. Ohio
Posted by dragonfly on Tuesday, January 31, 2006 5:20 PM

Joshua, I'm not sure what you're after here. Did you brush paint, trying to get a " in-the-field touch-up" kind of look? Even so, you may have gone with a little too much contrast. Maybe lightly shoot a thinned down version of your base color over what you have. That way, you'll still have some contrast yet tone it down a bit. Sort of a blend coat, if you will.

Jerry

JOIN OUR COMMUNITY!

Our community is FREE to join. To participate you must either login or register for an account.

SEARCH FORUMS
FREE NEWSLETTER
By signing up you may also receive reader surveys and occasional special offers. We do not sell, rent or trade our email lists. View our Privacy Policy.