SEARCH FINESCALE.COM

Enter keywords or a search phrase below:

Self Propelled Artillery/Mortar GB 2006-2007

23125 views
250 replies
1 rating 2 rating 3 rating 4 rating 5 rating
  • Member since
    November 2005
Posted by Anonymous on Saturday, June 30, 2007 10:32 PM
well your probably right here. Well I guess i'm out then. I'll just post this in the amour section then. Nope the kits a breeze to build!
  • Member since
    August 2006
  • From: Oromocto, Canada
Posted by Gun Tech on Saturday, June 30, 2007 9:18 AM

She's a beauty, makes me want to do mine Big Smile [:D]Cool [8D].

However, it is more of a tank destroyer than a self propelled arty.......    As per the original rules of the GB, it would not qualify.  It would normally be up to Will to make the decision, but he hasn't been around for a while Whistling [:-^]

Did you had any problems with the kit?

Jean-Michel    "Arte et Marte"

  • Member since
    November 2005
Posted by Anonymous on Saturday, June 30, 2007 6:38 AM
 Gun Tech wrote:
 Still-learning wrote:

is it too late to sign up? I'm trying to get involved in all the forum activities.


If not i'll be doing a 1:35 Dragon Marder 3 H, OOB. I'll post pics soon I promise. 

The GB is not done yet, thought I haven't heard of Will in a while.......   

Oh well, i'll just post anyway. Here my 1:35 Dragon Marder H, it's been sprayed white and ready for an AB. I've also added some extras as I felt it was alittle plain. This was my first 1:35 kit and I had alittle trouble with the photoetch but other than that, she was fairly easy to build.

Tarp/Blanket/Flag

Loose straps

She comes apart for ease of painting. Looking now I forgot to trim afew pits, but heh, Another use of primer!

  • Member since
    August 2006
  • From: Oromocto, Canada
Posted by Gun Tech on Wednesday, June 27, 2007 3:31 PM
 Still-learning wrote:

is it too late to sign up? I'm trying to get involved in all the forum activities.


If not i'll be doing a 1:35 Dragon Marder 3 H, OOB. I'll post pics soon I promise. 

The GB is not done yet, thought I haven't heard of Will in a while.......   

Jean-Michel    "Arte et Marte"

  • Member since
    November 2005
Posted by Anonymous on Wednesday, June 27, 2007 2:39 AM

is it too late to sign up? I'm trying to get involved in all the forum activities.


If not i'll be doing a 1:35 Dragon Marder 3 H, OOB. I'll post pics soon I promise. 

  • Member since
    December 2002
  • From: Reno, NV
Posted by espins1 on Sunday, May 20, 2007 12:01 PM
That's some nice interior detail work Jean-Michel, looking forward to watching this one come along.  Smile [:)]

Scott Espin - IPMS Reno High Rollers  Geeked My Reviews 

  • Member since
    August 2006
  • From: Oromocto, Canada
Posted by Gun Tech on Saturday, May 19, 2007 2:45 PM

Not sure if the GB is still active, haven't heard of Will in a while.....


But here's some progress pics

From that:


to this:

Also installed that drive shaft with the joints. I will add more details inside later in the build.

Jean-Michel    "Arte et Marte"

  • Member since
    August 2006
  • From: Oromocto, Canada
Posted by Gun Tech on Thursday, April 19, 2007 4:28 PM

Oh yeah! I really like it. Very original with the smoke effect Thumbs Up [tup]

Awesome Red!

Jean-Michel    "Arte et Marte"

  • Member since
    March 2006
  • From: Right Side of a Left State
Posted by Shellback on Thursday, April 19, 2007 11:42 AM

Well done !!!Thumbs Up [tup]  the rocket coming out of the launcher and the "smoke" really give a feeling of action !Smile [:)]

  • Member since
    December 2002
  • From: Reno, NV
Posted by espins1 on Thursday, April 19, 2007 10:52 AM

Nice redleg12!  The cotton makes for a pretty decent smoke effect!  Cool [8D]

Scott Espin - IPMS Reno High Rollers  Geeked My Reviews 

  • Member since
    July 2006
  • From: New Jersey
Posted by redleg12 on Wednesday, April 18, 2007 9:03 PM

See pics and more info in the armor forum

M270 MLRS - Desert Storm firing

Thanks

"The Moral High Ground....A Great Place to Emplace Artillery."

  • Member since
    December 2002
  • From: Reno, NV
Posted by espins1 on Wednesday, April 11, 2007 12:32 PM
Cool [8D] Very nice NTM! 

Scott Espin - IPMS Reno High Rollers  Geeked My Reviews 

  • Member since
    July 2006
  • From: Dallas, TX
Posted by Plastic_Cross on Wednesday, April 11, 2007 7:50 AM

NTM,

Great results on your behemoth AFV.  The camo is spellbindingly perfect.  I'm not exaggerating....it's really well done.  I particularly like what you did with the rear of the vehicle, an eye-catching finish.  Your photography is excellent, does justice to your fine build.

I have that kit in the stash.  Every so often I open the box and take a look, wondering if I should take the plunge.  I got the kit pretty cheap on eBay, but the low price was because someone had started the kit and then abandoned it.  The turret and mantle were assembled were very poorly assembled. Everything else appears intact.  I'm working on the tiny Soviet ASU-57, which should not take long.  Maybe I'll start the PzH2000 next.

Thanks for sharing your results.

 Larry

  • Member since
    August 2006
  • From: Oromocto, Canada
Posted by Gun Tech on Tuesday, April 10, 2007 7:19 PM

Thanks NTM Big Smile [:D]


You did very good on that beast. Cool [8D] Your camo scheme is top-notch! And the subtle weathering really brings it to life. I have seen real vehicles with paint scheme that looked only half decent as yours.


Congrats Thumbs Up [tup] 

Jean-Michel    "Arte et Marte"

  • Member since
    July 2006
  • From: New Jersey
Posted by redleg12 on Monday, April 9, 2007 9:28 AM
 Manic Moran wrote:

Just checking in, seeing what's up. The PzH is about done, picked up 'model of the month' at the club meeting a couple of weeks ago.

That M107 is well done. I have the same kit, it's a real eye-catcher on display on the shelf. They just don't make them like they used to.

As for those U-joints... You're certifiable. And very impressive.

NTM

Thanks on the M107.

Working on the M240 MLRS firing with missle leaving the launcher. Should have some pics soon.

"The Moral High Ground....A Great Place to Emplace Artillery."

  • Member since
    February 2005
  • From: California
Posted by Manic Moran on Sunday, April 8, 2007 6:34 PM

Right, so.

It's in the main armour forum as well, but pics here.

NTM

The difference between infantrymen and cavalrymen is that cavalrymen die faster for we ride into battle!

  • Member since
    February 2005
  • From: California
Posted by Manic Moran on Friday, April 6, 2007 12:15 PM

Just checking in, seeing what's up. The PzH is about done, picked up 'model of the month' at the club meeting a couple of weeks ago.

That M107 is well done. I have the same kit, it's a real eye-catcher on display on the shelf. They just don't make them like they used to.

As for those U-joints... You're certifiable. And very impressive.

NTM

The difference between infantrymen and cavalrymen is that cavalrymen die faster for we ride into battle!

  • Member since
    August 2006
  • From: Oromocto, Canada
Posted by Gun Tech on Wednesday, March 21, 2007 9:06 PM

I finished the gun assembly. The inner shield is left out for ease of painting. The muzzle brake is held by blue tack, as it will be impossible to remove the barrel after installing it. Same with the sight for ease of painting. Here's are some pics.

The craddle wasn't centered in the carriage, which might have resulted in alignment problems in the future. So I fixed it with a hairdryer. But I wasn't carefull enough........Disapprove [V]

It has been fixed though, by replacing the recoil guard by one from a Tamiya's Wespe in my scrap pile (pic 2 and 3)

Jean-Michel    "Arte et Marte"

  • Member since
    August 2006
  • From: Oromocto, Canada
Posted by Gun Tech on Sunday, March 11, 2007 12:10 PM
 Plastic_Cross wrote:
 Gun Tech wrote:

I finally made those "U-Joint".  Smile [:)] and they are workeable Big Smile [:D]    I'll wait for the "Scratchbuilt" forum to be operationnal to explain how I did them.

Bravo on the U-Joint GT! You must have used an electron microscope to put that assembly together.  You must also have some pair of steady hands.  And I see by your photo that you have some great looking fingers. Smile [:)] .  

Larry

Well thanks Larry Laugh [(-D]  I wasn't expecting that. Let's say it took a while to get them together, and a few prototypes......    I saw your Hotchkiss, and you have a way better interior with Bronco than Trumpeter. Too bad I already got the Marder I and the Beobachtungswagen from Trumpeter Tongue [:P]      Oh well..... C'est la vie

Thanks Hermes! That howitzer is a bit trickier than the one from Tamiya's Wespe. But it has such a unusuall look Cool [8D]  

Jean-Michel    "Arte et Marte"

  • Member since
    July 2006
  • From: Dallas, TX
Posted by Plastic_Cross on Sunday, March 11, 2007 11:56 AM
 Gun Tech wrote:

I finally made those "U-Joint".  Smile [:)] and they are workeable Big Smile [:D]    I'll wait for the "Scratchbuilt" forum to be operationnal to explain how I did them.

Bravo on the U-Joint GT! You must have used an electron microscope to put that assembly together.  You must also have some pair of steady hands.  And I see by your photo that you have some great looking fingers. Smile [:)] .  

Larry

  • Member since
    April 2006
  • From: LaValle, Wisconsin
Posted by Hermesminiatures on Sunday, March 11, 2007 9:57 AM
Lookin' good!

Jonathan

For every modeling technique that works, I have three that don't.

  • Member since
    August 2006
  • From: Oromocto, Canada
Posted by Gun Tech on Saturday, March 10, 2007 2:08 PM

Alright.....  I made some progress, so here's some picsSmile [:)]

I drilled and installed the idler wheels. Care had to be taken as the retaining arm is a separate part and you can adjust the idler's position with it. I also added styrene for more details.

I finally made those "U-Joint".  Smile [:)] and they are workeable Big Smile [:D]    I'll wait for the "Scratchbuilt" forum to be operationnal to explain how I did them.

I also started the gun's construction. Eduard's PE helped in hidding a few seams (like in the craddle) and adding details.

 There is a lot of steps that will be confusing after that. A lot of planning will be needed for the gun shield, barrel, muzzle brake and forward assembly of the craddle.  MTF

Jean-Michel    "Arte et Marte"

  • Member since
    December 2002
  • From: Reno, NV
Posted by espins1 on Thursday, March 8, 2007 11:14 AM

Your Wespe is coming along nicely Hermisminiatures!  Smile [:)] 

You're a bit further along than I am on my JagdTiger Wink [;)]

Scott Espin - IPMS Reno High Rollers  Geeked My Reviews 

  • Member since
    August 2006
  • From: Oromocto, Canada
Posted by Gun Tech on Wednesday, March 7, 2007 7:43 PM

Looking real fine there Hermes! Thumbs Up [tup]


Does anybody know Will's whereabout?     I emailed him, but no answer so far......

Jean-Michel    "Arte et Marte"

  • Member since
    April 2006
  • From: LaValle, Wisconsin
Posted by Hermesminiatures on Wednesday, March 7, 2007 4:49 PM

I finished detail painting on the Wespe and added some gear from a Gen2 figure set, with more to come after weathering. I used Archer dry transfers for the markings.


Jonathan

For every modeling technique that works, I have three that don't.

  • Member since
    August 2006
  • From: Oromocto, Canada
Posted by Gun Tech on Tuesday, March 6, 2007 9:03 PM
OMG!!!!!!    I made workable U-Joints!!!!!!!!!     I'll post pics and updates as soon as I get time.

Jean-Michel    "Arte et Marte"

  • Member since
    April 2006
  • From: LaValle, Wisconsin
Posted by Hermesminiatures on Wednesday, February 28, 2007 10:10 PM

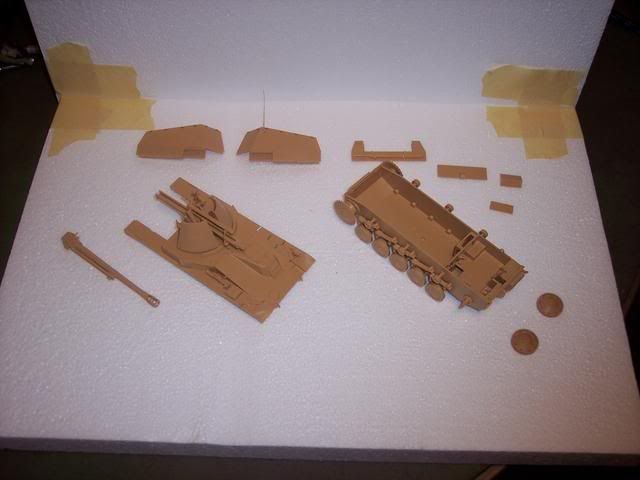
Well, I managed to wrestle the compressor back downstairs, and had quite an eventful afternoon (attempting) to paint the Wespe.

I gave everything a final cleaning and used the airbrush to dust the parts off one last time.

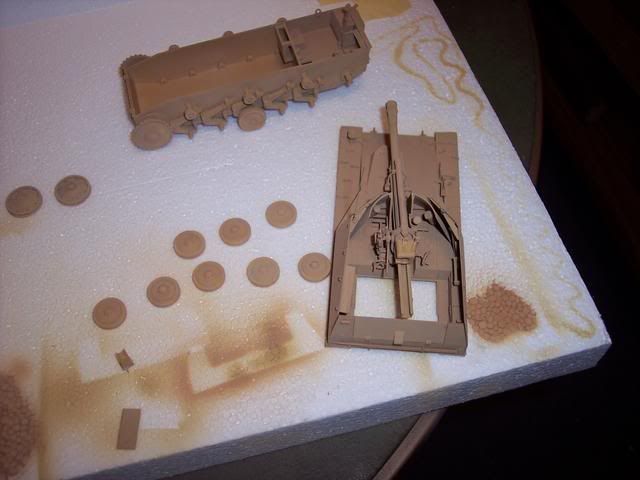
Then I painted the entire vehicle with a custom-mixed Dark Yellow, 90% XF-60 Dark Yellow and 10% XF-7 Red. The red corrects the overly green tone of the Tamiya color.

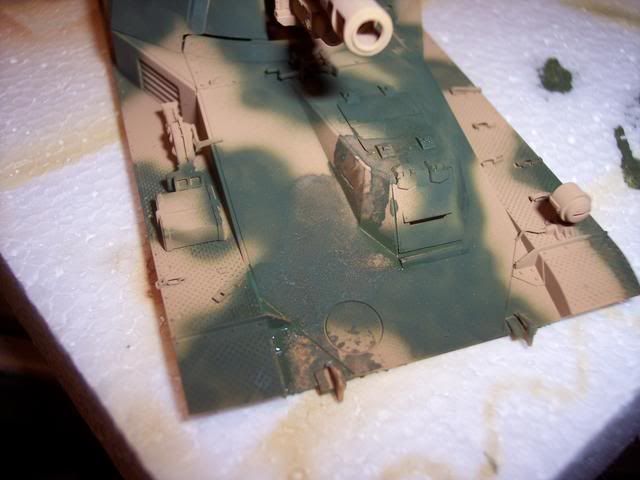
I began painting a wide, random camouflage pattern with Tamiya NATO green, and managed to commit the biggest airbrush mistake possible - spill the paint in the color cup onto the nearly finished model! Fortunately it was only a small area and was pretty easy to fix.

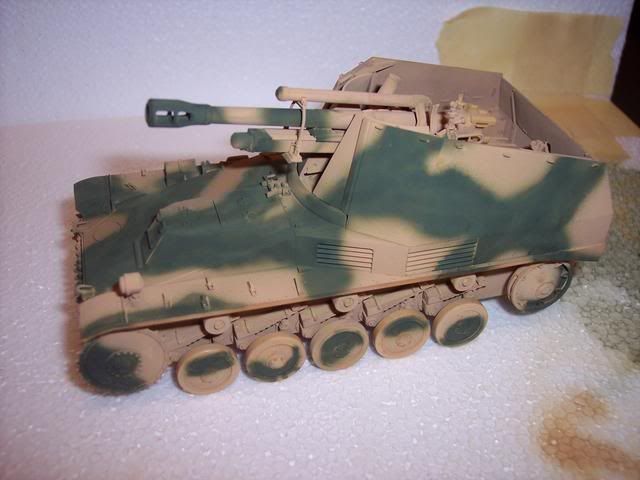
The finished camo, ready for detail painting tomorrow. I deliberately add a visible 'squiggle' to the green to give it an uneven, field-applied look without being lumpy.

At this rate of mistakes, I ought to be done by ChristmasAngry [:(!]

Jonathan

For every modeling technique that works, I have three that don't.

  • Member since
    August 2006
  • From: Oromocto, Canada
Posted by Gun Tech on Wednesday, February 28, 2007 1:53 PM
 Hermesminiatures wrote:

I can see it coming now - an "I hate Tamiya" GB!Wink [;)]

With their line of Panzer IV based kits. Disapprove [V]   

I am not buying any from Tamiya anymore because of the lack of underside details, and the ugly fit of the rear panel to the hull where the idler wheel is mounted.......      Not sure if it has been corrected on the 3.7cm Mobelwagen or the Wirbelwind.......  that why I passed.

Jean-Michel    "Arte et Marte"

  • Member since
    April 2006
  • From: LaValle, Wisconsin
Posted by Hermesminiatures on Wednesday, February 28, 2007 1:45 PM

For the same reason they sold necessary parts for the Leclerc MBT as a seperate set(Censored [censored]), and always use vinyl tracks. If they added sponsoons, they'd have to clean up all the ejector pin marks and rough CAD machining on the underside, and do something else about the always-thick fenders. They aren't really very concerned with customer satisfaction, which you would find out in a hurry if you ever try to contact customer support. That's the one reason why I don't like Tamiya.

I can see it coming now - an "I hate Tamiya" GB!Wink [;)]

Jonathan

For every modeling technique that works, I have three that don't.

JOIN OUR COMMUNITY!

Our community is FREE to join. To participate you must either login or register for an account.

SEARCH FORUMS
FREE NEWSLETTER
By signing up you may also receive reader surveys and occasional special offers. We do not sell, rent or trade our email lists. View our Privacy Policy.