SEARCH FINESCALE.COM

Enter keywords or a search phrase below:

Fleet Air Arm Group Build

728146 views
11139 replies
1 rating 2 rating 3 rating 4 rating 5 rating
  • Member since
    August 2016
  • From: Eufaula, Alabama
Posted by WannabeFarmboy on Thursday, March 2, 2017 12:39 AM

Well, slow and steady has been the name of the game for me thus far. 

As you can see, the seams on the engines were absolutely horrible. The clean up process was on the tedious side. When I bump up against something like that, I have to do a little at a time to avoid accidentally destroying something in frustration. 

Eventually I was able to get things evened out. Idk what happened to the picture after I recut the tiny little gaps between the fins on the cylinders, but that happened and took way longer than expected. I also drilled the small holes back in the tops of the cylinders because by the time I got everything evened out there, they were all but gone. 

Today I got a first coat on the engines. Will be doing touch ups and getting the bolt heads painted steel once everything is dry. I know that it's still kinda rough lookin, but I'm satisfied given the tools I have to work with right now (and the fact that I'll be keeping the cowling closed up on this one). 

Mess like this is what I'll be working on as paint dries, etc. 

  • Member since
    December 2016
Posted by dwsrazor on Tuesday, February 28, 2017 4:13 PM

Tonka, those are some pretty ancient kits there.  Looking forward to seeing you build them and the chipmunk os coming along nicely. 

Farmboy, looking forward to some progress pics.

John, The Lanc is looking great too.  I know what you mean about filling and sanding.  I've been working on Special Hobbies Piaggio P.108 and I have had my fill of it.  Looking forward to taking a break and starting the build for this.  I plan to start on my Swordfish tomorrow to coincide with a group build on another site.

  • Member since
    March 2007
  • From: Michigan
Posted by tonka on Saturday, February 25, 2017 7:28 PM

Great job on Lancaster!! Really nice detail!


Yes STIK that is an olast d Hawk of mine.

When we cleaned out my father's attic last year we came across several boxes of old models I had not built as a kit and put in attic when I joined the Marine Corps,,many many many years ago. Figure I may as well build them now. Most are from 60's , ear;y 70s.

]

  • Member since
    August 2016
  • From: Eufaula, Alabama
Posted by WannabeFarmboy on Tuesday, February 21, 2017 11:43 AM

Progress on the Lancaster is looking great! 

I should have an update on the Beaufighter soon. Been doin the tedious work of cleaning up the seams on the engines. Have to go slow and steady on them so I don't rush and screw them up. 

  • Member since
    November 2003
  • From: Naples, FL
Posted by tempestjohnny on Tuesday, February 21, 2017 5:12 AM
John that has got to be a beast. You're doing it wonderful justice.


  • Member since
    December 2002
  • From: Northern California
Posted by jeaton01 on Tuesday, February 21, 2017 12:35 AM

Well, it's been a little quiet in Lancasterville, mostly because I don't like to write about sanding, filling, and masking.  Although I have also assembled all the turrets, it's mostly been the former.
It would be nice to say the the fuselage halves went together easily, but that was not the case as it was not possible to get them together without steps in several locations.  Before assembling the halves, the mating edges were chamfered so that after the initial gluing thin CA could be flowed in along the seam to strengthen it.  However, after gluing with Tamiya Extra Thin cement but before the CA was applied the seams were inspected and the stepped areas were located.  A long section of the top was sawed along the seam line with a JLC saw and reset.  After that the seam was reglued and the CA was applied, followed by taping off the seams and filling the remaining chamfer with Tamiya grey putty.  Next came several sessions of sanding.  Montex masks were used, although they were incomplete in a few spots, and in other spots I was not happy with the fit and substituted Tamiya tape.  The turret  internal parts were painted flat black and gun metal as appropriate.  The nose turret required a little grinding to clear the gun mount.  On the early kits Tamiya reversed the orientation of the tail gun mounts, so they were re-reversed which required removal of a gusset like part which wasn't in any pictures I could find anyway.


John

To see build logs for my models:  http://goldeneramodel.com/mymodels/mymodels.html


  • Member since
    December 2002
  • From: Northern California
Posted by jeaton01 on Tuesday, February 21, 2017 12:33 AM

Well, Tonka, you may yet escape having to swab the decks!  I'll get these new projects on to the roster thread. Paint the interior of the Swift canopy with a layer of Tamiya Smoke and no one will be the wiser.

John

To see build logs for my models:  http://goldeneramodel.com/mymodels/mymodels.html


  • Member since
    July 2004
  • From: Sonora Desert
Posted by stikpusher on Monday, February 20, 2017 4:28 PM

Tonka, seeing that Hawk Supermarine Swift sure brings back some memories. I built quite a few of those many years ago. Yes


F is for FIRE, That burns down the whole town!

U is for URANIUM... BOMBS!

N is for NO SURVIVORS...

       - Plankton

LSM


  • Member since
    March 2007
  • From: Michigan
Posted by tonka on Monday, February 20, 2017 2:09 PM

Digging through my stash to organize it, I didn't realize I had so dang many old RAF kits. Since these are pretty simple kits and help in modelling skills. Decided to throw them in here .

First is a REALLY old Hawk kit of a Supermarine Swift K-4. This has no cockpit just a closed area and pilot's head. It also has the engraved decal locations. I was tempted to put a cocpit in, but decided against it. Its just a shelf model. But I did fill in the engraved decal locations.


Next is an old Frog Hurrican IIC Night fighter. I'm doing this one in a black scheme.

]

  • Member since
    March 2007
  • From: Michigan
Posted by tonka on Monday, February 20, 2017 2:05 PM

First coats on the Little Chipmunk Trainer. Decided to do it in yellow from Royal FLying School.

]

  • Member since
    August 2016
  • From: Eufaula, Alabama
Posted by WannabeFarmboy on Tuesday, February 14, 2017 4:56 PM

tonka

Farmboy, excellent work on using the engines as gappers for clothes pins! Very good initiative!Big Smile

Seriously great start, all models begin with 2 pieces and some glue!!


I'm glad someone got what I was really going for there.

Plenty of work to do to clean up the edges on those. I'm out of town for a day or two, so I'll be getting on that when I get home. 

  • Member since
    March 2007
  • From: Michigan
Posted by tonka on Tuesday, February 14, 2017 12:24 PM

Farmboy, excellent work on using the engines as gappers for clothes pins! Very good initiative!Big Smile

Seriously great start, all models begin with 2 pieces and some glue!!

]

  • Member since
    December 2016
Posted by dwsrazor on Tuesday, February 14, 2017 12:16 AM

I go away for a few days and there is all kinds of action going on here.  Excellent work mates. 

  • Member since
    August 2016
  • From: Eufaula, Alabama
Posted by WannabeFarmboy on Monday, February 13, 2017 12:25 AM

I've come to somewhat of a standstill on my 1/48 Tempest and V-1 (waiting for things to dry and cure). So, I decided to start on my Beaufighter this evening. There has been some serious self control going on. I wanted to start it last night, but I held out for a whole 24 hours. Anyway, not much happening with it. Just got it out of the box and started on the engines as Revell seems to want me to start there. I know that this picture is going to be impressive, but please try to contain your excitement. 

*Note* This post can be translated to pirate should it be deemed necessary. Stick out tongue

  • Member since
    July 2004
  • From: Sonora Desert
Posted by stikpusher on Sunday, February 12, 2017 12:34 PM

Delmo Kitslap??!! Now there is a name that I've not heard in a long time. I think that he was last seen with that n'er do well, Monty Graham.


F is for FIRE, That burns down the whole town!

U is for URANIUM... BOMBS!

N is for NO SURVIVORS...

       - Plankton

LSM


  • Member since
    December 2002
  • From: Northern California
Posted by jeaton01 on Sunday, February 12, 2017 11:59 AM

Been look'in fer that barmy bloke more'n 70 turns o'the golden orb!

John

To see build logs for my models:  http://goldeneramodel.com/mymodels/mymodels.html


  • Member since
    June 2008
Posted by lewbud on Sunday, February 12, 2017 1:16 AM

That is some fine work there John!  Begging the Admiral's pardon, you wouldn't happen to be related to Delmo Kitslap or know where the Deluxe Reduction Gizmo is?

Buddy- Those who say there are no stupid questions have never worked in customer service.

  • Member since
    December 2002
  • From: Northern California
Posted by jeaton01 on Sunday, February 12, 2017 12:57 AM

I was not happy with the location of many of the cockpit parts so I relocated the instrument panel, pilot's control column, navigator's seat, and the two posts that support the table with the wireless and navigator stations.   I removed all of the locating moldings on the floor as they don't reflect how the real thing looks, but I had to make a new base for the navigator's seat because it needed to be raised up to match the table,  I could have left it where it was but then it would block the view of the engineer's panels.  Apparently the seat had some method of moving around so crew could get by, I have seen photos where it was even behind the pilot's seat.  I didn't do anything with the wireless operator's seat, although I may still fashion some kind of spar cover there.   Never to be seen again and all that.  The posts should reach to the ceiling but that will not be visible. 
The best luck I had in figuring out how all this stuff fit was a BBC documentary about a pilot named Jack Currie, who also wrote a book titled "Lancaster Target"  which of course I had to order, as it is said to be one of the best best memoirs of Lancaster pilots.  In any event, a lot of the BBC video was a tour of the Lancaster interior by Jack Currie himself.   Here is a link to this video on youtube:
 
 
Here's another veteran's Lancaster walk through.
 
 
It appeared to me that the control yoke was both low and too far from the pilot for comfort, so the old base was removed and a new one was made by laminating plastic card to a height that looked better to me.  The instrument panel was moved back slightly to allow for the two instruments that sit atop the panel.  Now I think I can fly this thing, if I can just slim down to 1/48 scale and find the checklist.
Here is the best photo I have showing the old locations.
 
 
And two of the present setup.


John

To see build logs for my models:  http://goldeneramodel.com/mymodels/mymodels.html


  • Member since
    December 2002
  • From: Northern California
Posted by jeaton01 on Friday, February 10, 2017 4:27 PM

Aye, good progress there is!  Perhaps a first solo for the chap on the right?  No rum for the like's a him!

John

To see build logs for my models:  http://goldeneramodel.com/mymodels/mymodels.html


  • Member since
    March 2007
  • From: Michigan
Posted by tonka on Friday, February 10, 2017 2:25 PM

After a vacation to sunnier climes, I started on the little RAF .

It actually fit pretty well, one coat of primer and of course still need some filler and sanding. But its getting there!

The pilot on the right will be used in here with an empty rear seat...Since I used the 2nd pilot in my RAF Spitfire Floatplane in Floats and Boats GB.


]

  • Member since
    December 2002
  • From: Northern California
Posted by jeaton01 on Thursday, February 9, 2017 6:52 PM

dwsrazor

Looking mighty fine John!  Bow Down

I won't get to my Swordfish until March.  You might be done your Lancaster by then at the rate you are going.


Thanks, Dave.  Done by March?  I hope to take this Lanc and decimate Scweinfurt by then!  An if that irritates the Chermans they are free to start a Luftwaffe GB to oppose us!

John

To see build logs for my models:  http://goldeneramodel.com/mymodels/mymodels.html


  • Member since
    December 2002
  • From: Northern California
Posted by jeaton01 on Thursday, February 9, 2017 6:38 PM

WannabeFarmboy

Actually, I do have a 1/32 Beaufighter in my stash.. That's crazy though, right? I've got 2 WIPs going right now and two other GBs I've signed up for.

I think I may have an addiction...

If y'all are willing help enable my addiction though, I will try to add a third build to my GB schedule. Lol. 


Consider Yerself conscripted, Laddie!  I'll add yer name and yer poison to the roster thread for this year.  Here's the link to that thread:

http://cs.finescale.com/fsm/modeling_subjects/f/29/t/167518.aspx

John

To see build logs for my models:  http://goldeneramodel.com/mymodels/mymodels.html


  • Member since
    March 2007
  • From: Michigan
Posted by tonka on Thursday, February 9, 2017 1:56 PM

the Lancaster is really looking great!

WannabeFarmboy -- Break out the Beaufighter,,, can never have too many builds going!

]

  • Member since
    August 2016
  • From: Eufaula, Alabama
Posted by WannabeFarmboy on Thursday, February 9, 2017 3:36 AM

Actually, I do have a 1/32 Beaufighter in my stash.. That's crazy though, right? I've got 2 WIPs going right now and two other GBs I've signed up for.

I think I may have an addiction...

If y'all are willing help enable my addiction though, I will try to add a third build to my GB schedule. Lol. 

  • Member since
    December 2016
Posted by dwsrazor on Thursday, February 9, 2017 1:15 AM

Looking mighty fine John!  Bow Down

I won't get to my Swordfish until March.  You might be done your Lancaster by then at the rate you are going.

  • Member since
    August 2016
  • From: Eufaula, Alabama
Posted by WannabeFarmboy on Thursday, February 9, 2017 1:11 AM

That's a really great looking Lancaster. Hope y'all don't mind if I come along for the ride. I know next to nothing about British war planes other than the tempest, and that's only because I'm currently building one. Lol. I don't have a contribution to add to the GB right now.  I'd like to at least discover that other British aircraft exist though. 

  • Member since
    December 2002
  • From: Northern California
Posted by jeaton01 on Wednesday, February 8, 2017 4:37 PM

More work on the Lancaster.


The upper join on the tamiya parts required filler and a little sanding behind the resin engine.


The inner nacelles did not conform exactly to the wing contour so Perfect Plastic Putty and Tamiya grey putty were both used.  The parts were masked up close to the gap to reduce cleanup to a minimum.
 
 
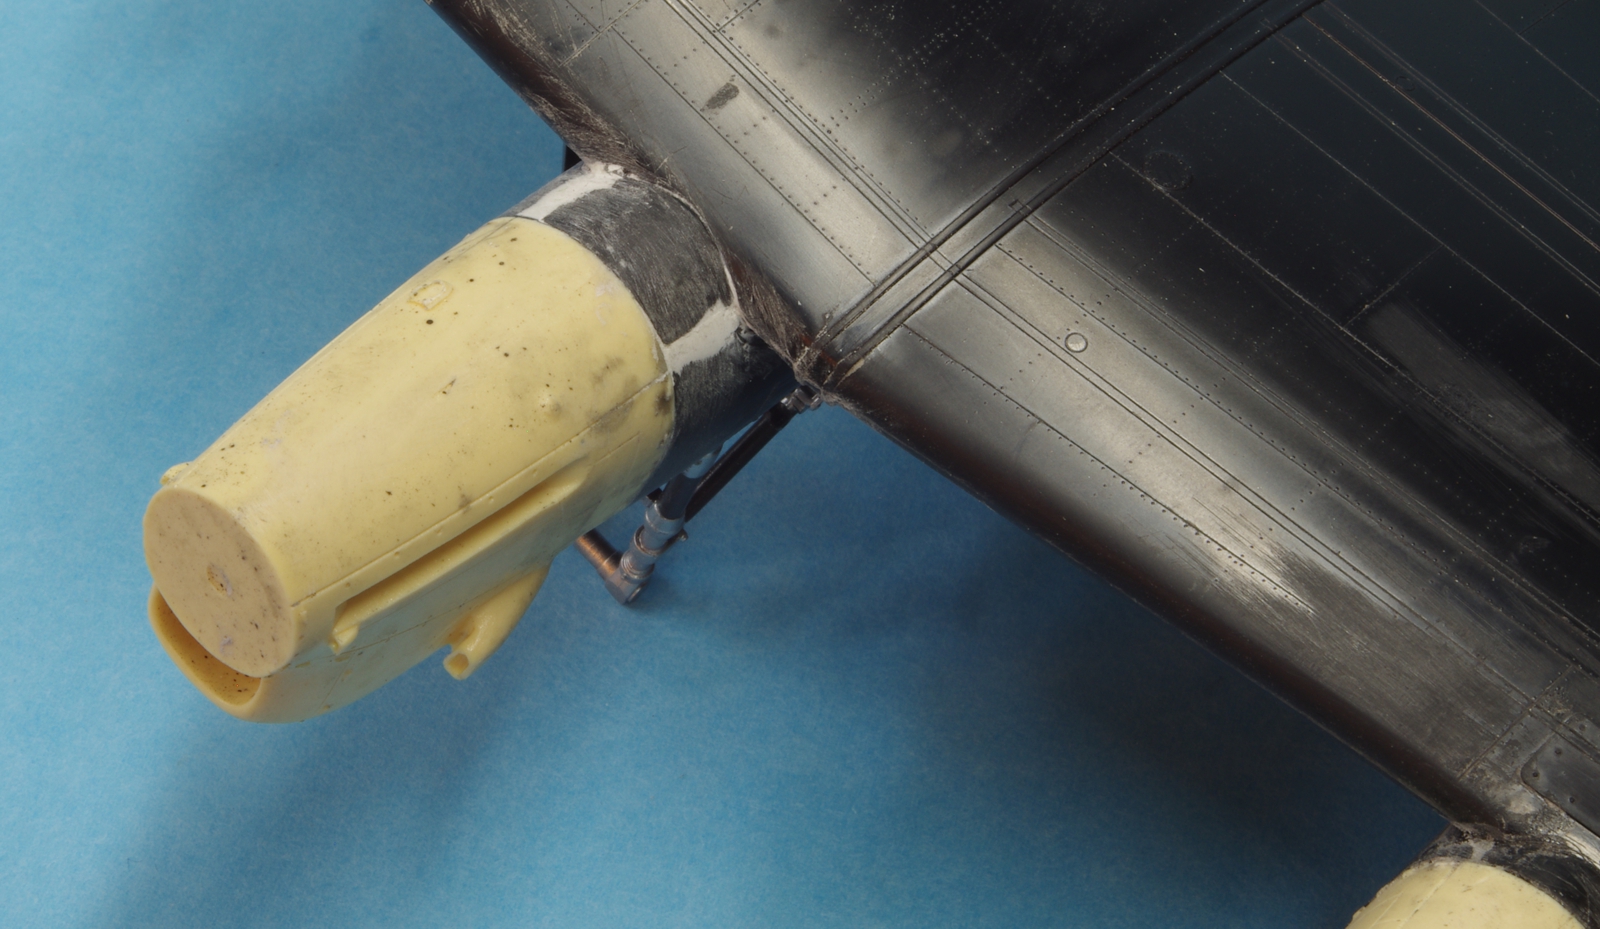
Aves Epoxysculpt was used to contour the Tamiya inner nacelle to the Belcher Bits engine on the bottom.  The sides of the Tamiya nacelles in all four positions had to be scraped down slightly and sanded smooth to match the nacelles. It wasn't much but there was a slight step.
 
 
Another view.  The fit of the outer nacelles to the wing and to the Belcher Bits engines was good, just requiring the scraping and sanding on the sides.
 
 
The Eduard interior set for the Lancaster.
 
 
Two views of the seat.  The little basket on the back is an oxygen bottle holder.  There was also a frame that rested around the bottom of the seat.  I have no idea where it went.
 
 
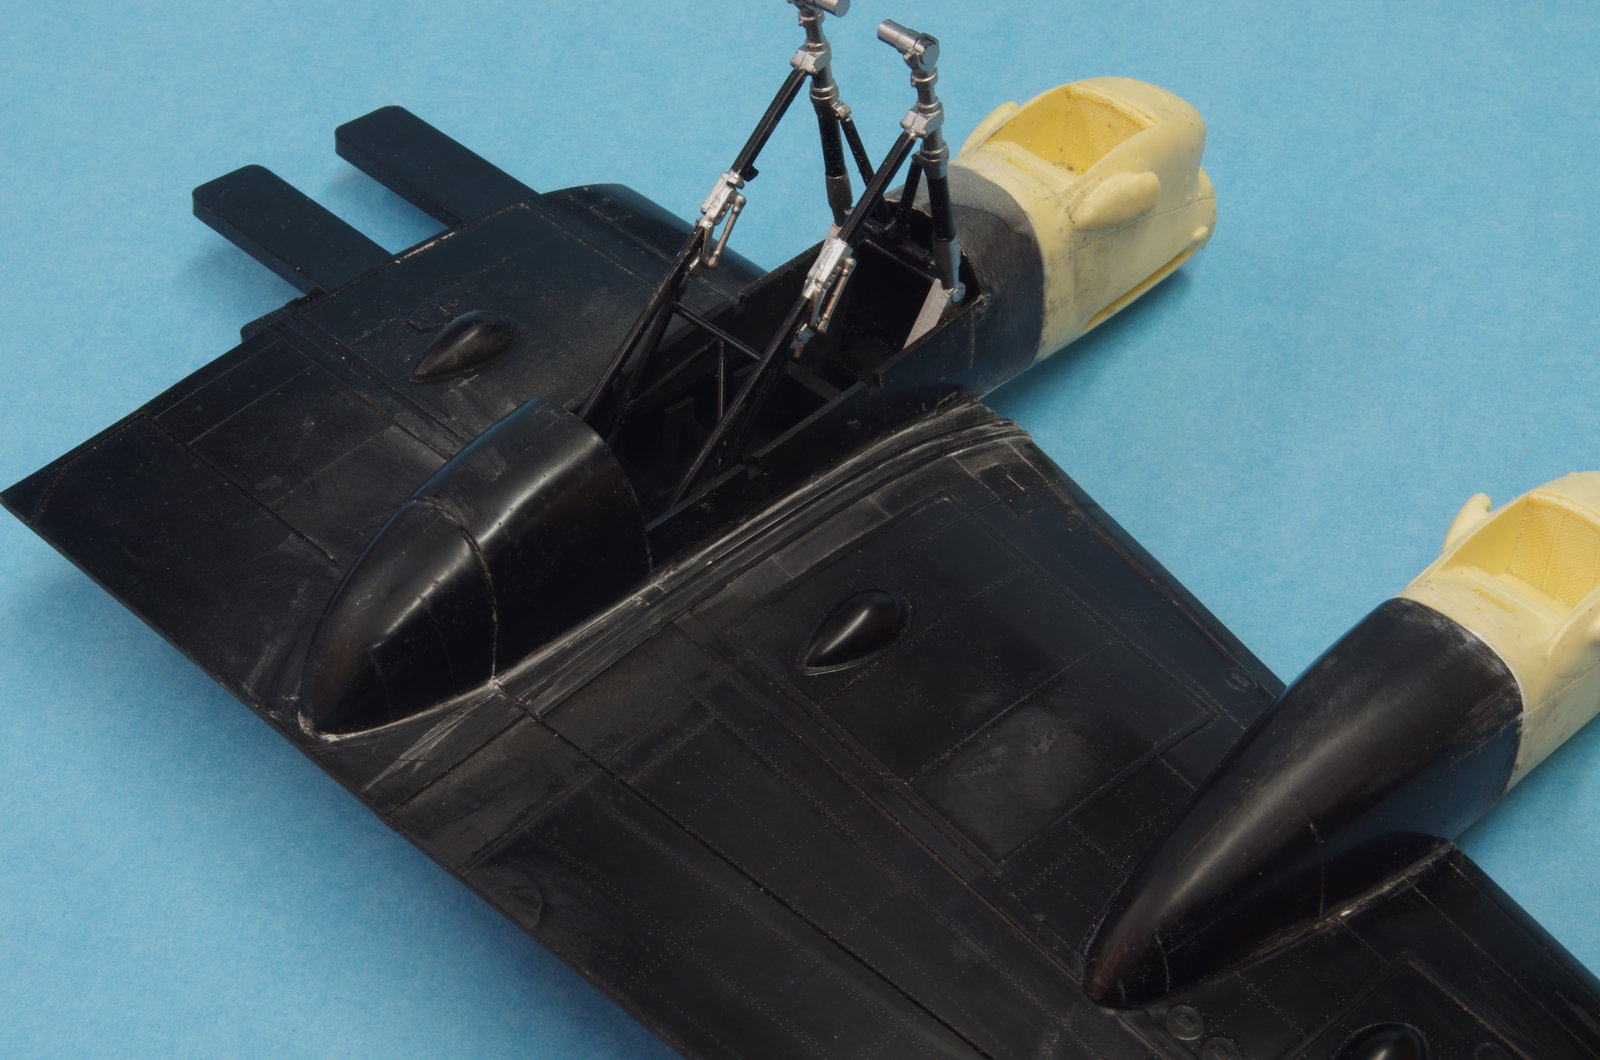
Some of the added parts around the pilot station.  The larger box on the lower front later had to have the lower outside corner trimmed back to clear the fuselage.
 
 
The instrument panel, navigator's station, and wireless operator station.
 
 
There is a PE frame for the wireless operator's seat, in the foreground.  There was a second one for the navigator's seat but Eduard made them both the same size so the navigator's seat got no PE, it is much narrower.
 
 
Eduard intended that the bomb aimer's computer would rest on the bottom of the fuselage, on the little tabs below it.  No fit there so it was instead installed using hot glue so it could be spaced out and aligned well.
 
 
Another view.
 
 
The right side, with the engineer's panel. The seat for the engineer later was trimmed back some to clear the pe parts added to the right of the pilot's seat.
 
 
The relationship of the pilot seat, yoke, and instrument panel is a bit off.  The yoke would be better off moved back 3/16 or so, and the panel 1/16.  However, it does fit as designed.


John

To see build logs for my models:  http://goldeneramodel.com/mymodels/mymodels.html


  • Member since
    December 2002
  • From: Northern California
Posted by jeaton01 on Thursday, February 2, 2017 9:32 PM

Thanks!

John

To see build logs for my models:  http://goldeneramodel.com/mymodels/mymodels.html


  • Member since
    December 2016
Posted by dwsrazor on Thursday, February 2, 2017 11:00 AM

Very thorough presentation Admiral!   Propeller


  • Member since
    November 2003
  • From: Naples, FL
Posted by tempestjohnny on Thursday, February 2, 2017 10:14 AM
Excellent start John


JOIN OUR COMMUNITY!

Our community is FREE to join. To participate you must either login or register for an account.

SEARCH FORUMS
FREE NEWSLETTER
By signing up you may also receive reader surveys and occasional special offers. We do not sell, rent or trade our email lists. View our Privacy Policy.