SEARCH FINESCALE.COM

Enter keywords or a search phrase below:

Liberation of Western Europe GB

22261 views
264 replies
1 rating 2 rating 3 rating 4 rating 5 rating
  • Member since
    June 2007
  • From: SE Asia, Singapore
Posted by katootsv2 on Wednesday, July 4, 2007 7:31 AM

Hey David, is the GB only for 1/35 or 1/48 armour? since almost everyone starts with a 1/35 scale kit.

Thanks! 

-Thanks Winson
  • Member since
    November 2006
  • From: United States
Posted by ww2modeler on Wednesday, July 4, 2007 7:47 AM

Nope, any scale.

David

On the bench:

1/35 Tamiya M26 Pershing-0%

1/144 Minicraft P-38J Lightning-50%

Numerous 1/35 scale figures in various stages if completion.


  • Member since
    November 2006
  • From: United States
Posted by ww2modeler on Wednesday, July 4, 2007 7:47 AM

cj95, welcome aboard!

David

On the bench:

1/35 Tamiya M26 Pershing-0%

1/144 Minicraft P-38J Lightning-50%

Numerous 1/35 scale figures in various stages if completion.


  • Member since
    June 2007
  • From: SE Asia, Singapore
Posted by katootsv2 on Wednesday, July 4, 2007 7:57 AM

Thanks for the reply David!

I am in for the GB then with a Tamiya 1/48 scale M4A1 Sherman Tank! 

edit: scale include as I left out in my 1st post.

-Thanks Winson
  • Member since
    November 2006
  • From: United States
Posted by ww2modeler on Wednesday, July 4, 2007 7:58 AM

What scale?

David

On the bench:

1/35 Tamiya M26 Pershing-0%

1/144 Minicraft P-38J Lightning-50%

Numerous 1/35 scale figures in various stages if completion.


  • Member since
    August 2005
  • From: Timberlake, North Carolina
Posted by the Postman on Wednesday, July 4, 2007 5:30 PM
 cj95 wrote:


Howdy from Texas all.   

I see somebody else is already working on a Dragon Firefly, but if you can find it in your hearts to let me another one to the list, I'd love to build this kit.

(You're gonna need all the Fireflys you can get what with that JagdTiger being added to the list.)Black Eye [B)]

cj- Don't worry too much about my Jadgtiger. The odds are in your favor that she'd be broken down, out of fuel or stuck in up to fenders somewhere. Wink [;)]

Happy Independence Day, everyone. Party [party]

It's got to be my favorite holiday - right after Christmas! Do I smell gunpowder?? Did someome say explosives?? Pirate [oX)]

-John   

Essayons. Esse Quam Videri.
  • Member since
    December 2003
  • From: Prince George B.C., Canada
Posted by Bullet21 on Monday, July 9, 2007 4:28 PM

My Achilles is taking a little longer than planned but it's all good.

As I was test fitting all the turret parts I decided that the interior just looked too empty. Thanks to Eduard's fine PE set,  some resin ammo and a trip to the spare parts pile it's looking much better.

Sorry about the lack of photos but I'm pretty sure I would still be classed as "Computer Illiterate", heck I can't even figure out how to get the GB logo. The wife is better at that stuff so I might have to (gulp) ask her for help.


 Keep SmilinLiberation of Western Europe'--it makes this world a nicer place.

  • Member since
    November 2006
  • From: United States
Posted by ww2modeler on Monday, July 9, 2007 7:37 PM

First off, let me explain how to post pictures. Its easy and free. First, you create a photobucket account at photobucket. Then you take pictures of the model and upload them to my pictures. Then you go to your photobucket account and click where it says upload pictures. YOui click the browse buttom, select the picture you want and click upload, then you click the third link, the one that says [img/].............[img] and copy it and then paste it to your post. THe GB badge goes the same way except you save it to my pictures and then upload it and paste the link in your signature. THis is all on the first page too.

David

On the bench:

1/35 Tamiya M26 Pershing-0%

1/144 Minicraft P-38J Lightning-50%

Numerous 1/35 scale figures in various stages if completion.


  • Member since
    November 2006
  • From: United States
Posted by ww2modeler on Tuesday, July 10, 2007 6:37 PM

Huh, I just noticed something, this GB ends on VE day. And I didn't even plan it that way.

David

On the bench:

1/35 Tamiya M26 Pershing-0%

1/144 Minicraft P-38J Lightning-50%

Numerous 1/35 scale figures in various stages if completion.


  • Member since
    August 2005
  • From: Timberlake, North Carolina
Posted by the Postman on Tuesday, July 10, 2007 7:47 PM

Sweet Thumbs Up [tup] Thumbs Up [tup].

-John

Essayons. Esse Quam Videri.
  • Member since
    June 2007
  • From: SE Asia, Singapore
Posted by katootsv2 on Thursday, July 12, 2007 8:54 AM

Hi all, managed to spent a few nights to "dolled" up my 1/48 Tamiya Sherman.

Here is the pics of my before and after applying pastel chalk and accessories on the back of the tank, here goes!!!

Before applying any further application of pastel chalk and accessories: 


-Thanks Winson
  • Member since
    June 2007
  • From: SE Asia, Singapore
Posted by katootsv2 on Thursday, July 12, 2007 8:58 AM

Now for the pics of after further applying the pastel chalk and accessories:

Ok, That's about it!!! Any feedback and comments is appreciated!!! Cheers!!!

-Thanks Winson
  • Member since
    December 2002
  • From: Reno, NV
Posted by espins1 on Thursday, July 12, 2007 10:11 AM
Looks great Winson!  You put a lot of effort into your Sherman, and it shows!  Nicely done!  Smile [:)]

Scott Espin - IPMS Reno High Rollers  Geeked My Reviews 

  • Member since
    November 2006
  • From: United States
Posted by ww2modeler on Thursday, July 12, 2007 10:33 AM

Nice build, is it totally done. If it is, I'll post it on the front page. Great looking Sherman.

David

On the bench:

1/35 Tamiya M26 Pershing-0%

1/144 Minicraft P-38J Lightning-50%

Numerous 1/35 scale figures in various stages if completion.


  • Member since
    November 2006
  • From: United States
Posted by ww2modeler on Thursday, July 12, 2007 7:45 PM

And, anyone with a finished project. Just tell me its okay and spcify the pic and I'll put it on the front page.

David

On the bench:

1/35 Tamiya M26 Pershing-0%

1/144 Minicraft P-38J Lightning-50%

Numerous 1/35 scale figures in various stages if completion.


  • Member since
    March 2007
  • From: Carmel, CA
Posted by bondoman on Thursday, July 12, 2007 8:54 PM

That is really cool, and 1/48 is new to me. great Job!!!

Bondoman

  • Member since
    June 2007
  • From: SE Asia, Singapore
Posted by katootsv2 on Friday, July 13, 2007 8:44 AM

Thanks for the comments guys! Am glad you all like it.

Think I will stop here and start on the dio for this kit!

Yes David, it is done. Thanks for the trouble and my late reply.

-Thanks Winson
gzt
  • Member since
    May 2007
  • From: Massachusetts
Posted by gzt on Wednesday, July 18, 2007 10:55 PM

My Tamiya 1/48 P-47M - just finished a cockpit. Here are two pictures

Greg 

Flying is a thrill #2 known to mankind. Landing is #1.

http://www.rwd-6.org

  • Member since
    November 2006
  • From: United States
Posted by ww2modeler on Thursday, July 19, 2007 7:31 AM

Lookin good so far, what did you use for the seat buckels or straps?

David

On the bench:

1/35 Tamiya M26 Pershing-0%

1/144 Minicraft P-38J Lightning-50%

Numerous 1/35 scale figures in various stages if completion.


  • Member since
    November 2003
  • From: Nashville, TN area
Posted by bobbaily on Thursday, July 19, 2007 8:56 AM
Greg-Outstanding job on the cockpit!

Bob


  • Member since
    December 2002
  • From: Reno, NV
Posted by espins1 on Thursday, July 19, 2007 10:39 AM
Your cockpit looks great Greg!  Smile [:)]

Scott Espin - IPMS Reno High Rollers  Geeked My Reviews 

gzt
  • Member since
    May 2007
  • From: Massachusetts
Posted by gzt on Thursday, July 19, 2007 2:56 PM

David, Bob, Scott: Thanks for nice words Smile [:)]. I am glad you like it.

David: I got Eduard PE set for Hasegawa kit but used the seatbelts from this set. Tamiya did a very nice job with the cockpit. I was surprised myself when I compared it to the P-47N in New England Air Museum i saw a month ago. The colors of some cockpit components are varied source to source, so I decided to use the existing pictures as a guide. P-47N should not be too far from the real one and the funny thing is: the HV-Z flown by Lanowski with 56FG was painted with a strange black (faded) color - supposed to be a car paint. I do not know the whole story but the result was a bit strange. Finaly I matched the paint and plan to use it pretty soon.

Thanks again for your kind words.

Greg 

Flying is a thrill #2 known to mankind. Landing is #1.

http://www.rwd-6.org

  • Member since
    July 2003
  • From: Alabama
Posted by Circuitrider on Friday, July 20, 2007 10:21 AM

Here are some interior shots from my Greyhound.  I sprayed it Tamiya Buff and when it dried, I followed with a filter of burnt umber.  The filter was a glob of burnt umber artist oils about the size of a BB mixed in an empty Model Master paint jar filled about 1/4 way with Better Way brand brush cleaner.  I slopped this on and continued to brush, without adding more filter, until it settled.  I then followed with a pinwash of black in all of the crevices.  After that dried, I proceeded to "chip" the paint with a dark gray artist marker.  I finished by mixing up and applying a dark brown coat of Doc O'Brien's weathering powders.  I blew off the excess with a couple of quick shots from the air compressor, and scrubbed the heavy traffic areas "clean" with an old, stiff brush.

  • Member since
    December 2006
  • From: t.r.f. mn.
Posted by detailfreak on Sunday, July 22, 2007 8:16 PM
well,just got rolling on the pz.4.primed the inside and outside of the hull.this is the italeri kit and for its age i like it very much.just built the revell offering of a pz 4 h.both are very similar except for the full interior on the h.still out here grinding away at these projects.good building to all.Thumbs Up [tup]

[View:http://s172.photobucket.com/albums/w1/g-earl828/]  http://i158.photobucket.com/albums/t104/cycledupes/1000Roadwheels4BuildBadge.jpg

  • Member since
    December 2002
  • From: Reno, NV
Posted by espins1 on Monday, July 23, 2007 11:12 AM
Nice interior work David!  Cool [8D] Thumbs Up [tup] Thumbs Up [tup]

Scott Espin - IPMS Reno High Rollers  Geeked My Reviews 

  • Member since
    November 2006
  • From: United States
Posted by ww2modeler on Monday, July 23, 2007 1:09 PM

Sorry I haven't replied earlier, I'm on vacation and this is the first hotel that has had interent. Great looking build, how did you achieve the effect? Thanks,

David

On the bench:

1/35 Tamiya M26 Pershing-0%

1/144 Minicraft P-38J Lightning-50%

Numerous 1/35 scale figures in various stages if completion.


  • Member since
    July 2003
  • From: Alabama
Posted by Circuitrider on Monday, July 23, 2007 3:53 PM

Thanks, Scott (David, were you talking to me?).  I was pleased, as well.  The heck of it is, as I was putting the M8 back on my workbench I noticed that the left rear wheel was misaligned.  So, I put a little back-pressure on it to bring it into line.  I was going to hold it there and add some Tenax to soften the styrene when....SNAP...the axle broke!  Censored [censored]  Now, I'm a preacher, so I didn't actually say it...but I must admit, I sure thought it!  So, now I have to pin that bad boy back in place.

Incidentally I took the pictures with a pretty basic Kodak digital camera, but my wife got me this mini photo studio for my birthday last week.
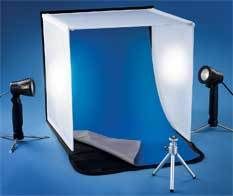
She got it at WalMart for about $50.  I think it really helped with the lighting and exposure and am pleased with the results.  I have a good wife.

  • Member since
    November 2006
  • From: United States
Posted by ww2modeler on Monday, July 23, 2007 5:27 PM

Cool photo booth. Sorry about asking about how you achieved the affect. Since then I read your post thouroly. Great work. What are the dimensions of the photo booth.

David

On the bench:

1/35 Tamiya M26 Pershing-0%

1/144 Minicraft P-38J Lightning-50%

Numerous 1/35 scale figures in various stages if completion.


  • Member since
    July 2003
  • From: Alabama
Posted by Circuitrider on Tuesday, July 24, 2007 9:55 PM

Hey David!

The booth is 17" square and deep.  It folds in on itself to form its own case which holds both lights and the mini-tripod.  It comes with two backdrops...one blue and one light gray.  Well worth the investment IMHO.

  • Member since
    October 2005
  • From: Yuma, Arizona
Posted by Brumbles on Wednesday, July 25, 2007 8:04 AM
Looks perfect for our shared purposes!  Now it only I could learn how to get decent, in-focus close ups.... 
JOIN OUR COMMUNITY!

Our community is FREE to join. To participate you must either login or register for an account.

SEARCH FORUMS
FREE NEWSLETTER
By signing up you may also receive reader surveys and occasional special offers. We do not sell, rent or trade our email lists. View our Privacy Policy.