SEARCH FINESCALE.COM

Enter keywords or a search phrase below:

F-22 Group Build!

4208 views
13 replies
1 rating 2 rating 3 rating 4 rating 5 rating
  • Member since
    May 2007
  • From: Nor-Cal
F-22 Group Build!
Posted by Midnight Storm on Tuesday, May 29, 2007 8:10 PM

F-22 Raptor Group Build!

Who all would be interested in a any scale F-22 Group Build?

It would include the YF-22, F-22 and F-22A models, dressed in your favorite squadron colors and serial number! Big Smile [:D]

Well?

Deadline will be May 12th 2008!

Please let me know what model & aircraft squadron you'll be building and I'll add you to the list!

Chris_in_Japan - Italeri 1/48 F-22A

Midnight Storm - Italeri 1/48 F-22A Ether ED or OT. - Trumpeter 1/144 F-22A ED

mph34 - Italeri 1/72 YF-22

painklr - Undecided


Here are the Group Build badges: Choose One, add it to your Sig & link it back to this page. Smile,Wink, & Grin [swg]

Eddie P. Sarber -=If you are living on the edge, you're taking up to much space=-
  • Member since
    May 2007
  • From: Nor-Cal
Posted by Midnight Storm on Tuesday, May 29, 2007 8:12 PM

Well, I'm off to a good start! I started out by trimming and test fitting parts from my Italeri kit tonight. I'm pretty happy with the fit, but I've very upset about the lack of detail. So after spending many hours searching the net I was able to find and order replacement parts and detail kits to upgrade this bird. I also ordered a set of decals for both Edwards AFB and Nellis AFB markings. I'll choose my bird's skin later in time. I found two cockpits that are nothing like each other in the sale photos, so I ordered both and I'll compare them to the photos I took a few years ago of a F-22A's cockpit at Edwards AFB and keep the best rep. Big Smile [:D] I'm still looking for some 600 Gal. drop tanks to mount under the wings.

Here are the 1:48 oob parts.

I'm also working on a 1/144 kit as well. I'm going to take a Trumpeter YF-22 and mod it into a F-22A. Looking at the kit it's going to ba ALOT of work, but well worth it in the end. Smile,Wink, & Grin [swg]

Here are the 1:144 oob parts.

I'm also working on getting a 1/200th scale F-22A Raptor to build as well. Big Smile [:D]

Eddie P. Sarber -=If you are living on the edge, you're taking up to much space=-
  • Member since
    May 2007
  • From: Nor-Cal
Posted by Midnight Storm on Thursday, May 31, 2007 12:08 AM

After dry fitting all the parts for my 1/48th scale model, I could help but notice the model is incorrect in many places. One spot I just can stand is the nose. The model's nose is straight and alined with the body, the real birds nose is angled down from the intakes on.

 So after about 4 hours of homework I figured out a way to mod my model to look like the real bird. It went together smoother then in my mind. With everything dry fitted, I'm VERY happy with my nose job. I can post photos if anybody wants them? I don't even know if anybody is looking at this post. Sleepy [|)]

 I found a pair of drop tanks and modded them to match the prototype photos. Cool [8D] I still need to do a little work to them. While I was working under the wings I thought I would work on the wings as well, so I ended up cutting all of the flaps and front wing tip off. This way I can later mount them in a relaxed postion. I'm finding in photos, that they only relax a tiny bit, but it's noticible.

 I also completed the cockpit area (minus the HUD) and it's all ready for paint. Next on the list is the canopy. I need to build it up and add the defoggers and handles, along with a lip.

It seems like I've done a ton of work, but nothing shows yet. Still a bunch of parts in the box.

Photos at request! Big Smile [:D]

Eddie P. Sarber -=If you are living on the edge, you're taking up to much space=-
  • Member since
    July 2005
  • From: Texas
Posted by painklr on Thursday, May 31, 2007 10:12 AM

MS please post pics!!!!  This plane caught my eye when it came out and l am looking forward in building one soon.  Is the GB still open?  I know I should not join one since I am booged down with others, but what the heck.  Count me in.  Now I just have to find one to build.  I will give you my entry later so that you can put it on the list.


  • Member since
    May 2007
  • From: Nor-Cal
Posted by Midnight Storm on Thursday, May 31, 2007 12:27 PM
Yes the GB is open for another 11 months. There is a post under the aircraft topic area as well, so keep an eye out there. Big Smile [:D] I've added you to the list, so let me know what model you end up buying, and I'll add that to the list. Thumbs Up [tup] Well, I'm off to go take some photos to post later.
Eddie P. Sarber -=If you are living on the edge, you're taking up to much space=-
  • Member since
    May 2007
  • From: Nor-Cal
Posted by Midnight Storm on Friday, June 1, 2007 8:01 PM

Photos photos photos!

 Ok here we have the new correct nose angle. Keep in mind the parts are only dry fitted. There are no gaps when I press the body together. The model also now has the correct intake size and shape.

Bottom view. The intakes are glued, but nothing else. I have not even started to work on this area. I just wanted to show off the fit before I putty and sand everything. The only area that needs work is just behind the wheel bay, that small hump needs to be blended together.

Here is the cockpit about 80% done. Lots to do behind the seat and along the rails.

Another view.

Eddie P. Sarber -=If you are living on the edge, you're taking up to much space=-
  • Member since
    May 2007
  • From: Nor-Cal
Posted by Midnight Storm on Sunday, June 3, 2007 3:45 PM

 I'm about ready to rip the dang hook out of this model! It has given me nothing, but h*ll so far. Nothing fits and the I went to sand it and the doors sunk into the opening. So now I'm going to tear everything out and fill it with putting and I'll scribe it later. UGH!

 Photos of the new nozzles. This was another area bugging me. The models nozzels are to long and don't get me started on the gap. Thank you Edaurd for saving this area! This mod is a real pain in the rear, but I think I got it to a point where it looks correct. Now I need to build the walls and latches and all of the little gizmos in that area. Only one side is cut open so far. Before I shorten the nozzles any more I was going to get some feedback from you guys.

 Now I know I still need to add walls and braces, also I need to putty the area and blend the nozzle top to the bottom, but any feedback is welcomed. I want this area to be perfect.

Eddie P. Sarber -=If you are living on the edge, you're taking up to much space=-
  • Member since
    June 2006
  • From: Princeton, North Carolina
Posted by ModelMan8 on Sunday, June 24, 2007 4:48 PM

Midnight Storm, you are not alone.  My friend is building the Italeri 1/72 F-22 and the fit is just as bad if not worse.  This is the fifth model he has ever built and I am trying to help him.  I think Italeri really screwed the pooch on the F-22.(pardon my language but this is bad!!!)

Just wanted you to know you are not alone.

Chris

  • Member since
    May 2007
  • From: Nor-Cal
Posted by Midnight Storm on Friday, July 27, 2007 5:30 PM

Updates!!! 

Cockpit, weapon bays, grilles and more!

Nothing is complete, but I'm workin'!!! Top and bottom are still not together, so I can't work on seams and gaps. I did install the engine and ducts. I'm in the middle of building new intakes and a center weapon bay. Side bays are just getting started. There is alot going on in there!!! 

The cockpit had a make over. I'm about 75% done... lots to add!!!  I threw a bit of paint on the seat to check out my putty marks. Nothing is complete.

How does she look so far? Sorry about the water! I just washed the model for the photos and I forgot to dry a few areas. 

Eddie P. Sarber -=If you are living on the edge, you're taking up to much space=-
  • Member since
    May 2007
  • From: Nor-Cal
Posted by Midnight Storm on Friday, July 27, 2007 5:32 PM

Oh boy I hope I can explain this as good as I can model. 

One thing to keep in mind is... this is ALOT easier then it looks/sounds. So don't make it harder. Make a few small cuts at a time and test fit 10 times!
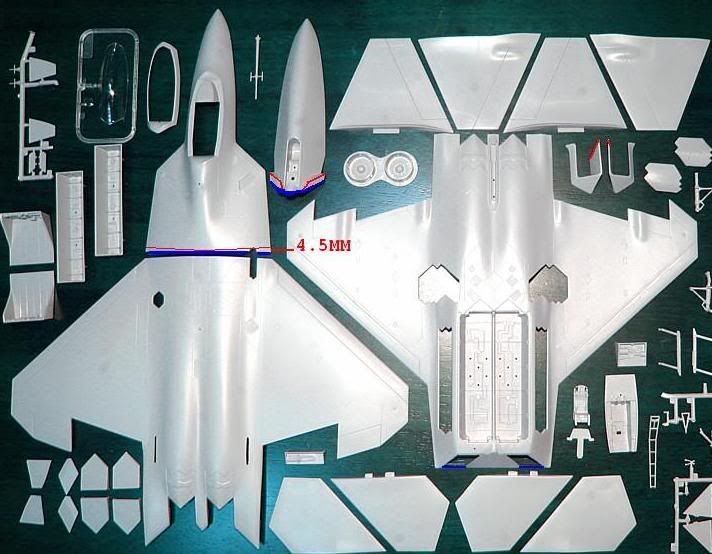
Step 1.

Remove the blue shaded tab on the upper nose.

Mark a spot about 4.5mm from the rear edge of the upper nose on both sides. Cut a slight arc from the 4.5mm point back to the center of the rear edge of the upper nose half, then repeat the other side. The smoother the line, the less putty you use later. Test fit the upper nose to the upper body, file till everything is straight.

Then glue the upper nose to the upper body. I added some styrene and putty on the underside to re enforce the parts together. Remember you gotta do alot of sanding to remove the hump from Italeri. Add putty to the top for any gaps... and bring out the sand paper!

I spent hours sanding the back of this plane. This step needs to be made no matter what, even if you don't mod the Raptor you'll still need to sand this baby good. So don't turn away now!

I used 5 different grits... the first being M-100. The final being 2000. I think. I'll still do a bit more before I paint.

Now You'll also need to make the gun port longer, since this area got shorter with the cut. I went toward the tail since the prototype shows the door stopping right at the mark we made the cut. So in fact we are making the door correct!

Ok I think we are done with top. Easy right?

Step 2 soon.


Eddie P. Sarber -=If you are living on the edge, you're taking up to much space=-
  • Member since
    May 2007
  • From: Nor-Cal
Posted by Midnight Storm on Friday, July 27, 2007 5:33 PM

Step 2.

This is the hardest part, so take your time!

Take the upper body/nose and the lower body and dry fit them together using the tabs in the wings. You'll be able to see right away the angle you'll need to start cuting.

Note RED. I just slowly removed a little bit at a time on both sides, on the bottom half only, till the top matches up and the gaps are gone!

Note YELLOW. Next you'll want to do the same thing to the inside of the intakes. Just file away till everything is flush again.

Eddie P. Sarber -=If you are living on the edge, you're taking up to much space=-
  • Member since
    May 2007
  • From: Nor-Cal
Posted by Midnight Storm on Friday, July 27, 2007 5:34 PM

Step 3

Now we need to mod the lower nose half.

Note BLUE. You need to slowly remove this area in the shape of a "V". Test fit the nose to the upper nose and the lower body all together to make sure you are still in the right tracks. AT THE SAME TIME, note RED, file down the sides so the nose can slip between the intakes. Just file a little, cut a little till the nose sits into it's original tabs. 

During this you will make a small hole at the bottom of the gear bay. It's just enough a hole will appear, just putty this up later.

Once everything is all glued up, you'll want to remove the "bump" just behind the gear bay and mold a new on out of putty.I have not gotton this far so I don't have any photos of this step at this time.

Eddie P. Sarber -=If you are living on the edge, you're taking up to much space=-
  • Member since
    May 2007
  • From: Nor-Cal
Posted by Midnight Storm on Friday, August 10, 2007 10:19 AM

One step closer!!!

Grilles are on the top and bottom. I'm not happy with how two came out. They will need some more work.


The tail hook is almost finished. I had some great photos to work with and I'm happy with how it looks so far. I left the photo dark so you can see the details that would get washed out by the white putty. The real tail hook compartment is very square and the model's was flat and round. Thus the reason for work done here.

I also worked on the cockpit some more. This is a never ending project. Not shown is the work done to the canopy, I added a lip with 61 drilled holes. Also I'm working on some de-foggers and that weird looking cylinder on the bottom of the Raptor out of putty. 

FEEDBACK PLEASE!!! 

Eddie P. Sarber -=If you are living on the edge, you're taking up to much space=-
  • Member since
    January 2004
  • From: Colorado
Posted by mph34 on Thursday, August 30, 2007 10:18 PM

I am trying to get caught up on things here on the forum.  With the work and my daughter's school complete (complete remodel, with lots of parental volunteer-ism), my weekends will get free-d up now (maybe).

Midnight Storm, wonderful progress notes and photos.  Thanks for the walk thru of what fixes you made.  You have intemendated me some with your work.  The leading edges of the body appear to have headaches much like an F-117 or F-16, but only more.  Hopefully your next few posts will give me encouragement that this is not such a difficult plane to build.

JOIN OUR COMMUNITY!

Our community is FREE to join. To participate you must either login or register for an account.

SEARCH FORUMS
FREE NEWSLETTER
By signing up you may also receive reader surveys and occasional special offers. We do not sell, rent or trade our email lists. View our Privacy Policy.