SEARCH FINESCALE.COM

Enter keywords or a search phrase below:

Vintage Armor Kit GB - 5/1/08 - 12/31/08 WIP

19111 views
150 replies
1 rating 2 rating 3 rating 4 rating 5 rating
  • Member since
    September 2007
  • From: Relocating
Posted by Mobious on Sunday, May 18, 2008 5:02 PM

Nevermind


"It's a problem of applied physics" Roy Brown

  • Member since
    November 2003
  • From: savannah ga.
Posted by GA.modelmaker on Sunday, May 18, 2008 9:11 PM
i have a small update coming. i am about to get this to the paint booth. so far a trouble free build with just a little puttie on both front side panels at the front of it.  i have a few pics to post but will get them on here tomrrow afternon after i get home from work. so how is everyone elses builds turning out? if i get done with this one i may do another one for it.
  • Member since
    August 2005
  • From: Sydney, Australia
Posted by Phil_H on Monday, May 19, 2008 6:21 AM

Hiya Redleg,

You might have missed my submission for this GB near the top of page 4 on the thread on the Armor forum. Tamiya's M113 FSV, Kit #35107, from about 1978/79.

Yes, I know, another Tamiya... But you don't see Aussie armour very often Clown [:o)]


  • Member since
    July 2006
  • From: New Jersey
Posted by redleg12 on Monday, May 19, 2008 6:38 AM

Phil - Your in....the vintage brain sometimes slows down. Sorry I missed it. That is a way to twist it... Aussie armor. Look forward to seeing the work

Anyone else that I may have forgot, missed, etc., please let me know.

Rounds Complete!! 

"The Moral High Ground....A Great Place to Emplace Artillery."

  • Member since
    December 2005
  • From: back seat of your car with duct tape streched out
Posted by soulcrusher on Tuesday, May 20, 2008 6:54 PM

Hey redleg just an observation but are we going to have a Vintage Armor GB badge for this build?

                                                                                     Soulcrusher


  • Member since
    July 2006
  • From: New Jersey
Posted by redleg12 on Wednesday, May 21, 2008 6:58 PM

Soulcrusher - Sorry I took so long to get back...this is the one I put togeather...no one else realy had any other and a most people liked it.

So thats the badge.

Rounds Complete!!

"The Moral High Ground....A Great Place to Emplace Artillery."

  • Member since
    December 2005
  • From: back seat of your car with duct tape streched out
Posted by soulcrusher on Wednesday, May 21, 2008 10:27 PM

Sweet I love it. How do we post it as a thumbnail or can that be done with photobucket?

                                                                                   Soulcrusher


  • Member since
    January 2008
  • From: Adelaide, South Australia
Posted by somenewguy on Thursday, May 22, 2008 2:29 AM

Redleg, my Churchill is from 1975.

I've done a litle bit of work on the lower hull and began preping all of the 44 road-wheel halves. I will try to gain access to a digital camera asap and post pics.

At the end of the day one's work may be completed but one's education never!
  • Member since
    July 2004
  • From: Oregon, Rain country U.S.A.
Posted by russianfist on Sunday, May 25, 2008 5:32 PM

OK,I finally found my kit and I will start building. Big Smile [:D]

This where I'm at.

This looks alot like the T-34 kit and I think will make for quick build.

I'm thinking I want to do a Berlin invader.

Would it be ok to add bed spring or window shutter armor (scratch built)?

You got a telegram from headquarters today. Headquarters--what is it? Well, it's a big building where generals meet, but that's not important right now. [ img] f_armorsecretm_ac7eb73[/ img]
  • Member since
    December 2005
  • From: back seat of your car with duct tape streched out
Posted by soulcrusher on Monday, May 26, 2008 9:19 PM

Asembled the major hull pieces tonight. The overall fit is not bad for a kit this old. Some slight warpage of the big armor plates that was easily fixed with a bit if tape and liquid cement. it took all of about an half an hour. Thinks will definely slow down when the suspension assemble page of the instruction sheet rears its ugly head.

                                                                             Soulcrusher


  • Member since
    November 2003
  • From: savannah ga.
Posted by GA.modelmaker on Wednesday, June 4, 2008 2:31 PM
well guys i am all most done with the kangaroo. i have applied the coat of future last night and i hope to get the wash done this evening. the kit came with a lost of goodies to put on it and those still have to be painted and put into place. other than that an all most trouble free build except up near the front on both sides thier was bad gaps on both sides and my puttieng job didnt turn out that good. but i have a way to cover those two spots on the kangaroo. 
  • Member since
    July 2006
  • From: New Jersey
Posted by redleg12 on Thursday, June 5, 2008 6:50 PM

Well....when do we see it???????

Post some construction pics

Rounds Complete!!

"The Moral High Ground....A Great Place to Emplace Artillery."

  • Member since
    December 2005
  • From: back seat of your car with duct tape streched out
Posted by soulcrusher on Thursday, June 5, 2008 7:49 PM

I've got the hull constructed and am in the progress of cleaning up all of the little wheels that make up the suspension. Nothing really exciting to look at yet. When i get the suspension build and installed I plan on posting some pics.

                                                                             Soulcrusher


  • Member since
    November 2003
  • From: savannah ga.
Posted by GA.modelmaker on Friday, June 6, 2008 9:45 AM

well here it is as promised. i still have to do the wash and weathering. i didnt get to do the wash last night i was just to darn tired from work. so here are just a few pics of the priest-kangaroo. as you see the road weels arent quite done yet. i have a suprise for what i am going to do with those. so enjoy and any tips or critics is welcomed.  welll no modeling over the dam weekend. looks like i have been roped into my anuts and unlces 50th wedding anniversy party,  i really dont mind going but i have to go to columbia,sc for it. anybody know if thier is any model shops in columbia?

  • Member since
    July 2006
  • From: New Jersey
Posted by redleg12 on Saturday, June 7, 2008 8:09 AM

Ga -  

Looking good....moving nicely

Rounds Complete!!

"The Moral High Ground....A Great Place to Emplace Artillery."

  • Member since
    April 2008
  • From: Portland, Oregon
Posted by Dannenbergerblitz on Friday, June 13, 2008 10:51 PM

Redleg.........

     I would propose to build my Air Fix 1/32, pre-80 Monty's Humber.  I assume that would be a softskin.  Let me know if that works and I'll see if I can get some pix of the box and kit to get started here.

ThanksSmile [:)]

www.buckbradenart.com
  • Member since
    March 2007
  • From: NJ
Posted by JMart on Saturday, June 14, 2008 7:49 AM

russianfist - I am building that kit now myself (not for this GB), falls together pretty well. I am a rookie, would be interested in any suggestions you have about this kit.

Dannenbergerblitz - Welcome back to the hobby, good to know I am not the only 30+ year returnee ;)

As for me, I have decided on the Tamiya M3 Lee (#MM 39), copyright stamp in the inside of the hull is 1974. I wont start for a month or so, as I finish other GBs first.

Looking forward to everyone's work , cheers


  • Member since
    July 2006
  • From: New Jersey
Posted by redleg12 on Saturday, June 14, 2008 9:15 PM

dannenbergerblitz -

Sounds great, you are added to the list

Rounds Complete!!

"The Moral High Ground....A Great Place to Emplace Artillery."

  • Member since
    November 2003
  • From: savannah ga.
Posted by GA.modelmaker on Thursday, June 19, 2008 7:19 PM
well were is every one. all i have left to do on the kanagroo is weather it and add all the little goodies that came with it and then build the base for it. and i am not going to tell ya what iam doing for it.
  • Member since
    December 2005
  • From: back seat of your car with duct tape streched out
Posted by soulcrusher on Monday, June 30, 2008 5:15 PM

Wow seems like this one kind of died out? I myself am guilty of pushing my M13/40 of to the side so I could jump into the BoB group build with both feet. I should really spend a little qualitly time with the old bugger.

                                                                           Soulcrusher


  • Member since
    July 2006
  • From: New Jersey
Posted by redleg12 on Monday, June 30, 2008 5:35 PM

Soulcrusher & GA -

I'm here and watching but it seems the want and desire for this build died. No problem though, keep going and posting...I'm watching from my artillery obervation bunker! You never know when they will come in force.

GA - Nice work on the roo, lets see some finished shots.

Rounds Complete!!

"The Moral High Ground....A Great Place to Emplace Artillery."

  • Member since
    November 2003
  • From: savannah ga.
Posted by GA.modelmaker on Monday, June 30, 2008 5:53 PM

ask you shall recieve it redleg but this is the only shot the group will get till its all finished up. i am not going to show any more of the priest kanagroo. still have to get a few suppiles for what i am doing with it but thats top secret too so on with the only pic.

  • Member since
    July 2006
  • From: San Francisco Bay Area
Posted by bufflehead on Monday, June 30, 2008 6:34 PM

Hey!  I'm still here, checking on the GB every now and then!  Still working on my ancient Tamiya PZ III!  Its been VERRRY slow going since I've trying to work on it during lunch time at work.  Problem is I have a Censored [censored]load of work that keeps interfering with lunch!Angry [:(!]  Maybe I should just take the kit home this weekend and see how much I can get done!!   Still not sure how I want to do this PZ III....as a long barreled Ausf M or a short barreled 75mm Ausf N in Africa.


Ernest

Last Armor Build - 1/35 Dragon M-26A1, 1/35 Emhar Mk.IV Female


Last Aircraft Builds - Hobby Boss 1/72 F4F Wildcat & FW-190A8


  • Member since
    August 2005
  • From: Sydney, Australia
Posted by Phil_H on Monday, June 30, 2008 6:42 PM

I'm still here too.

Haven't posted yet because I've only done some basic prep work on the kit, no real construction yet, and I've been scratching a few minor mods and additions.

  • Member since
    July 2006
  • From: New Jersey
Posted by redleg12 on Monday, June 30, 2008 7:09 PM

Ahhh....Others reporting in.....I don't need the defibulator....It's ALIVE.

No problem guys....Post when ever you are ready

Rounds Complete!!

"The Moral High Ground....A Great Place to Emplace Artillery."

  • Member since
    March 2007
  • From: NJ
Posted by JMart on Monday, June 30, 2008 8:36 PM
Oh I am still planning on doing this one, not for a couple months, have to finish couple other Gbs first! Still doing the old Tamiya M3, dont have the box in front of me to give the exact kit #


  • Member since
    December 2005
  • From: back seat of your car with duct tape streched out
Posted by soulcrusher on Monday, June 30, 2008 10:53 PM

Guys this just the response I was hoping for. My heart would not be in my build if the rest of you guys were not in it with me. I promise to at least paint my road wheels by the weekend! Still the BoB group build has managed to atract the majority of my attention right now. This was a great idea for a group build and I am glad to see itis still alive!

                                                                                          Soulcrusher


  • Member since
    June 2005
  • From: Indiana U.S.A.
Posted by Panther F on Thursday, July 3, 2008 10:15 AM
I'll be posting some pics as soon as I get some paint on my 'other' group build.
  • Member since
    March 2007
  • From: NJ
Posted by JMart on Thursday, July 3, 2008 6:13 PM

I checked my kit, Tamiya M3 Lee  #MM 39, an oldie at 1974.

Will start in a month or two, once I clear up other GBs, will keep looking in here in the meantime! Cheers


  • Member since
    July 2006
  • From: New Jersey
Posted by redleg12 on Thursday, July 3, 2008 9:05 PM

Panther - No problem

JMart - Have you covered

Rounds Complete!!

"The Moral High Ground....A Great Place to Emplace Artillery."

  • Member since
    November 2003
  • From: savannah ga.
Posted by GA.modelmaker on Saturday, July 5, 2008 7:45 PM

well it looks like i am the first to be all most done with the vintage armor gb. i have only to paint and weather the tracks and detail the .50 cal and i  belive a vickers 303 mg. i did a lot of things diffrent than the instructions called for. like putting all the addons in diffrent places and i tried to make it like it was lived in. so here are some pics of the priest kangaroo all most done. i will take some better pictures after i get it all thru.

  • Member since
    July 2006
  • From: San Francisco Bay Area
Posted by bufflehead on Sunday, July 6, 2008 3:28 AM
Hey GA.modelmaker!  I can barely see the Kangaroo beneath all that foliage!!Laugh [(-D] Looking good though, inside and out!  I thought the idler and return rollers were all metal, not black rubber like you painted them, but I could be wrong....those Canadians did strange things to American tanks!! LOL!

Ernest

Last Armor Build - 1/35 Dragon M-26A1, 1/35 Emhar Mk.IV Female


Last Aircraft Builds - Hobby Boss 1/72 F4F Wildcat & FW-190A8


  • Member since
    July 2006
  • From: New Jersey
Posted by redleg12 on Sunday, July 6, 2008 6:28 AM

GA - Looking good. May I suggest some of the stowage on the frond looks flat. Try a black pin wash to bring up some details.

The foilage is a different look and interesting.

Rounds Complete!!

"The Moral High Ground....A Great Place to Emplace Artillery."

  • Member since
    March 2007
  • From: NJ
Posted by JMart on Sunday, July 6, 2008 7:56 AM
GA- very nice set up! I agree with the pin wash to get more contrast, break up all the "green". Look forward to the rest!


  • Member since
    November 2003
  • From: savannah ga.
Posted by GA.modelmaker on Sunday, July 6, 2008 11:26 AM
yeah i know what yall mean about adding the wash up front. the darn camera picks up every little mistake dosent, i was going to add this to a dio heading into hedgerow contury but i couldnt find the stuff i really was looking for so i scratched it. as for the idler wheels every picture i have found of the kanagroo looked like thier was rubber on them so thats how i did mine, thier arent to many pics around of this thing. thanks guys for the input. the only other thing i may try to do is paint a fugure that is maning the vickers 303 mg. thats why you see the canten thier on the front of it
  • Member since
    July 2006
  • From: San Francisco Bay Area
Posted by bufflehead on Monday, July 7, 2008 10:39 AM

The Panzer III is coming along!  I brought it home and was able to get some good work done.  No photos yet, probably this evening or tomorrow.  I do have some questions regarding scratchbuilding from the Vintage Age:

  1. What material could I use for the mesh screens over the air intake louvers?  Since I can't use PE I need a material that would have been used 30 yrs ago!!
  2. Same deal with the tow cables.  I could use some thread or string but I hate the look.  Is it OK to make my own from very thin copper wire (or similar) or is that a later technique?
  3. I've assumed its OK to use sheet plastic (plasticard) as I know it was available back then, but what about metal from a soda can?  I might use this instead of plastic for the schurzen and for some straps and stuff.

Thanks for any info you can provide!!

Ernest

Last Armor Build - 1/35 Dragon M-26A1, 1/35 Emhar Mk.IV Female


Last Aircraft Builds - Hobby Boss 1/72 F4F Wildcat & FW-190A8


  • Member since
    July 2006
  • From: New Jersey
Posted by redleg12 on Monday, July 7, 2008 6:55 PM

Bufflehead -

1. On the screen material, it depends how fine a screen you need. Sometimes a screen door patch might work.

2. Tow cables are fine with thin muti strand wire

3. Plastic sheet is fine...no need to go to a soda can!!

Otherwise things sound good. Waiting to see some pics when you can!

Rounds Complete!! 

"The Moral High Ground....A Great Place to Emplace Artillery."

  • Member since
    March 2007
  • From: NJ
Posted by JMart on Monday, July 7, 2008 7:35 PM
I guess you could also use wine foil as "poors man PE". if you flatten it and carefully "fold", you can make interesting shapes. Also gives you a good reason to open a new bottle of red for dinner  Whistling [:-^]


  • Member since
    June 2005
  • From: Indiana U.S.A.
Posted by Panther F on Wednesday, July 9, 2008 7:37 PM

Okay, I spent some more time with the Churchill last night and I'll work on some pics tomorrow while I'm off work.  I had to do some minor surgery because one of the boggie wheel supports had snapped off and was not in the box, even though it was sealed when I bought it.  It more than likely broke when it was removed from the mold and was not noticed when packaging.  I didn't have the correct thickness in styrene sheet but a storage shelf for a M4A3 that I didn't use for the Tamiya Early Production was and I cut and drilled it to fit.  Man, Ambroid Pro Weld is the best.


Need to play around with the new lighting kit first.  Tongue [:P]

  • Member since
    July 2006
  • From: New Jersey
Posted by redleg12 on Wednesday, July 9, 2008 8:52 PM

Okay....remain calm. Get everything the way you want. Post when you can. I'm here in the obervation bunker. No problem.

Rounds Complete!!

"The Moral High Ground....A Great Place to Emplace Artillery."

mmc
  • Member since
    February 2007
  • From: Newcastle upon Tyne, England
Posted by mmc on Thursday, July 10, 2008 9:52 AM

Finally nearing the end of my Academy Sherman Dozer, so i'm looking forward to getting started on my 2 entries to the GB. Think I'll start with Revells Puma, will post some pics along the way. Been along time since I've made anything in 1/76, hope I can pull it off. Should be up and running early next week, since this is my first GB I'm looking forward and nervous about sharing the experience.

Long live the Vintage Group BuildBig Smile [:D]

  • Member since
    June 2005
  • From: Indiana U.S.A.
Posted by Panther F on Thursday, July 10, 2008 3:31 PM

Still working on the lighting, but at least some proof here that there is some work being completed.  Big Smile [:D]  I deleted over half of the pictures I took but what I kept is good enough.

Here you can see the part that had to be repaired ... sorta. Sigh [sigh]

This gives you a little idea what it'll start looking like once I sand the putty down and move on to the next step.

Here's a side view.  That is all I have assembled for right now are the sponsons with the suspension.  Plenty of flash to remove and I might spend the next two nights doing just that to avoid it along the way.

I really forgot how distrubing the smell of this plastic was when you sanded on it, but I have not encountered any problems yet.  Plenty of 'extra' stuff I can throw on the base since it really isn't part of the actual model itself.  Wink [;)]

Later.

  • Member since
    July 2006
  • From: New Jersey
Posted by redleg12 on Thursday, July 10, 2008 6:07 PM

MMC - You should not worry, we are like family. What we try to do if help each other improve and share skills. Over my time here I have learen alot and hopefully passed on some knowledge. Looking forward to seeing your work.

Panther F - Were off and running. The older kits don't always fit well and so always require putty and sanding. It's the nature of the beast. Looks good so far.

Watching from my observation bunker!!

Rounds Complete!!

"The Moral High Ground....A Great Place to Emplace Artillery."

  • Member since
    July 2006
  • From: San Francisco Bay Area
Posted by bufflehead on Thursday, July 10, 2008 6:49 PM
 redleg12 wrote:

Panther F - Were off and running. The older kits don't always fit well and so always require putty and sanding. It's the nature of the beast. Looks good so far.

You're not kidding redleg!!  One of the reasons my Pz III has been taking so long is that EVERY part has either sink marks, pin marks, mold seams or ALL THREE!!  Black Eye [B)]  The fit is actually still pretty good with very little putty required where major parts join, but getting to that point so far has been full of obstacles!  Its SO different from building say Dragon's new Pz IV Ausf G Smart Kit where the engineering, mold quality and fit is just great!!  2-3 times as many parts though!!Shock [:O]  Funny thing is both sides present their own challenges that are fun to overcome!

BTW, thanks for your tips to my earlier questions.  I read in one of my older books that "tule" can be used.....some type of wedding dress material?  I think I may have seen something like that at Michael's.  I'll stop by there this weekend and take a look!

Jmart,  thanks for the wine foil tip!  I keep forgetting about that.  Guess I need to start stocking up on good wines!!Make a Toast [#toast]  I like your idea about opening up and drinking some good vino!!

Ernest

Last Armor Build - 1/35 Dragon M-26A1, 1/35 Emhar Mk.IV Female


Last Aircraft Builds - Hobby Boss 1/72 F4F Wildcat & FW-190A8


  • Member since
    July 2006
  • From: New Jersey
Posted by redleg12 on Friday, July 11, 2008 5:39 AM

Bufflehead - I love Michaels. Its almost as good as a LHS. You can find tons of stuff that you can use there.  Glad my comments helped

Rounds Complete!!

"The Moral High Ground....A Great Place to Emplace Artillery."

  • Member since
    June 2005
  • From: Indiana U.S.A.
Posted by Panther F on Friday, July 11, 2008 2:33 PM

The nice thing about the 'older' kits is that they are relatively simple to build, without too many parts and accessories.  As long as you don't mind a lot of flash, sanding putty and more sanding, they do come together really nice.  And they are such a break from todays complicated detail oriented builds that sometimes make you want to pull your hair out.  Big Smile [:D]

I did get more accomplished today and hope to wrap up the build by the end of the month so I can concentrate on painting it and the diorama stand that came with the kit.

Anyone know if these Aurora kits treads can handle paint?  I can't decide if I wanna put them on after it's painted and run the chance of ruining the paint or before.  I guess I could always mask it off ... all 22 road wheels.

  • Member since
    August 2005
  • From: Sydney, Australia
Posted by Phil_H on Friday, July 11, 2008 10:52 PM

I've made a slow start to the M113 FSV (aka "The Beast" in Australian service). I'm adding a few bits and pieces but I'm not going all out on this one - just personalising the basic kit a little. All the mods here are eyeballed from reference pics, so the dimensions aren't necessarily accurate, but they look close enough to me. 

Some basic prep work:

Filling holes:
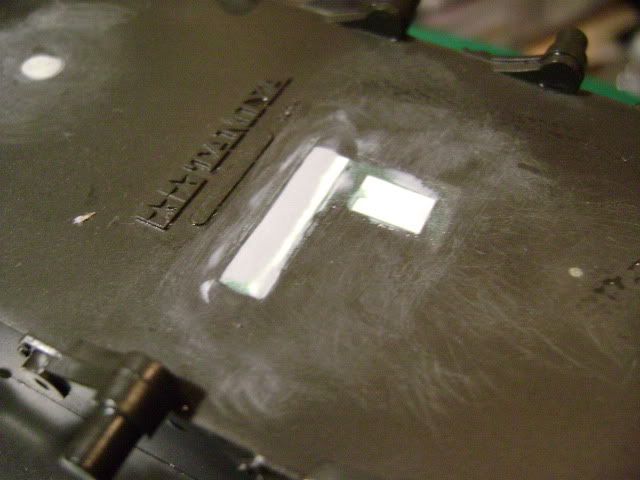
Drilling holes: All the photos I've seen of the Beasts show them without the side skirts, so the bolt holes needed to be drilled.
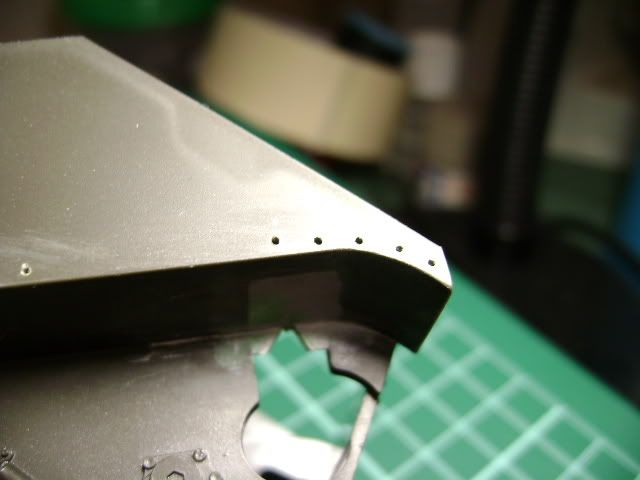
All Australian M113 variants have add-on armour plating under the sponsons. With the skirts off, these are visible as a thin strip above the first three road wheels.

But before this can happen, these moulded ribs, for the locating stubs on the skirts, have to go:
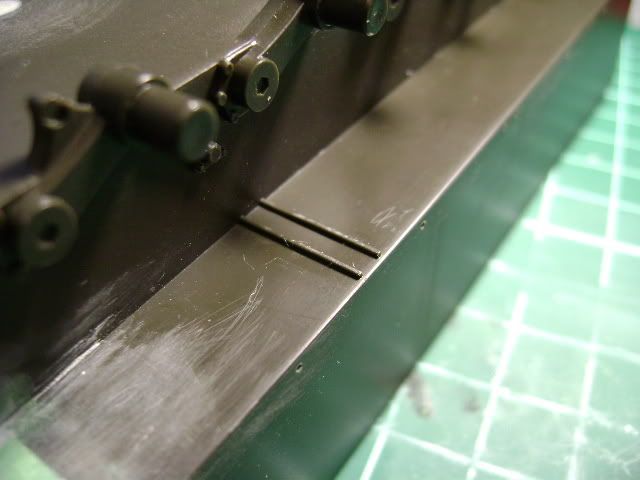
This is where they go (not glued in place yet)
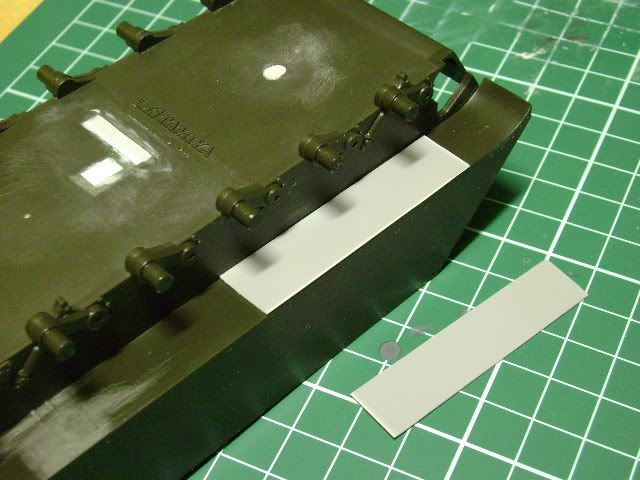
And this is how they will appear from the side:
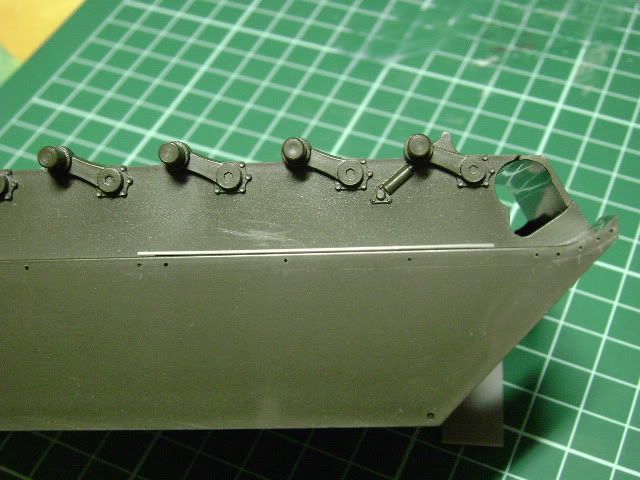
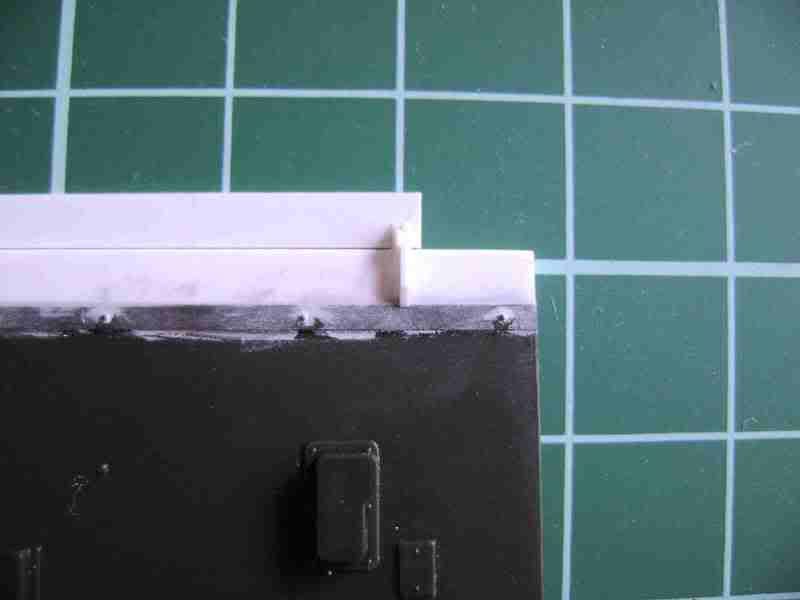
The trim vane on all the older Tamiya M113 variants is too shallow for anything other than the original M113, so it needs an extension using strip styrene. The shorter strip above it is an additional folding extension unique to the Beast. This is shorter because it has to clear the headlight clusters. The tiny white pieces between the two strips are the hinges.

Trim vane assembled (extension flap in place but not glued yet):

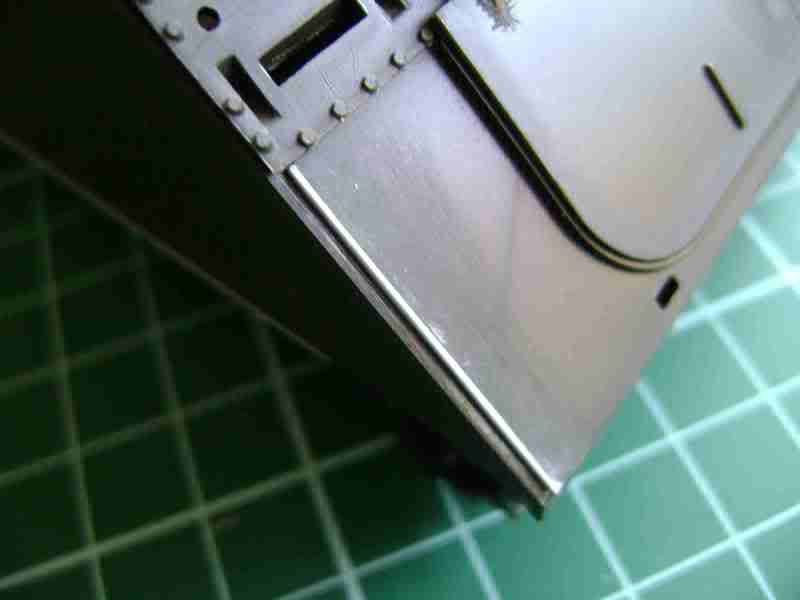
There was a sizeable gap along edges of the front hull panel. This was shimmed using a strip of Evergreen, which filled the gap nicely.
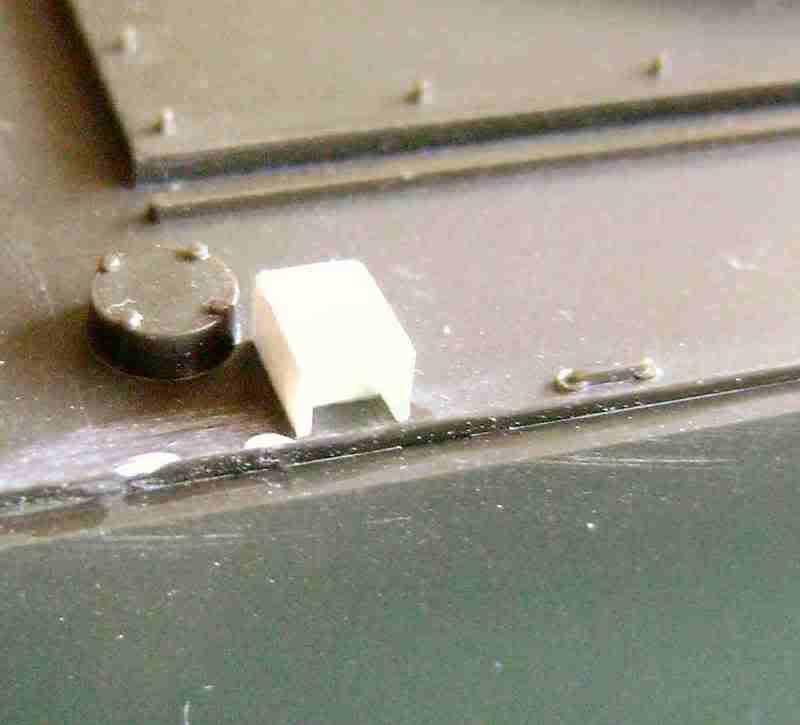
Added a small box for the external fire extinguisher handle to the upper hull.
The trim vane lever in the kit is little more than a solid stick. I scratched a replacement using Evergreen strip, stretched sprue and tiny bits of metal foil. Only the top end will be visible when the kit is completed.
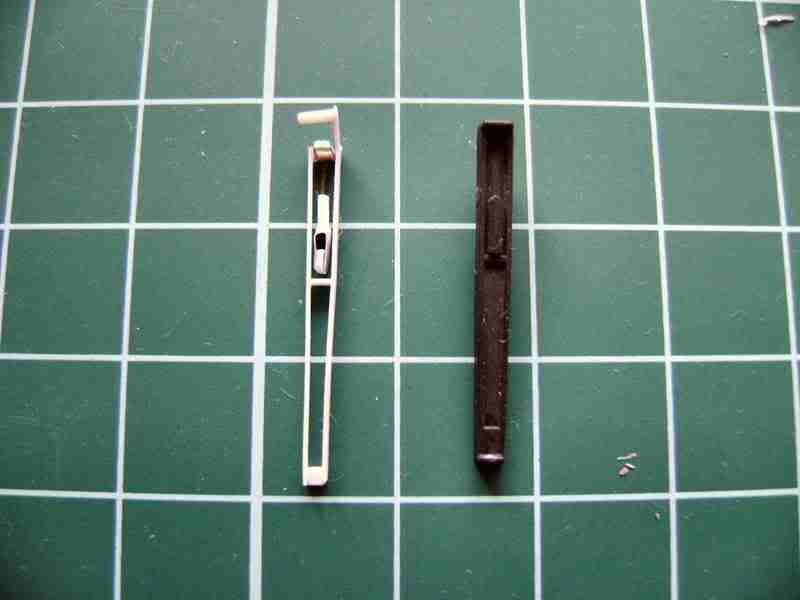
Thats about all I've done for now.

  • Member since
    July 2006
  • From: New Jersey
Posted by redleg12 on Saturday, July 12, 2008 10:28 AM

Very nice work. love the scratch detailing. Looking good so far/

Rounds Complete!!

"The Moral High Ground....A Great Place to Emplace Artillery."

mmc
  • Member since
    February 2007
  • From: Newcastle upon Tyne, England
Posted by mmc on Saturday, July 12, 2008 11:16 AM

Hello all, finally made a start on Revell's Puma in 1/76. This is one of the few old Matchbox kits I didn't build when I was a teen, when they cost me 99p instead of nearly £4!!

This is my first WIP, so I hope it's up to the standard of all the rest.

First of all, the box and contents. One of the first things I noticed was how small the contents are, since getting back into the hobby if stuck to 1/35, so 1/76 is going to be an interesting challenge.

[/img]

[/img] 

The first 3 stages deal with the turret, including a moveable main gun and 2 very small smoke dispensers. The fit and finish isn't too bad, so I'm hoping to get away without filling any gaps, as I havn't done that yet.

[/img] 

The next stage is the construction of the main body and attaching the side panels. This took 2 attempts as the fit is a bit dodgy, one thing I have noticed is that the plastic is very soft so care has to be taken when sanding off any excess. I also added the suspension to the body as I want to paint them before I add the wheels.

[/img]

The last stage for today is the wheels, these consist of 3 parts, hub, tyre and axle. The hub is glued to the axle allowing the tyre's to move.

[/img] 

Thats all for now, will post another update soon.

Look forward to hearing your comments, please be niceAngel [angel]

Mark 

  • Member since
    March 2007
  • From: NJ
Posted by JMart on Saturday, July 12, 2008 1:44 PM

Panther F - good start.. that IS an old kit, I almost forgot that type of plastic! :)  I read somewhere to make sure to wash the trcks with soapy water, gets rid of some of the old plastic/organic goo. (very scientific term)

bufflehead - cheers mate! and yes, Michaels is your friend! :) Im there a lot more often than my wife lol  not to mention those 50% off coupons! Last month they had an assortemnt of neumann oil tubes on half price.

Phil_H - nice work on your M113! I have that omne in the stash, will keep track of your progress and take notes oin the scratchbuilding

mmc - nice start onthe Puma.. looks like the tires/tyres have a nasty mold seam line down the middle..will be a pain to sand! loooking forward to the rest


  • Member since
    July 2006
  • From: New Jersey
Posted by redleg12 on Saturday, July 12, 2008 2:46 PM

mmc - What are you worried about, we are always gentle. For your first WIP, your doing great. As for the seams, the older kits are always a seam problem. Take your time and all will be well. Looking forward to your next update.

jmart - Michaels is your friend....many times its better than an LHS. I'm in there so much, my daughter now buys me gift cards from there for different holidays. Coupons great, sales great. Yes, I too am in there way more than my wife. If she starts getting Home Depot gift cards, we are in big trouble...LOL

Rounds Complete!!

"The Moral High Ground....A Great Place to Emplace Artillery."

mmc
  • Member since
    February 2007
  • From: Newcastle upon Tyne, England
Posted by mmc on Sunday, July 13, 2008 12:37 PM

Hello all. Just a quick update on the luvverly Puma.

First of all can I say thanks for the encouragment, it means a lotMake a Toast [#toast]

Well all the construction is done, including a number of tiny tools, the only thing that is missing is the headlights. One dissappeared into the carpet and the other snapped in two, still I'm proud I managed to build the kit in more or less one piece.

[/img]

[/img]

One of the good things about the old Matchbox kits was the fact they came complete with a mini dio scene, and the Puma is no exception. The scene is a street with road and pavement, along with a street light and 3 figures.

[/img] 

[/img]

JMart you weren't kidding about the mold seam on the wheels, what a pain in the a**e, the more I sanded the more the tread came off, hopefully they will look ok once they are painted and attached to the body. I've given the wheels one coat of Mr Hobby Tire Black, but another coat will be needed. Since I don't own a airbrush I will be painting by hand, and I will be using the Lifecolour German Tank Camo set 1 and Vallejo Model colour paints.

[/img]

Thats all for now. Thanks again for all the support.

Mark 

  • Member since
    March 2007
  • From: NJ
Posted by JMart on Friday, July 18, 2008 4:36 PM

Mark - looks good! I forgot about the "dio in a box", seems like a good one!

you are missing the lens part itself? (of the headlights) or the headlight itself? You can replicate the 'lens" by painting the inner headlight silver, followed by some clear glue and topped off with Future (Klear on your side of the pond).

I hand paint/brush a lot, since my AB booth is in an unheated garage attachment, not too bad as long as I remember to still thin the paint and do a few layers/coats.

Cheers!


mmc
  • Member since
    February 2007
  • From: Newcastle upon Tyne, England
Posted by mmc on Saturday, July 19, 2008 4:23 AM

Hello all, got a long weekend off work so going to crack on and get the Puma finished.

Hi JMart, the head lights we're all one unit but so small and the molding was awful. It's a shame they aren't on, hope they don't spoil the finish to much. I used to love the old Matchbox kits for the exact reason of the "Dio in a box", after this one I might do a few more.

I've given the Puma 3 coats of Dunkelgelb from the Lifecolour set. I thinned the paint down with water and the results are good, you can use Lifecolour thinner also, other thinner's aren't recommended.

[/img]

[/img]

[/img]

Next up is the camo which if I'm honest is the part I'm not looking forward to, so any tips will be more than welcome.

Mark 


  • Member since
    August 2007
  • From: The Plains of Kansas
Posted by doc-hm3 on Saturday, July 19, 2008 1:37 PM
 Looks like there's some progress going on. Well I'm on the home stretch with my pak40. Just glosscoated her today and will apply some filters and pinwashes tommorow., but heres a couple of pic's for now.See you all in a few days with a sitrep.

All gave some and some gave all.

  • Member since
    July 2006
  • From: New Jersey
Posted by redleg12 on Sunday, July 20, 2008 1:21 PM

MMC - Very nice. Coming along and what a great kit, it comes with a dio base.

Doc- See you did not need a compass and map to get here!!

The Pak 40 is moving well. Looks like a shovel on the front. I presume that detail is next.

Now that you know your way...I'll see you soon

Here in my vintage observation bunker.

Rounds Complete!!

"The Moral High Ground....A Great Place to Emplace Artillery."

  • Member since
    August 2007
  • From: The Plains of Kansas
Posted by doc-hm3 on Sunday, July 20, 2008 5:16 PM

 Tamiya kit no. MM146 Finished and reporting for duty SIR!

  http://i61.photobucket.com/albums/h50/CharlieinKansas/P1010062-2.jpghttp://i61.photobucket.com/albums/h50/CharlieinKansas/P1010062-2.jpg

 I'm getting hooked on this building thing again... I'd better go mow the lawn or do something like clean out the garage. I'm afraid I've got a plastic monkee on my back!


All gave some and some gave all.

  • Member since
    July 2006
  • From: New Jersey
Posted by redleg12 on Sunday, July 20, 2008 5:57 PM

Doc - Very nice. Great job on the weathering, nice shovel on the front. Good job with the breech, the internal should be shiny and clean. A qualified winner for the Vintage GB.

I would post some pics on the armor side and let some of the "Germaholics" give you their praise & review.

As far as having the bug....I started modeling again 4 years ago (after a 30 year break) with one kit and a folding table. Now I have my own studio with my bench, storage shelves for the stash, paint booth, desk, etc, etc. I love it. It helps that my wife supports my hobby so it feels great to build. The force is strong in the armor world!!

Rounds Complete!!

"The Moral High Ground....A Great Place to Emplace Artillery."

mmc
  • Member since
    February 2007
  • From: Newcastle upon Tyne, England
Posted by mmc on Monday, July 21, 2008 5:15 AM
Fantastic Pak 40 doc. Hope my 6 pounder comes out half as good.
  • Member since
    August 2007
  • From: The Plains of Kansas
Posted by doc-hm3 on Monday, July 21, 2008 9:31 AM
 Arty & mmc, thanks for checking this little piece of antique plastic out, and thanks for your kind comments.

All gave some and some gave all.

  • Member since
    November 2003
  • From: savannah ga.
Posted by GA.modelmaker on Monday, July 21, 2008 12:29 PM

hi guys i can get back to the bench now that my fishing fever has died down some due to them not really biting and the heat has really cranked up a lot. i am off for the next 2 weeks. were i work at they have cutt my hours to 0. so i have plenty of time on my hands to get the priest kangaroo done and a few more gb here on fsm. all thats left is to detail the tracks and thats it. the wash has been done to the front like yall suggested and it does look a heck of a lot better. i did leave one box unwashed to make it really stand out so look out for a few pics i hope by tuesday the latest.


by the way doc the pack-40 looks great as do the rest of the builds.

  • Member since
    June 2005
  • From: Indiana U.S.A.
Posted by Panther F on Tuesday, July 22, 2008 6:49 AM

Sweet camo work there on your Pak 40 doc.  That old kit looks like a new release now! Thumbs Up [tup]

I've pretty much finished all construction work on mine, just need to take some BETTER pictures before they all go together, then paint and then work on why I selected this kit.  The diorama stand. 

The figures are so crude but a file and a blade does wonder on them.  There were alot of sink holes to fill in and the instructions had you put the muzzle piece on wrong. Wow!! [wow]  I'm glad for all the internet references that are available.  Man, they didn't have anything to help a guy out back then.  Dead [xx(]

  • Member since
    July 2006
  • From: San Francisco Bay Area
Posted by bufflehead on Thursday, July 24, 2008 12:27 PM

Wow!  Nice work on that Pak 40 doc!!  I'm impressed with the paint job and weathering!Thumbs Up [tup]  I would have never thought this was such an old, vintage kit....you did a great job with it!  Shows that even these older kits can turn into winners with some TLC!

Ernest

Last Armor Build - 1/35 Dragon M-26A1, 1/35 Emhar Mk.IV Female


Last Aircraft Builds - Hobby Boss 1/72 F4F Wildcat & FW-190A8


  • Member since
    July 2006
  • From: San Francisco Bay Area
Posted by bufflehead on Thursday, July 24, 2008 6:41 PM

Here's the progress of my Tamiya Pz III Ausf M/N.  Unfortunately it sat stagnant for over a week while I was out of town.  I have a completely free weekend coming up so I hope to get a lot done by next week.

So far its been mostly OOB except for filling gaps with sheet styrene and putty, replacing lost bolt heads with styrene hex rod and adding a scratchbuilt intake screen using sheet styrene and "tulle" netting (still need to do the other side!)

All the parts for the fenders were installed except for the Bosch headlights.   They look kinda delicate and since I'm prone to breaking off parts I decided to wait until the end to install them, but I did plug the holes and sand the undersides smooth.

Once the other intake screen and a few other minor parts are installed the hull will be done and I'll start working on the turret.


Ernest

Last Armor Build - 1/35 Dragon M-26A1, 1/35 Emhar Mk.IV Female


Last Aircraft Builds - Hobby Boss 1/72 F4F Wildcat & FW-190A8


  • Member since
    July 2006
  • From: New Jersey
Posted by redleg12 on Thursday, July 24, 2008 8:30 PM

Bufflehead - Nice work, love to see some old fashioned scratch building work. You are making the old kit look great.

Rounds Complete!!

"The Moral High Ground....A Great Place to Emplace Artillery."

  • Member since
    November 2003
  • From: savannah ga.
Posted by GA.modelmaker on Thursday, July 24, 2008 9:35 PM
ok guys the priest-kangaroo is done as of 10:30 tonight. i am quite happy with how it turned out. the tracks were finished just a few minutes agao and they are drying right now. . i hope to get the academy priest and build it.. now its off to the forgotten war gb and finish the jeep ambulance. pics will follow tomrrow
  • Member since
    November 2003
  • From: savannah ga.
Posted by GA.modelmaker on Friday, July 25, 2008 3:07 PM

as promised lastnight here are the pics of the now done priest-kangaroo. the only thing i may add is the vickers 303 machine anti-tank gun next to the canteen. i guess you can say this is the for runner of the m-113 apc.and now for the pics.

  • Member since
    March 2007
  • From: NJ
Posted by JMart on Saturday, July 26, 2008 4:50 PM

doc-hm3 - very well done doc...  like your weathering, on the spot, not too much.

Panther F - Look forward to your finished pics... I never have any problems with figures... I cut the parts of the sprue, bag them and store them away, no problem! Laugh [(-D]

bufflehead - nice work! I like the tulle netting idea, another thing to look for next time I goto Michaels! lol

GA.modelmaker - great finish to your priest-roo! Great job on the stowage and camo-bushes. cheers!

I am also one of those who came back to modelling 2 years ago, now have a workbench and a (way too) big stash. Wife supports my hobby and pats me in the back and compares me to an elf making toys. No, she is too sweet to be corrected and told they are NOT toys;). Does not help she caught me strafing some armor with my P-51D.


  • Member since
    June 2005
  • From: Indiana U.S.A.
Posted by Panther F on Sunday, July 27, 2008 2:41 PM

A few more progress pictures.  Either I suck at taking them or I should shop for a new camera.  Anyway, this is what I have before it all goes together and the paint gets thrown on.

mmc
  • Member since
    February 2007
  • From: Newcastle upon Tyne, England
Posted by mmc on Monday, July 28, 2008 10:45 AM

Hello all.

Getting near the end for my Puma. I've put the camo on using Lifecolour Olivgrun and Rotbraun, to be honest I'm not to happy with the results, doing camo is not one of my favourite things, still practice makes perfect.

[/img]

[/img]

[/img]

I've started painting the 3 little figures also, this will be another first for me as I have never attempted anything as small as them.

The dio base is all done, I've added a coating of Javis Tarmac to the road after I checked to make sure it fitted the correct dates. Javis first started producing scatter in the 50's. 

[/img]

[/img]

Next up will be to finish the fig's, add the decals and do some weathering. All being well should have everything done in the next few days.

Panther F, looking forward to seeing your Churchill, one of my all time favourites. 

GA. Modelmaker fantastic KangarooThumbs Up [tup]

Mark 


  • Member since
    August 2005
  • From: Sydney, Australia
Posted by Phil_H on Monday, July 28, 2008 6:40 PM

That's coming along very nicely mmc. With a little weathering the camo will blend right in. 

Nice work on the base too.

  • Member since
    March 2007
  • From: NJ
Posted by JMart on Monday, July 28, 2008 7:47 PM

Panther F - looks good! I find that my own sucky pics get a tad better (for theDig Cam I use) if I put a lot of light on the model.

mmc - nice work so far.. did you "free-hand" the camo? Ive never done camo before, there a few tutorials in here (FSM forum), I remember reading one in which it suggested the use of a filter/wash to blend the colors together a bit. I really REALLY like your base! Looking forward to the rest~!


  • Member since
    July 2006
  • From: New Jersey
Posted by redleg12 on Monday, July 28, 2008 9:05 PM

PantherF - You seem to be moving along nicely. As far as the pics, there was an article in FSM on taking digital pics I think last year. It give a bunch of good tips even if you don't have a super camera. most of the stuff with lighting, they show you some easy stuff you can do without spending any money (or maybe a few schekles)

mmc - Nice work. The camo is very nice. The base really looks great. Can't wait to see it all in brought togeather.

jmart - For me, I use silly putty. Depending how you use it you can get sharp lines or overspray blending. There are a couple of discussions and its real easy.

GA - Nice job, I did not comment in the armor area but the veggies....Normally if you put them on a vehicle, you change them daile so they look fresh. with the different colors I'm not sure??

Lichen is nice but look for woodland scienics in your LHS. They have a material for making bushes which is much more realistic than the Lichen. Also that much sticking off the vehicle may be a hazard. Try and look at some old WWII pics of vehicle camo with branches and work form there.

All in all a nice build....hope it was fun for you

Rounds Complete!!

"The Moral High Ground....A Great Place to Emplace Artillery."

  • Member since
    June 2005
  • From: Indiana U.S.A.
Posted by Panther F on Tuesday, July 29, 2008 6:02 AM

Thanks everyone for the tips on the photos!  I looked back on a GB I did last year and now remembered I DID use a lot of lighting.

And Mark, your dio base is awesome my friend! Thumbs Up [tup]  Camo's are hard to do (especially that scale) but I think it looks just fine and with it on the base with some weathering it'll all fall into place!

My base is pre-made, so painting and adding details will be more fun than the actual build itself.

mmc
  • Member since
    February 2007
  • From: Newcastle upon Tyne, England
Posted by mmc on Tuesday, July 29, 2008 6:46 AM

Hello all.

Phil H, JMart, Redleg and Panther F thanks for all your kind words, they really mean a lot.

I am really pleased with the way the base came out.

JMart yes I painted the camo free hand, I put 3 thin coats of each colour on. I was thinking about doing a wash, just not sure where to start. 

Thanks again for all you kind words, next up will be to finish the figs and weather the Puma a bit, I was thinking about adding some foliage to the Puma, not sure yet.

Mark 

mmc
  • Member since
    February 2007
  • From: Newcastle upon Tyne, England
Posted by mmc on Thursday, July 31, 2008 8:58 AM

Hello all.

Well I've finally finished Revell's SdKfz 234/2 Puma. 

[/img]

[/img]

[/img]

[/img]

[/img] 

I added some Mig pigments and some Woodland Scenics Foliage. I'm pleased with how the Puma turned out, looking forward to starting my 6 pounder next.

Thanks again for everyones kind words and support Make a Toast [#toast].

Mark 


  • Member since
    August 2005
  • From: Sydney, Australia
Posted by Phil_H on Thursday, July 31, 2008 10:14 AM

Looks great - the foliage sets it off nicely. It's hard to tell that's 1/76 scale. If I ddin't know otherwise, I might have thought it was larger than that.  

  • Member since
    June 2005
  • From: Indiana U.S.A.
Posted by Panther F on Sunday, August 3, 2008 10:23 AM
Wow, only 6 out of 14 have shown any work and it's going into the 4th month.  Is this a group build or what?
mmc
  • Member since
    February 2007
  • From: Newcastle upon Tyne, England
Posted by mmc on Sunday, August 3, 2008 12:04 PM

I was wondering the same thing Panther F, it's a shame that only a few of us have stuck with it. I'm very proud that I've taken part in this, my first GB, so much so that I can't wait till the next one. Going to start on my 2nd entrant soon, hopefully the rest of the entrants will be on board soon.

Mark 

  • Member since
    July 2006
  • From: San Francisco Bay Area
Posted by bufflehead on Monday, August 4, 2008 3:35 PM

That's the way GB's go fellas.  Sometimes the entrants are so busy with other things in their life (like OTHER GBs Smile,Wink, & Grin [swg]) that they can't contribute or participate often or regularly.  I'm sure the others will post when they're ready. 

My Tamiya Panzer III is nearing completion and will be ready for paint soon. I'll post photos in a day or two...as soon as I can clean up the disaster I call a desk/workbench/photo booth!!Laugh [(-D]

GA.modelmaker - Great job on your Kangaroo!  What color/brand did you use for the OD?  I think a couple of figures inside would really complete the look!

mmc - That little Puma is sweeeet!  It's so cool that the kit comes with the base and the figs!  The camo looks very nice and the foliage really adds to the look!  I'd hate to see that Puma coming at me unless I had a bazooka!!

Panther F - Your Churchill is looking good so far!  What scale is it?

Ernest

Last Armor Build - 1/35 Dragon M-26A1, 1/35 Emhar Mk.IV Female


Last Aircraft Builds - Hobby Boss 1/72 F4F Wildcat & FW-190A8


  • Member since
    July 2006
  • From: New Jersey
Posted by redleg12 on Monday, August 4, 2008 8:49 PM

Sorry guys there is not as many as you could want. Remember, its quality not quantity.

Being the old F$%t that I am, my stash has numerous kits from the 50s thru the 70s. I collected my memories of days gone by. Most people today are interested in the big tank super kit with all the AM and some to try and build the show stopper. If any of you watch my builds they are usually differnt then the rest. I took the lead on this GB for thos who may be interested in those ideals. For that, you should all be commended.

MMC - OUTSTANDING, Very nice finish. I would post some of the finished pics in the armor section and show off to the general crew.

Panther - Keep heart....I always found it is better to be a leader than a follower. Can't wait to see how you are doing.

Bufflehead - Same for you, hope to see yours soon

Think of it this way, the M113 GB has less replies than this one. You would think that GB would be mobbed.

Rounds Complete!! 

"The Moral High Ground....A Great Place to Emplace Artillery."

  • Member since
    November 2003
  • From: savannah ga.
Posted by GA.modelmaker on Monday, August 4, 2008 8:51 PM
thanks buffhead for the nice comments. as for the paint i ues MM olive drab. yeah i to have been thinking about putting a couple of figures in thier but one thing thats stoping me i really STINK at painting figures.
mmc
  • Member since
    February 2007
  • From: Newcastle upon Tyne, England
Posted by mmc on Tuesday, August 5, 2008 2:54 AM

Hello all.

redleg12: Already posted the Puma over in the armour section, met with some mixed review's, but I'm happy with it so I 'm not complaining.

bufflehead: Thanks for the kind words, really enjoyed taking part in my first GB.

Going to start the 6 Pounder today so will post an update later.

Mark 

  • Member since
    March 2007
  • From: NJ
Posted by JMart on Tuesday, August 5, 2008 7:27 AM

mmc - very nice job on an oldie...specially at that scale! I would not call your response in the armor section as negative... some great feedback!. My experience has been (as a newbie- hobby re-turnee) that MOSt people in here give you good constructive feedback, in both the aircraft and armor sections. As for ships.... well.......   Whistling [:-^]

Panther F - Mine is next in line at the workbench... still have to finish couple other GBs first (that have an earlier deadline! ;) and a 350 scale ship taking some time away from building targets..

cheers


mmc
  • Member since
    February 2007
  • From: Newcastle upon Tyne, England
Posted by mmc on Tuesday, August 5, 2008 10:57 AM

Thanks JMart, I'm really pleased that some of the great people on here, whose work inspires me to try and improve, took the time to reply and post some feedback, unlike on some other sitesSoapBox [soapbox].

For my first venture in 1/76 I've been truly humbled by the response.

Mark 

  • Member since
    June 2005
  • From: Indiana U.S.A.
Posted by Panther F on Tuesday, August 5, 2008 8:32 PM
 redleg12 wrote:

Sorry guys there is not as many as you could want. Remember, its quality not quantity.

Being the old F$%t that I am, my stash has numerous kits from the 50s thru the 70s. I collected my memories of days gone by. Most people today are interested in the big tank super kit with all the AM and some to try and build the show stopper. If any of you watch my builds they are usually differnt then the rest. I took the lead on this GB for thos who may be interested in those ideals. For that, you should all be commended.

MMC - OUTSTANDING, Very nice finish. I would post some of the finished pics in the armor section and show off to the general crew.

Panther - Keep heart....I always found it is better to be a leader than a follower. Can't wait to see how you are doing.

Bufflehead - Same for you, hope to see yours soon

Think of it this way, the M113 GB has less replies than this one. You would think that GB would be mobbed.

Rounds Complete!! 

Just trying to play the part of the motivator! Angel [angel]

bufflehead ... the Aurora Churchill is 1/48!  Big Smile [:D]

mmc
  • Member since
    February 2007
  • From: Newcastle upon Tyne, England
Posted by mmc on Wednesday, August 6, 2008 10:49 AM

Hello all.

Made a start on Tamiya's 6 Pounder anti-tank gun today.

Here's the box and contents:

[/img]

[/img]

There seems to be less parts in the kit compared to the Puma, but at least they are bigger Whistling [:-^].

Started to assemble the gun, it's gone together very nicely.

[/img]

Before I add the gun shield, I'm going to paint the gun barrel. Thats all for now, will try and post an update before I go back to work next week.

Mark


  • Member since
    July 2006
  • From: San Francisco Bay Area
Posted by bufflehead on Tuesday, August 12, 2008 1:52 AM

Well, here ya are guys....assembly of the Tamiya Panzer III Ausf M is almost complete.  Just need to add the schurzen and its off to the painting booth.  As you can see there was some scratchbuilding done.  I HAD to replace the molded on tow cables....they were pretty lame!!Disapprove [V]I twisted some copper wire for the cables.  The brackets and holders were made from bits of soda can and sheet plastic.  I got the tow ends from two other vintage Tamiya kits, the Panzer IV D and the Panzer IV H, both circa 1975.  I accidentally spilled liquid glue on the top of the turret stowage box and had to scratchbuild a lid to cover up the boo-boo. Then I added strip styrene to represent the wooden rubbing strips, not realizing that they wouldn't be seen with the turret schurzen on!Banged Head [banghead].  Oh, and I redid all the weld beads with a hot knife and added some missing ones where necessary.

I'll probably have the schurzen on this week, but I'll be out of town on the weekend so painting will have to wait until next week.

Ernest

Last Armor Build - 1/35 Dragon M-26A1, 1/35 Emhar Mk.IV Female


Last Aircraft Builds - Hobby Boss 1/72 F4F Wildcat & FW-190A8


mmc
  • Member since
    February 2007
  • From: Newcastle upon Tyne, England
Posted by mmc on Tuesday, August 12, 2008 10:26 AM

WOW what a fantastic build bufflehead, so clean. Look forward to seeing it with the schurzen and some paint. Haven't done any scratchbuilding yet, that's another thing to add to my "to do list".


Mark 

  • Member since
    March 2007
  • From: NJ
Posted by JMart on Tuesday, August 12, 2008 10:49 AM

Mark - good going...another oldie/goodie kit!

bufflehead - very nice job, love the tow cable! did you actually twist it yourself, or what is your source of cable? The Su85 im finishing, lets just say my SB cable did not twist too well :)


  • Member since
    July 2006
  • From: San Francisco Bay Area
Posted by bufflehead on Tuesday, August 12, 2008 3:55 PM
 mmc wrote:

WOW what a fantastic build bufflehead, so clean. Look forward to seeing it with the schurzen and some paint. Haven't done any scratchbuilding yet, that's another thing to add to my "to do list".


Mark 

Thanks Mark!  Scratchbuilding is not only fun, but there's a great sense of personal satisfaction knowing that you can actually make parts from bits & pieces of plastic, metal...whatever.  I found that the more you do it, the easier it becomes AND you don't get stressed if you lose or break a kit part....just make a new one from scratch!!  Give it a try!

Ernest

Last Armor Build - 1/35 Dragon M-26A1, 1/35 Emhar Mk.IV Female


Last Aircraft Builds - Hobby Boss 1/72 F4F Wildcat & FW-190A8


  • Member since
    July 2006
  • From: San Francisco Bay Area
Posted by bufflehead on Tuesday, August 12, 2008 4:11 PM
 JMart wrote:

Mark - good going...another oldie/goodie kit!

bufflehead - very nice job, love the tow cable! did you actually twist it yourself, or what is your source of cable? The Su85 im finishing, lets just say my SB cable did not twist too well :)


Thanks JMart!  Yeah, I twisted the tow cable from 5 or 6 strands (I can't remember how much) of thin copper wire.  I tried silver wire, brass wire and even steel, but copper is the softest and easiest to twist...plus its much more pliable when done!  I found that the key is to make sure all the strands are TIGHT when twisting.  Loose strands just end up messing it all up!  I put all the strands of one end in a stationary vise, make sure all the strands are separate and then tighten the other ends in a handheld vise (I use a pin vise or an Exacto handle).  Then I make either a RH or LH twist (Germans used a LH twist, U.S. a RH twist, etc) keeping constant tension on the wires.  That's it.  It took me a few tries and I'm still not 100% statisfied with the results, but they look a whole lot better than the indistinct lump that was originally molded on the hull!!

BTW, the copper wire I used came from some small electrical wire I found in my junk box.  I just stripped off the jacket and had 10 strands to work with.  I'm guessing its 32 gauge...possibly smaller.  

Ernest

Last Armor Build - 1/35 Dragon M-26A1, 1/35 Emhar Mk.IV Female


Last Aircraft Builds - Hobby Boss 1/72 F4F Wildcat & FW-190A8


  • Member since
    November 2003
  • From: savannah ga.
Posted by GA.modelmaker on Tuesday, August 12, 2008 4:32 PM
great clean build thier buffhead.
  • Member since
    December 2005
  • From: back seat of your car with duct tape streched out
Posted by soulcrusher on Wednesday, August 13, 2008 11:31 AM

Michael I agree with you that this group build was a good idea to get back to what modeling armor use to be. Mabye it is not the most populated or frequently posted GB but it is still a great idea. I have not posted much but I am about half done with my M13/40. Just no pics worth posting yet. it kind of forces you to go back to scratch building instead of these new hi-tech kits that leave little room for it. bufflehead's panzer is a great example of what can be done with these often overlooked kits. The BoB GB is tying me up right now waiting on decals that are taking forever to arrive! After that i plan on finishing up my build.

                                                                                  Soulcrusher


  • Member since
    July 2006
  • From: New Jersey
Posted by redleg12 on Wednesday, August 13, 2008 6:55 PM

bufflehead - Very nice details, nice cable work. Just think a great model and no PH....no indy tracks. You embrace the true spirt of the old modeler. Can't wait to see it finished.

mmc - Waiting to see your next work of art

soulcrusher - No problem with the posting....sometimes small is better.

Rounds Complete!!

"The Moral High Ground....A Great Place to Emplace Artillery."

  • Member since
    August 2005
  • From: Sydney, Australia
Posted by Phil_H on Thursday, August 14, 2008 2:44 AM
Hey there bufflehead. Great work on the ancient PzIII kit - and to think it had been destined for the spares/scrap box. Cool [8D]
mmc
  • Member since
    February 2007
  • From: Newcastle upon Tyne, England
Posted by mmc on Thursday, August 14, 2008 4:15 AM

Hello all.

Went back to work this week so haven't had much time to post any updates.

Redleg12 thanks for the vote of confidenceThumbs Up [tup].

Well my 6 pounder is almost done, it's all painted and has recieved a little weathering. It's been a very nice kit, ideal for a novice ( like me!!! ). I've started to paint the 3 figures that come with the kit, not sure if I'm going to add them, as the moulding is very rough. Anyway here's the pics:

[/img]

[/img]

[/img] 

I'm quite pleased with how the kit has turned out, although I think the painting could be a bit better, think it might be time to invest in a airbrush!

Will post some pics with the figures once they are done.

Mark 

  • Member since
    July 2006
  • From: New Jersey
Posted by redleg12 on Monday, August 18, 2008 6:08 AM

MMC - Pictures are a little dark so it is hard to tell on the pain, but looks good so far. Waiting to see with the figs.

As far as an AB...it will open a new world for you. If you are enjoying model building....it may be time....think of it this way....4 months until Christmas...makes a great gift!!

I'll keep an eye for your updates!

Rounds Complete!!

"The Moral High Ground....A Great Place to Emplace Artillery."

mmc
  • Member since
    February 2007
  • From: Newcastle upon Tyne, England
Posted by mmc on Monday, August 18, 2008 7:11 AM

You're right about the pics redleg, think I'll try a few more along with the figures.

Mark 

  • Member since
    March 2007
  • From: NJ
Posted by JMart on Monday, August 18, 2008 7:22 PM

bufflehead - thanks for the info!

Mark - yes, AB will be much better.. I got one when I got back into the hobby last year... at first, I just use it for priming and large surfaces as I learn more. Do some searches and research, many options out there... also, you have to figure out if you need (and can afford) a paint hood/fume hood. They can be pricey (on both sides of the pond!) but a must if you model indoors and you have little ones in the house...

cheers


  • Member since
    July 2006
  • From: San Francisco Bay Area
Posted by bufflehead on Thursday, August 21, 2008 2:07 AM

mmc - your 6 pounder is looking pretty good!  Those photos COULD use a little more light as mentioned, but I can still make out the general details!   Yep, and an AB would make painting really nice!!  You mentioned figs, but are you going to put them all on a dio or base?

 Phil_H wrote:
Hey there bufflehead. Great work on the ancient PzIII kit - and to think it had been destined for the spares/scrap box. Cool [8D]

Tell me about it Phil!!  I didn't expect to be working on this kit and am delightfully surprised to find out that its not that bad a kit! 

So here it is, ready for paint!  I was sorely tempted to scratchbuild the schurzen, but decided to keep within the spirit of the GB and used the kit parts instead.  The turret schurzen was not altered, but the hull schurzen was waaay too thick so I thinned them by about 70%, so they could look more in-scale.  Now I have to figure out what paint scheme for the darn thing!


Ernest

Last Armor Build - 1/35 Dragon M-26A1, 1/35 Emhar Mk.IV Female


Last Aircraft Builds - Hobby Boss 1/72 F4F Wildcat & FW-190A8


mmc
  • Member since
    February 2007
  • From: Newcastle upon Tyne, England
Posted by mmc on Thursday, August 21, 2008 10:01 AM

Hello everyone.

bufflehead: I am in awe, your Panzer III is amazing, I love the little scratch details, can't wait to see it all done, fantastic work.

I've finally finished the 6 Pounder and the figures that came with the kit. The moulding on them was terrible, after a couple of coats of Vallejo English Uniform the details became very hard to see. The date on the box says 1970,and looking at the results you can tell they are old.

I took a few more pics, with a bit more light, so here goes

[/img]

[/img]

[/img]

[/img]

[/img]

[/img]

bufflehead: I came across a photo of a 6 Pounder in France which gave me the idea for doing the 6 Pounder for this GB.

[/img]

I plan to make a dio along the lines of the photo.

Mark 


  • Member since
    June 2005
  • From: Indiana U.S.A.
Posted by Panther F on Tuesday, August 26, 2008 11:40 AM

Just about ready for paint on mine after sanding and gluing 22 dolly wheels.  Censored [censored]

I posted a question in the figures section and at this point I really want to replace the 1/48th scale figures.  They should be WWII British Infantrymen and if I can't get any in time I'll just leave them out of the build. 

They are just too plain looking and the mold likes are pretty thick.

  • Member since
    July 2006
  • From: San Francisco Bay Area
Posted by bufflehead on Wednesday, August 27, 2008 2:17 PM

mmc - I like what your doing with the 6 pounder and figures, that last B&W photo is great!  However in photo #6 there is a problem....the crew is pointing the 6 pounder between those two trees when they should be aiming for that Panzer Mark IV to the right!!  Well....that shadow between the trees and the fence LOOKS like a Pz IV!!   OK, I've got a vivid imagination......Propeller [8-]

Panther F - Dude I feel your pain with those roadwheels!  22 is a lot, but try a Pz IV (I like Pz IVs!!)....they've got 32!!  Wish I could help with the figs, but I know almost nothing about 1/48 scale kits.  Anyway, hope to see the results of your hard work soon!  I haven't seen a Churchill posted in quite a while.

To update my Tamiya Pz III....its already painted with camo. I want to get the markings on before posting photos.  Maybe tomorrow?

Ernest

Last Armor Build - 1/35 Dragon M-26A1, 1/35 Emhar Mk.IV Female


Last Aircraft Builds - Hobby Boss 1/72 F4F Wildcat & FW-190A8


  • Member since
    June 2005
  • From: Indiana U.S.A.
Posted by Panther F on Wednesday, August 27, 2008 7:01 PM

Nice work on the detail with the PIII bufflehead.  Thumbs Up [tup]  That is pretty slick work.  Yeah, I know all about the PIV road wheels, I'm building a Brummbar in another group build at ArmoramA.  Just got the primer on it and a base color coat on the Churchill last night. 

I think the real pain on those 22 wheels was they didn't line up, so I had to re-drill a straighter hole for all of them.  Dead [xx(]  But hey, we're talking about 1966 here. 

Post some pics of that camo when you can.  Too bad it'll hide all the extra work you did.

  • Member since
    July 2006
  • From: New Jersey
Posted by redleg12 on Wednesday, August 27, 2008 8:45 PM

bufflehead - you are doing the scrach builder a great justice. Nice job on the little details. Looks good in just ugly brown plastic....can't wait to see it painted.

mmc - love the little 6 lb gun. I love the outdoor pic and the research photo. Looks good with the figs. It has been great watching the two guns you have built.

panther - Hey in 1966 most of these were build and run on the carpet to destruction. There were no details or precision. What you are doing is proof that it is the modeler that makes the model look good not the quality of the kit.

Sorry to all I have not been here the past week. Off on buisness. Trying to catch up on everything in all the forums. But......I'MM BACK

Rounds Complete!!

"The Moral High Ground....A Great Place to Emplace Artillery."

  • Member since
    November 2003
  • From: savannah ga.
Posted by GA.modelmaker on Wednesday, August 27, 2008 9:41 PM
great looking builds thier guys. i still check in and see whats going on. but i do have something funny about my priest that i built. i uesd super glue and testors plastic cement and one more glue to put it all togther. and i went to pick it up the other day and the darn thing started falling a part on me. i got so tickled my sides began to hurt. well i saved what stuff i could use in my dodge 1 1/2 ton truck that i am building for the supply and demand gb other than that its ij the trash.
mmc
  • Member since
    February 2007
  • From: Newcastle upon Tyne, England
Posted by mmc on Thursday, August 28, 2008 8:36 AM

Hello all.

redleg12: It's been a great experience for me to share my 2 little builds with everyone, I'd like to say a big thank you to everyone for making my first GB a pleasure to take part in. Can't wait till the Red Storm on the Reich GB is due to start.

bufflehead: You're right that shadow does look like a Panzer IV!! Big Smile [:D]. I'll post some pics of the dio once I get round to doing it. Looking forward to seeing that III of your's.

G.A.modelmaker: Sorry to read about your mishap, such a p****r.

Looking forward to seeing all the other builds, thanks again, had great fun.

Mark 

  • Member since
    June 2005
  • From: Indiana U.S.A.
Posted by Panther F on Thursday, August 28, 2008 1:51 PM
Well, I had the day off today and did NOTHING,  Zzz [zzz]  except watch the paint dry on the Churchill some more and surf the forums.  I do hope everyone learned that super glue and modeling don't work well (that blows) with each other.  Grumpy [|(]  The second half of the build will be the most challenging for me for I haven't really done any serious dio's before.  Yuck [yuck]
  • Member since
    March 2007
  • From: NJ
Posted by JMart on Thursday, August 28, 2008 3:44 PM

bufflehead - I really like it so far, many great ideas for the schurzen tweaks.

mark - love the pics! The outdoor ones specially, really looks nice...  and kudos on the figures... I know they are hard to paint in a convicing manner, of course *I* never have a problem with figs... I bagged 'em and put in the spares box, no problem! ;)  One day I will attempt to paint figures...

Panther - that is why I always have more than one build on my bench! In case I have an off day, hour or 20 min and want to do SOMETHING on the work bench! Summer is the worst, high humidity, takes 2-3 days for ANYTHING to dry..paint, future, dullcote.... spray..wait 3 days...spray another thin coat...wait 3 days.. lol


  • Member since
    June 2005
  • From: Indiana U.S.A.
Posted by Panther F on Thursday, August 28, 2008 4:17 PM

Well, did nothing on the Vintage Armor Kit GB that is.  I did lay some paint down on another group build I'm in, but that only took a few minutes.  I did take a moment to think about what to use in the next GB, but then I decided that was too much to think about!  Whistling [:-^]

I needed a day where I did almost nothing at all but some down time for me and my dogs.  Pretty hot out so we took a ride and just soaked up some A/C all day.  Smile,Wink, & Grin [swg]

  • Member since
    June 2005
  • From: Indiana U.S.A.
Posted by Panther F on Wednesday, September 3, 2008 3:37 PM
A week has gone by and another day off.  I think I'll work on those 42 year old decals tomorrow and see if they'll still work.  Confused [%-)]  Could be fun.  Dead [xx(]
  • Member since
    July 2006
  • From: San Francisco Bay Area
Posted by bufflehead on Thursday, September 4, 2008 9:55 AM

Hey Panther F, I'm glad you're still posting here!  Yeah, watch those ancient decals...I tried to use some old Italeri decals recently and they practically disintegrated when I moved them into position!! Sigh [sigh]  Hope to see some photos soon!

I've been steadily working on my Pz III, just haven't had the time to take photos.  Most of the decals are on; I have to make a tape stencil for one of the markings that I don't have a decal for.  I made some boo-boos Black Eye [B)] along the way, but its getting there.  I MIGHT finish it this weekend, but that's probably wishful thinking! Whistling [:-^]

Ernest

Last Armor Build - 1/35 Dragon M-26A1, 1/35 Emhar Mk.IV Female


Last Aircraft Builds - Hobby Boss 1/72 F4F Wildcat & FW-190A8


mmc
  • Member since
    February 2007
  • From: Newcastle upon Tyne, England
Posted by mmc on Friday, September 5, 2008 9:18 AM

Know the feeling there bufflehead, something always seems to crop up.Looking forward to seeing your III.

Mark

  • Member since
    July 2006
  • From: San Francisco Bay Area
Posted by bufflehead on Monday, September 8, 2008 12:15 AM

Well guys, I managed to clean up the workdesk enough to snap a few quick photos of the Pz III.  Markings are finally done (I managed to screw them up a couple of times) and I toned down the gloss finish enough for photos. 

without the schurzen:

wheelie things ready for weathering:

Everything was going OK until......DISASTER STRUCK!!!! Shock [:O]Shock [:O]

I pinned the tracks to cardboard and took them outside to paint (used a lacquer based rattle can).  I left them in direct sun hoping the heat would soften the tracks and straighten out a little.  Stupid me forgot about them for a couple of hours and when I checked, the wind had blown them under a tree, where they had ripped apart!!  Shock [:O]Boohoo [BH]  Fortunately, I think I can staple the broken pieces together and still use them...the schurzen will hide most of the track anyway!!  I'm so glad I decided to use the schurzen!!  Anyway I just need to give it some pin washes and final weathering and fix those tracks and she's done!

Ernest

Last Armor Build - 1/35 Dragon M-26A1, 1/35 Emhar Mk.IV Female


Last Aircraft Builds - Hobby Boss 1/72 F4F Wildcat & FW-190A8


mmc
  • Member since
    February 2007
  • From: Newcastle upon Tyne, England
Posted by mmc on Monday, September 8, 2008 9:09 AM

Wow!!!!!

I love it, I want one, fantastic paint job, been well worth the wait. What a p****r about the track, hope you can save them.

The details are amazing, I'm in awe, superb build bufflehead.

Mark

  • Member since
    March 2007
  • From: NJ
Posted by JMart on Monday, September 8, 2008 7:48 PM
fantastic paint job! really good...and what a mess about the tracks! sorry to hear that... maybe black thread better than stapling, I try stapling my last old tamiya build, staple really stood out. I should have put the stapled portion on the bottom and then cover the staple with mud. good luck!


  • Member since
    August 2005
  • From: Sydney, Australia
Posted by Phil_H on Monday, September 8, 2008 9:23 PM

Hey Bufflehead,

That looks great with the paint on. Big Smile [:D] Nice camo work.

Another alternative you may consider for repairing the tracks is "invisible" sewing thread. It's thin clear (well sort of) nylon thread which blends in with the background.

  • Member since
    July 2006
  • From: San Francisco Bay Area
Posted by bufflehead on Thursday, September 18, 2008 2:04 AM

I know there isn't a lot of activity in this GB, but for what's its worth I have a complete build to submit.  I'm surprised because I actually finished a build way before the end date of the GB!!Shock [:O]    

So here it is:  Tamiya's VENERABLE (1971) Panzer III Ausf. M/N built as a long barreled M.  The markings represent the command vehicle of Oberst Hermann von Oppeln-Bronikowski during the Battle of Kursk, July 1943.  I was inspired by this color plate in "The Panzerkampfwagen III at War".

Since this GB is for vintage armor kits, I figured go for that "vintage" look on the build....the look I aspired to when I was a teen back in the 70s when my modeling heroes were Shep Paine and Francois Verlinden.  So I held back with the weathering - no chipping, scratching, pastels, pigments, dot-filtering, color modulation, etc...you know - all the newer techniques of armor weathering.  I decided to stick with just the basics.  Basecoat and camo done with Tamiya acrylics, a couple of applications of oil washes, some postshading  and dusting with more Tamiya acrylics and finally some basic drybrushing.  I know there are many who think this type of finish is not accurate, not dirty enough, but what the hey...its my tank and I'll finish it how I want!

Anyway, I really like how it turned out.  This is probably closer to the "vintage" look than anything I've ever done, recently and looong before.  Its amazing how a decent paint job can turn an "old timer" like this into something worth displaying!  I hope you like it!

BTW I fixed those broken vinyl tracks with staples and they worked pretty good!  Don't know why but the tracks shrank quite a bit after painting!  I could barely get them on...before painting they were a little loose.   You can see how much they're stretching at the sprocket.  Also I added little strips of clear plastic tinted light green to represent the armored glass in the cupola view slits.  You can see a little bit of one in photo #5

Ernest

Last Armor Build - 1/35 Dragon M-26A1, 1/35 Emhar Mk.IV Female


Last Aircraft Builds - Hobby Boss 1/72 F4F Wildcat & FW-190A8


  • Member since
    June 2005
  • From: Indiana U.S.A.
Posted by Panther F on Thursday, September 18, 2008 3:27 PM
What's not to like?  I love it! Bow [bow]  Two thumbs up on this one bufflehead!  Yeah!! [yeah]
  • Member since
    July 2006
  • From: New Jersey
Posted by redleg12 on Friday, September 19, 2008 7:39 AM

Bufflehead - First, nice recovery on the tracks. Part of modeling is recovery from an OOPS.

The build overall is very nice. The detailing, I love the tow cables and the exhaust. Did you do the exhaust with just washes or did you use something like rustex??????

Great job on the pinwashes...all the fine details stand out.

Paint is a good copy of your research photo.

Not only is this a Vintage build...its a winner, even today.

Nice job Thumbs Up [tup]

As far as the intrest in the GB, We tried....Most people want todays super kits with super details. They are nice but I also like older kits and scratch building. Scratch building details seems to be a dying art.

For those few who have stayed on....you should be proud of doing something few other wanted to try.

Panther.....don't give up!!!

I'll still be watching from the bunker

Rounds Complete!!

"The Moral High Ground....A Great Place to Emplace Artillery."

mmc
  • Member since
    February 2007
  • From: Newcastle upon Tyne, England
Posted by mmc on Friday, September 19, 2008 8:16 AM

Bufflehead: You are an artist, your III is stunning, I hope your going to post some pics in the armour forum so everyone can see it. I need to practice my weathering a bit more, I still do the basic stuff. I'm glad you stuck with it, it's been well worth the wait.

redlrg12: I know I've said it before but thanks for letting me take part in my first GB, it's a shame that more didnt stick to itMake a Toast [#toast].

Panther F: c'mon you can do it.

Mark

  • Member since
    August 2005
  • From: Sydney, Australia
Posted by Phil_H on Friday, September 19, 2008 8:16 AM

Great job Bufflehead - you really took that kit to a whole new level. I like the light weathering - it's good to see the tank itself without the all the distractions of loads of mud and dirt and a whole lot of stuff piled on the back, including the kitchen sink.

Redleg, I'm still here and still working (slowly) on my FSV. It's coming together fairly well, but progress is pretty slow, but it will get there eventually. Smile [:)]

  • Member since
    July 2006
  • From: New Jersey
Posted by redleg12 on Friday, September 19, 2008 11:56 AM

MMC - Your more than welcome and glad to have had you!

Phil-H - No problem, all are always welcome and you have no problem to work on it at your pace. We will be here!

Rounds Complete!!

"The Moral High Ground....A Great Place to Emplace Artillery."

  • Member since
    June 2005
  • From: Indiana U.S.A.
Posted by Panther F on Sunday, September 21, 2008 2:25 PM
 mmc wrote:

Panther F: c'mon you can do it.

Mark

Plenty of time.  Angel [angel]

  • Member since
    July 2006
  • From: San Francisco Bay Area
Posted by bufflehead on Sunday, September 21, 2008 9:59 PM

Panther F, mmc, Phil _H, redleg12, thanks so much for the kind words guys!  It was very nice to "get back to basics" with this kit!  Thanks for hosting the GB redleg Thumbs Up [tup], I enjoyed every minute of my vintage kit!!

BTW, the rusting on the muffler was done using mostly oil washes.  For my exhausts I've been trying a technique I read about some time ago.  The exhaust is first hand painted with a light pink color.  Yep...PINK!  For this I used Vallejo Salmon Rose as I don't have any Tamiya acrylic red.  Then I painted dark brown "dots" on the bends and corners. These two colors were blended a little using the same dark brown mix I used for post shading.  Then burnt sienna and burnt umber oil washes were applied (a little thicker than the vehicle washes) , followed by a brownish/black wash.  Finally drybrushed with a light tan....and there you go.  Its more rusted looking than I would have preferred, but I'm still learning and experimenting with this technique.

I'll be keeping an eye on this GB to see how everyone else is doing.  Heck, if I have time I may even do a second vintage kit.  I've been eyballing my Tamiya PZ II Ausf F thinking it would look great as a DAK vehicle!Smile,Wink, & Grin [swg]

Ernest

Last Armor Build - 1/35 Dragon M-26A1, 1/35 Emhar Mk.IV Female


Last Aircraft Builds - Hobby Boss 1/72 F4F Wildcat & FW-190A8


  • Member since
    August 2005
  • From: Sydney, Australia
Posted by Phil_H on Friday, September 26, 2008 2:35 AM

This puppy's about ready to hit the paint shop. Just a few odds and ends to put on.

I added the hinge pins/plates for the trim vane. They're a little crude, but they're there.

Many M113's in Australian service have (or have had at some stage) jerry can racks rather than simply having them strapped to the back.

The kit lacks the turret front lifting rings, so these were added using brass wire bent accordingly. Also added the wiring for the smoke grenade launchers, the lead-through plugs for the wires and the dust cover for the mantlet sleeve.

Still to add another antenna mount on the right rear quarter, as most pics show the FSV's with two antennas, but only the left mount is provided.

Time for some paint.. Big Smile [:D]

mmc
  • Member since
    February 2007
  • From: Newcastle upon Tyne, England
Posted by mmc on Friday, September 26, 2008 9:30 AM

Seeing all the little details you've put in Phil, makes me realise how much of a novice I amBoohoo [BH]. All my builds to date have been OOB, I am starting to scratch build some scenery items but thats it so far, I'm to afraid to even tackle my Dragon 88 that I got for Christmas!!!!

Look forward to seeing your 113 all done and painted.

Mark

  • Member since
    August 2005
  • From: Sydney, Australia
Posted by Phil_H on Friday, September 26, 2008 10:24 AM

Hi MMC,

Thanks for the compliment. Smile [:)] I'm usually an OOB builder too. This is actually the first time I've set out to extra detail to a kit and what you see here are really my first attempts at scratchbuilding at any level. I just wanted to make it a little different to the OOB builds I've seen of this kit. I just added little details here and there and got a bit carried away once I got a feel for it. So far it's been a great learning exercise.

I hear what you're saying about your Dragon 88 - I have a few kits in the stash which I would put in the "intimidating" class - I have yet to bend my first PE part Shock [:O].

It's all fun... Smile [:)]

mmc
  • Member since
    February 2007
  • From: Newcastle upon Tyne, England
Posted by mmc on Friday, September 26, 2008 1:16 PM

Yeah I'm not the only one who hasn't bent any PE!!! One day I will sit down and tackle my nemisis.

Mark

  • Member since
    August 2005
  • From: Sydney, Australia
Posted by Phil_H on Friday, October 3, 2008 10:54 PM

Base coats applied:

  • Member since
    July 2006
  • From: New Jersey
Posted by redleg12 on Sunday, October 5, 2008 2:33 PM

Phil - It is coming along nicely. Always love to see a different M113. Can't wait to see it completed.

Rounds Complete!!

"The Moral High Ground....A Great Place to Emplace Artillery."

  • Member since
    March 2007
  • From: NJ
Posted by JMart on Sunday, October 5, 2008 5:40 PM

bufflehead - that is a gorgeous build! I actually like the 'cleaner" type of build, lets you see more details and appreciate the engineering of the machine. paint job is fantastic!

I am still "here", so to speak, but a massive job project has sucked all my time and lifeforce, could not even attend the ASPMS in CT, have not been to the bench in more than a month :(

Hey marc, Im a newbie and OOB only and waaaaay behind the "skill" set of most in here..but I have fun and learn a lot, I add one new "technique" or angle to each build. I think all "newbies" or hobby-returnees like me should start with *exactly* this type of build.

Phil_H - love the paint job, the color gradient looks great!

Cheers all


mmc
  • Member since
    February 2007
  • From: Newcastle upon Tyne, England
Posted by mmc on Tuesday, October 7, 2008 3:30 AM

Phil_H: Yout 113 is looking great, never built any modern stuff before, but seeing your's has got me thinking about giving it a try.

JMart: I've only been back into the hobby for about 2 years now, but I'm having fun and enjoying learning along the way, I've just got my first PE set to have a go at.

Mark

  • Member since
    July 2006
  • From: San Francisco Bay Area
Posted by bufflehead on Wednesday, October 15, 2008 10:10 PM

Hey guys, I'm still hanging around here, checking out what else has turned up!

Phil_H, what a great looking M113!  Don't know much about them but that version with the turret is sweeet!  Love all the detail work you did, its really paying off! Thumbs Up [tup]

JMart, thanks for the kinds words on the Pz III!Big Smile [:D]  I really do like the way it turned out.

Its not real hard to turn one of these older kits into a looker!  This GB has got me interested again in such kits even though I have plenty of the "uber kits" in the stash!  So while I'm on the subject.....I just HAD to build another one!! Smile,Wink, & Grin [swg]  I already did my official build, but I figured I'd post this one here anyway.  I hope all of you and redleg12 don't mind.

This time its Tamiya's old Pz II Ausf F/G, another one from the early 70's.  I started it a couple of weeks ago, but I only managed to snap these quick photos before launching into the build.

SHHHHH!!!!  Don't tell anyone! Taped Shut [XX]  I'm SUPPOSED to be finishing my King Tiger for the Panzer Aces GB, but I couldn't resist working on this one too!  Its actually almost completely assembled, just a few minor parts and it will be ready for paint.  Maybe I can snap a quick photo before the evening is over...??

Ernest

Last Armor Build - 1/35 Dragon M-26A1, 1/35 Emhar Mk.IV Female


Last Aircraft Builds - Hobby Boss 1/72 F4F Wildcat & FW-190A8


  • Member since
    August 2005
  • From: Sydney, Australia
Posted by Phil_H on Saturday, October 18, 2008 2:23 AM

redleg12, JMart, mmc, bufflehead -  Thanks for the comments guys Big Smile [:D]

It could do with a little more weathering, but I'm calling it done.

Some of the kinks in the tracks wouldn't come out... Whistling [:-^]

mmc
  • Member since
    February 2007
  • From: Newcastle upon Tyne, England
Posted by mmc on Saturday, October 18, 2008 11:13 AM

Phil_H: Your welcome, IMHO your 113 looks perfect.

Mark

  • Member since
    July 2006
  • From: San Francisco Bay Area
Posted by bufflehead on Sunday, October 19, 2008 1:10 AM

Phil, that M113 is a real beauty!  Detail work, painting, markings, weathering are all first rate! Thumbs Up [tup]Thumbs Up [tup].  You've turned this old classic into a work of art!

I don't know much about this vehicle so I'm curious about some things;  What caliber gun is that?  Can you provide any info on the operational history of this Aussie M113?  Exactly what designation is this one?  Is it an Aussie modification or was it U.S. factory made and sold "Down Under"?  Sorry about the load of questions, but seeing this fine build just makes me want to know more about it!

Ernest

Last Armor Build - 1/35 Dragon M-26A1, 1/35 Emhar Mk.IV Female


Last Aircraft Builds - Hobby Boss 1/72 F4F Wildcat & FW-190A8


  • Member since
    August 2005
  • From: Sydney, Australia
Posted by Phil_H on Sunday, October 19, 2008 7:35 AM

Hi Bufflehead.

Thanks for the compliments.

No worries about the questions - I'll try to answer them as best I can.

The M113A1 FSV (Fire Support Vehicle), aka "The Beast" as it was known to its crews in Australian service, was developed in Australia around 1970-71 by the simple expedient of mating the turrets from a number of recently retired Alvis Saladin armoured cars to the hulls of US supplied M113A1's. Only about 15 vehicles were converted to this configuration.

The main gun is a low velocity 76mm. A number of these vehicles were "trialled" in Vietnam towards the end of that conflict. After the trials were concluded, the FSV did not see service outside of Australia.

Some of the FSV's were upgraded in 1977, replacing the Saladin turrets with Scorpion turrets and having additional flotation tanks added. A number of additional vehicles were built/converted, for a total of about 45 vehicles. The upgraded vehicles received a new designation. MRV, (Medium Reconnaissance Vehicle). These continued in Australian Army service until retierd in the late 1990's.

Here's one of the pics I used for reference - it's a vehicle at the Royal Australian Armoured Corps museum at Puckapunyal in Victoria.

PS: Looking forward to seeing your PzII - that's a classic little kit Big Smile [:D]

  • Member since
    July 2006
  • From: San Francisco Bay Area
Posted by bufflehead on Monday, October 20, 2008 12:28 AM

Wow Phil!!  That's great information!!  Thanks!  I had no idea that such mods existed for the M113.  The photo is awesome....you did a great job making your model look like the real thing!Approve [^]

Here's what I managed to get done this weekend on the Pz II.  Not much scratchbuilding done except for modifying the muffler and jack block.  I sanded off the poor representation of the perforated muffler shield and made a new one from a beer can (OK, I think it was Miller LiteBlush [:I]). Perforations are off, but I think it looks a heck of lot better than the kit job.   Did the same with the coaxial MG34.  The jack block looked like a storage box so I sanded, scraped, scribed and carved it to look more like wood and added banding straps made from lead foil (luved the wine!!Make a Toast [#toast])  Carved off the molded on tools and scratchbuilt new ones and stole one from that same Pz IV kit that I scavenged from for the Pz III that I just finished!

Primer/Under coat of Tamiya German Gray (rattle can)

Base coat of Tamiya's Desert Yellow + Buff + Flat White.  Allowed some of the gray undercoat to show through, though you can barely see it in the photos.

Muffler base coated in pink.....yes, pink!

Need to do some post shading and basecoat variations before markings are applied.  I hope I can finish it by next weekend!

Ernest

Last Armor Build - 1/35 Dragon M-26A1, 1/35 Emhar Mk.IV Female


Last Aircraft Builds - Hobby Boss 1/72 F4F Wildcat & FW-190A8


  • Member since
    August 2005
  • From: Sydney, Australia
Posted by Phil_H on Tuesday, October 21, 2008 8:24 AM

Hi Bufflehead,

WOW!

Your work on this old kit is awesome. Thumbs Up [tup] The heat shield looks great - did you drill the perforations individually?

She's going to be spectacular when she's done. Cool [8D]

mmc
  • Member since
    February 2007
  • From: Newcastle upon Tyne, England
Posted by mmc on Tuesday, October 21, 2008 11:37 AM

Sign - Ditto [#ditto] What Phil said!!!!

Looking forward to seeing this oldie.

Mark

  • Member since
    July 2006
  • From: New Jersey
Posted by redleg12 on Tuesday, October 21, 2008 5:07 PM

bufflehead - Thumbs Up [tup] Nice......very nice work. can't wait to see the finish coats....

PINK....Hummmmm

Rounds Complete!!

"The Moral High Ground....A Great Place to Emplace Artillery."

  • Member since
    March 2007
  • From: NJ
Posted by JMart on Saturday, October 25, 2008 7:47 PM

Phil_H - Looks GREAT! The weathering is spot on, enough to make it look interesting without hiding details. Fantastic paint job too. And extra points for the information about the Aussie vehicle, a great mini-lesson!

bufflehead - Love what you did with the muffler shield... will save this tip for future use. Ditto on the perforations..what did you use? very evenly spaced. Color basecoat looks great.


  • Member since
    July 2006
  • From: San Francisco Bay Area
Posted by bufflehead on Monday, January 5, 2009 12:00 AM

Hello....anyone here?   Anyone?  Question [?]

Well, even though this GB is supposedly over I assume that someone from here will read this post.  If not..oh well!!Big Smile [:D]

I just wanted to let you all know I finally finished the Tamiya Pz. II Ausf. F!  Sorry, it sat stagnant for over two months while I finished up other GBs and dealt with work, family and holiday stuff.  All it took was one day, yesterday and a little bit this morning to finish it off (it was mostly done back in October).  JMart, sorry to be so late answering your question....for the holes in the exhaust sheild I used a drilling guide that came with some CMK bolts I bought a couple of years ago.  This allowed me to get perfect spacing between the holes, but then getting the rows of holes to line up....well that wasn't so perfect!! Laugh [(-D]

Although the model was done with no AM parts, only a little scratchbuilding, I did use Archer transers for some of the markings as the kit decals were pretty thick and prone to silvering.   Paint was mostly Tamiya acrylics with some Vallejo Model Color and Humbrol enamels thrown it where necessary.  I also used some MIG pigments for the dusty weathering.  The spare tracks assy is missing from the front plate....it disappeared sometime during the last two months!Shock [:O] 

So here she is all ready to do battle with Field Marshal Erwin Rommel and the Deutsche Afrika Korps:

Thanks Redleg12 for creating and hosting this GB!  I had a blast building these vintage kits and am eager to do another.  Well, as soon as I finish up all my other GBs!!Big Smile [:D]

Ernest

Last Armor Build - 1/35 Dragon M-26A1, 1/35 Emhar Mk.IV Female


Last Aircraft Builds - Hobby Boss 1/72 F4F Wildcat & FW-190A8


  • Member since
    August 2005
  • From: Sydney, Australia
Posted by Phil_H on Monday, January 5, 2009 6:06 AM

Hey there Bufflehead,

I love these older kits and I think with this GB, we've shown that you don't always need the latest and greatest to build a great looking model. You really brought this and the PzIII to life.

Looking at your PzII makes me want to do another one, and I only did one of these about a year ago. Smile [:)]

Thanks once again to Redleg12 for hosting this GB - it's been great fun to participate in thsi one and to see everyone else's builds here. If anyone's interested in extending or doing a "Mk.II" of this GB, I've got more "classic" kits in the stash. Smile [:)]

mmc
  • Member since
    February 2007
  • From: Newcastle upon Tyne, England
Posted by mmc on Monday, January 5, 2009 8:35 AM

Wasn't sure if anyone still posted in this thread.

Hey Phil_H I'd be up for "Vintage GB 2- Bring out the oldies", had fun doing the Puma and 6 Pounder, keep us posted.

Mark

  • Member since
    July 2006
  • From: New Jersey
Posted by redleg12 on Monday, January 5, 2009 10:09 AM

I'm still watching!!!!!!

Nice job bufflehead. It does not matter when.....what matters is you finished and it looks great

To all, it was my pleasure to act as host. I am not a big "Group Build" person but I am an avid fan of the old kits.

It was an honor to have you as part of the build and what you did with the builds was special and shows you don't need super kits to build a super model.

Have a great 09 and have fun building.

Rounds Complete!!

End of Mission!!!!!

"The Moral High Ground....A Great Place to Emplace Artillery."

  • Member since
    March 2007
  • From: NJ
Posted by JMart on Thursday, January 8, 2009 7:10 AM

bufflehead - cheers man! hey never need to apologize when real life gets in the way, happened to many of us in 2008! You did an absolutely GORGEOUS job on that old kit! brilliant!

Love the weathering... I am planning on doing the old Tamiya IV D in DAK markings for the 1,000 Wheels GB, will use your WIP/pics as reference and inspiration.

redleg12 - My apologies for not finishing my kit... work/family health issues slammed on me in 2008 and wiped most of my modelling build time. But I really enjoyed this GB and builds, coming back to the hobby last year after a 25 year break, was nice to get re-acquainted with the old classics.

Anyone that wants to start a Vintage II - I am in! :)

and happy new year everyone!


  • Member since
    July 2006
  • From: San Francisco Bay Area
Posted by bufflehead on Sunday, January 11, 2009 8:42 PM

Thanks for all your kind comments fellas, it means a lot to me to have my efforts appreciated by someone!!  Have fun in all your future modeling endeavors and hope to see your work soon on other GBs or posts! 

Jmart, I'll be joining you soon (I hope) on the 1000 Roadwheels GB!

Ernest

Last Armor Build - 1/35 Dragon M-26A1, 1/35 Emhar Mk.IV Female


Last Aircraft Builds - Hobby Boss 1/72 F4F Wildcat & FW-190A8


JOIN OUR COMMUNITY!

Our community is FREE to join. To participate you must either login or register for an account.

SEARCH FORUMS
FREE NEWSLETTER
By signing up you may also receive reader surveys and occasional special offers. We do not sell, rent or trade our email lists. View our Privacy Policy.