SEARCH FINESCALE.COM

Enter keywords or a search phrase below:

Vintage Armor Kit GB - 5/1/08 - 12/31/08 WIP

19101 views
150 replies
1 rating 2 rating 3 rating 4 rating 5 rating
  • Member since
    July 2006
  • From: New Jersey
Posted by redleg12 on Thursday, July 3, 2008 9:05 PM

Panther - No problem

JMart - Have you covered

Rounds Complete!!

"The Moral High Ground....A Great Place to Emplace Artillery."

  • Member since
    November 2003
  • From: savannah ga.
Posted by GA.modelmaker on Saturday, July 5, 2008 7:45 PM

well it looks like i am the first to be all most done with the vintage armor gb. i have only to paint and weather the tracks and detail the .50 cal and i  belive a vickers 303 mg. i did a lot of things diffrent than the instructions called for. like putting all the addons in diffrent places and i tried to make it like it was lived in. so here are some pics of the priest kangaroo all most done. i will take some better pictures after i get it all thru.

  • Member since
    July 2006
  • From: San Francisco Bay Area
Posted by bufflehead on Sunday, July 6, 2008 3:28 AM
Hey GA.modelmaker!  I can barely see the Kangaroo beneath all that foliage!!Laugh [(-D] Looking good though, inside and out!  I thought the idler and return rollers were all metal, not black rubber like you painted them, but I could be wrong....those Canadians did strange things to American tanks!! LOL!

Ernest

Last Armor Build - 1/35 Dragon M-26A1, 1/35 Emhar Mk.IV Female


Last Aircraft Builds - Hobby Boss 1/72 F4F Wildcat & FW-190A8


  • Member since
    July 2006
  • From: New Jersey
Posted by redleg12 on Sunday, July 6, 2008 6:28 AM

GA - Looking good. May I suggest some of the stowage on the frond looks flat. Try a black pin wash to bring up some details.

The foilage is a different look and interesting.

Rounds Complete!!

"The Moral High Ground....A Great Place to Emplace Artillery."

  • Member since
    March 2007
  • From: NJ
Posted by JMart on Sunday, July 6, 2008 7:56 AM
GA- very nice set up! I agree with the pin wash to get more contrast, break up all the "green". Look forward to the rest!


  • Member since
    November 2003
  • From: savannah ga.
Posted by GA.modelmaker on Sunday, July 6, 2008 11:26 AM
yeah i know what yall mean about adding the wash up front. the darn camera picks up every little mistake dosent, i was going to add this to a dio heading into hedgerow contury but i couldnt find the stuff i really was looking for so i scratched it. as for the idler wheels every picture i have found of the kanagroo looked like thier was rubber on them so thats how i did mine, thier arent to many pics around of this thing. thanks guys for the input. the only other thing i may try to do is paint a fugure that is maning the vickers 303 mg. thats why you see the canten thier on the front of it
  • Member since
    July 2006
  • From: San Francisco Bay Area
Posted by bufflehead on Monday, July 7, 2008 10:39 AM

The Panzer III is coming along!  I brought it home and was able to get some good work done.  No photos yet, probably this evening or tomorrow.  I do have some questions regarding scratchbuilding from the Vintage Age:

  1. What material could I use for the mesh screens over the air intake louvers?  Since I can't use PE I need a material that would have been used 30 yrs ago!!
  2. Same deal with the tow cables.  I could use some thread or string but I hate the look.  Is it OK to make my own from very thin copper wire (or similar) or is that a later technique?
  3. I've assumed its OK to use sheet plastic (plasticard) as I know it was available back then, but what about metal from a soda can?  I might use this instead of plastic for the schurzen and for some straps and stuff.

Thanks for any info you can provide!!

Ernest

Last Armor Build - 1/35 Dragon M-26A1, 1/35 Emhar Mk.IV Female


Last Aircraft Builds - Hobby Boss 1/72 F4F Wildcat & FW-190A8


  • Member since
    July 2006
  • From: New Jersey
Posted by redleg12 on Monday, July 7, 2008 6:55 PM

Bufflehead -

1. On the screen material, it depends how fine a screen you need. Sometimes a screen door patch might work.

2. Tow cables are fine with thin muti strand wire

3. Plastic sheet is fine...no need to go to a soda can!!

Otherwise things sound good. Waiting to see some pics when you can!

Rounds Complete!! 

"The Moral High Ground....A Great Place to Emplace Artillery."

  • Member since
    March 2007
  • From: NJ
Posted by JMart on Monday, July 7, 2008 7:35 PM
I guess you could also use wine foil as "poors man PE". if you flatten it and carefully "fold", you can make interesting shapes. Also gives you a good reason to open a new bottle of red for dinner  Whistling [:-^]


  • Member since
    June 2005
  • From: Indiana U.S.A.
Posted by Panther F on Wednesday, July 9, 2008 7:37 PM

Okay, I spent some more time with the Churchill last night and I'll work on some pics tomorrow while I'm off work.  I had to do some minor surgery because one of the boggie wheel supports had snapped off and was not in the box, even though it was sealed when I bought it.  It more than likely broke when it was removed from the mold and was not noticed when packaging.  I didn't have the correct thickness in styrene sheet but a storage shelf for a M4A3 that I didn't use for the Tamiya Early Production was and I cut and drilled it to fit.  Man, Ambroid Pro Weld is the best.


Need to play around with the new lighting kit first.  Tongue [:P]

  • Member since
    July 2006
  • From: New Jersey
Posted by redleg12 on Wednesday, July 9, 2008 8:52 PM

Okay....remain calm. Get everything the way you want. Post when you can. I'm here in the obervation bunker. No problem.

Rounds Complete!!

"The Moral High Ground....A Great Place to Emplace Artillery."

mmc
  • Member since
    February 2007
  • From: Newcastle upon Tyne, England
Posted by mmc on Thursday, July 10, 2008 9:52 AM

Finally nearing the end of my Academy Sherman Dozer, so i'm looking forward to getting started on my 2 entries to the GB. Think I'll start with Revells Puma, will post some pics along the way. Been along time since I've made anything in 1/76, hope I can pull it off. Should be up and running early next week, since this is my first GB I'm looking forward and nervous about sharing the experience.

Long live the Vintage Group BuildBig Smile [:D]

  • Member since
    June 2005
  • From: Indiana U.S.A.
Posted by Panther F on Thursday, July 10, 2008 3:31 PM

Still working on the lighting, but at least some proof here that there is some work being completed.  Big Smile [:D]  I deleted over half of the pictures I took but what I kept is good enough.

Here you can see the part that had to be repaired ... sorta. Sigh [sigh]

This gives you a little idea what it'll start looking like once I sand the putty down and move on to the next step.

Here's a side view.  That is all I have assembled for right now are the sponsons with the suspension.  Plenty of flash to remove and I might spend the next two nights doing just that to avoid it along the way.

I really forgot how distrubing the smell of this plastic was when you sanded on it, but I have not encountered any problems yet.  Plenty of 'extra' stuff I can throw on the base since it really isn't part of the actual model itself.  Wink [;)]

Later.

  • Member since
    July 2006
  • From: New Jersey
Posted by redleg12 on Thursday, July 10, 2008 6:07 PM

MMC - You should not worry, we are like family. What we try to do if help each other improve and share skills. Over my time here I have learen alot and hopefully passed on some knowledge. Looking forward to seeing your work.

Panther F - Were off and running. The older kits don't always fit well and so always require putty and sanding. It's the nature of the beast. Looks good so far.

Watching from my observation bunker!!

Rounds Complete!!

"The Moral High Ground....A Great Place to Emplace Artillery."

  • Member since
    July 2006
  • From: San Francisco Bay Area
Posted by bufflehead on Thursday, July 10, 2008 6:49 PM
 redleg12 wrote:

Panther F - Were off and running. The older kits don't always fit well and so always require putty and sanding. It's the nature of the beast. Looks good so far.

You're not kidding redleg!!  One of the reasons my Pz III has been taking so long is that EVERY part has either sink marks, pin marks, mold seams or ALL THREE!!  Black Eye [B)]  The fit is actually still pretty good with very little putty required where major parts join, but getting to that point so far has been full of obstacles!  Its SO different from building say Dragon's new Pz IV Ausf G Smart Kit where the engineering, mold quality and fit is just great!!  2-3 times as many parts though!!Shock [:O]  Funny thing is both sides present their own challenges that are fun to overcome!

BTW, thanks for your tips to my earlier questions.  I read in one of my older books that "tule" can be used.....some type of wedding dress material?  I think I may have seen something like that at Michael's.  I'll stop by there this weekend and take a look!

Jmart,  thanks for the wine foil tip!  I keep forgetting about that.  Guess I need to start stocking up on good wines!!Make a Toast [#toast]  I like your idea about opening up and drinking some good vino!!

Ernest

Last Armor Build - 1/35 Dragon M-26A1, 1/35 Emhar Mk.IV Female


Last Aircraft Builds - Hobby Boss 1/72 F4F Wildcat & FW-190A8


  • Member since
    July 2006
  • From: New Jersey
Posted by redleg12 on Friday, July 11, 2008 5:39 AM

Bufflehead - I love Michaels. Its almost as good as a LHS. You can find tons of stuff that you can use there.  Glad my comments helped

Rounds Complete!!

"The Moral High Ground....A Great Place to Emplace Artillery."

  • Member since
    June 2005
  • From: Indiana U.S.A.
Posted by Panther F on Friday, July 11, 2008 2:33 PM

The nice thing about the 'older' kits is that they are relatively simple to build, without too many parts and accessories.  As long as you don't mind a lot of flash, sanding putty and more sanding, they do come together really nice.  And they are such a break from todays complicated detail oriented builds that sometimes make you want to pull your hair out.  Big Smile [:D]

I did get more accomplished today and hope to wrap up the build by the end of the month so I can concentrate on painting it and the diorama stand that came with the kit.

Anyone know if these Aurora kits treads can handle paint?  I can't decide if I wanna put them on after it's painted and run the chance of ruining the paint or before.  I guess I could always mask it off ... all 22 road wheels.

  • Member since
    August 2005
  • From: Sydney, Australia
Posted by Phil_H on Friday, July 11, 2008 10:52 PM

I've made a slow start to the M113 FSV (aka "The Beast" in Australian service). I'm adding a few bits and pieces but I'm not going all out on this one - just personalising the basic kit a little. All the mods here are eyeballed from reference pics, so the dimensions aren't necessarily accurate, but they look close enough to me. 

Some basic prep work:
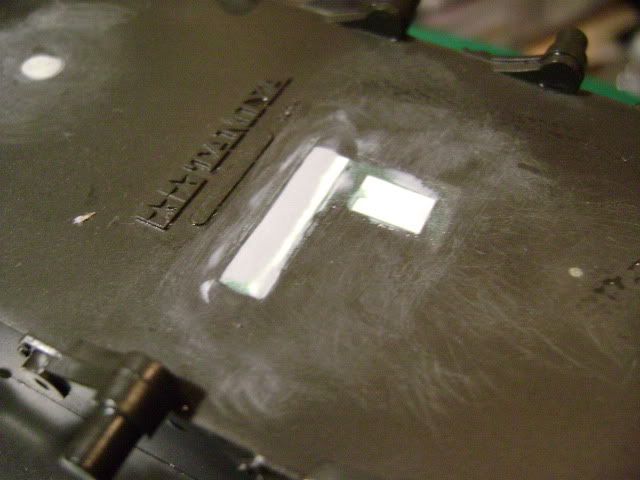
Filling holes:

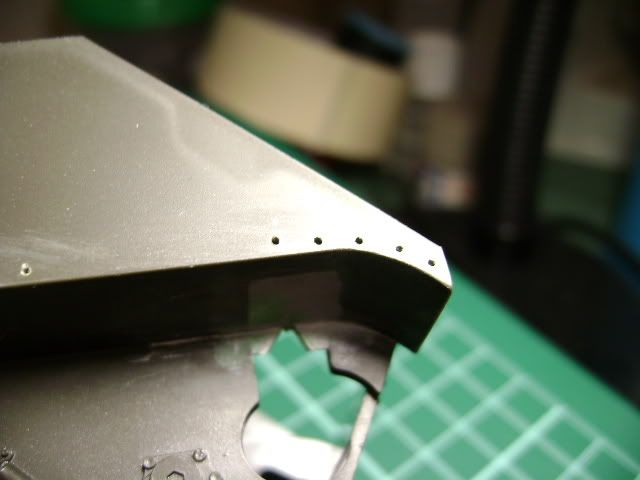
Drilling holes: All the photos I've seen of the Beasts show them without the side skirts, so the bolt holes needed to be drilled.

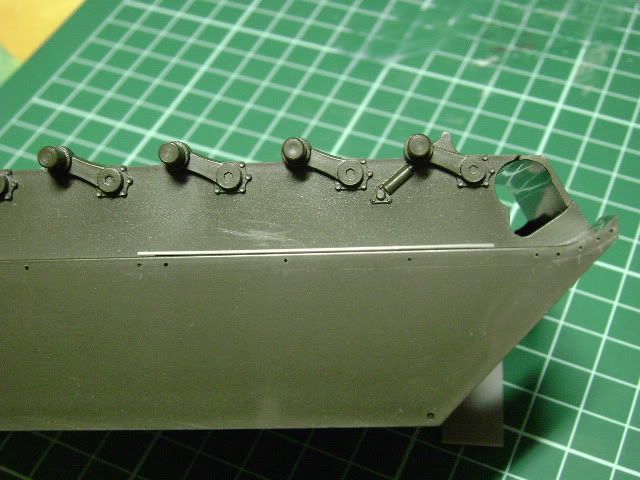
All Australian M113 variants have add-on armour plating under the sponsons. With the skirts off, these are visible as a thin strip above the first three road wheels.

But before this can happen, these moulded ribs, for the locating stubs on the skirts, have to go:

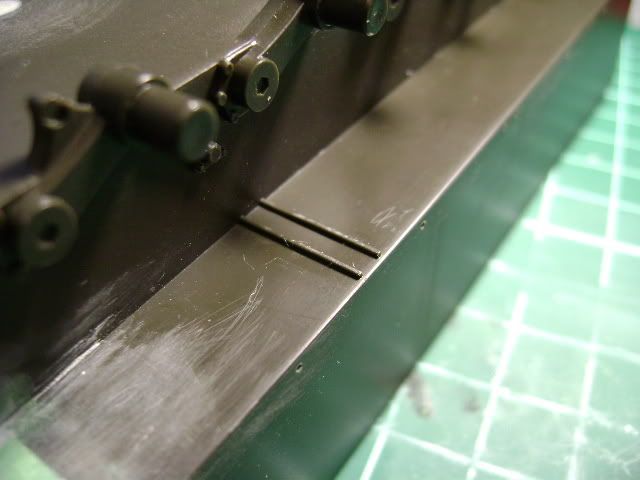
This is where they go (not glued in place yet)

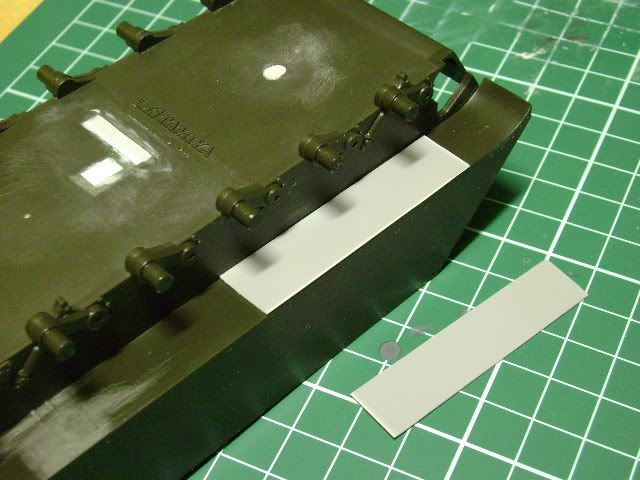
And this is how they will appear from the side:

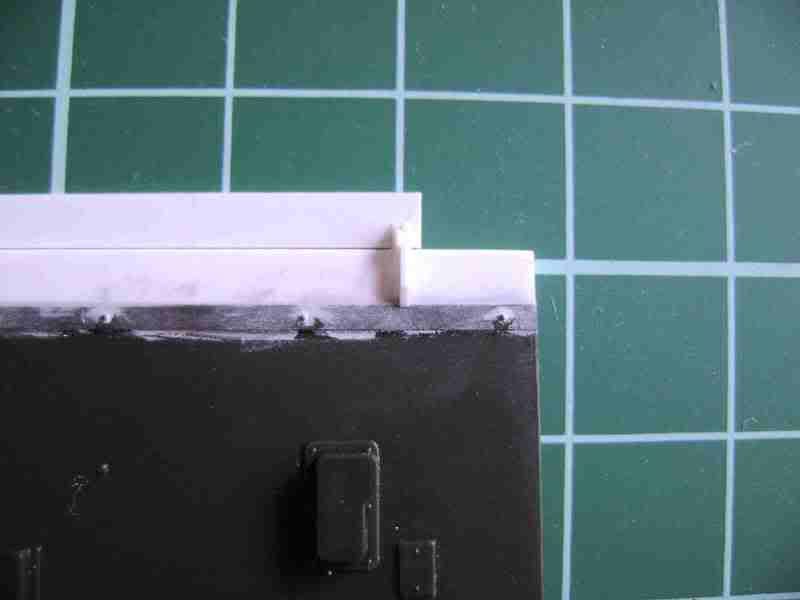
The trim vane on all the older Tamiya M113 variants is too shallow for anything other than the original M113, so it needs an extension using strip styrene. The shorter strip above it is an additional folding extension unique to the Beast. This is shorter because it has to clear the headlight clusters. The tiny white pieces between the two strips are the hinges.

Trim vane assembled (extension flap in place but not glued yet):

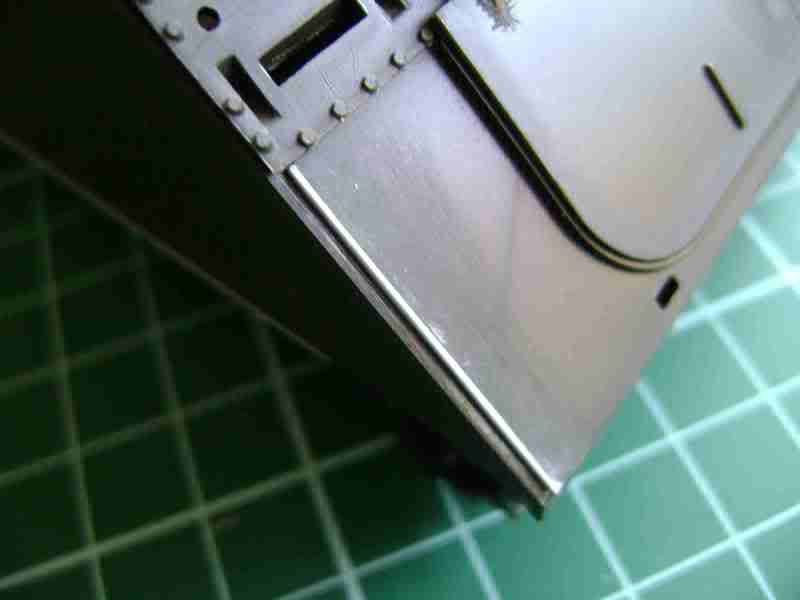
There was a sizeable gap along edges of the front hull panel. This was shimmed using a strip of Evergreen, which filled the gap nicely.

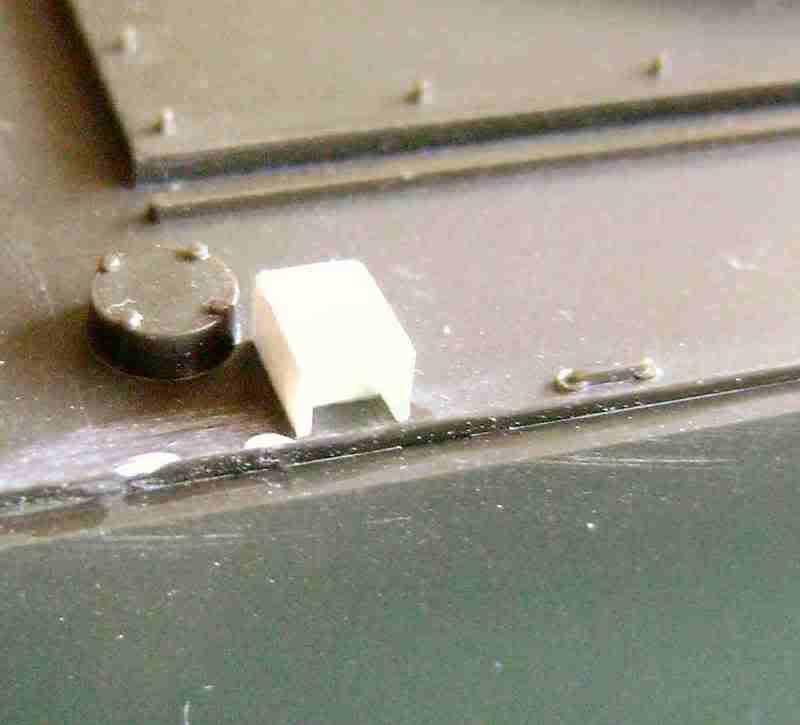
Added a small box for the external fire extinguisher handle to the upper hull.

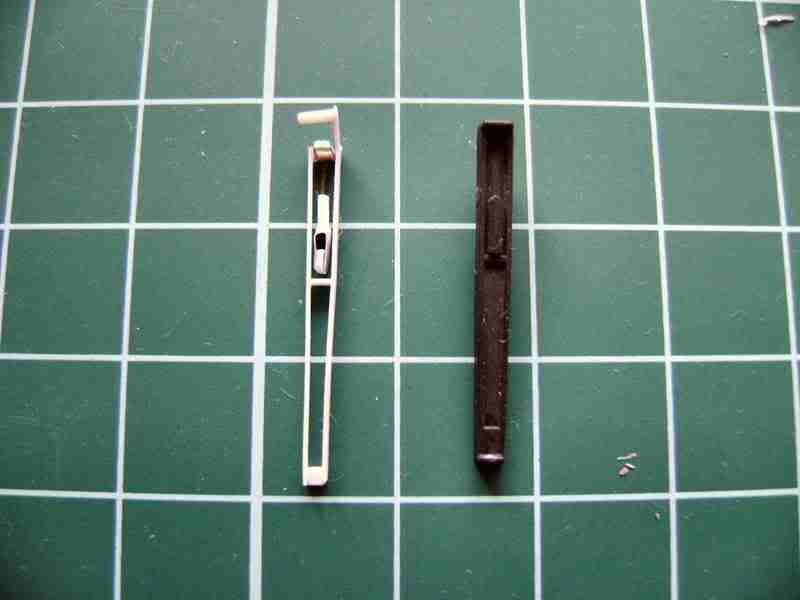
The trim vane lever in the kit is little more than a solid stick. I scratched a replacement using Evergreen strip, stretched sprue and tiny bits of metal foil. Only the top end will be visible when the kit is completed.

Thats about all I've done for now.

  • Member since
    July 2006
  • From: New Jersey
Posted by redleg12 on Saturday, July 12, 2008 10:28 AM

Very nice work. love the scratch detailing. Looking good so far/

Rounds Complete!!

"The Moral High Ground....A Great Place to Emplace Artillery."

mmc
  • Member since
    February 2007
  • From: Newcastle upon Tyne, England
Posted by mmc on Saturday, July 12, 2008 11:16 AM

Hello all, finally made a start on Revell's Puma in 1/76. This is one of the few old Matchbox kits I didn't build when I was a teen, when they cost me 99p instead of nearly £4!!

This is my first WIP, so I hope it's up to the standard of all the rest.

First of all, the box and contents. One of the first things I noticed was how small the contents are, since getting back into the hobby if stuck to 1/35, so 1/76 is going to be an interesting challenge.

[/img]

[/img] 

The first 3 stages deal with the turret, including a moveable main gun and 2 very small smoke dispensers. The fit and finish isn't too bad, so I'm hoping to get away without filling any gaps, as I havn't done that yet.

[/img] 

The next stage is the construction of the main body and attaching the side panels. This took 2 attempts as the fit is a bit dodgy, one thing I have noticed is that the plastic is very soft so care has to be taken when sanding off any excess. I also added the suspension to the body as I want to paint them before I add the wheels.

[/img]

The last stage for today is the wheels, these consist of 3 parts, hub, tyre and axle. The hub is glued to the axle allowing the tyre's to move.

[/img] 

Thats all for now, will post another update soon.

Look forward to hearing your comments, please be niceAngel [angel]

Mark 

  • Member since
    March 2007
  • From: NJ
Posted by JMart on Saturday, July 12, 2008 1:44 PM

Panther F - good start.. that IS an old kit, I almost forgot that type of plastic! :)  I read somewhere to make sure to wash the trcks with soapy water, gets rid of some of the old plastic/organic goo. (very scientific term)

bufflehead - cheers mate! and yes, Michaels is your friend! :) Im there a lot more often than my wife lol  not to mention those 50% off coupons! Last month they had an assortemnt of neumann oil tubes on half price.

Phil_H - nice work on your M113! I have that omne in the stash, will keep track of your progress and take notes oin the scratchbuilding

mmc - nice start onthe Puma.. looks like the tires/tyres have a nasty mold seam line down the middle..will be a pain to sand! loooking forward to the rest


  • Member since
    July 2006
  • From: New Jersey
Posted by redleg12 on Saturday, July 12, 2008 2:46 PM

mmc - What are you worried about, we are always gentle. For your first WIP, your doing great. As for the seams, the older kits are always a seam problem. Take your time and all will be well. Looking forward to your next update.

jmart - Michaels is your friend....many times its better than an LHS. I'm in there so much, my daughter now buys me gift cards from there for different holidays. Coupons great, sales great. Yes, I too am in there way more than my wife. If she starts getting Home Depot gift cards, we are in big trouble...LOL

Rounds Complete!!

"The Moral High Ground....A Great Place to Emplace Artillery."

mmc
  • Member since
    February 2007
  • From: Newcastle upon Tyne, England
Posted by mmc on Sunday, July 13, 2008 12:37 PM

Hello all. Just a quick update on the luvverly Puma.

First of all can I say thanks for the encouragment, it means a lotMake a Toast [#toast]

Well all the construction is done, including a number of tiny tools, the only thing that is missing is the headlights. One dissappeared into the carpet and the other snapped in two, still I'm proud I managed to build the kit in more or less one piece.

[/img]

[/img]

One of the good things about the old Matchbox kits was the fact they came complete with a mini dio scene, and the Puma is no exception. The scene is a street with road and pavement, along with a street light and 3 figures.

[/img] 

[/img]

JMart you weren't kidding about the mold seam on the wheels, what a pain in the a**e, the more I sanded the more the tread came off, hopefully they will look ok once they are painted and attached to the body. I've given the wheels one coat of Mr Hobby Tire Black, but another coat will be needed. Since I don't own a airbrush I will be painting by hand, and I will be using the Lifecolour German Tank Camo set 1 and Vallejo Model colour paints.

[/img]

Thats all for now. Thanks again for all the support.

Mark 

  • Member since
    March 2007
  • From: NJ
Posted by JMart on Friday, July 18, 2008 4:36 PM

Mark - looks good! I forgot about the "dio in a box", seems like a good one!

you are missing the lens part itself? (of the headlights) or the headlight itself? You can replicate the 'lens" by painting the inner headlight silver, followed by some clear glue and topped off with Future (Klear on your side of the pond).

I hand paint/brush a lot, since my AB booth is in an unheated garage attachment, not too bad as long as I remember to still thin the paint and do a few layers/coats.

Cheers!


mmc
  • Member since
    February 2007
  • From: Newcastle upon Tyne, England
Posted by mmc on Saturday, July 19, 2008 4:23 AM

Hello all, got a long weekend off work so going to crack on and get the Puma finished.

Hi JMart, the head lights we're all one unit but so small and the molding was awful. It's a shame they aren't on, hope they don't spoil the finish to much. I used to love the old Matchbox kits for the exact reason of the "Dio in a box", after this one I might do a few more.

I've given the Puma 3 coats of Dunkelgelb from the Lifecolour set. I thinned the paint down with water and the results are good, you can use Lifecolour thinner also, other thinner's aren't recommended.

[/img]

[/img]

[/img]

Next up is the camo which if I'm honest is the part I'm not looking forward to, so any tips will be more than welcome.

Mark 


  • Member since
    August 2007
  • From: The Plains of Kansas
Posted by doc-hm3 on Saturday, July 19, 2008 1:37 PM
 Looks like there's some progress going on. Well I'm on the home stretch with my pak40. Just glosscoated her today and will apply some filters and pinwashes tommorow., but heres a couple of pic's for now.See you all in a few days with a sitrep.

All gave some and some gave all.

  • Member since
    July 2006
  • From: New Jersey
Posted by redleg12 on Sunday, July 20, 2008 1:21 PM

MMC - Very nice. Coming along and what a great kit, it comes with a dio base.

Doc- See you did not need a compass and map to get here!!

The Pak 40 is moving well. Looks like a shovel on the front. I presume that detail is next.

Now that you know your way...I'll see you soon

Here in my vintage observation bunker.

Rounds Complete!!

"The Moral High Ground....A Great Place to Emplace Artillery."

  • Member since
    August 2007
  • From: The Plains of Kansas
Posted by doc-hm3 on Sunday, July 20, 2008 5:16 PM

 Tamiya kit no. MM146 Finished and reporting for duty SIR!

  http://i61.photobucket.com/albums/h50/CharlieinKansas/P1010062-2.jpghttp://i61.photobucket.com/albums/h50/CharlieinKansas/P1010062-2.jpg

 I'm getting hooked on this building thing again... I'd better go mow the lawn or do something like clean out the garage. I'm afraid I've got a plastic monkee on my back!


All gave some and some gave all.

  • Member since
    July 2006
  • From: New Jersey
Posted by redleg12 on Sunday, July 20, 2008 5:57 PM

Doc - Very nice. Great job on the weathering, nice shovel on the front. Good job with the breech, the internal should be shiny and clean. A qualified winner for the Vintage GB.

I would post some pics on the armor side and let some of the "Germaholics" give you their praise & review.

As far as having the bug....I started modeling again 4 years ago (after a 30 year break) with one kit and a folding table. Now I have my own studio with my bench, storage shelves for the stash, paint booth, desk, etc, etc. I love it. It helps that my wife supports my hobby so it feels great to build. The force is strong in the armor world!!

Rounds Complete!!

"The Moral High Ground....A Great Place to Emplace Artillery."

mmc
  • Member since
    February 2007
  • From: Newcastle upon Tyne, England
Posted by mmc on Monday, July 21, 2008 5:15 AM
Fantastic Pak 40 doc. Hope my 6 pounder comes out half as good.
JOIN OUR COMMUNITY!

Our community is FREE to join. To participate you must either login or register for an account.

SEARCH FORUMS
FREE NEWSLETTER
By signing up you may also receive reader surveys and occasional special offers. We do not sell, rent or trade our email lists. View our Privacy Policy.