SEARCH FINESCALE.COM

Enter keywords or a search phrase below:

Prototype GB All Era's

45698 views
306 replies
1 rating 2 rating 3 rating 4 rating 5 rating
  • Member since
    January 2009
  • From: Algonquin, IL
Posted by model geek on Monday, May 11, 2009 8:37 PM

MG,

It's been almost 2 weeks since I've touched the HE-100Sad [:(]. Like many other companies these days the same amount of work or more and less people to do it. Even doing work from homeSoapBox [soapbox]. I know, be happy I'm still gainfully employeed even if it's a lower salary, fewer benefits, blah, blah, blah.

OK, enough venting. At least I get a few minutes to log on and see what everyone's doing! Hopefully I can set aside some time this weekend to do some more work. I'm really anxious to do the major assembly and painting.

Till then, keep modeling!

Tom  


  • Member since
    December 2007
  • From: Bridgeview, Illinois
Posted by mg.mikael on Monday, May 11, 2009 9:12 PM

spiralcity- Thanks for the comments!Smile [:)]

model geek- Well glad to hear you still have a job.(My father lost his job almost a year and a half ago, and the company screwed him over. He lost about a half a million dollars of stock he had in the company, and now he can't think of retirement, he's gotta find a job.Sad [:(]) Anyways, sorry for the downer of a story, lookin' forward to seeing some progress! 

"A good plan executed now is better than a perfect plan next week." - George S. Patton

  Photobucket 

  • Member since
    April 2008
  • From: Fox Lake, Il., USA
Posted by spiralcity on Tuesday, May 12, 2009 12:00 AM
 model geek wrote:

MG,

It's been almost 2 weeks since I've touched the HE-100Sad [:(]. Like many other companies these days the same amount of work or more and less people to do it. Even doing work from homeSoapBox [soapbox]. I know, be happy I'm still gainfully employeed even if it's a lower salary, fewer benefits, blah, blah, blah.

OK, enough venting. At least I get a few minutes to log on and see what everyone's doing! Hopefully I can set aside some time this weekend to do some more work. I'm really anxious to do the major assembly and painting.

Till then, keep modeling!

Hey model geek,

We just went through a rolling lay-off at my shop ! I was working in the energy field, they held out at long as they could. Times are VERY hard.

Not much work available for machinist right now!!! Black Eye [B)]


  • Member since
    January 2009
  • From: Algonquin, IL
Posted by model geek on Wednesday, May 13, 2009 7:57 PM

MG, Sprialcity,

Sorry to get off topic the other night, it was just one of those days.

MG, sorry to hear about your dad. What industry was he in?

Sprialcity, I know where your coming from. I've been in the mfg industry for 20 years.

Anyway, like I said the other night hope to do some more work this weekend and post some WIP pics.


Tom  


  • Member since
    December 2007
  • From: Bridgeview, Illinois
Posted by mg.mikael on Wednesday, May 13, 2009 11:41 PM
 model geek wrote:

MG, Sprialcity,

Sorry to get off topic the other night, it was just one of those days.

MG, sorry to hear about your dad. What industry was he in?

Sprialcity, I know where your coming from. I've been in the mfg industry for 20 years.

Anyway, like I said the other night hope to do some more work this weekend and post some WIP pics.


My dad used to be a computer technician for United Airlines. Now he's trying to get a government job aka technican at the Post Office, but those governement jobs are hard to get.

"A good plan executed now is better than a perfect plan next week." - George S. Patton

  Photobucket 

  • Member since
    December 2007
  • From: Bridgeview, Illinois
Posted by mg.mikael on Thursday, May 21, 2009 1:27 PM
Sorry about the lack of updates, I've sorta been put off by all the work I've got to do on the axle. Thus, because I got lazy it's been sittin' to the side of my bench for a week or so. Though I will try to get some work done on the multiplane later today(or tommorrow.)Wink [;)]

"A good plan executed now is better than a perfect plan next week." - George S. Patton

  Photobucket 

  • Member since
    December 2007
  • From: Bridgeview, Illinois
Posted by mg.mikael on Tuesday, June 2, 2009 5:20 PM

Yeah I know it's been awhile since I got any updates up. Probably because I got lazy and kept putting the work off. Though I finally, yes finally did some work on my multiplane today.Big Smile [:D]

I glued on the supports that hold the rear axle to the frame, along with connecting the axle to the supports. It took a bit longer then expected, since I had to do constant measuring with a ruler to make sure the support brackets weren't too close, not too far, but just right. That so the height of the wheels(later put on) is at the key amount. Also had to use a level to ensure the axle wasn't sagging to far to one side(which could later give the build a lopsided view.)

As for what glue I used, I couldn't use the standard glue that bonds stryene. So I first applied a little Elmer's Nano Glue, (basically Gorilla Glue), to the ends of the support brackets where it would be touching the wood. Then I took some Krazy glue and applied a tad over the Nano Glue. The Nano glue has almost a 4 hour setting timeShock [:O], so I needed something to bond it quick to make sure it wouldn't move when setting. I then reapeated this process when connecting the axle itself to the supports.

I also started work on the front wheel. I already have an axle for it(using the clear green Lego rod I used for the supports on the rear axle.)  I also made the parts where the supports will touch on the axle. To make these parts, I simply took a piece of sprue and cut it. Then made another cut to get a small piece that sorta looks like a pancake. Taking that piece I drilled it out to fit the axle aka clear lego. Just be sure not to drill to quickly or you'll crack the fragile piece.

Thanks for looking!Smile [:)]


"A good plan executed now is better than a perfect plan next week." - George S. Patton

  Photobucket 

  • Member since
    January 2009
  • From: Algonquin, IL
Posted by model geek on Sunday, June 7, 2009 3:54 PM

mg,

That's definitely some precision work your doing. I find that even with instructions I'll sometimes take a couple of days just to think through the process of how I'm going to accomplish a task I've not performed before. So building from scratch as your are I can see why there may be some time between posts.

Keep at it, it's going to be a unique contribution to the forum and collection when finished.

I too have not posted in awhile but have been slowing working on the HE-100D. Here's an update.

Cockpit finished with PE seat belts provided with the kit.

Cockpit side walls with a few PE details also provided with the kit and a wash to help enhance the few details.

Wings and fuselage assembled.

Most of the seam filling is complete. I need to rescribe some panel lines (ordered a 1/48 Verlinden scribing template which will hopefully be here tomorrow). A few more small parts to add and then on to paint.

Thanks for looking. Comments and suggestions welcome.


Tom  


  • Member since
    December 2007
  • From: Bridgeview, Illinois
Posted by mg.mikael on Sunday, June 7, 2009 7:42 PM
Thanks for the comments, model geek!Smile [:)] You're HE-100D is really starting to come together. Especially love the PE seat belts, they look fantastic(really add alot of detail)!!Thumbs Up [tup]

"A good plan executed now is better than a perfect plan next week." - George S. Patton

  Photobucket 

  • Member since
    April 2008
  • From: Fox Lake, Il., USA
Posted by spiralcity on Monday, June 8, 2009 1:45 AM

Hey,

I'm glad to see everyone is moving along.

Looks like a lot of good work... Smile [:)]

I havent been at the bench in some time. I'll see what I can do over the week.


  • Member since
    January 2009
  • From: Algonquin, IL
Posted by model geek on Saturday, June 27, 2009 11:23 AM

Hello everyone,

Summertime has finally arrived in Chicago, straight from cool and rainy to 100+ heat indexs! I'm not complaining, been waiting for warm weather for months. I imagine everyone is busy outdoors or on vacations.

I however have made some progress on my HE-100. So here's the update.

1) I decided to make my first attempt at preshading panel lines. The first 2 pictures are the preshaded lines done with RLM66 Schwargrua.

2) The underside is painted RLM 65 Hellblau lighten with about 25% white. I should have listened to my 15 year old's advise and forgone the last coat as it pretty well covered the preshaded areas. Oh well, live and learn.

3) The top side is done in a splinter camo of RLM70 Schwargrun and RLM71 Dunkel Grun both lightened with approximately 25% flat white. I think I did a better job on the RLM71 as far as the preshading is concerned. The RLM70 is so dark it completely covers the preshaded areas.

Hope to do a gloss coat, decals, a wash, and maybe final assembly this weekend.

Thanks for looking. As always comments and suggestions welcome.

Tom  


  • Member since
    April 2008
  • From: Fox Lake, Il., USA
Posted by spiralcity on Saturday, June 27, 2009 8:57 PM

Hey, the kit is moving along very nice. Smile [:)]

I havent touched a thing in some time now. We jaust had our daughter graduate, so it's been an interesting start to the summer.


  • Member since
    December 2007
  • From: Bridgeview, Illinois
Posted by mg.mikael on Saturday, June 27, 2009 9:41 PM

model geek- Sweet looking splinter camo!Thumbs Up [tup] Wish my build was moving along as fast as yours. But mine had sorta stalled since I ran into some problems with the wheels, plus I'm trying to finish another build so my multiplane has sorta been on the back burner lately.

spiralcity- Congrats on your daughter's graduation!Party [party] So was it from college or high school?(if you don't mind me asking.)

"A good plan executed now is better than a perfect plan next week." - George S. Patton

  Photobucket 

  • Member since
    January 2009
  • From: Algonquin, IL
Posted by model geek on Saturday, June 27, 2009 10:59 PM

Spiralcity,

Thanks and congrats to your daughter!

Mg,

Thanks. As for the multiplane I'm sure your subconscious will come up with a solution while your away from it for a while. That's how it usually works for me anyway.

On a different subject I attended my first IPMS meeting yesterday. The meeting was hosted by Minicraft Models in Elgin IL. It was a very interesting evening. I also scored a 1/35 Dragon Jadgpanther Smart Kit for $5.00 worth of raffle tickets!!! My 15 year old is drooling over the box.

Tom  


  • Member since
    April 2008
  • From: Fox Lake, Il., USA
Posted by spiralcity on Sunday, June 28, 2009 12:56 PM

Hi guys,

My daughter graduated from high school. Now she needs to decide on what college she will attend. I believe she's leaning towards DePaul University here in Chicago.

I hope to see some more progress pics. Smile [:)]

I'll do what I can to add a few pics of my kit very soon, HOPEFULLY... Whistling [:-^]


  • Member since
    December 2007
  • From: Bridgeview, Illinois
Posted by mg.mikael on Sunday, June 28, 2009 2:02 PM

model geek- Sounds like you got a fantastic score on a Dragon Jadgpanther. I'm soooooo jealous.Wink [;)]

spiralcity- Lookin' forward to your next update!Smile [:)] Yikes, tell your daughter to make a decision on the college quickly or the classes she'll want to take will fill up.(but that sorta depends upon the major)

"A good plan executed now is better than a perfect plan next week." - George S. Patton

  Photobucket 

  • Member since
    April 2008
  • From: Fox Lake, Il., USA
Posted by spiralcity on Sunday, June 28, 2009 6:49 PM
 mg.mikael wrote:

model geek- Sounds like you got a fantastic score on a Dragon Jadgpanther. I'm soooooo jealous.Wink [;)]

spiralcity- Lookin' forward to your next update!Smile [:)] Yikes, tell your daughter to make a decision on the college quickly or the classes she'll want to take will fill up.(but that sorta depends upon the major)

No rush on the college, she's taking a year off. She claims she needs to relax... Whistling [:-^] LOL


  • Member since
    December 2007
  • From: Bridgeview, Illinois
Posted by mg.mikael on Sunday, June 28, 2009 10:03 PM
 spiralcity wrote:
 mg.mikael wrote:

model geek- Sounds like you got a fantastic score on a Dragon Jadgpanther. I'm soooooo jealous.Wink [;)]

spiralcity- Lookin' forward to your next update!Smile [:)] Yikes, tell your daughter to make a decision on the college quickly or the classes she'll want to take will fill up.(but that sorta depends upon the major)

No rush on the college, she's taking a year off. She claims she needs to relax... Whistling [:-^] LOL

Wait, hold up.....what?  Year off from school, and she just graduated high school, that's just plain strange if you ask me.(I myself just graduated from high-school this year, and let's just say taking a year off is just plain impossible. I gotta get to college, graduate with the major I want, then move out as soon as possible.Wink [;)]

"A good plan executed now is better than a perfect plan next week." - George S. Patton

  Photobucket 

  • Member since
    December 2007
  • From: Bridgeview, Illinois
Posted by mg.mikael on Thursday, July 9, 2009 3:23 PM

Sorta been awhile since my last update, but I didn't really have that much to show for. I had started on the wheels almost a month ago, with this plan to make the tires out of rubber washers. This entitled cutting them to size, trimming the width, and inverting them......long story short this never really panned out.Dunce [D)] So only today, did I scrap that plan and moved on to a new one.

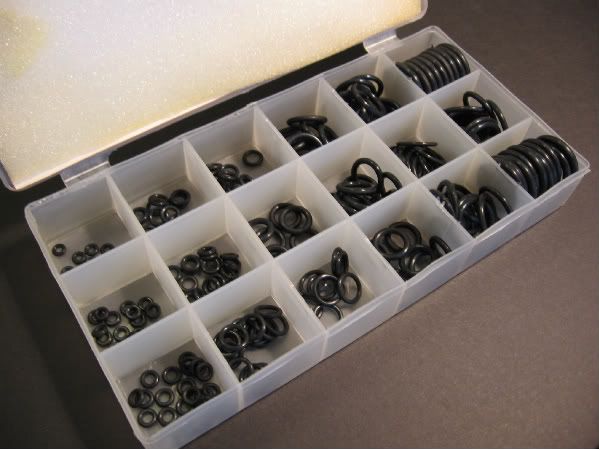
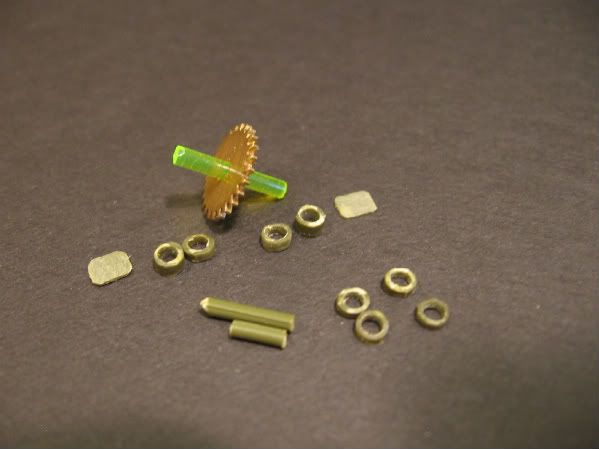
I finally went to the basement and got the o-rings out and to my amazement their was a size that was pretty much perfect for the gears.Shock [:O]  I had thought about using o-rings orginally, but I didn't think I had any the right size....d'oh. So a month later of useless work, I finally got the wheels near completion.

O-rings come in many different sizes, and the set I have has about 225 pieces, with sizes all under an inch. So if you're looking for a specific size, you'll more then likely find it.

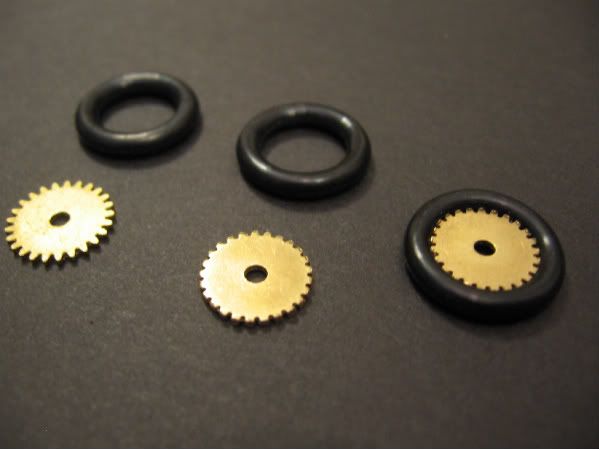
 After finding the closest size to fitting my gears, I did some test fitting. This helped me figure out that the gears would have to be slighty smaller to fit inside the o-ring. Thus I got out the industrial files and started shaving down the brass teeth of the gear. I didn't shave the teeth flush off, since the o-ring wouldn't have a nice tight fit.

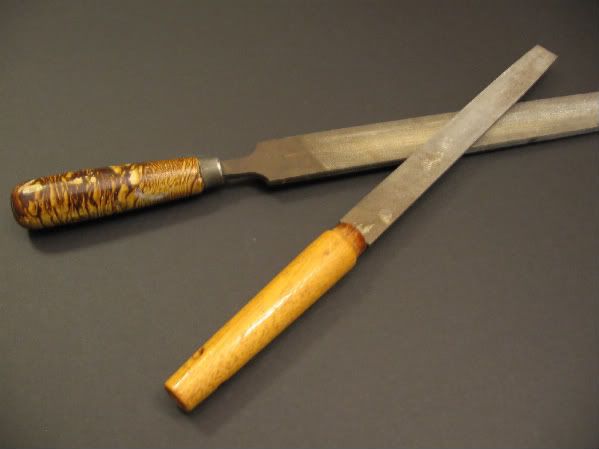
As for the files, any grit/groove is fine. However you'll want to use the ones with much bigger grits/grooves, that way it doesn't take you forever to shave down the teeth.

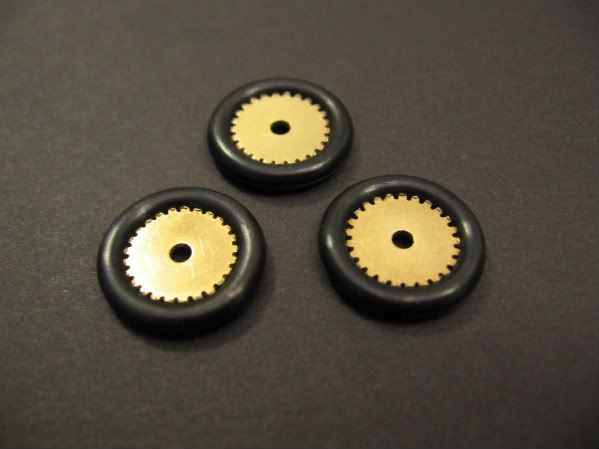
Then after the shaving down of the gear teeth, I slipped the o-rings around the gear. Thus making a wheel(even if it is a bit crude.) Now I have to actually glue the o-rings to the gear, which I have to do later today.

As for the axle supports, I've finished drilling out all the styrene and collecting all the pieces I need. Thus I can soon get to putting together the front axle, and putting on all three wheels.

Thanks for looking!Smile [:)]

"A good plan executed now is better than a perfect plan next week." - George S. Patton

  Photobucket 

  • Member since
    January 2009
  • From: Algonquin, IL
Posted by model geek on Friday, July 10, 2009 3:46 PM

MG,

Very good idea using the o-rings. Look forward to the update.

The HE-100 is nearly finished. However the end of the build has been painfully slow. I will detail some of the problems I encounter at the end of this build with this short run kit.


Tom  


  • Member since
    December 2007
  • From: Bridgeview, Illinois
Posted by mg.mikael on Friday, July 10, 2009 4:46 PM
 model geek wrote:

MG,

Very good idea using the o-rings. Look forward to the update.

The HE-100 is nearly finished. However the end of the build has been painfully slow. I will detail some of the problems I encounter at the end of this build with this short run kit.


Thanks for the comments! Sorry to hear about the problems on your end, but I'm still lookin' forward to the HE-100 finished pics, model geek!

"A good plan executed now is better than a perfect plan next week." - George S. Patton

  Photobucket 

  • Member since
    January 2009
  • From: Algonquin, IL
Posted by model geek on Sunday, July 19, 2009 10:08 PM

I'm calling the HE-100 finished!!!

The shortcomings of the short run kit became apparent at the end of this build. The 3 piece canopy I planned to use so the cockpit could be viewed did not fit. So I ended up using the one piece which fit slightly better. Other than the wheels the rest of the landing gear was poorly molded and difficult to assembe. And then there was the stupid mistake of dipping a wing tip in super glue (I did a separate post on this and I am relieved to see I'm not the only person who suffers this affliction. We should give it a nameSmile,Wink, & Grin [swg])

Anyway I'm very happy with the results. Here's the finished pics.

Thanks for looking.


Tom  


  • Member since
    April 2008
  • From: Fox Lake, Il., USA
Posted by spiralcity on Monday, July 20, 2009 1:28 PM
 model geek wrote:

I'm calling the HE-100 finished!!!

The shortcomings of the short run kit became apparent at the end of this build. The 3 piece canopy I planned to use so the cockpit could be viewed did not fit. So I ended up using the one piece which fit slightly better. Other than the wheels the rest of the landing gear was poorly molded and difficult to assembe. And then there was the stupid mistake of dipping a wing tip in super glue (I did a separate post on this and I am relieved to see I'm not the only person who suffers this affliction. We should give it a nameSmile,Wink, & Grin [swg])

Anyway I'm very happy with the results. Here's the finished pics.

Thanks for looking.


Very nice work!

She looks sweet and clean. Smile [:)] Make a Toast [#toast]


  • Member since
    December 2007
  • From: Bridgeview, Illinois
Posted by mg.mikael on Monday, July 20, 2009 1:58 PM
She's a beauty, model geek!Bow [bow] The decals look fantastic, and I love the overall clean look of your HE-100. An all-around superb build.

"A good plan executed now is better than a perfect plan next week." - George S. Patton

  Photobucket 

  • Member since
    January 2009
  • From: Algonquin, IL
Posted by model geek on Monday, July 20, 2009 9:29 PM

Sprialcity, MG,

Thanks for looking and the compliments.

Tom  


  • Member since
    December 2007
  • From: Bridgeview, Illinois
Posted by mg.mikael on Wednesday, July 22, 2009 9:37 PM
Look for an update some time tomorrow. I just got the wheels completely finished!!!! Yah hooo!Propeller [8-] By that I mean all three wheels are painted(along with the support truss), and all three are permanetly on. That means I can finally move onto either the boiler or the entire wing frame.....decisions, descisions.Big Smile [:D]

"A good plan executed now is better than a perfect plan next week." - George S. Patton

  Photobucket 

  • Member since
    December 2007
  • From: Bridgeview, Illinois
Posted by mg.mikael on Thursday, July 23, 2009 12:42 PM

Alright, here's that update I promised.Big Smile [:D] Got all three wheels completley finished up, thus now construction moves to parts above the main frame. The axles are painted a mix of black and steel. The support truss is simply Floquil Weathered Black. Oh and if you're wondering the wheels don't move, sorry to dissapoint(would have been to much extra stress on the lone front wheel support.)

Yep, those wheels look nothing like those gears anymore. I applied a layer of nano glue all over the gears surface(including the sides of where it's not touching the o-ring. After that dried, I ran into a small problem. The glue expands(bubbles up) where ever theirs moisture. It must have not been dry or something because in a few areas the glue bubbled up.Dunce [D)] So to resolve the problem, I took good-ole Elmer's glue and filled in the hub area to make it a nice smooth surface(had to use a good amount.) After all that dried I painted the hub ModelMaster Neutral Gray, the wheels Floquil weathered black, and finally took an extra fine sharpie to the area between the hub and wheel.

With the wheels painted I could finally attach them. I took a few hours and did some dry-fitting. For the rear axle, I then dabbled on some nano glue to the axle tips and put on one of those black pieces I drilled out, then the wheel, and then the other black cap piece.(I added those small black painted pieces inorder to ensure the wheel doesn't go crooked.) For the lone front wheel the process was pretty much the same, except alot of adjustments had to be done when the glue was drying.

Thanks for looking.Smile [:)] Might move onto the boiler next, since I have a few ideas for what I can use.

"A good plan executed now is better than a perfect plan next week." - George S. Patton

  Photobucket 

  • Member since
    December 2007
  • From: Bridgeview, Illinois
Posted by mg.mikael on Thursday, July 30, 2009 1:12 PM

I finally got started with the engine/boiler, that meant scavenging for parts. Luckily, I had a few ideas in my head for what I was planning to use so that saved some time. Plus I found some parts I thought I would have to make myself, so that was a real time saver.

Here's a pic of all the random parts I gathered so far. It doesn't look like much now, but in due time it will start to look like something.Wink [;)] The oil barrel (in pieces) you see there(from Tamiya's 1/35 Jerry can Set) will be made into the boiler itself. The two white Lego pieces that are slightly cuved like bowls, will be the end pieces of the boiler. The flat green piece of styrene you see there(which came from my 1/35 Zvezda scout car, it was orginally the armored radiator slats) will be going to make a top plate on the boiler(where the piston rods come through.) Finally the tie-tag you see there(came from one of those Christmas toys that is impossible to open) will be used to make the exhaust pipe. Since it has the metal in it, it easily keeps it shape, thus perfect for making it curve the way I want.

I sanded off all the markings/ridges that make the oil barrel look like an oil barrel. Thus creating something that looks more like a boiler instead. Then I took the two lego pieces and cut/sanded off all the placement bumps so they lay perfectly flat.

Then it's just a simple action of attaching them to the former oil barrel. Thus creating a simple boiler that still has curved ends and detail. Note: the end pieces aren't permanetly on since I still have to do some drilling and etc.

Finally a list I made for myself, so I still know what I have left to do just on the steam engine. As you can see I still have a lot of drilling, sanding, modifying, and scavenging ahead of me. Though at least I found some rivets in a stash kit that look perfect, so I'll save some time there.Big Smile [:D]

Thanks for looking.Smile [:)]

"A good plan executed now is better than a perfect plan next week." - George S. Patton

  Photobucket 

  • Member since
    April 2008
  • From: Fox Lake, Il., USA
Posted by spiralcity on Thursday, July 30, 2009 10:13 PM

Excellent !

Looks like your making some headway. Make a Toast [#toast]


  • Member since
    December 2007
  • From: Bridgeview, Illinois
Posted by mg.mikael on Friday, July 31, 2009 11:42 AM
 spiralcity wrote:

Excellent !

Looks like your making some headway. Make a Toast [#toast]

Thanks, I guess I'm finally in the groove or something. Hopefully this mometum won't wear off.Wink [;)]

"A good plan executed now is better than a perfect plan next week." - George S. Patton

  Photobucket 

JOIN OUR COMMUNITY!

Our community is FREE to join. To participate you must either login or register for an account.

SEARCH FORUMS
FREE NEWSLETTER
By signing up you may also receive reader surveys and occasional special offers. We do not sell, rent or trade our email lists. View our Privacy Policy.