SEARCH FINESCALE.COM

Enter keywords or a search phrase below:

1/6th scale RC Sherman VC Firefly Project

2496 views
9 replies
1 rating 2 rating 3 rating 4 rating 5 rating
  • Member since
    April 2005
1/6th scale RC Sherman VC Firefly Project
Posted by armourguy on Tuesday, November 3, 2015 10:03 PM

Hi Guys, Since I completed the Late Tiger I, I turned my attention to another 1/6th scale commission build, this project being a British VC Firefly. For the Base model I will be using the Firefly VC kit from Armortek. 


This kit is the same starter kit that I used on the recently completed US Army M4A4 sherman. Unlike that build in which the model was backdated, this build we be as of the kit intended British 17pounder VC Firefly.  


The Being an armortek the kit contents are all scale thickness metal plates and are all bolt together assembly, 


Aside from the 75mm US backdating, this model will be receiving all same mods and details that went into the last a4 build... This includes reworked 3 peice transmission cover, lower hull details, reworked Idler mounts, final drives, and rear hull area. Cast texturing was added to the appropriate locations along with the weld beads 


Like with my other armortek builds I deburred and fully lubricated the final drive gears prior to installation.


all surfaces have been primed and the interior was also prepainted in white. 


more pics were posted on the ECA Facebook page, 

https://www.facebook.com/EastCoastArmory/


and a project start video was uploaded to youtube, where I go into more detail on what mods and changes were made


https://youtu.be/FSBAC5DqjpE


Currently I'm working on reworking the VVSS suspension and will be adding some other lower hull details that were specific to Brit versions of the sherman... More to come!

  • Member since
    July 2014
Posted by modelcrazy on Tuesday, November 3, 2015 10:42 PM

Very cool, I'll be watching. I see armor isn't the only RC you are into.

Steve

Building a kit from your stash is like cutting a head off a Hydra, two more take it's place.


http://www.spamodeler.com/forum/

  • Member since
    November 2009
  • From: SW Virginia
Posted by Gamera on Wednesday, November 4, 2015 7:17 AM

Yes, very cool!!! Takes me forever to just finish a 1/35th scale vehicle! 

"I dream in fire but work in clay." -Arthur Machen


  • Member since
    April 2005
Posted by armourguy on Monday, February 20, 2017 12:16 AM

Thanks guys, It has felt like eons since I posted an update and it looks like the project start pics have all expired (thanks facebook)>:( . I'm happy to say that for the last three months this build has been my primary focus and will be worked on until completion. Currently the model is over 55% complete and everyday is chugging closer to the finish line, 

Since the last post the tank is running, sealed up, and is being detailed. Currently most of the hull details have been completed along with many new firefly specific parts


On the tank's rear section all of the exhaust details, grills, and tow hitch equipment was fabricated / mounted


The rear doors started off as the armortek kit supplied units and were reworked. For added detail an armorpax british box smoke discharger system was added. The armorpax units were modded to be full function and were modded to mount to the sherman's doors. 


The British leaf spring tow hitch was also fabricated / installed. The tow hitch was also added to the ECA catalog, http://eastcoastarmory.com/m4.htm


The last of the hull RC functions that was added was the remote lighting system, once this was out of the way the tank could start it's seal up


Basically the same mods/ improvements that were made to my A4 were done to this build as well 


This was also true for the bow hatch area. The stock armortek parts give a good base skeleton for the build up with epoxy, to get the appropriate all cast mosaic look of the real tank


Start:


Completed:


Just like I wrote in the A4 build log, The kit does supply you with a basic set of CNC hatches, however in place of using them I swapped in a set of my resin early sherman hatches instead


The kit does supply you with a set of Armorpax interior periscope inserts and brush guards, and these were used on the ECA hatches as they were a drop in install 


The one difference to point out between the two sherman builds is that on my build I deleted the details for the counter open spring system, while this build has the springs present. This was because the version that my build replicates was an early production pattern and were not yet developed, By the time these M4A4 tanks were handed over to the brits the spring system were present


The hatches were mounted to the model and everything was blended in via the bodywork


The one new feature that I added to the model that is specific for the Firefly is that of the Bow MG plug. Because of the longer 17 pounder ammo the brits had to delete the assistant driver position, when this was done the bow M1919 was removed and a large armored steel plug was added in place


A new resin detail plug was fabricated and was added to the ECA catalog, 

http://eastcoastarmory.com/m4.htm 


The rest of the tank's front detailing is mostly standard, lights, brush guards, mudflaps, aplicate armor, lift hooks... etc. All these parts are the same off the self units found on my other builds and found on the ECA site. 


With the front basically out of the way I have turned my attention to the top deck and sides of the model, the detailing that was added would include the two front blowers and side armor. The armor was kit supplied and used OOB, and the blowers were ECA


A few youtube video update were made going over in more detail the work that was made, 


https://youtu.be/x42m0jpWaJ8?list=PLd7tR3_WI_vtZ62OMI8yd1Ne4pN1IyPWm


https://youtu.be/Ebd4_CsLbOY?list=PLd7tR3_WI_vtZ62OMI8yd1Ne4pN1IyPWm


https://youtu.be/NzYtlGQ2aag?list=PLd7tR3_WI_vtZ62OMI8yd1Ne4pN1IyPWm


https://youtu.be/3UneZT1iufk?list=PLd7tR3_WI_vtZ62OMI8yd1Ne4pN1IyPWm


https://youtu.be/ekbguOqvNIU  


and more pics were posted on the facebook page, http://www.facebook.com/EastCoastArmory/


Since these pics were taken currently I'm wrapping up the side, upper deck, and rear deck fittings / details. There are also several new firefly parts that are currently about to go into mold and will be posted soon!


At my current pace I should be on the turret within a week, and once there the build will be entering it's final lap!! more to come!

  • Member since
    April 2005
Posted by armourguy on Friday, March 3, 2017 12:17 AM

Got some more headway on the build and the project is getting very close to the 3/4 way mark!Most of the focus was on the rear hull detailing 


The upper deck hull welds were wrapped, along with the tank's tool posts. For the tool posts I used my usual format for construction, that being bent sheet metal / soldered construction. The layout is standard M4 sherman family and the rest of the tools themselves along with the retention belts will be added after the paint work. 


Where things get different for this build is the addition of the Armorpax British pattern fire extinguisher, and the 17 pounder gun cleaning rods. The fire extinguisher set was included by armortek and to mount I added a plastic strip to the bottom to elevate the mount off the deck as I seen on surviving British shermans   


The 17 pounder cleaning rods mount is located on the left hand side, and is comprised of a metal box cup, and two pairs of tie down mounts (for the belts) 


The remainder of the splash rims w/ neck armor was added, The cast texture was added and they were then bolted to the hull, and welds were added to complete the look. Just like on all shermans there are drainage holes present to allow the access of water to gutter out of these areas. 


One unique feature that is excursively found on the M4A4 family was the addition of an armor plate to cover the drainage hole. During the tank's production run at Chrysler one of the engineers had the fear that because of the large drainage hole towards the rear of the neck armor, a stray bullet or round can enter and damage the lower portion of the turret. To fix this a armor plate was added to the neck and the hull to protect the hole yet still allow for drainage. This feature was not done to any of the other sherman variants that I'm aware of but is a interesting foot note for the A4. On the model the armor was fabricated out of some Lexan.


The fluid filler caps were also added, these are the functional sets form armorpax and are included with the armortek kit as well. 


The radiator cover, tow cable cleats, tow cable lock, fire extinguisher box, and rear intake blower were other parts that were mounted, along with the tail lights guards, these parts are all standard off the shelf ECA


On the rear plate a large tool box was fabricated. This box is present on Fireflies. The box was fabricated out of sheet metal and is full function. This will soon be added to the ECA catalog after two resin part molds are completed. 


The box is mounted to the rear via two bolts and two pined bosses. What is interesting is that the brits modified / adapted the bosses for the american designed flip grill to mount on the box. Prior to being sent to the Burma or to the lend lease recipients the M4A4 was upgraded in the US to have a large flip deflector gill mounted to the back. To secure the grill to the hull hinge points were added to the lower plate, and to secure the grill when the crew needs to access the engine locking bosses were added towards the top of the plate to get the grill out of the way. 


When the brits got the tanks the removed the grill, but kept the hinge / boss mounts, the boss mounts are where the box mounts to.  


On the sides of the Hull the side skirt mounting rails were also fabricated, they are fabricated out of brass trips and are mounted to the hull via hidden fasteners for strength, the welds were added in spots as are present on the real unit. 


and on the rear portion the notch is present which was found on most of the A4's that were upgraded with the rails


Another unique feature to the firefly that was added to the model is that of the house boat system. The house boat system was a system of brackets that were mounted to the hull that would have a camouflage system clip on. The system was developed by the brits. 


The system utilized three mounts on the hull sides, and two more on the front. The most prominent is the mounts on the fenders which have extended arms that emerge from the mounts. 


Currently I'm working on the remainder of the parts to finish off the set, once done they will be added to the ECA catalog. 


More pics were posted on the ECA facebook page, https://www.facebook.com/EastCoastArmory/


and a video update was also added to youtube that goes over these additions in more detail.


https://youtu.be/gkh_Unvg8Kg


Currently I'm finishing off some more firefly masters and will soon be turning my attention to the turret. Soon the project will be winding down, More updates to come!

  • Member since
    April 2005
Posted by armourguy on Saturday, May 27, 2017 11:06 PM

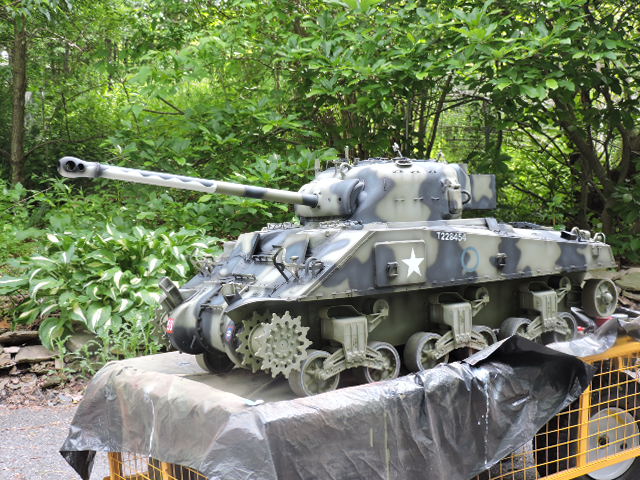
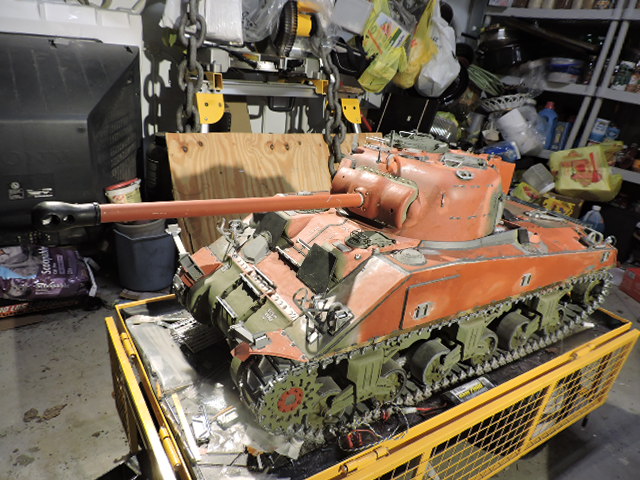
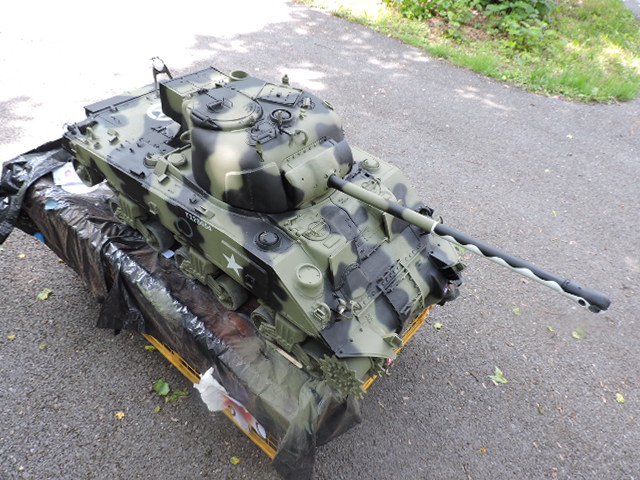
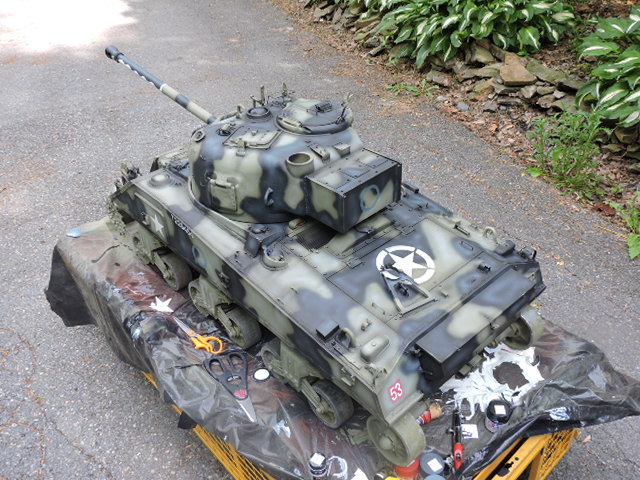
It's been a while since I posted on this project, but even though I have not posting regularly I've been muscling through the build and currently the tank is 90% complete!!


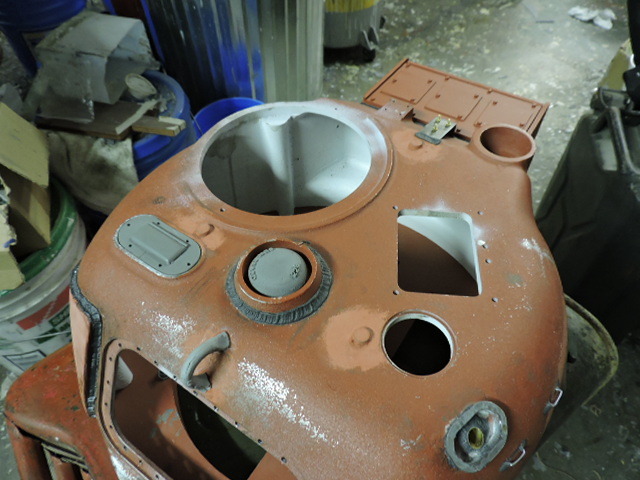
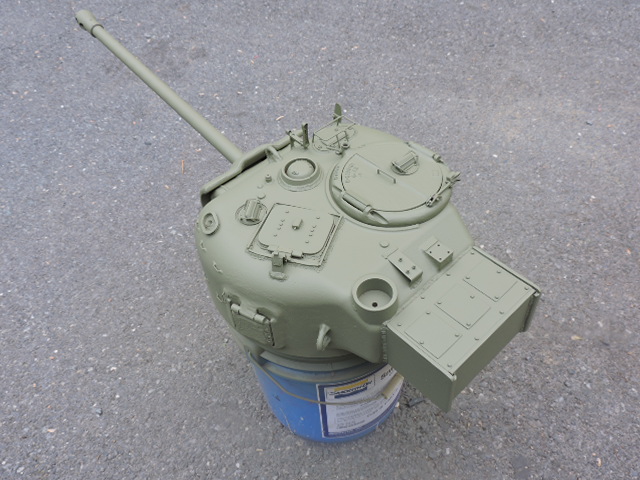
After my last post I turned my attention to the tank's turret. The first steps that were done prior to adding any sorts of equipment and details would be adding the fastener removal notch, the rotor blister, and removing the stock provisions for adding the kit's lift handles, and spent shell ejection hatch. After this prepwork it was time to add details.


Some of the details that were added were the applique cheek armor. The armor was not kit included and was scratch built by sculpting the armor to the turret side via epoxy.


ECA spent shell ejection port, and ECA turret lift rings. These two components once added were flared and blended into the turret's body work.


British army style turret footman loops


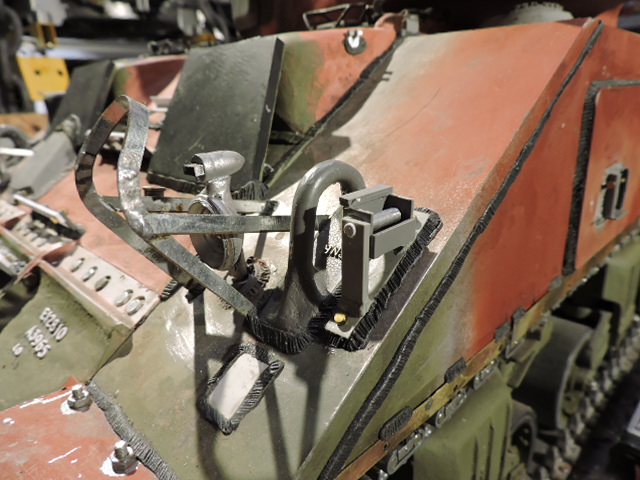
ECA vane sights, ECA Gunner's scope, as well as a rod iron style brush guard. 


Not sure but from my research it looks as this pattern of brush guard was a British army mod as the US pattern was a different design and when these tanks were handed over for lend lease the US pattern was still in development, so the brits went ahead and made their own. 


The design is similar to the ones found on the M5A1 stuart gunner's scope just scaled up for the sherman. For the model one was fabricated out of soldered brass rod


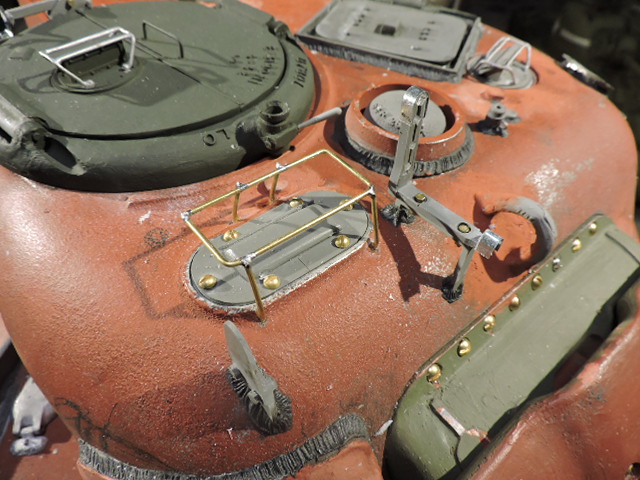
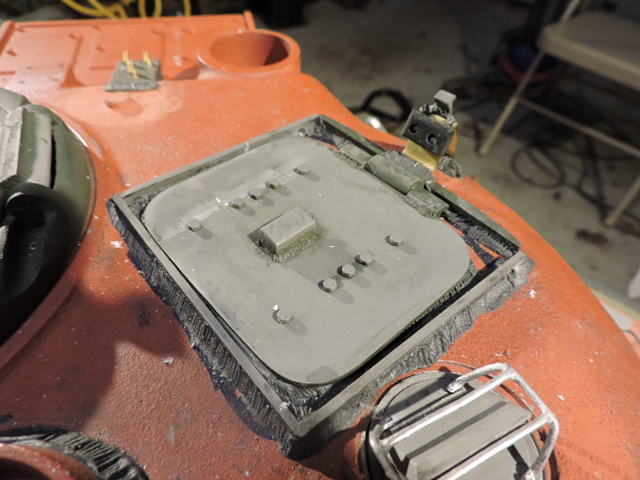
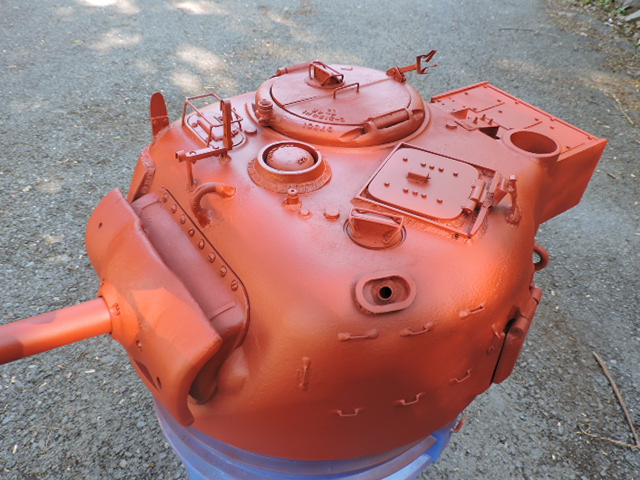
ECA blower center, ECA turret lift handles were added along with provisions for mounting a search light. 


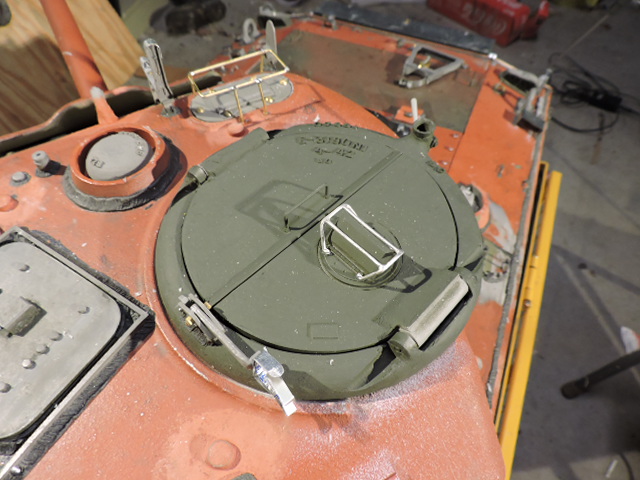
The commander's copula was also mounted. For this I used the ECA early pattern version, but replaced the ladder pattern 50.cal travel lock with a later folding one. This was one mod that I've seen on several of the rebuilt / upgraded tanks that were sent to lend lease.  


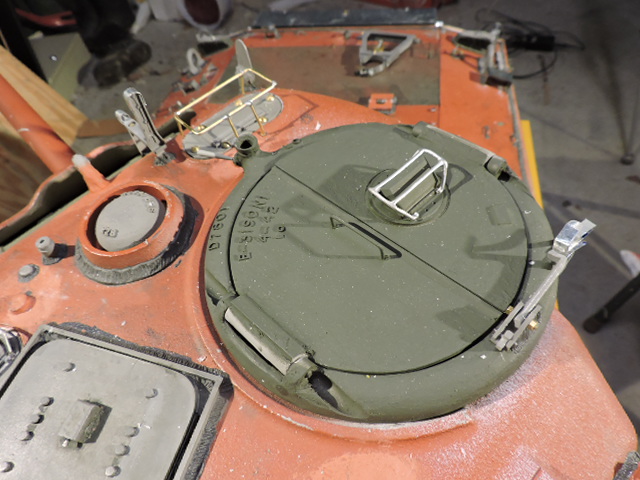
Just like with my A4 build I made the copula rotate as it would do on the real tank, however the design was changed to use a spring retention system that holds the copula in yet allows it to rotate freely


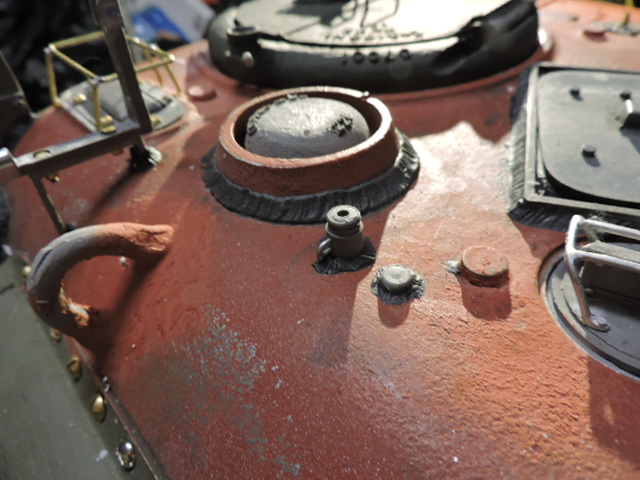
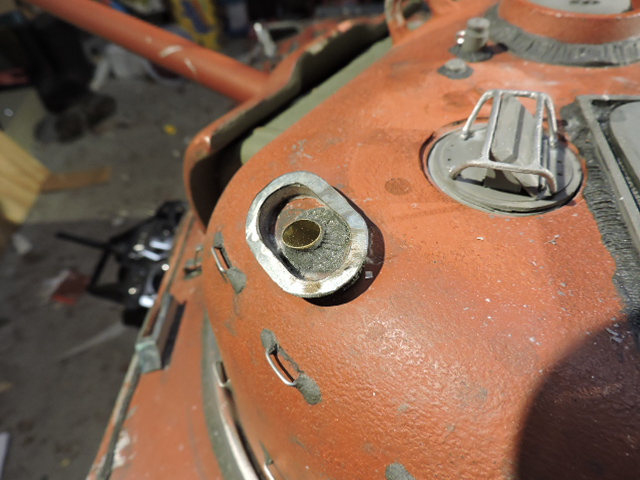
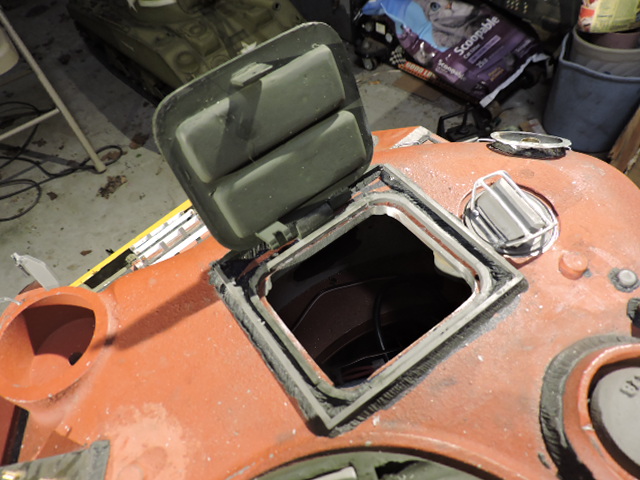
The Turret smoke grenade launcher was another part that was added. The part was a simple tube mounted to the turret. Welds were mounted to finish off the install. After the mounting of the tube, I went and fabricated the British army pattern tarpaulin mount. 


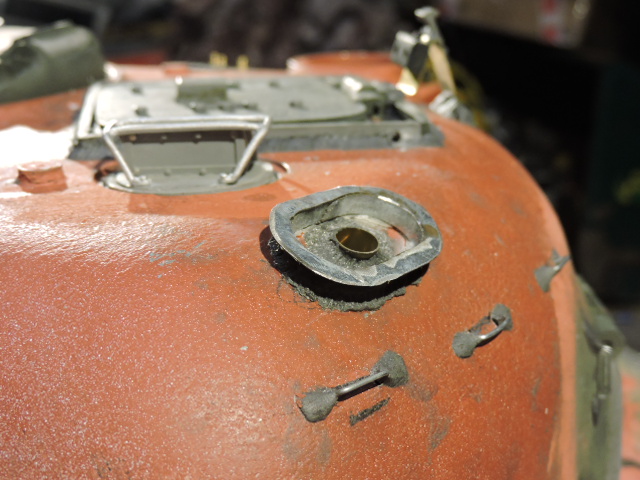
Rather then a rubber chain retained cap as what was seen on US tanks, the brits fabricated an elevated oval design which surrounded the mortar and allowed what I believe was a cloth tarpaulin to clip over sealing it off from the elements


The one on the model is all sheet metal fabrication and is a new item to the ECA catalog, http://eastcoastarmory.com/m4.htm


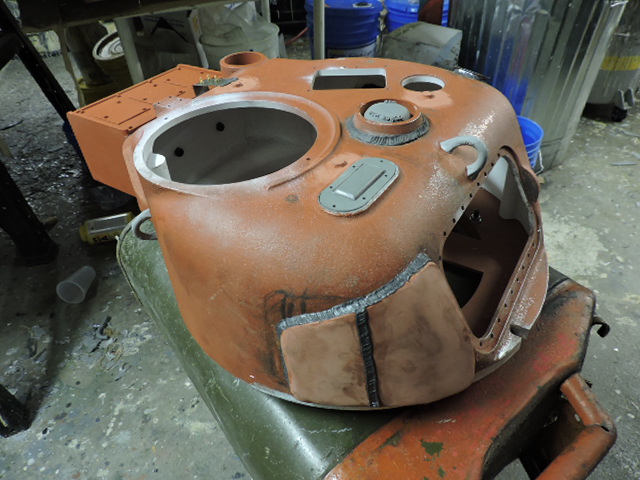
For the Turret rear I needed to assemble the rear bustle counter weight / radio box. This was needed for the firefly due to the longer length of the 17 pounder gun.


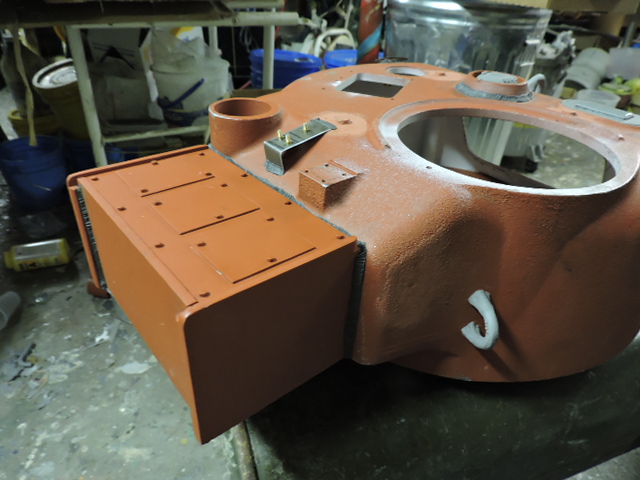
The part started as the kit original. The kit supplies the basic shape of the counter weight with the overall correct dimensions. The parts are all CNCed aluminium


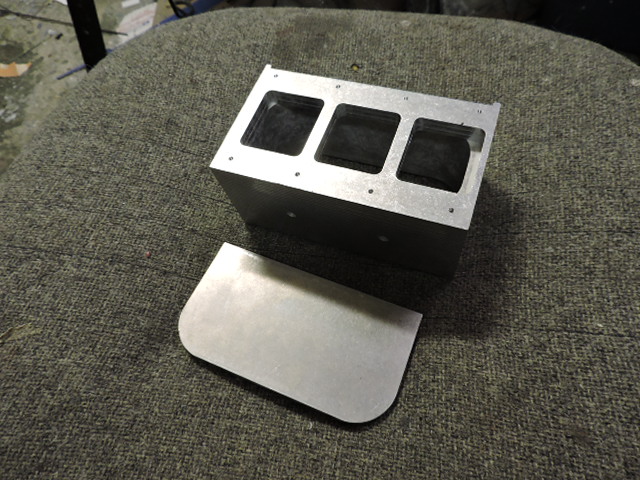
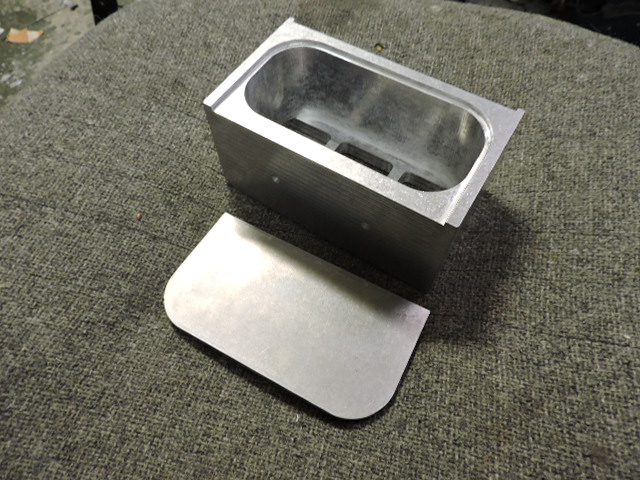
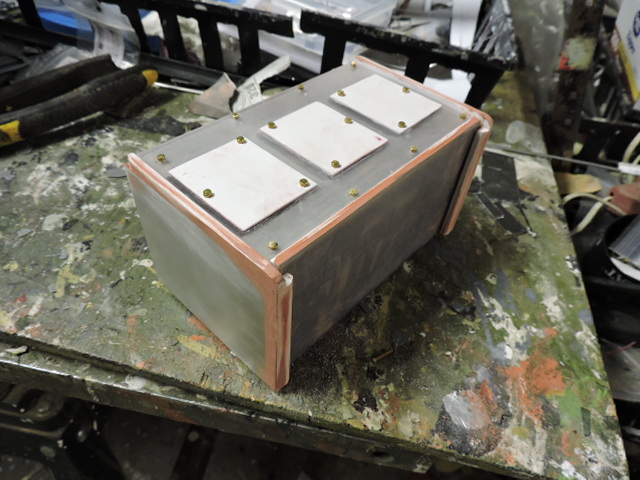
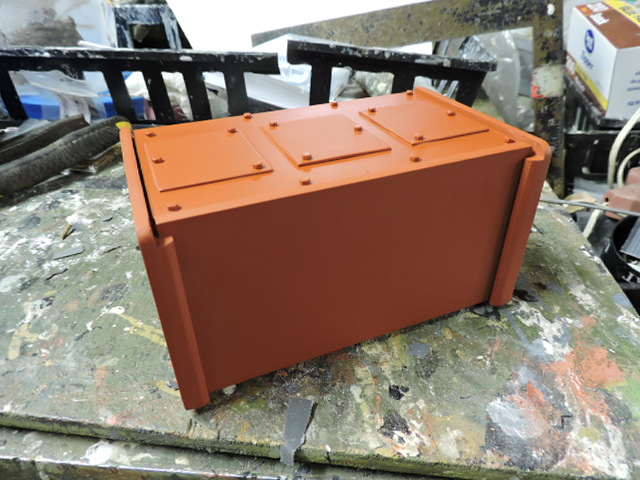
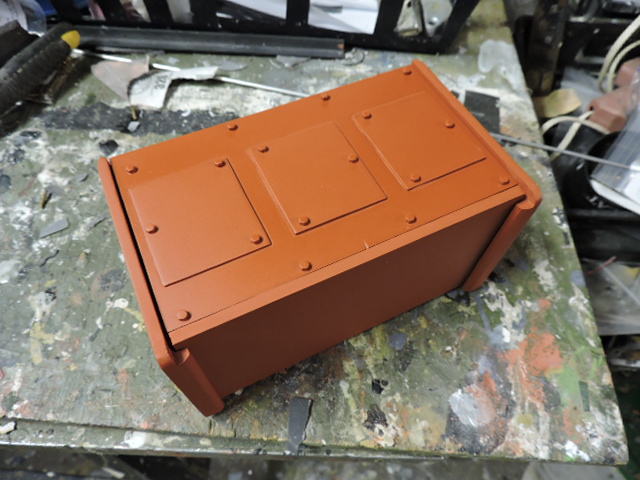
The box was a good base to enhance by adding sections of plastic strip here and there, a new bottom, and a new lid with access hatches mounted. Once the revisions were ready the box was mounted to the turret's rear and weld beads added. 


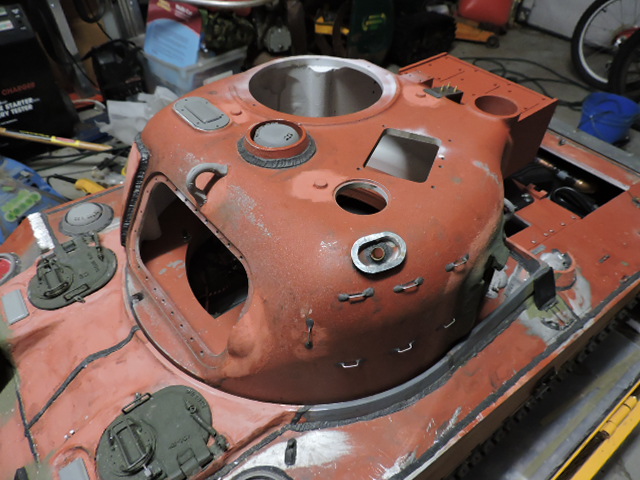
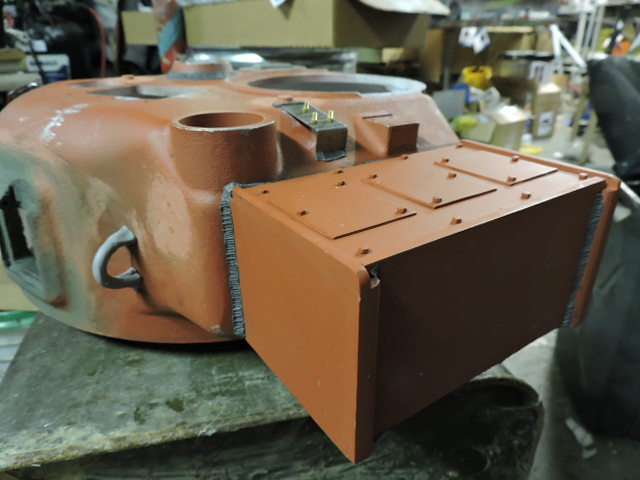
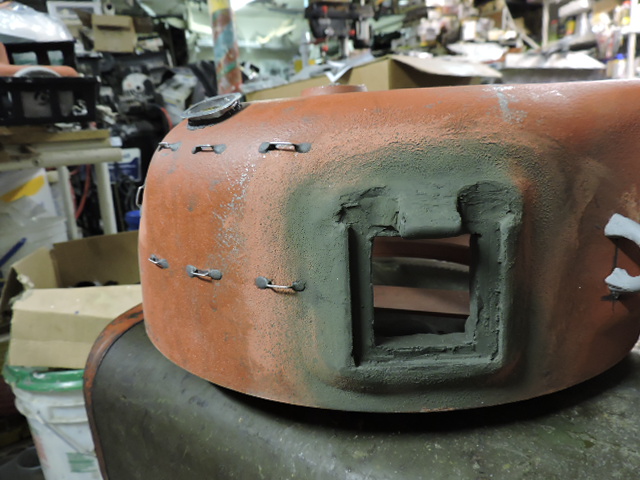
Once the box was out of the way I added a small plate with fasteners to the rear bustle top, not sure what purpose this unit has but was added as I've seen this plate found on many fireflys. 


Also on the turret roof I added the molded in lift eyelets bosses. These bosses were a carry over from the initial pilot design of the sherman and were meant for a eyelet to be threaded into these locations where a crane would lift the turret. 


This design was used on the M3 Lee, but was never done to the sherman and the bosses remained as they were found in the early turret castings, and were never drilled out / tapped. For an early turret like this one these details were needed to be added. 


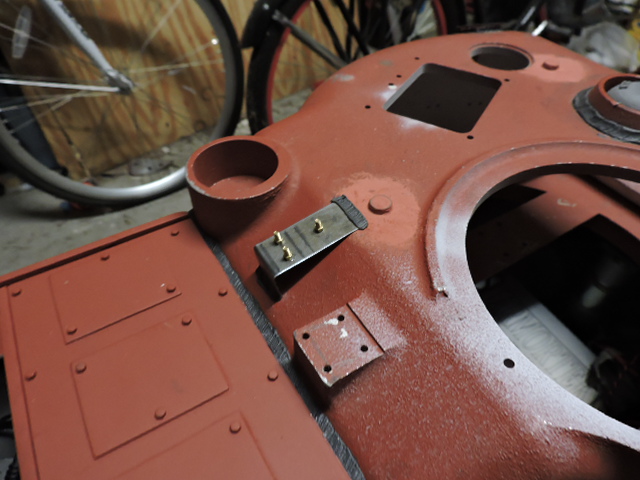
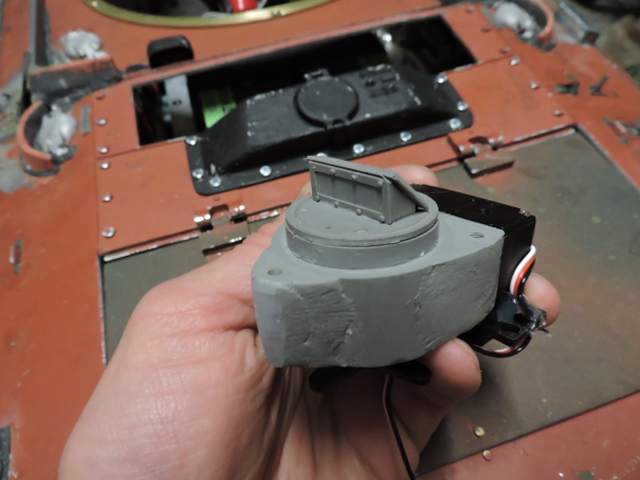
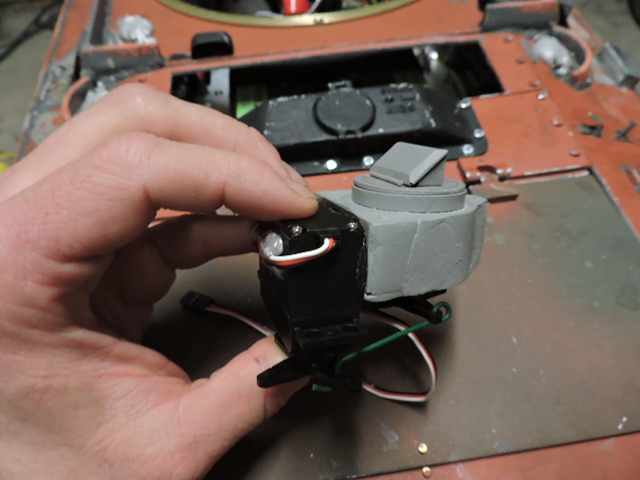
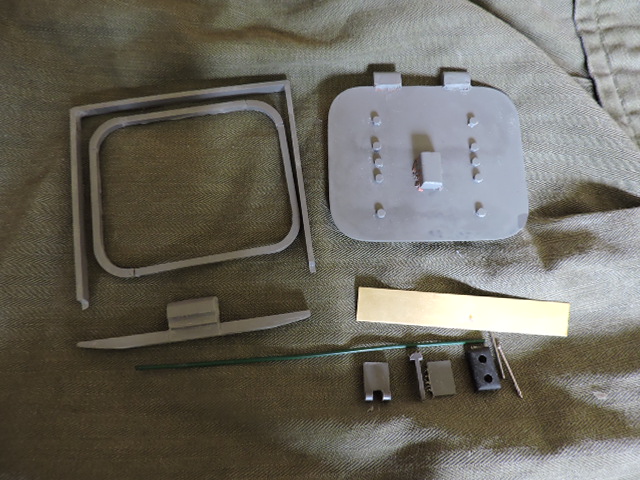
For the loader's periscope I made the component function as I've done on RC sherman builds in the past, however for this build I developed a new easy way to add this animation. 


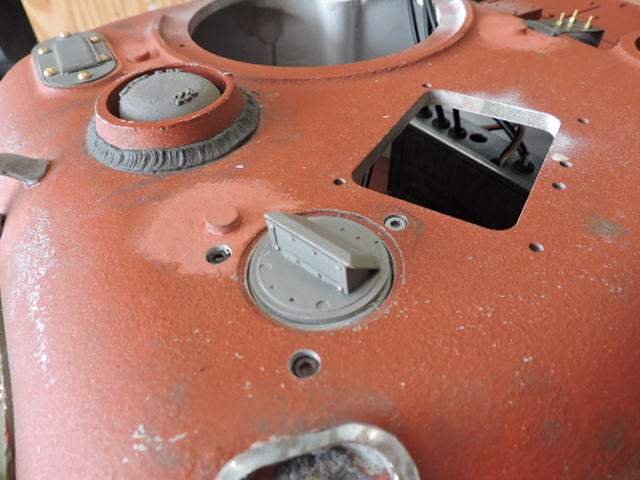
The component is designed to be a all in one servo mounted drop in installation unit. With this system it removes any need to fabricate servo mounts / harnesses and complex motion arms to make the part animate. The device has been added to the ECA catalog aswell, http://eastcoastarmory.com/m4.htm


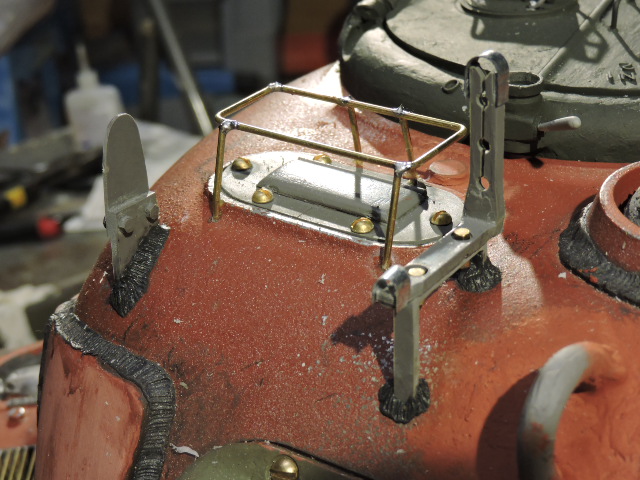
Another new addition to the ECA line was that of the firefly loader's hatch set, 


The new hatch was added to the model,


The stock mantlet and rotor had the basic overall shape and appearance for the firefly parts, and were a good base to work with for the mods. The rotor drum was modded in having it's internal details added, along with extending the left hand side as the firefly rotor was larger then the 75mm version. Counter sunk holes were also added for the fasteners which is a common sight for sherman rotor drums.


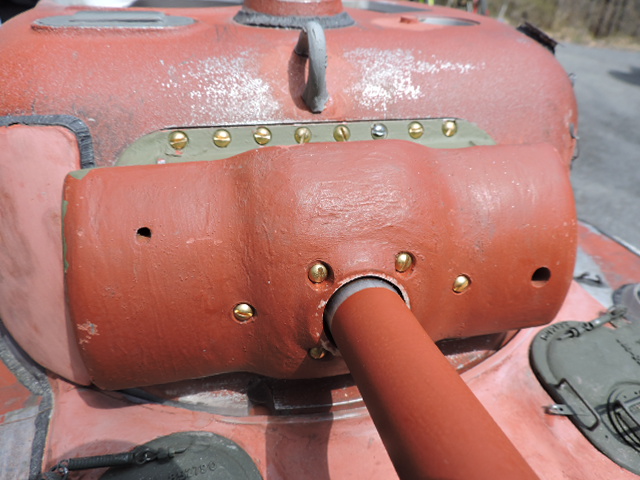
For mounting the parts The real shermans used large slot screws. For the model I replaced the kit fasteners with brass slot screws, however the only fasteners that I can find in my area with the correct dimensions for the real screws are in imperial, so the mounting holes in the mantlet and turret were retapped.


Also because of the new rotor surface details the mantlet needs to stand off from the rotor more compared to the kit original, To do this a simple plastic spacer disk was fabricated and added in place.


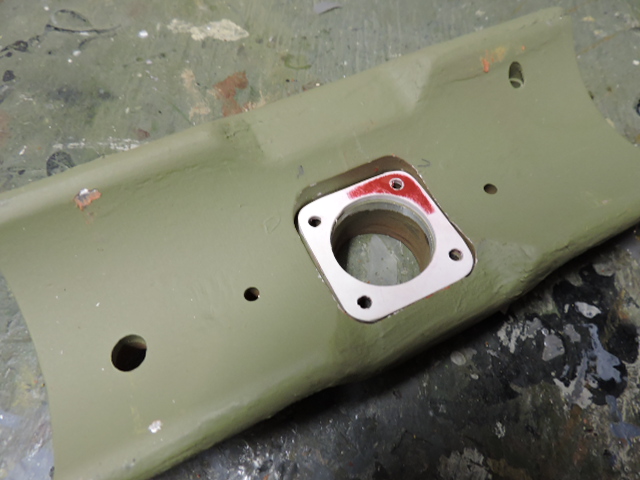
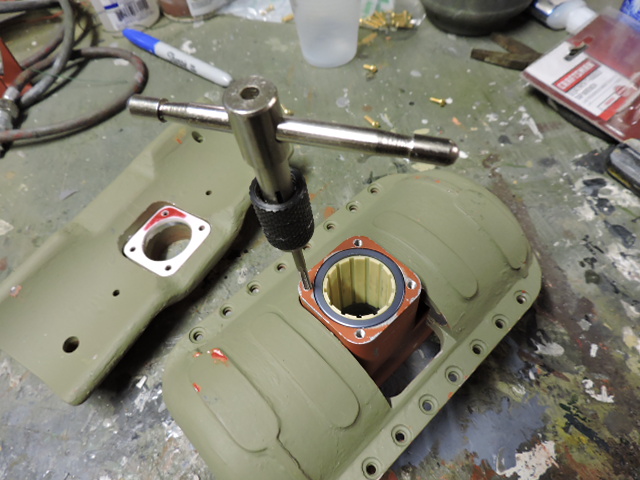
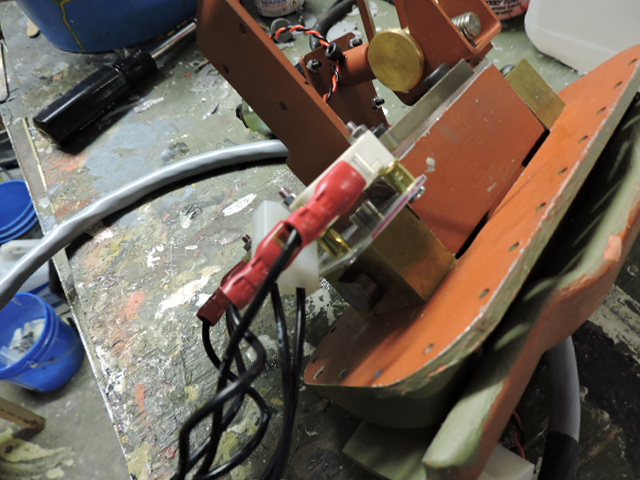
The rest of the gun elevation system was assembled mostly OOB, with a mod made to the limit switch system, Rather then using the kit design I fabricated a self contained system that mounted to the trunion. 


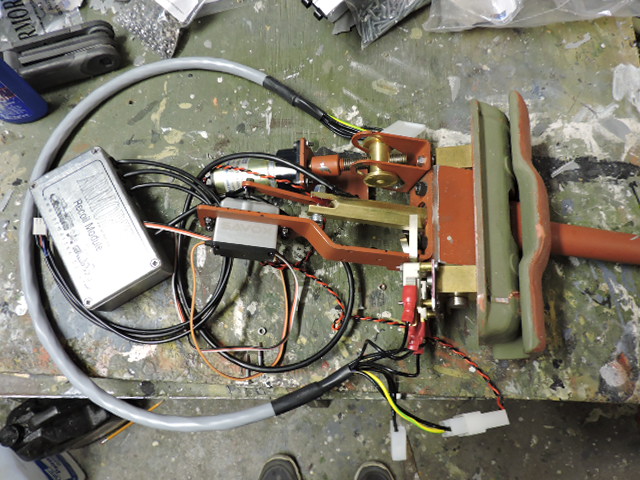
with this design the whole gun system is one complete unit and is easier to install or remove if need be, Also this system makes it easier for me to calibrate the limit switches compared to the kit design. 


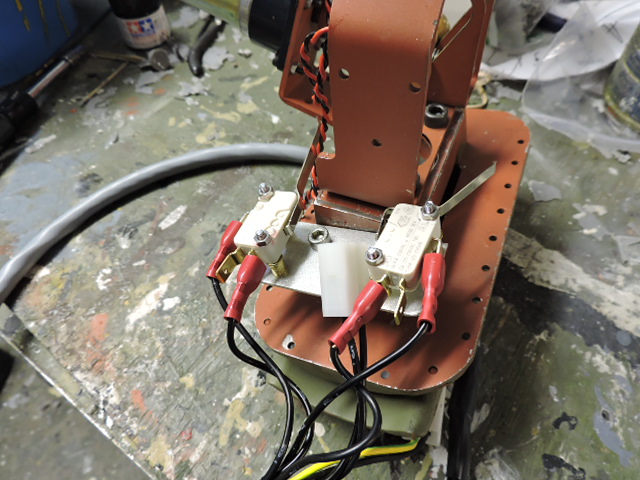
For the bracket Aluminium strip was used, and for the switch spacers modded spent .22LR casings were used


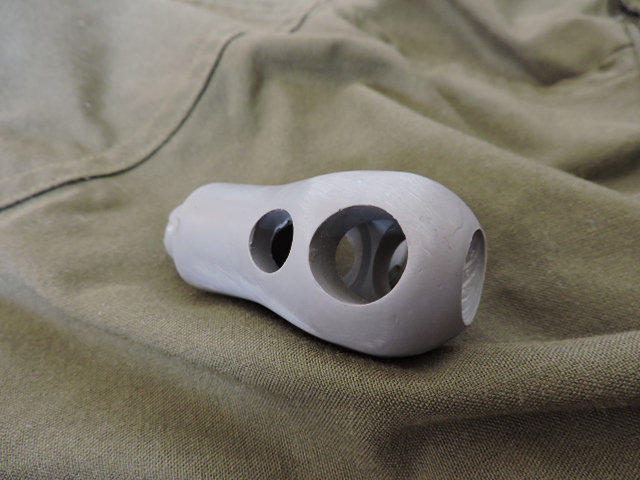
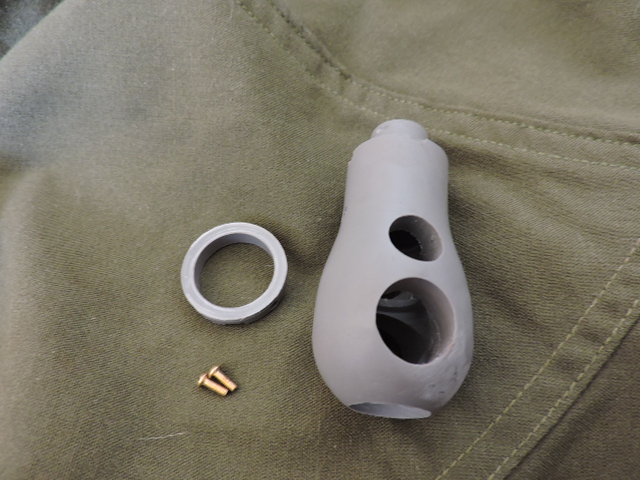
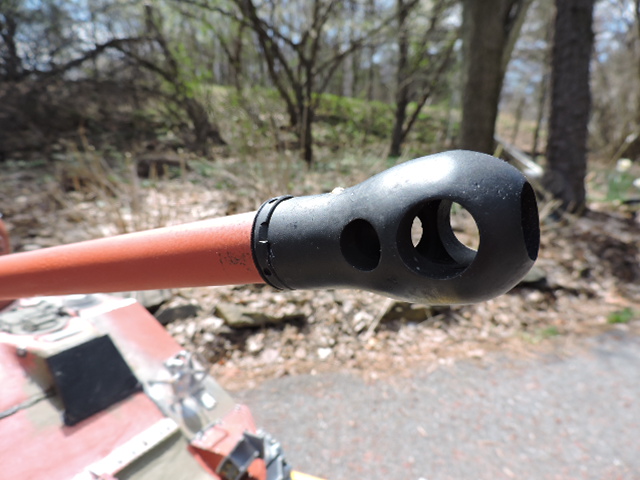
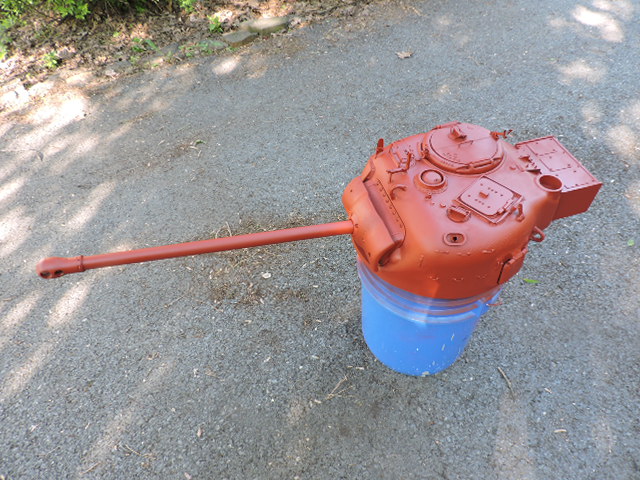
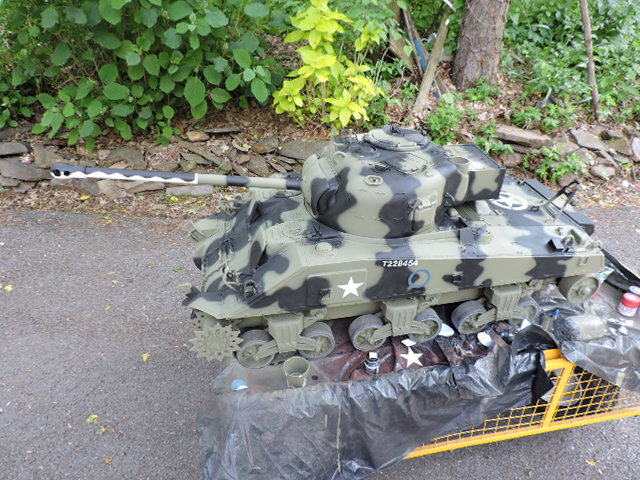
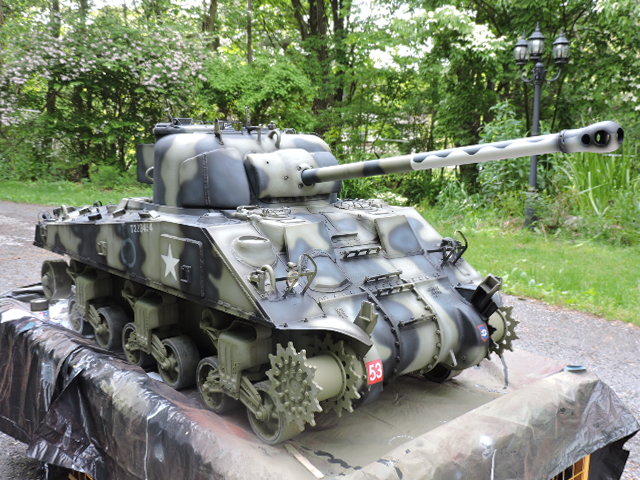
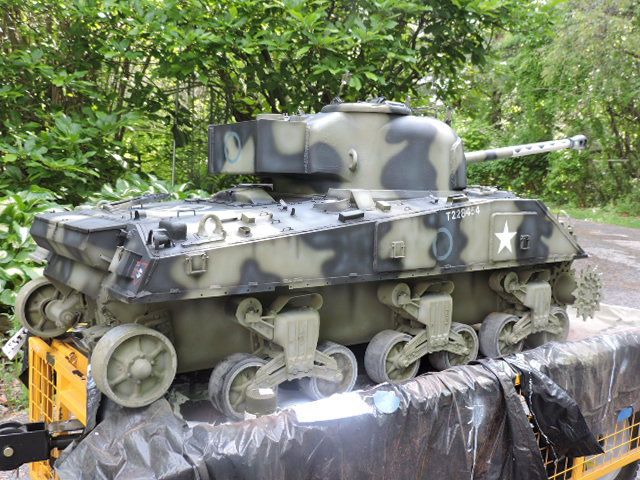
For the tank's iconic 17 pounder gun muzzle I tooled up a new resin unit and used it in place of the kit original. This was another new addition to the ECA catalog, http://eastcoastarmory.com/m4.


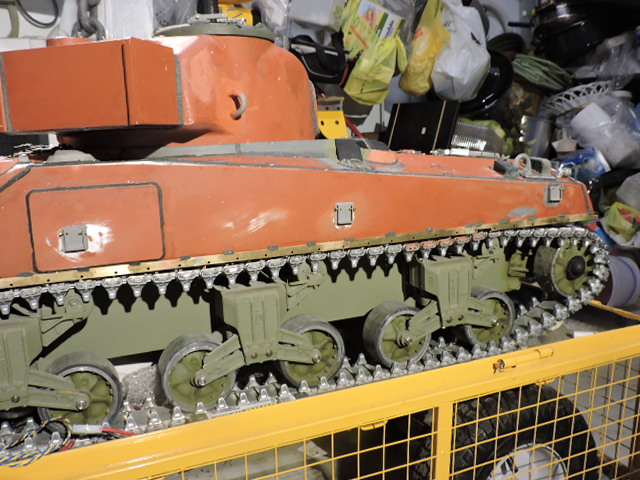
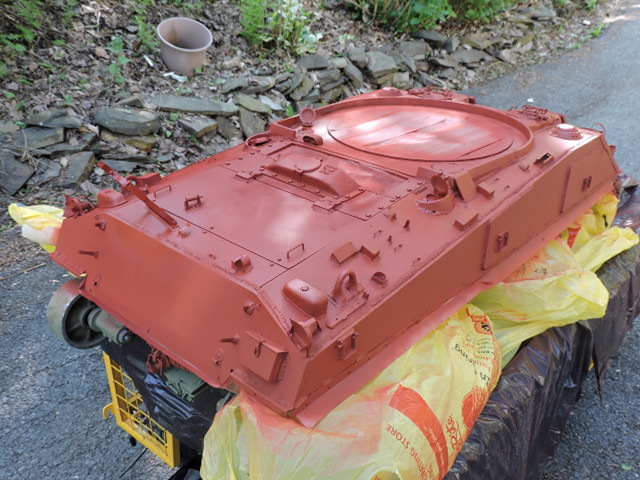
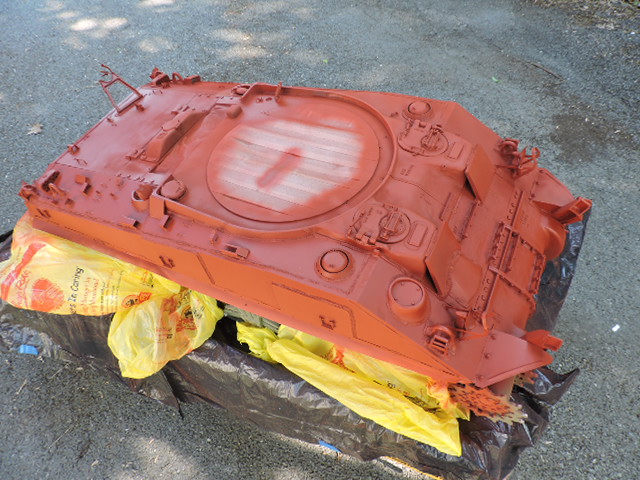
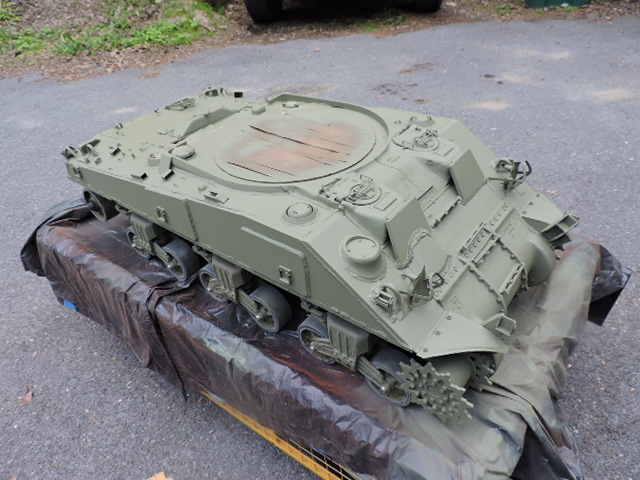
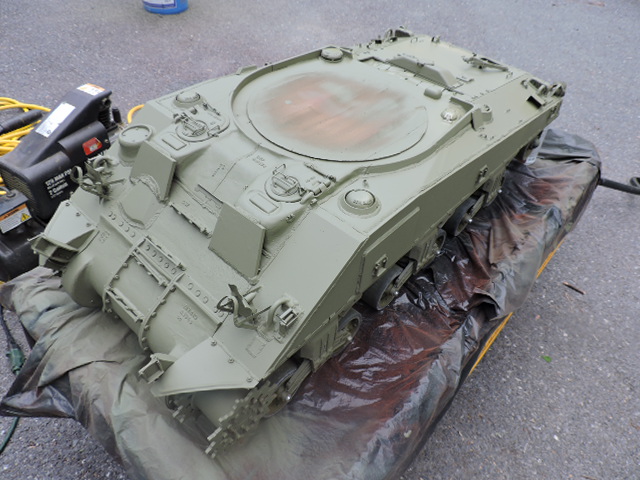
Once the turret was done I turned my attention to completing the hull and getting her ready for paint, 


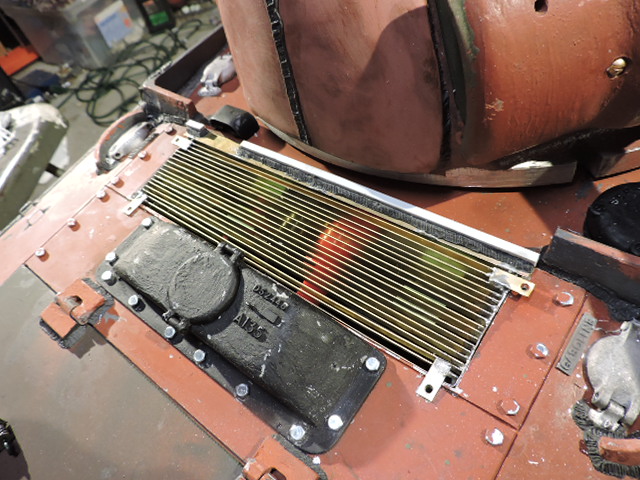
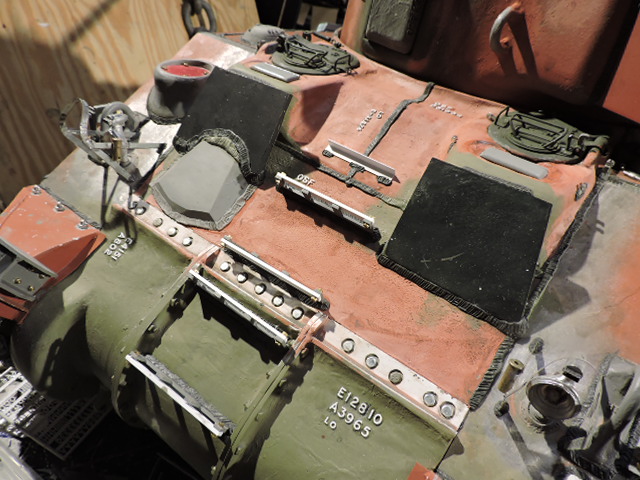
The tank's grill work was first to be fabricated. Just like with the A4 a new grill was fabricated out of strip brass and all soldered together assembly


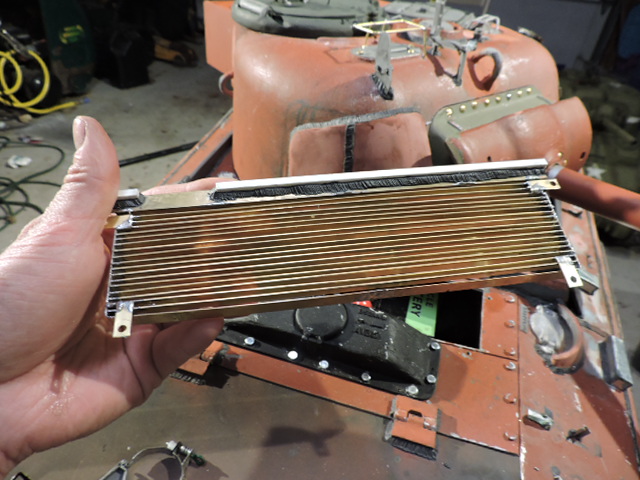
Unlike the a4 however this model I made the fasteners bolt directly to the upper deck as this allows easy access to the battery terminals. 


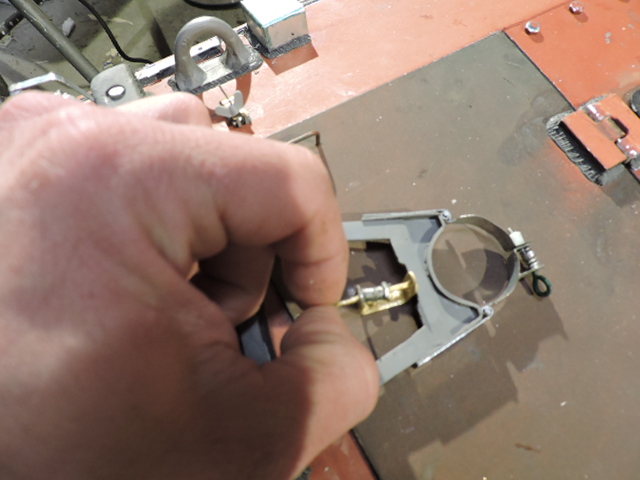
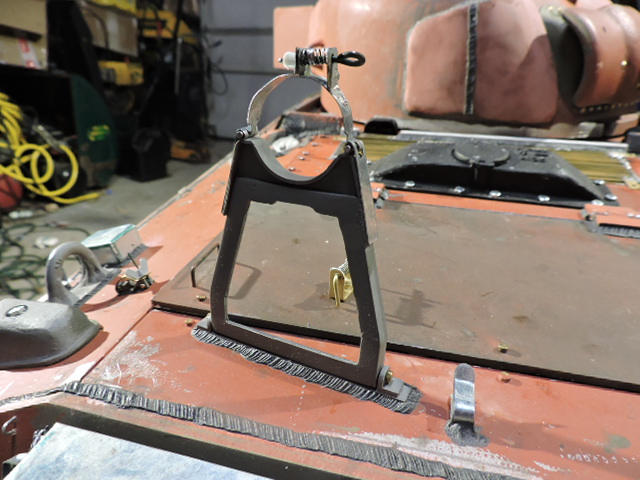
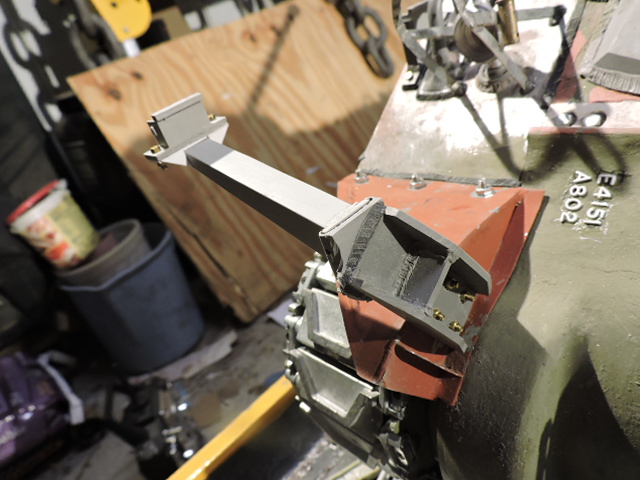
The 17 pounder travel lock was also added. This will be added to the catalog but right now I'm still working out some fittings that need to be made. The one on this model is more or less a one prototype


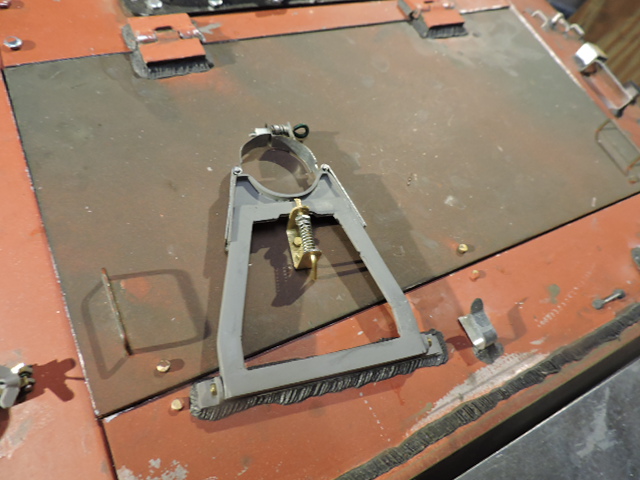
On the model the travel lock secures to the engine hatch via a real spring loaded latch, This needs to be opened prior to getting access to the control panel underneath the engine hatch


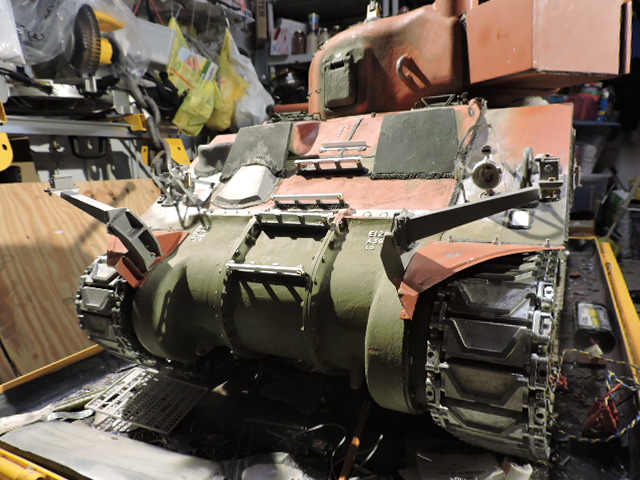
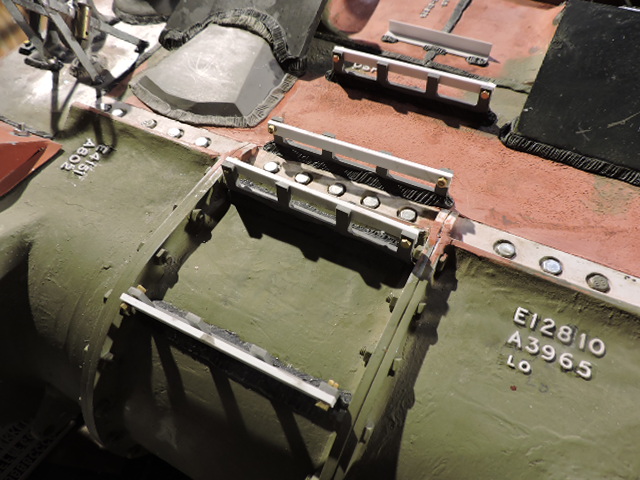
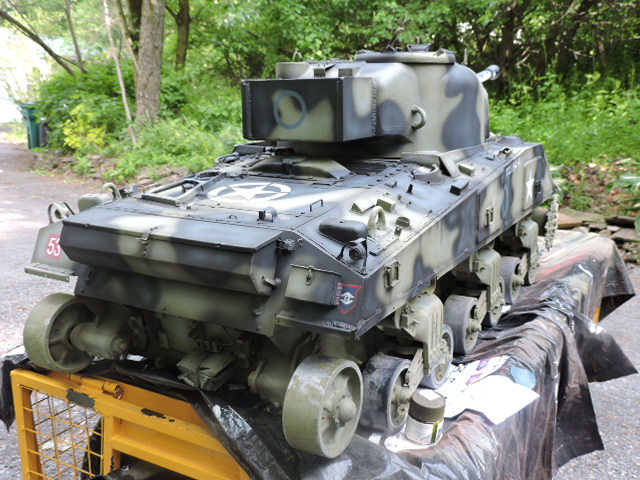
On the tank's front hull the last of the cast numbers were added with my usual method (plastruct letters sets) along with the British army pattern spare track racks


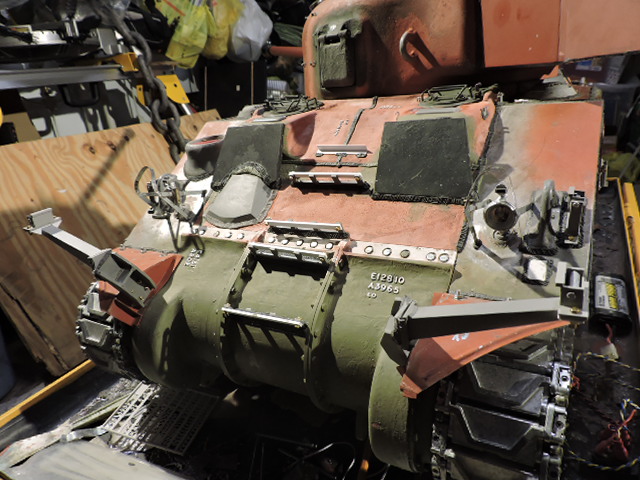
The final components for the House boat camouflage system were added aswell. Both the house boat and the track racks were added to the ECA catalog pages http://eastcoastarmory.com/m4.htm


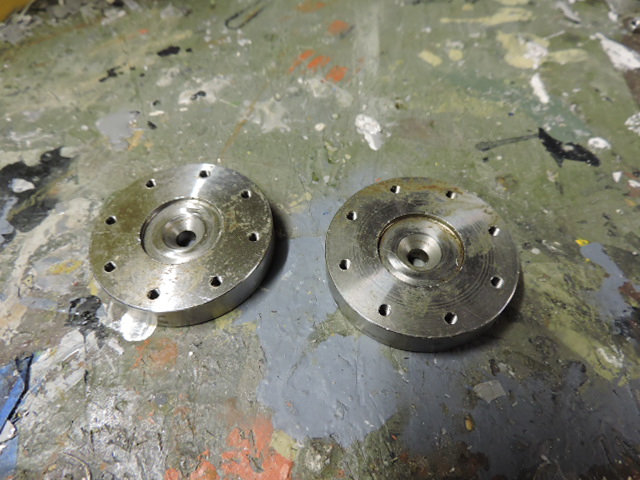
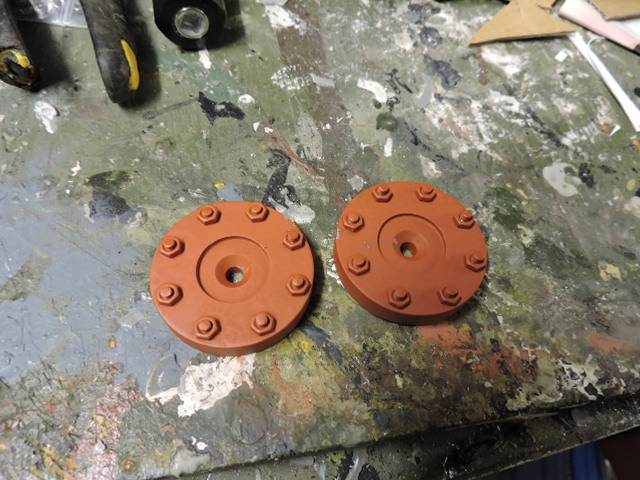
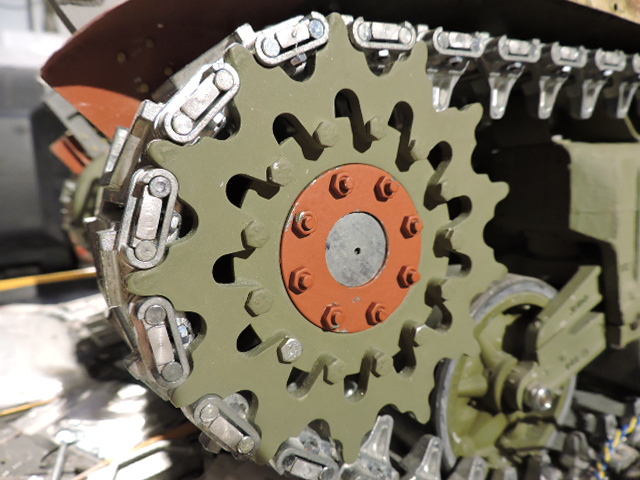
One of the last parts needed to be added were the tank's hub caps. The stock caps were modded to have their fasteners pointing outward (as like the real tank) and the center mounting bolt was hidden under a removable detail face disk 


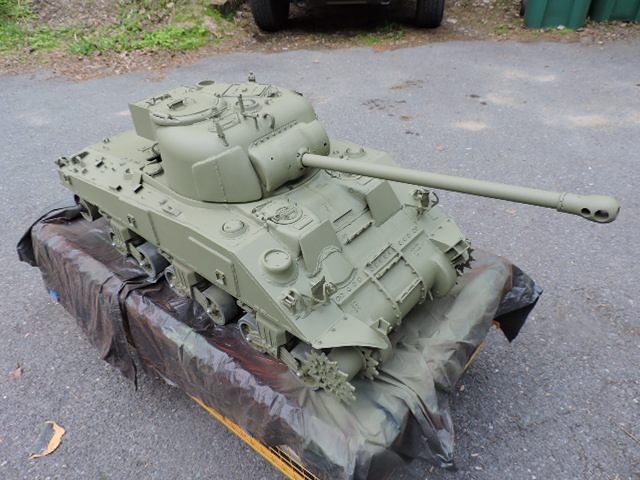
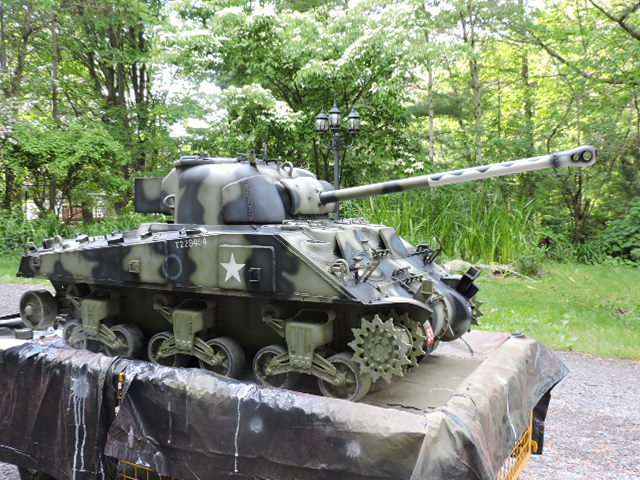
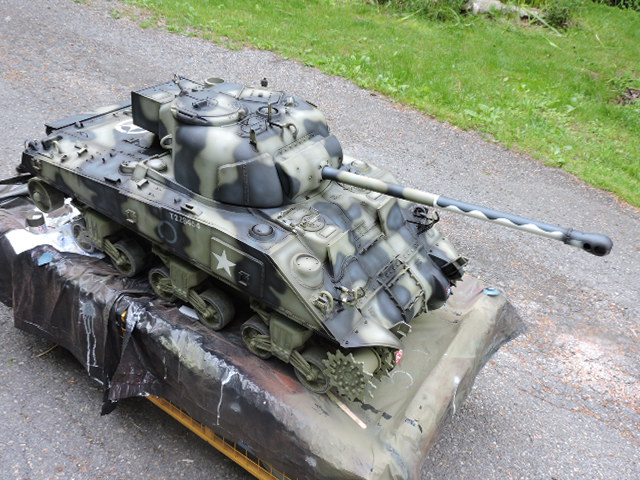
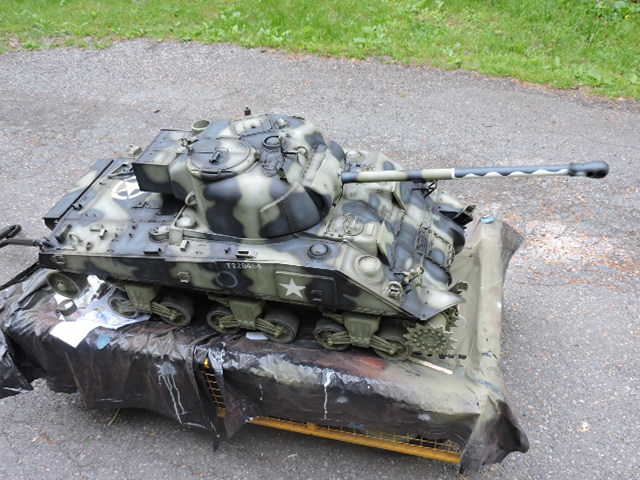
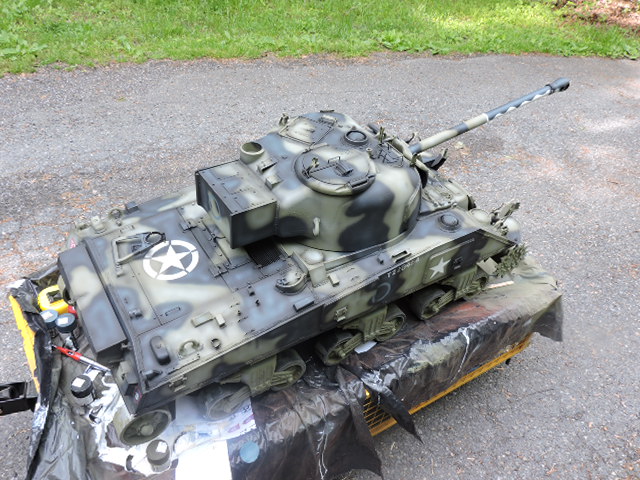
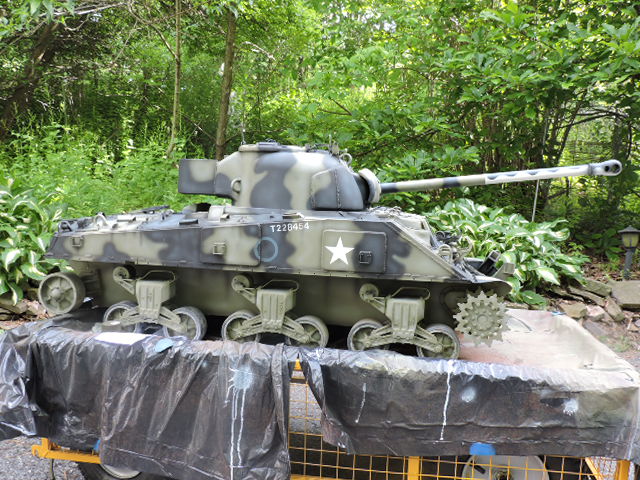
Once all these parts were done the tank went into paint! first was final prime


Once the prime was done, the base coat was added... The color I used was a new mix of OD that differs from the US shades of OD I've used on my US builds


And it was a nice sight to see the tank in one color of green as opposed to the mix of painted / unpainted parts during construction.


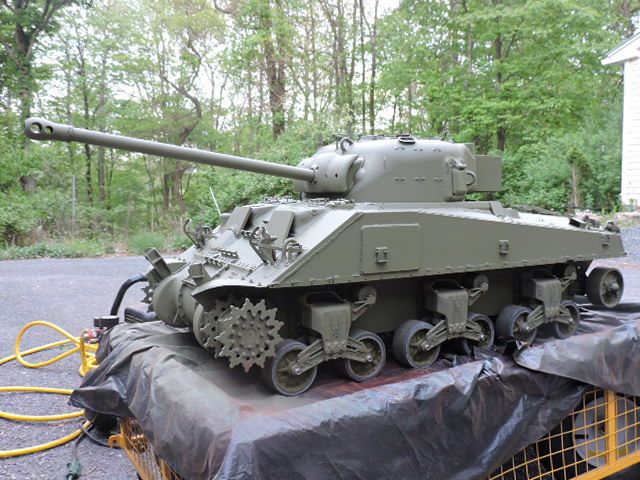
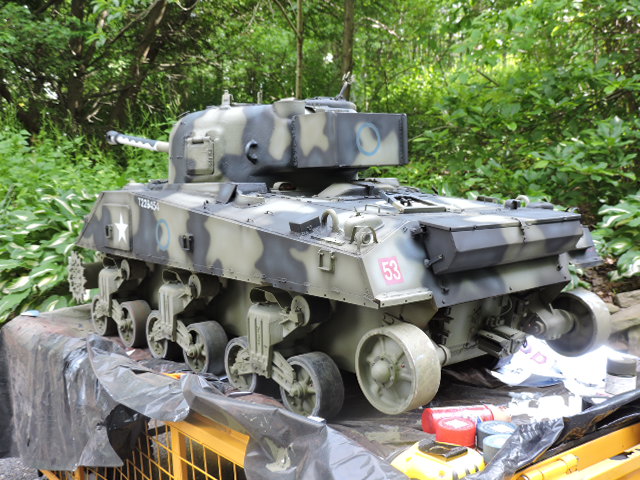
Once the base was done, the fun began, first with the camo / markings.


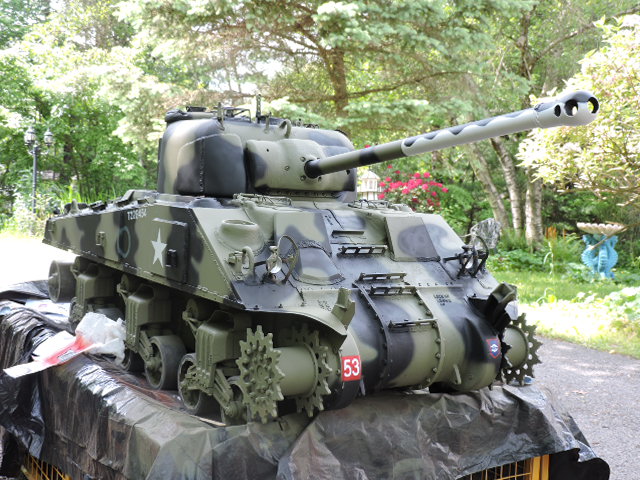
One of my favorite parts to paint was the distinctive firefly barrel wave cammo. From what I read this was done to hide the extra length of the 17 pounder. The long barrel would protrude from cover as well as would at a quick glance make the tank look like a standard 75mm sherman.


This was important as the firefly was a primary target for german tank gunners. So the barrel was cammoed to conceal the fact it was a firefly and would be easier to have it blend into the other 75mm shermans that were in the column. This is why the cammo stops at the point where the 75mm barrel would end on a regular sherman. 


What's unique about the cammo is that it heavily resembles the barrels found on WWI / WWII period British battleships.


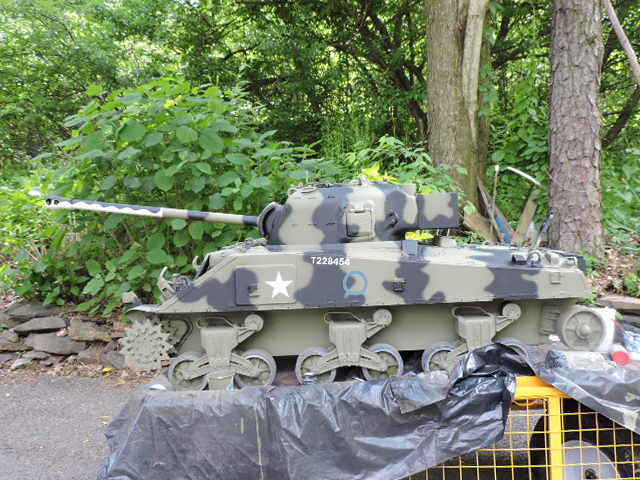
As for the markings, they are all painted on via my disposable stencil technique. The tank is not based on a real tank but it's unit and markings would be for summer 1944 time frame.


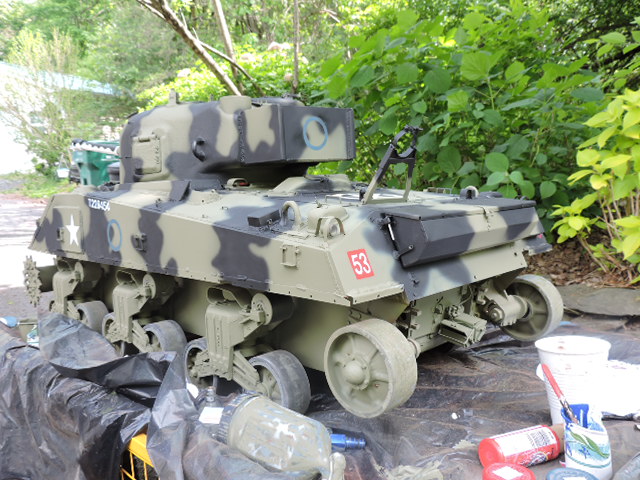
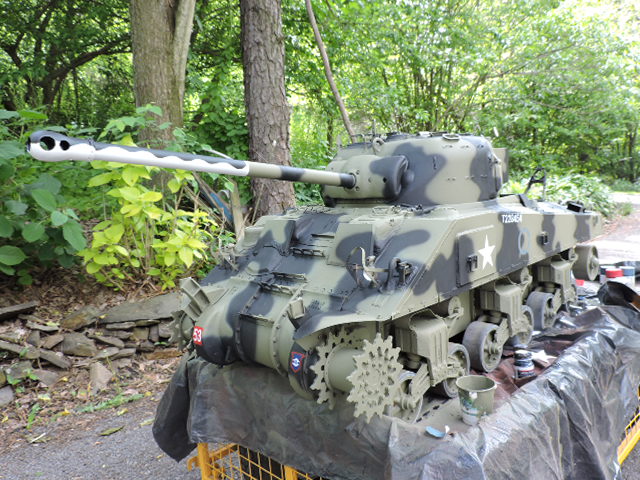
Once that stage was complete the model went into weathering. 


More pics were posted on the ECA facebook page, https://www.facebook.com/EastCoastArmory/


Also lots of video updates were posted that go into more detail then I wrote above,


update #8

https://youtu.be/w9Xbu54gBTU


https://youtu.be/NvAS6-cE1D8


Update #9

https://youtu.be/o1qSm8BdgSA


Update #10 (pre paint test run)

https://youtu.be/o1qSm8BdgSA


Currently I'm mounting on the tracks now and within a couple of days she'll be ready to hunt down some cats. 


Also something about finishing a Sherman on memorial day just feels right... even if it's a Brit :D


  • Member since
    July 2014
Posted by modelcrazy on Saturday, May 27, 2017 11:36 PM
That is unbelievable AG, I don't have any words.

Steve

Building a kit from your stash is like cutting a head off a Hydra, two more take it's place.


http://www.spamodeler.com/forum/

  • Member since
    November 2009
  • From: SW Virginia
Posted by Gamera on Sunday, May 28, 2017 10:57 PM

Yeah, love seeing your updates. She's out of this world!!! Heart

"I dream in fire but work in clay." -Arthur Machen


  • Member since
    April 2005
Posted by armourguy on Saturday, June 24, 2017 10:53 PM

Thanks guys, this was a long build and am happy to see it come to an end. The last of the details have been added and the tank is now DONE!!


Since the last post the note worthy parts that were added were the tools, track, Light inserts, Chainwork, Fluid filler caps, Antenna bases, and M2HB


For the tools I used the kit supplied tools. The kit supplies you with a nice cast metal set from Armorpax. addition to the paint / weathering work I replaced the molded metal handles with real wooden ones. The tools also were mounted to the tank via scratch built miniature tie down belts. These are found on all tools and really fasten them to the model.


The only tools that were not included was the Sledge hammer, and the gun cleaning staves. The Sledge was my resin version and the staves were scratch built out of brass and wood


The all important British pattern fire extinguishers were the kit supplied cast metal sets from armorpax, 100% rec. for any period Brit tank. they were simply painted, weathered and mounted to the mounts that were mentioned earlier


For the filler cap detailing I used my standard method (turned and weathered aluminum). 


On the Model's front I added spare track links to the track racks. For the spare links I made resin copies of the kit track. The reason for the use of resin for the spares was to save on weight


As for the antenna bases I used the Armorpax British antenna base sets. These were also included with the armortek kit and like the fire extinguishers are highly rec. 


On the turret I painted all the hatch interiors, 


For the tank's M2HB and M23 Cradle mount I again used the pair from Armorpax, as I mentioned in the past the sets are awesome and you can't go wrong if your looking to add a M2 to your build. 


Once the last bits were on it was time to run the tank on it's freshly painted tracks... to add the weathering to them of coarse ;)


I even had a chance to take one of my never used Brit tanker figures out of the case for some running shots


A video update was posted on youtube when the tank was 98% complete, https://youtu.be/VgvO-Vu6tb0


And many more pics were posted on the ECA facebook page, 

https://www.facebook.com/EastCoastArmory/


With the tank now done this one will soon be crated up and off to it's owner. With this one out of the way I can now focus on the other customer builds I got in the shop waiting to get the same treatment. More to come!

  • Member since
    April 2013
Posted by KnightTemplar5150 on Saturday, June 24, 2017 11:35 PM

Beautiful work, as always, ArmourGuy! You add a lot of gorgeous little details to every build and this is no exception - great work!

JOIN OUR COMMUNITY!

Our community is FREE to join. To participate you must either login or register for an account.

SEARCH FORUMS
FREE NEWSLETTER
By signing up you may also receive reader surveys and occasional special offers. We do not sell, rent or trade our email lists. View our Privacy Policy.