SEARCH FINESCALE.COM

Enter keywords or a search phrase below:

Palm-sized Brummbär

5010 views
41 replies
1 rating 2 rating 3 rating 4 rating 5 rating
  • Member since
    June 2010
  • From: Rochester, New York USA
Palm-sized Brummbär
Posted by rocker286 on Thursday, January 12, 2017 9:03 PM

I've been looking forward to building this thing for a long time! I've always had a soft spot in my heart for odd and ungainly looking German armor, especially the Brummbär. I thought up a diorama for this kit when I bought it over a year ago, so you folks are in for a treat.

As of tonight, the parts have been washed. That's about all I've done thus far. I've been working a ton of over time at work this week and just haven't had the energy to sit down and start this tank. Rest assured- once I actually GET some rest - I'll start this thing!


2017-01-11_10-28-59

4badges

  • Member since
    March 2003
  • From: Rain USA, Vancouver WA
Posted by tigerman on Friday, January 13, 2017 1:30 AM

Good luck with all those tiny wheels and tracks. Should be a relatively quick build.

   http://i7.photobucket.com/albums/y269/wing_nut_5o/PANZERJAGERGB.jpg

 Eric 

  • Member since
    June 2010
  • From: Rochester, New York USA
Posted by rocker286 on Sunday, January 15, 2017 5:43 PM

Thanks Eric! I was able to put the wheels and rollers together this weekend. 20170114_172823


And of course- me being the historically accurate type guy - had to research Zimmerit. And now I'm asking myself why haha. I've heard some people argue against even attempting to create Zimmerit (aside from PE add-ons) for 1:72 scale. Other people say it's easy. Well, I woke up out of a sound sleep and did research until the sun came up. I came across an idea via the internet which worked well enough for me. It involved taking a small piece of the corrugated plastic from a CD case and using it to form lines in putty for the Zimmerit. So I broke out my tube of Squadron white putty, and I also broke (quite literally) the cover of an old CD and put this practice to the test.

2017-01-15_06-35-18


The results? Not perfect but not so horrible that I feel like I ruined the model. Not to mention this is my very first time attempting this. In addition to using the CD case plastic, I made vertical lines by using a #17 hobby blade. It might look a bit rough, but luckily Italeri provides an entirely separate Panzer IV hull in this kit for me to practice on! I also had difficulty working the putty around the rollers - in retrospect I wish I had researched this stuff BEFORE I glued the rollers on. But I digress. A steady hand and all the time in the world will give me the results I need when it comes time to "zim" up the casemate for this beast. Now I just hope Gene, Paul, Ace and Peter aren't too upset I used the case from one of their albums to do the job!

20170115_181716

4badges

  • Member since
    December 2012
Posted by RX7850 on Tuesday, January 17, 2017 10:43 AM
Hey rocker286, Any build updates?
  • Member since
    June 2010
  • From: Rochester, New York USA
Posted by rocker286 on Tuesday, January 17, 2017 11:03 AM

Hey RX,


I chose to take advantage of the awesome weather yesterday and take a nice three hour hike with my girlfriend- so I didn't get any work done on the Brummbar. But I'll be working on it tonight hopefully!


I'm considering putting a base coat of dark brown paint on it first as opposed to a coat of primer that I'd usually put on. I happened upon an old article by Bill Plunk in a 2013 issue of FSM where he built a 1:35 Brummbar and used dark brown paint as a base. When it comes to scale models, I'm willing to try anything new!  So I'll give it a shot. 

4badges

  • Member since
    June 2010
  • From: Rochester, New York USA
Posted by rocker286 on Tuesday, January 17, 2017 8:39 PM

I managed to get a little tank time in tonightCool I painted the tracks with testor's Steel, and the plating near the road wheels/rollers got a coat of Schokoladenbraun '43. I'm using the brown as a base coat. My home-made Zimmerit took the paint like a champ! The real test will come tomorrow when I put my first coat of Panzergelb on the brown sections.

This whole German armor thing (as I may have mentioned before) is new territory for me. Even though I'm only on the first few steps..I gotta tell ya I'm hooked! Maybe I oughta try a StuG or a King Tiger at some point ! 

2017-01-17_09-20-18

2017-01-17_09-21-39

4badges

  • Member since
    November 2009
  • From: SW Virginia
Posted by Gamera on Wednesday, January 18, 2017 7:34 AM

Very cool, looking forward to more progress! 

"I dream in fire but work in clay." -Arthur Machen


  • Member since
    December 2012
Posted by RX7850 on Wednesday, January 18, 2017 1:55 PM
Looking good. Keep it up.
  • Member since
    June 2010
  • From: Rochester, New York USA
Posted by rocker286 on Tuesday, January 31, 2017 8:42 PM

I got a bit more work done on the Brummbar tonight. I pieced together one set of the link and length tracks. This was the first time that I've worked with link and length tracks, and it was a bit challenging. Everything went on okay, until I noticed that there was a gap! I checked and double-checked to make sure I didn't screw something up, but the gap wasn't due to any error I made!

20170131_201339

Luckily, Italeri provided extra links, and I was able to fill the gap. Although the gap was actually smaller than the link, I trimmed the link down so it would fit.


20170131_202119

Later this week, I'll tackle the other track. And then It'll be time for more zimmerit!


20170131_202129

4badges

  • Member since
    January 2015
  • From: Tumwater, WA.
Posted by M. Brindos on Tuesday, January 31, 2017 10:29 PM

That's a problem that comes up a lot with link and length.

Simulating a little track sag along the top run of links by bending them into shape would have taken up a little space to fit that extra link in there without trimming it.

The solution you came to will at least be hard to see on the bottom of the road wheel.

Looks good so far.  :)

- Mike Brindos "Lost Boy"

  • Member since
    June 2010
  • From: Rochester, New York USA
Posted by rocker286 on Thursday, February 9, 2017 7:59 PM

Thanks Mike!


I've been at it again this week, and was hoping to get a bit more work done tonight. But with snow on it's way, there's a good chance I'll be in the cab of a sidewalk plow at 2am tomorrow so I've gotta turn in early!

I glued the hull together a few days ago, and started coating the outside of the casemate with more Zimmerit. I've discovered that waiting 1-2 minutes before pressing the plastic "mold" down onto the putty yields the best results....though molding the putty in a smaller amount of time creates irregularities that look a lot like battle damage. So either way, I'm pleased!

2017-02-08_08-52-16

2017-02-08_08-52-27

4badges

  • Member since
    November 2009
  • From: SW Virginia
Posted by Gamera on Thursday, February 9, 2017 8:43 PM

Ohhhh, that's some cool looking zimmerit.

"I dream in fire but work in clay." -Arthur Machen


  • Member since
    December 2012
Posted by RX7850 on Thursday, February 9, 2017 9:54 PM

Looking good.

  • Member since
    June 2010
  • From: Rochester, New York USA
Posted by rocker286 on Sunday, February 19, 2017 4:42 PM

Thanks a lot! Well on this unseasonably warm day, I took the dogs for a walk early so I could set aside the afternoon for some tank time. And low and behold, I got my Brummbar 90% put together! The fit was a little tricky, especially in the front where the lower and top hulls meet. I ended up using super glue to combine both halves and with a little pressue from my fingers, the glue dried and the hulls stayed in place. I'm all set with the zimmerit for now as well, and all I'll have to do when I work on it again is attach the spare wheel racks, hatches and some tools and before ya know it I'll be painting this thing!

20170219_171315

20170219_171139

20170219_171158

4badges

  • Member since
    December 2012
Posted by RX7850 on Sunday, February 19, 2017 7:52 PM

Coming along nicely.

  • Member since
    November 2009
  • From: SW Virginia
Posted by Gamera on Sunday, February 19, 2017 7:56 PM

That's neat, gonna look cool with paint. 

"I dream in fire but work in clay." -Arthur Machen


  • Member since
    September 2005
  • From: Groton, CT
Posted by warshipguy on Monday, February 20, 2017 7:47 AM

Beautiful work so far!

Bill Morrison

  • Member since
    June 2014
  • From: New Braunfels , Texas
Posted by Tanker - Builder on Monday, February 20, 2017 9:13 AM

Sorry;

 I had to wait till now to comment . I guess you know now , don't you ?  That is one of the best sloppy jobs of Zimmerit I have ever seen .That's why I think when you weren't looking , a little german crew , Field Applied this stuff .The effect is awesome ! I have the King Tiger and I ain't gonna do the Zim but for fun I enjoyed all them there widdle biddy wheels !. Nope , Size is small but fun is large ! T.B.

  • Member since
    June 2014
  • From: New Braunfels , Texas
Posted by Tanker - Builder on Monday, February 20, 2017 9:17 AM

Rocker 286 ;

 Gotta make another comment NOT tank related . I like your device that demonstrates size . By that you must be around the Great Lakes somewhere . I grew up on that stuff . LOL-LOL.-T.B.

  • Member since
    June 2010
  • From: Rochester, New York USA
Posted by rocker286 on Tuesday, February 21, 2017 8:32 PM

Thanks everyone! Your comments keep me motivated on this build- especially on a day where I forgot to make coffee before work AND had a dental appointment to go to. Crying TB that was exactly the look I was going for! Tonight I glued on a few more small details (wheel racks, spare wheels, tools). I have only a few more things to take care of and then it's on to painting!

And by the way TB, I'm about a 13 minute drive from the place that makes my size demonstrating device- you can thank my Grandfather for getting me hooked on that stuff !!Smile

2017-02-21_09-28-45

4badges

  • Member since
    June 2010
  • From: Rochester, New York USA
Posted by rocker286 on Thursday, February 23, 2017 9:35 PM

With the exception of the spare wheels and track, my brummbar is complete! I'll paint the spare stuff and figures after the rest of the beast is painted.


2017-02-23_10-32-16

4badges

  • Member since
    November 2009
  • From: SW Virginia
Posted by Gamera on Saturday, February 25, 2017 11:30 AM

Looking pretty friggin' cool. Yes

"I dream in fire but work in clay." -Arthur Machen


  • Member since
    June 2010
  • From: Rochester, New York USA
Posted by rocker286 on Sunday, February 26, 2017 12:59 PM

Thanks Gamera! I've applied the first coat of schokoladenbraun 43' to my Brummbar. I left the spare track and tools alone for now because they're not part of the overall scheme. Once i've let this coat cure, I'll start working on the three part camoflauge.

2017-02-26_01-07-10

4badges

  • Member since
    June 2010
  • From: Rochester, New York USA
Posted by rocker286 on Wednesday, March 1, 2017 5:55 PM

The paint is pretty much all set on this beast! I hand painted the camo scheme and it turned out way better than I could have imagined. I'll have to touch up a few spots, and then paint the tools and other minor parts.

2017-03-01_06-52-32

4badges

  • Member since
    December 2012
Posted by RX7850 on Wednesday, March 1, 2017 6:26 PM

Nice handy work with the paint.Yes

  • Member since
    November 2009
  • From: SW Virginia
Posted by Gamera on Thursday, March 2, 2017 9:11 AM

Looks pretty darn cool! 

Guess you'd have to hand-brush her, I can't imagine masking something that tiny for airbrushing. Dead

"I dream in fire but work in clay." -Arthur Machen


  • Member since
    June 2010
  • From: Rochester, New York USA
Posted by rocker286 on Tuesday, March 7, 2017 7:38 PM

Thanks guys!

Last night I sprayed a clear coat on the tank, and tonight I placed the decals onto it.

2017-03-07_07-41-03

4badges

  • Member since
    October 2004
  • From: Northern Virginia
Posted by ygmodeler4 on Tuesday, March 7, 2017 9:17 PM
Looking good, can't wait to see the weathering and what you have in store for the diorama

-Josiah

  • Member since
    June 2010
  • From: Rochester, New York USA
Posted by rocker286 on Sunday, March 12, 2017 8:54 PM

Thanks Josiah!

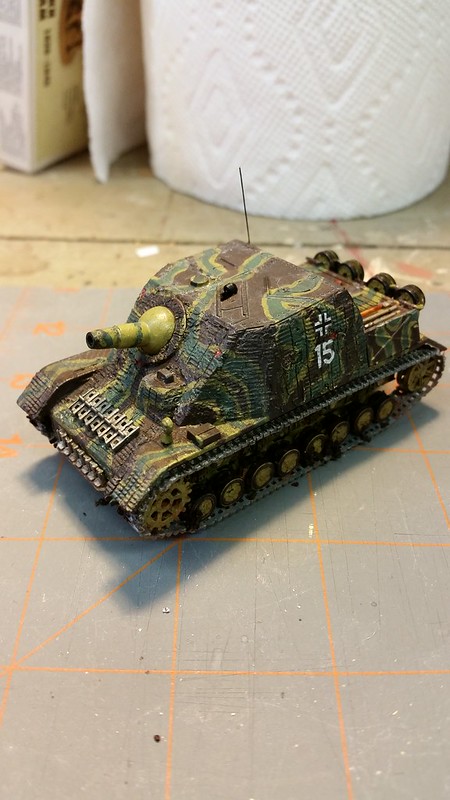
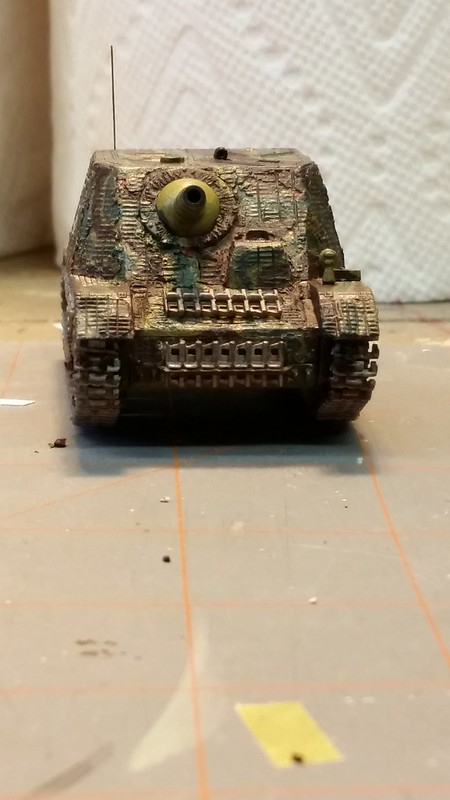
Good news: The Brummbar is complete, and I've already started working on the diorama! As soon as I have that done, I'll call the whole project complete and start on something new!

I weathered the tank with craft acrylics mixed with water to create a sludge wash- using black on the Dunkelgelb areas and "goose feather" on the darker areas to make this thing look dusty. I used model master gunmetal for the muzzle of the gun, and dry brushed gunmetal on some of the areas where paint might be worn away due to the gun's recoil. In the tracks, I added some coffee grounds I swiped from my girlfriend's French press and attached them on with Elmer's glue. The grounds were hazelnut flavored- which didn't effect the tank's looks but did make it smell kinda nice !Stick out tongue

I used a small piece of an E string I found with my guitar stuff as a radio antenna. An application of Testors dullcote rounded this baby out and it looks ready to roll out over the French countryside.


20170312_152405

20170312_152424

Like I said before, the tank is done but I'm just getting started on the diorama- so keep checking back because it's going to be awesome!

4badges

  • Member since
    November 2009
  • From: SW Virginia
Posted by Gamera on Wednesday, March 15, 2017 7:54 AM

Looks cool, are you going to try to add figures at that scale? Hard for me to see, much less paint guys that small. Blind Fold

"I dream in fire but work in clay." -Arthur Machen


JOIN OUR COMMUNITY!

Our community is FREE to join. To participate you must either login or register for an account.

SEARCH FORUMS
FREE NEWSLETTER
By signing up you may also receive reader surveys and occasional special offers. We do not sell, rent or trade our email lists. View our Privacy Policy.